17 KiB
โปรเจคแชท
โปรเจคแชทนี้แสดงวิธีการสร้างผู้ช่วยแชทโดยใช้ GitHub Models
นี่คือลักษณะของโปรเจคที่เสร็จสมบูรณ์:

ข้อมูลเบื้องต้น การสร้างผู้ช่วยแชทโดยใช้ Generative AI เป็นวิธีที่ดีในการเริ่มเรียนรู้เกี่ยวกับ AI สิ่งที่คุณจะได้เรียนรู้คือการผสาน Generative AI เข้ากับเว็บแอปตลอดบทเรียนนี้ มาเริ่มกันเลย
การเชื่อมต่อกับ Generative AI
สำหรับ Backend เราใช้ GitHub Models ซึ่งเป็นบริการที่ยอดเยี่ยมที่ช่วยให้คุณใช้ AI ได้ฟรี ไปที่ Playground ของมันและดึงโค้ดที่ตรงกับภาษาของ Backend ที่คุณเลือก นี่คือลักษณะของมันที่ GitHub Models Playground

ดังที่กล่าวไว้ เลือกแท็บ "Code" และ Runtime ที่คุณเลือก

การใช้ Python
ในกรณีนี้เราเลือก Python ซึ่งหมายความว่าเราจะเลือกโค้ดนี้:
"""Run this model in Python

> pip install openai
"""
import os
from openai import OpenAI

# To authenticate with the model you will need to generate a personal access token (PAT) in your GitHub settings.
# Create your PAT token by following instructions here: https://docs.github.com/en/authentication/keeping-your-account-and-data-secure/managing-your-personal-access-tokens
client = OpenAI(
    base_url="https://models.github.ai/inference",
    api_key=os.environ["GITHUB_TOKEN"],
)

response = client.chat.completions.create(
    messages=[
        {
            "role": "system",
            "content": "",
        },
        {
            "role": "user",
            "content": "What is the capital of France?",
        }
    ],
    model="openai/gpt-4o-mini",
    temperature=1,
    max_tokens=4096,
    top_p=1
)

print(response.choices[0].message.content)
มาทำความสะอาดโค้ดนี้เล็กน้อยเพื่อให้สามารถนำกลับมาใช้ใหม่ได้:
def call_llm(prompt: str, system_message: str):
    response = client.chat.completions.create(
        messages=[
            {
                "role": "system",
                "content": system_message,
            },
            {
                "role": "user",
                "content": prompt,
            }
        ],
        model="openai/gpt-4o-mini",
        temperature=1,
        max_tokens=4096,
        top_p=1
    )

    return response.choices[0].message.content
ด้วยฟังก์ชัน call_llm นี้ เราสามารถนำ Prompt และ System Prompt มาใช้ และฟังก์ชันจะคืนค่าผลลัพธ์
ปรับแต่งผู้ช่วย AI
หากคุณต้องการปรับแต่งผู้ช่วย AI คุณสามารถกำหนดวิธีการที่คุณต้องการให้มันทำงานโดยการเติม System Prompt ดังนี้:
call_llm("Tell me about you", "You're Albert Einstein, you only know of things in the time you were alive")
เปิดใช้งานผ่าน Web API
เยี่ยม เราได้ทำส่วน AI เสร็จแล้ว มาดูกันว่าเราจะผสานมันเข้ากับ Web API ได้อย่างไร สำหรับ Web API เราเลือกใช้ Flask แต่ Framework เว็บใด ๆ ก็น่าจะใช้ได้ มาดูโค้ดกัน:
การใช้ Python
# api.py
from flask import Flask, request, jsonify
from llm import call_llm
from flask_cors import CORS

app = Flask(__name__)
CORS(app)   # *   example.com

@app.route("/", methods=["GET"])
def index():
    return "Welcome to this API. Call POST /hello with 'message': 'my message' as JSON payload"


@app.route("/hello", methods=["POST"])
def hello():
    # get message from request body  { "message": "do this taks for me" }
    data = request.get_json()
    message = data.get("message", "")

    response = call_llm(message, "You are a helpful assistant.")
    return jsonify({
        "response": response
    })

if __name__ == "__main__":
    app.run(host="0.0.0.0", port=5000)
ที่นี่ เราสร้าง Flask API และกำหนด Route เริ่มต้น "/" และ "/chat" โดย Route หลังนี้มีไว้สำหรับ Frontend เพื่อส่งคำถามเข้ามา
เพื่อผสาน llm.py นี่คือสิ่งที่เราต้องทำ:
-
Import ฟังก์ชัน
call_llm:from llm import call_llm from flask import Flask, request -
เรียกใช้มันจาก Route "/chat":
@app.route("/hello", methods=["POST"])
def hello():
   # get message from request body  { "message": "do this taks for me" }
   data = request.get_json()
   message = data.get("message", "")

   response = call_llm(message, "You are a helpful assistant.")
   return jsonify({
      "response": response
   })
ที่นี่เราวิเคราะห์คำขอที่เข้ามาเพื่อดึง Property
messageจาก JSON Body หลังจากนั้นเราเรียกใช้ LLM ด้วยการเรียกนี้:response = call_llm(message, "You are a helpful assistant") # return the response as JSON return jsonify({ "response": response })
เยี่ยม ตอนนี้เราทำสิ่งที่จำเป็นเสร็จแล้ว
ตั้งค่า Cors
เราควรกล่าวถึงว่าเราตั้งค่าบางอย่างเช่น CORS หรือ Cross-Origin Resource Sharing ซึ่งหมายความว่าเนื่องจาก Backend และ Frontend ของเราจะทำงานบนพอร์ตที่ต่างกัน เราจำเป็นต้องอนุญาตให้ Frontend เรียก Backend ได้
การใช้ Python
มีโค้ดใน api.py ที่ตั้งค่านี้:
from flask_cors import CORS

app = Flask(__name__)
CORS(app)   # *   example.com
ตอนนี้มันถูกตั้งค่าให้อนุญาต "*" ซึ่งหมายถึงทุก Origin และนั่นไม่ปลอดภัยนัก เราควรจำกัดมันเมื่อเราไปสู่ Production
รันโปรเจคของคุณ
ในการรันโปรเจคของคุณ คุณต้องเริ่ม Backend ก่อนแล้วจึง Frontend
การใช้ Python
โอเค เรามี llm.py และ api.py แล้ว เราจะทำให้มันทำงานกับ Backend ได้อย่างไร? มีสองสิ่งที่เราต้องทำ:
-
ติดตั้ง Dependencies:
cd backend python -m venv venv source ./venv/bin/activate pip install openai flask flask-cors openai -
เริ่ม API
python api.pyหากคุณอยู่ใน Codespaces คุณต้องไปที่ Ports ในส่วนล่างของ Editor คลิกขวาและเลือก "Port Visibility" และเลือก "Public"
ทำงานกับ Frontend
ตอนนี้เรามี API ที่ทำงานแล้ว มาสร้าง Frontend สำหรับมันกัน Frontend ขั้นต่ำที่เราจะปรับปรุงทีละขั้นตอน ในโฟลเดอร์ frontend สร้างสิ่งต่อไปนี้:
backend/
frontend/
index.html
app.js
styles.css
เริ่มต้นด้วย index.html:
<html>
    <head>
        <link rel="stylesheet" href="styles.css">
    </head>
    <body>
      <form>
        <textarea id="messages"></textarea>
        <input id="input" type="text" />
        <button type="submit" id="sendBtn">Send</button>
      </form>
      <script src="app.js" />
    </body>
</html>
ข้างต้นคือสิ่งที่จำเป็นขั้นต่ำสุดที่คุณต้องมีเพื่อรองรับหน้าต่างแชท ประกอบด้วย Textarea ที่จะแสดงข้อความ Input สำหรับพิมพ์ข้อความ และปุ่มสำหรับส่งข้อความไปยัง Backend มาดู JavaScript ต่อใน app.js
app.js
// app.js

(function(){
  // 1. set up elements
  const messages = document.getElementById("messages");
  const form = document.getElementById("form");
  const input = document.getElementById("input");

  const BASE_URL = "change this";
  const API_ENDPOINT = `${BASE_URL}/hello`;

  // 2. create a function that talks to our backend
  async function callApi(text) {
    const response = await fetch(API_ENDPOINT, {
      method: "POST",
      headers: { "Content-Type": "application/json" },
      body: JSON.stringify({ message: text })
    });
    let json = await response.json();
    return json.response;
  }

  // 3. add response to our textarea
  function appendMessage(text, role) {
    const el = document.createElement("div");
    el.className = `message ${role}`;
    el.innerHTML = text;
    messages.appendChild(el);
  }

  // 4. listen to submit events
  form.addEventListener("submit", async(e) => {
    e.preventDefault();
   // someone clicked the button in the form

   // get input
   const text = input.value.trim();

   appendMessage(text, "user")

   // reset it
   input.value = '';

   const reply = await callApi(text);

   // add to messages
   appendMessage(reply, "assistant");

  })
})();
มาดูโค้ดทีละส่วน:
-
- ที่นี่เราอ้างอิงถึง Element ทั้งหมดที่เราจะใช้ในโค้ดต่อไป
-
- ในส่วนนี้ เราสร้างฟังก์ชันที่ใช้
fetchซึ่งเป็น Method ในตัวที่เรียก Backend ของเรา
- ในส่วนนี้ เราสร้างฟังก์ชันที่ใช้
-
appendMessageช่วยเพิ่มการตอบกลับรวมถึงข้อความที่คุณพิมพ์ในฐานะผู้ใช้
-
- ที่นี่เราฟัง Event
submitและอ่าน Input Field วางข้อความของผู้ใช้ใน Textarea เรียก API และแสดงการตอบกลับใน Textarea
- ที่นี่เราฟัง Event
มาดูการจัดสไตล์ต่อ นี่คือที่ที่คุณสามารถสร้างสรรค์ได้เต็มที่และทำให้มันดูเหมือนที่คุณต้องการ แต่มีคำแนะนำบางอย่าง:
styles.css
.message {
    background: #222;
    box-shadow: 0 0 0 10px orange;
    padding: 10px:
    margin: 5px;
}

.message.user {
    background: blue;
}

.message.assistant {
    background: grey;
}
ด้วยสามคลาสนี้ คุณจะจัดสไตล์ข้อความต่างกันขึ้นอยู่กับว่ามาจากผู้ช่วยหรือคุณในฐานะผู้ใช้ หากคุณต้องการแรงบันดาลใจ ลองดูที่โฟลเดอร์ solution/frontend/styles.css
เปลี่ยน Base Url
มีสิ่งหนึ่งที่เรายังไม่ได้ตั้งค่า นั่นคือ BASE_URL ซึ่งจะไม่ทราบจนกว่า Backend ของคุณจะเริ่มต้นขึ้น ในการตั้งค่า:
- หากคุณรัน API ในเครื่อง ควรตั้งค่าเป็น
http://localhost:5000 - หากรันใน Codespaces ควรมีลักษณะบางอย่างเช่น "[name]app.github.dev"
งานที่ได้รับมอบหมาย
สร้างโฟลเดอร์ของคุณเอง project พร้อมเนื้อหาเช่นนี้:
project/
  frontend/
    index.html
    app.js
    styles.css
  backend/
    ...
คัดลอกเนื้อหาจากที่ได้รับคำแนะนำข้างต้น แต่ปรับแต่งตามที่คุณต้องการ
โซลูชัน
โบนัส
ลองเปลี่ยนบุคลิกของผู้ช่วย AI
สำหรับ Python
เมื่อคุณเรียก call_llm ใน api.py คุณสามารถเปลี่ยน Argument ที่สองเป็นสิ่งที่คุณต้องการ เช่น:
call_llm(message, "You are Captain Picard")
Frontend
เปลี่ยน CSS และข้อความตามที่คุณต้องการ ดังนั้นให้เปลี่ยนใน index.html และ styles.css
สรุป
เยี่ยม คุณได้เรียนรู้ตั้งแต่เริ่มต้นวิธีการสร้างผู้ช่วยส่วนตัวโดยใช้ AI เราได้ทำสิ่งนี้โดยใช้ GitHub Models, Backend ใน Python และ Frontend ใน HTML, CSS และ JavaScript
ตั้งค่าด้วย Codespaces
-
ไปที่: Web Dev For Beginners repo
-
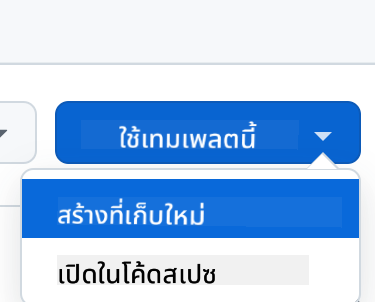
สร้างจาก Template (ตรวจสอบให้แน่ใจว่าคุณเข้าสู่ระบบ GitHub) ที่มุมขวาบน:
-
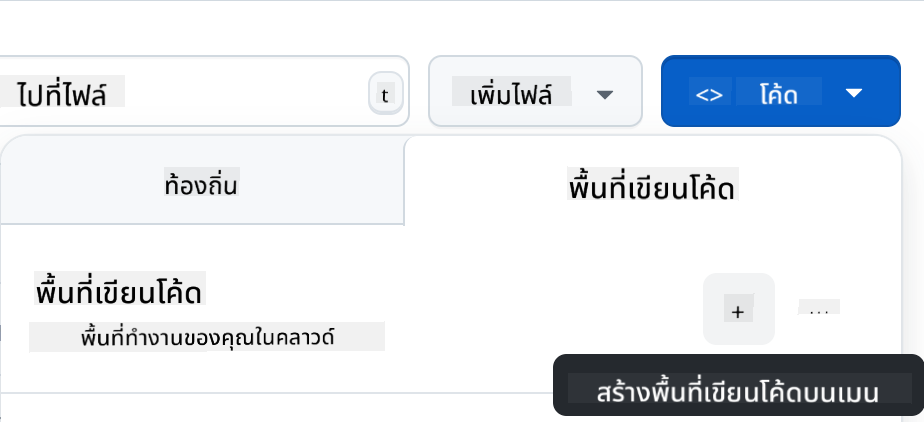
เมื่ออยู่ใน Repo ของคุณ สร้าง Codespace:
สิ่งนี้จะเริ่มต้น Environment ที่คุณสามารถทำงานได้
ข้อจำกัดความรับผิดชอบ:
เอกสารนี้ได้รับการแปลโดยใช้บริการแปลภาษา AI Co-op Translator แม้ว่าเราจะพยายามให้การแปลมีความถูกต้อง แต่โปรดทราบว่าการแปลอัตโนมัติอาจมีข้อผิดพลาดหรือความไม่ถูกต้อง เอกสารต้นฉบับในภาษาดั้งเดิมควรถือเป็นแหล่งข้อมูลที่เชื่อถือได้ สำหรับข้อมูลที่สำคัญ ขอแนะนำให้ใช้บริการแปลภาษามืออาชีพ เราไม่รับผิดชอบต่อความเข้าใจผิดหรือการตีความผิดที่เกิดจากการใช้การแปลนี้

