55 KiB
သင့်အသီးရှာဖွေစက်ကို Edge ပေါ်တွင် အလုပ်လုပ်စေပါ
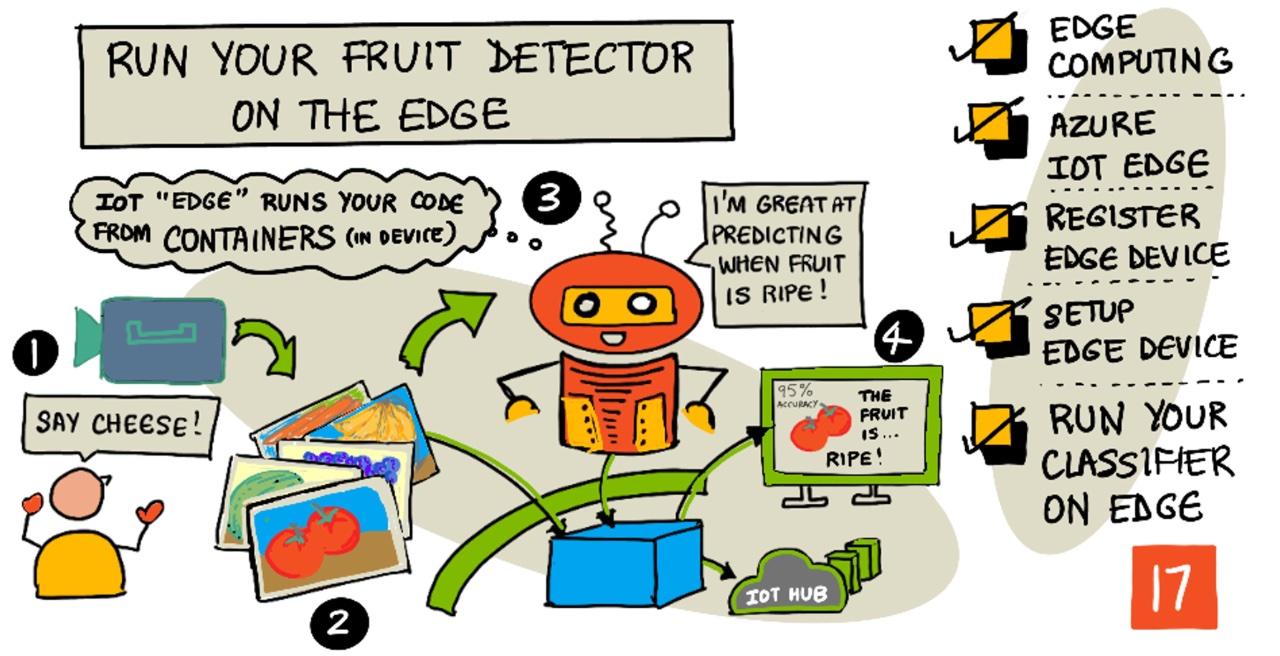
Sketchnote ကို Nitya Narasimhan မှရေးသားထားသည်။ ပုံကို click လုပ်ပြီး အကြီးအရွယ်ကို ကြည့်ပါ။
ဤဗီဒီယိုသည် IoT စက်ပစ္စည်းများပေါ်တွင် ပုံရိပ်ခွဲခြားစက်များကို အလုပ်လုပ်စေခြင်းအကြောင်းကို အကျဉ်းချုပ်ပေးပြီး၊ ဒီသင်ခန်းစာတွင် ပါဝင်သော အကြောင်းအရာကို ဖော်ပြထားသည်။
သင်ခန်းစာမတိုင်မီ စမ်းမေးခွန်း
သင်ခန်းစာမတိုင်မီ စမ်းမေးခွန်း
အကျဉ်းချုပ်
ပြီးခဲ့သည့် သင်ခန်းစာတွင် သင်၏ ပုံရိပ်ခွဲခြားစက်ကို အသုံးပြု၍ အနုစိတ်အသီးနှင့် အနုစိတ်မဟုတ်သော အသီးများကို ခွဲခြားခဲ့ပြီး၊ သင်၏ IoT စက်ပစ္စည်းပေါ်ရှိ ကင်မရာမှ ရိုက်ကူးထားသော ပုံရိပ်ကို အင်တာနက်မှတဆင့် cloud service သို့ ပို့ခဲ့ပါသည်။ ဤအခေါ်ဆိုမှုများသည် အချိန်ယူပြီး၊ ကုန်ကျစရိတ်ရှိပြီး၊ သင်အသုံးပြုနေသော ပုံရိပ်ဒေတာအမျိုးအစားပေါ်မူတည်၍ privacy အကျိုးသက်ရောက်မှုများရှိနိုင်ပါသည်။
ဒီသင်ခန်းစာတွင် သင်သည် machine learning (ML) မော်ဒယ်များကို edge ပေါ်တွင် - cloud မဟုတ်ဘဲ သင်၏ network ပေါ်တွင် အလုပ်လုပ်စေခြင်းအကြောင်းကို လေ့လာပါမည်။ Edge computing နှင့် cloud computing တို့၏ အကျိုးကျေးဇူးများနှင့် အားနည်းချက်များ၊ AI မော်ဒယ်ကို edge ပေါ်သို့ deploy လုပ်နည်း၊ သင်၏ IoT စက်ပစ္စည်းမှ access လုပ်နည်းတို့ကို သင်လေ့လာပါမည်။
ဒီသင်ခန်းစာတွင် ကျွန်ုပ်တို့ဖော်ပြမည့်အကြောင်းအရာများမှာ -
- Edge computing
- Azure IoT Edge
- IoT Edge စက်ပစ္စည်းကို မှတ်ပုံတင်ပါ
- IoT Edge စက်ပစ္စည်းကို စတင်တပ်ဆင်ပါ
- မော်ဒယ်ကို Export လုပ်ပါ
- Deploy လုပ်ရန် container ကို ပြင်ဆင်ပါ
- Container ကို Deploy လုပ်ပါ
- သင့် IoT Edge စက်ပစ္စည်းကို အသုံးပြုပါ
Edge computing
Edge computing သည် IoT ဒေတာကို ဒေတာထွက်ရှိသောနေရာအနီးဆုံးတွင် process လုပ်ခြင်းဖြစ်သည်။ Cloud တွင် အလုပ်လုပ်စေခြင်းမဟုတ်ဘဲ၊ cloud edge - သင့် internal network ပေါ်သို့ ပြောင်းရွှေ့ခြင်းဖြစ်သည်။
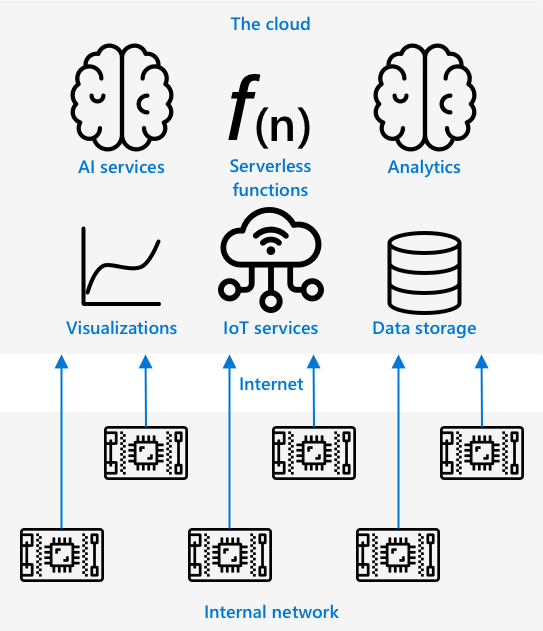
ယခင်သင်ခန်းစာများတွင် သင်သည် စက်ပစ္စည်းများမှ ဒေတာကို စုဆောင်းပြီး cloud သို့ ပို့ကာ serverless functions သို့မဟုတ် AI မော်ဒယ်များကို cloud တွင် အလုပ်လုပ်စေခဲ့ပါသည်။

Edge computing သည် cloud services အချို့ကို cloud မှ ပြောင်းရွှေ့ကာ IoT စက်ပစ္စည်းများနှင့် network တူသော စက်ပစ္စည်းများပေါ်တွင် အလုပ်လုပ်စေခြင်းဖြစ်သည်။ ဥပမာအားဖြင့်၊ သင်သည် AI မော်ဒယ်များကို edge စက်ပစ္စည်းများပေါ်တွင် အလုပ်လုပ်စေကာ အသီးအနုစိတ်ကို ခွဲခြားနိုင်ပြီး၊ cloud သို့ analytics ပို့ရန်သာ လိုအပ်သည်။
✅ သင်ဖန်တီးထားသော IoT application များကို စဉ်းစားပါ။ အဲဒီ application များ၏ အချို့ကို edge သို့ ပြောင်းရွှေ့နိုင်မည်ဖြစ်သည်။
အကျိုးကျေးဇူးများ
Edge computing ၏ အကျိုးကျေးဇူးများမှာ -
-
အမြန်နှုန်း - Edge computing သည် အချိန်အရေးကြီးသော ဒေတာများအတွက် အထူးသင့်လျော်ပြီး၊ အင်တာနက်မှတဆင့် ခေါ်ဆိုမှုများမဟုတ်ဘဲ device network ပေါ်တွင် အလုပ်လုပ်စေခြင်းဖြစ်သည်။ ဒါက network အတွင်းမှာ အကောင်းဆုံးအမြန်နှုန်းဖြင့် အလုပ်လုပ်နိုင်စေပြီး၊ ဒေတာသည် အကန့်အသတ် bandwidth များကြောင့် congestion ဖြစ်ခြင်းကို လျှော့ချနိုင်သည်။
💁 Optical cables သည် အလင်း၏အမြန်နှုန်းဖြင့် ဒေတာကို ပို့ဆောင်နိုင်သော်လည်း၊ cloud provider များသို့ ဒေတာကို ပို့ရန်အချိန်ယူနိုင်သည်။ ဥပမာအားဖြင့်၊ ဥရောပမှ US တွင်ရှိသော cloud services သို့ ဒေတာကို ပို့ရန် optical cable ဖြင့် အနည်းဆုံး 28ms လိုအပ်သည်။
-
Remote accessibility - Edge computing သည် connectivity အကန့်အသတ်ရှိသောနေရာများတွင် အလုပ်လုပ်နိုင်သည်။ ဥပမာအားဖြင့်၊ အကူအညီလိုအပ်သော disaster area များတွင် သို့မဟုတ် infrastructure အကန့်အသတ်ရှိသော နိုင်ငံများတွင် အသုံးပြုနိုင်သည်။
-
ကုန်ကျစရိတ်လျှော့ချခြင်း - Edge device ပေါ်တွင် ဒေတာစုဆောင်းခြင်း၊ သိမ်းဆည်းခြင်း၊ ခွဲခြားခြင်းနှင့် အရေးယူမှုများကို ပြုလုပ်ခြင်းသည် cloud services အသုံးပြုမှုကို လျှော့ချနိုင်ပြီး IoT application ၏ စုစုပေါင်းကုန်ကျစရိတ်ကို လျှော့ချနိုင်သည်။
-
Privacy နှင့် လုံခြုံရေး - Edge computing သည် ဒေတာကို network ပေါ်တွင်သာထားရှိပြီး cloud သို့ upload မလုပ်ပါ။ ဒါက sensitive ဒေတာများအတွက် အထူးသင့်လျော်ပြီး၊ ဒေတာကို သိမ်းဆည်းရန်မလိုအပ်သည့်အတွက် ဒေတာပေါက်ကြားမှုများကို လျှော့ချနိုင်သည်။
-
လုံခြုံမှုမရှိသော စက်ပစ္စည်းများကို ကိုင်တွယ်ခြင်း - Security flaws ရှိသော devices များကို network သို့မဟုတ် အင်တာနက်နှင့် တိုက်ရိုက်ချိတ်ဆက်ရန် မလိုအပ်ပါ။ Gateway IoT Edge device ကို အသုံးပြုနိုင်သည်။
-
မကိုက်ညီသော စက်ပစ္စည်းများကို ပံ့ပိုးခြင်း - IoT Hub နှင့် ချိတ်ဆက်မရသော devices များကို edge device တစ်ခုကို gateway device အဖြစ် အသုံးပြုနိုင်သည်။
✅ သုတေသနလုပ်ပါ - Edge computing ၏ အခြားအကျိုးကျေးဇူးများကို ရှာဖွေပါ။
အားနည်းချက်များ
Edge computing ၏ အားနည်းချက်များမှာ -
-
Scale နှင့် flexibility - Cloud computing သည် network နှင့် ဒေတာလိုအပ်ချက်များကို အချိန်နှင့်တပြေးညီ ပြင်ဆင်နိုင်သည်။ Edge computing သည် devices များကို manually ထည့်သွင်းရန် လိုအပ်သည်။
-
Reliability နှင့် resiliency - Cloud computing သည် redundancy နှင့် disaster recovery အတွက် server များကို အများအပြားပံ့ပိုးပေးသည်။ Edge computing တွင် အလားတူသော redundancy ရရှိရန် အများကြီးရင်းနှီးမြှုပ်နှံရန် လိုအပ်သည်။
-
Maintenance - Cloud service provider များသည် system maintenance နှင့် updates ကို ပံ့ပိုးပေးသည်။
✅ သုတေသနလုပ်ပါ - Edge computing ၏ အခြားအားနည်းချက်များကို ရှာဖွေပါ။
IoT စနစ်များအတွက် Cloud နှင့် Edge computing ကို ပေါင်းစပ်အသုံးပြုရန် လိုအပ်နိုင်သည်။
Azure IoT Edge
![]()
Azure IoT Edge သည် workload များကို cloud မှ edge သို့ ပြောင်းရွှေ့ရန် ကူညီပေးသော service ဖြစ်သည်။ Edge device တစ်ခုကို setup လုပ်ပြီး cloud မှ code ကို edge device သို့ deploy လုပ်နိုင်သည်။
🎓 Workloads သည် AI မော်ဒယ်များ၊ application များ သို့မဟုတ် serverless functions များလို အလုပ်လုပ်စေသော service များကို ဆိုလိုသည်။
ဥပမာအားဖြင့်၊ cloud တွင် image classifier ကို training လုပ်ပြီး၊ edge device သို့ deploy လုပ်နိုင်သည်။ IoT device သည် ပုံရိပ်များကို edge device သို့ ပို့ကာ classification လုပ်နိုင်သည်။
🎓 IoT Edge သို့ deploy လုပ်သော software ကို modules ဟုခေါ်သည်။
IoT Edge သည် IoT Hub တွင် built-in ဖြစ်ပြီး၊ IoT devices များကို စီမံခန့်ခွဲသည့် security အတူတူဖြင့် edge devices များကို စီမံခန့်ခွဲနိုင်သည်။
IoT Edge သည် containers မှ code ကို run လုပ်သည်။ Container သည် computer ပေါ်တွင် အခြား application များနှင့် isolation ဖြစ်စေသော self-contained application ဖြစ်သည်။
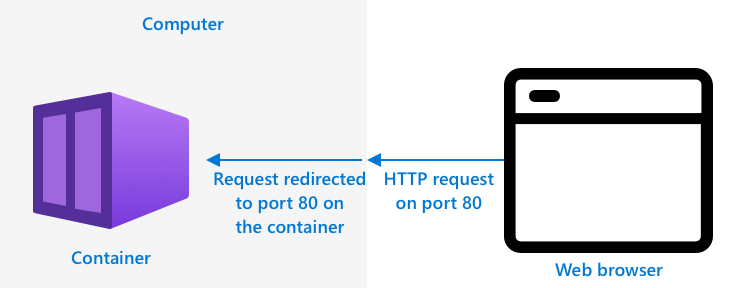
ဥပမာအားဖြင့်၊ port 80 ပေါ်တွင် web site တစ်ခုကို container မှ run လုပ်နိုင်ပြီး၊ computer ပေါ်တွင် port 80 ကို expose လုပ်နိုင်သည်။
✅ သုတေသနလုပ်ပါ - Containers နှင့် Docker သို့မဟုတ် Moby စသည့် service များကို ဖတ်ရှုပါ။
Custom Vision ကို အသုံးပြု၍ image classifiers များကို download လုပ်ပြီး container အဖြစ် deploy လုပ်နိုင်သည်။
IoT Edge စက်ပစ္စည်းကို မှတ်ပုံတင်ပါ
IoT Edge စက်ပစ္စည်းကို IoT Hub တွင် မှတ်ပုံတင်ရန် လိုအပ်သည်။
Task - IoT Edge စက်ပစ္စည်းကို မှတ်ပုံတင်ပါ
-
fruit-quality-detectorresource group တွင် IoT Hub တစ်ခုကို ဖန်တီးပါ။fruit-quality-detectorအပေါ်မူတည်၍ unique name တစ်ခုပေးပါ။ -
IoT Hub တွင်
fruit-quality-detector-edgeဟုခေါ်သော IoT Edge စက်ပစ္စည်းကို မှတ်ပုံတင်ပါ။ Command သည် non-edge device မှတ်ပုံတင်ခြင်းနှင့် ဆင်တူပြီး၊--edge-enabledflag ကို ထည့်သွင်းပါ။az iot hub device-identity create --edge-enabled \ --device-id fruit-quality-detector-edge \ --hub-name <hub_name><hub_name>ကို သင့် IoT Hub အမည်ဖြင့် အစားထိုးပါ။ -
အောက်ပါ command ကို အသုံးပြု၍ device connection string ကို ရယူပါ:
az iot hub device-identity connection-string show --device-id fruit-quality-detector-edge \ --output table \ --hub-name <hub_name><hub_name>ကို သင့် IoT Hub အမည်ဖြင့် အစားထိုးပါ။Output တွင် ဖော်ပြထားသော connection string ကို ကူးယူထားပါ။
IoT Edge စက်ပစ္စည်းကို စတင်တပ်ဆင်ပါ
Edge device registration ကို IoT Hub တွင် ဖန်တီးပြီးနောက်၊ edge device ကို setup လုပ်နိုင်ပါသည်။
Task - IoT Edge Runtime ကို Install လုပ်ပြီး စတင်ပါ
IoT Edge runtime သည် Linux containers များကိုသာ run လုပ်သည်။ Linux တွင် run လုပ်နိုင်သည့်အပြင် Windows တွင် Linux Virtual Machines အသုံးပြု၍ run လုပ်နိုင်သည်။
-
Raspberry Pi ကို IoT device အဖြစ် အသုံးပြုပါက၊ Raspberry Pi OS သည် Linux supported version ဖြစ်ပြီး IoT Edge runtime ကို host လုပ်နိုင်သည်။ Microsoft docs တွင်ရှိသော Azure IoT Edge ကို Linux အတွက် install လုပ်ရန် guide ကို လိုက်နာပါ။
💁 Raspberry Pi OS သည် Debian Linux ၏ variant ဖြစ်သည်။
-
Raspberry Pi မဟုတ်ဘဲ Linux computer ကို အသုံးပြုပါက၊ IoT Edge runtime ကို run လုပ်နိုင်သည်။ Microsoft docs တွင်ရှိသော Azure IoT Edge ကို Linux အတွက် install လုပ်ရန် guide ကို လိုက်နာပါ။
-
Windows ကို အသုံးပြုပါက၊ Linux Virtual Machine တွင် IoT Edge runtime ကို install လုပ်နိုင်သည်။ Microsoft docs တွင်ရှိသော Windows device အတွက် IoT Edge module ကို deploy လုပ်ရန် quickstart ကို လိုက်နာပါ။
-
macOS ကို အသုံးပြုပါက၊ IoT Edge device အဖြစ် cloud တွင် virtual machine (VM) တစ်ခုကို ဖန်တီးနိုင်သည်။ IoT Edge ကို run လုပ်သော virtual machine ဖန်တီးရန် guide ကို လိုက်နာပါ။
မော်ဒယ်ကို Export လုပ်ပါ
Classifier ကို edge ပေါ်တွင် run လုပ်ရန် Custom Vision မှ export လုပ်ရန် လိုအပ်သည်။ Custom Vision သည် standard models နှင့် compact models နှစ်မျိုးကို generate လုပ်နိုင်သည်။ Compact models သည် IoT devices တွင် deploy လုပ်ရန်အတွက် မော်ဒယ် size ကို လျှော့ချထားသည်။
Task - Food (compact) domain ကို အသုံးပြု၍ မော်ဒယ်ကို training လုပ်ပါ
-
CustomVision.ai တွင် Custom Vision portal ကိုဖွင့်ပြီး အကောင့်ဝင်ပါ။ အကောင့်မဝင်ရသေးပါက အရင်ဝင်ပါ။ ထို့နောက်
fruit-quality-detectorproject ကိုဖွင့်ပါ။ -
Settings ခလုတ် (⚙ icon) ကိုရွေးပါ။
-
Domains စာရင်းတွင် Food (compact) ကိုရွေးပါ။
-
Export Capabilities အောက်တွင် Basic platforms (Tensorflow, CoreML, ONNX, ...) ရွေးထားကြောင်းသေချာပါစေ။
-
Settings စာမျက်နှာ၏ အောက်ဆုံးတွင် Save Changes ကိုနှိပ်ပါ။
-
Train ခလုတ်ကိုအသုံးပြု၍ Quick training ကိုရွေးပြီး model ကိုပြန်လည်လေ့ကျင့်ပါ။
Task - မော်ဒယ်ကို export လုပ်ပါ
Model ကိုလေ့ကျင့်ပြီးပါက container အဖြစ် export လုပ်ရန်လိုအပ်ပါသည်။
-
Performance tab ကိုရွေးပြီး compact domain ကိုအသုံးပြု၍ training လုပ်ထားသော နောက်ဆုံး iteration ကိုရှာပါ။
-
အပေါ်တွင် Export ခလုတ်ကိုရွေးပါ။
-
DockerFile ကိုရွေးပြီး edge device နှင့်ကိုက်ညီသော version ကိုရွေးပါ။
- Linux computer, Windows computer, သို့မဟုတ် Virtual Machine တွင် IoT Edge ကို run လုပ်နေပါက Linux version ကိုရွေးပါ။
- Raspberry Pi တွင် IoT Edge ကို run လုပ်နေပါက ARM (Raspberry Pi 3) version ကိုရွေးပါ။
🎓 Docker သည် container များကိုစီမံခန့်ခွဲရန်အတွက် အလွန်လူကြိုက်များသော tool တစ်ခုဖြစ်ပြီး DockerFile သည် container ကို setup လုပ်ရန်အတွက် လမ်းညွှန်ချက်များပါဝင်သော ဖိုင်တစ်ခုဖြစ်သည်။
-
Export ကိုရွေးပြီး Custom Vision ကို သက်ဆိုင်သော ဖိုင်များကိုဖန်တီးရန်အပ်ပါ၊ ထို့နောက် Download ကိုနှိပ်ပြီး zip ဖိုင်အဖြစ် download လုပ်ပါ။
-
ဖိုင်များကို computer တွင် save လုပ်ပြီး folder ကို unzip လုပ်ပါ။
Container ကို deployment အတွက် ပြင်ဆင်ပါ
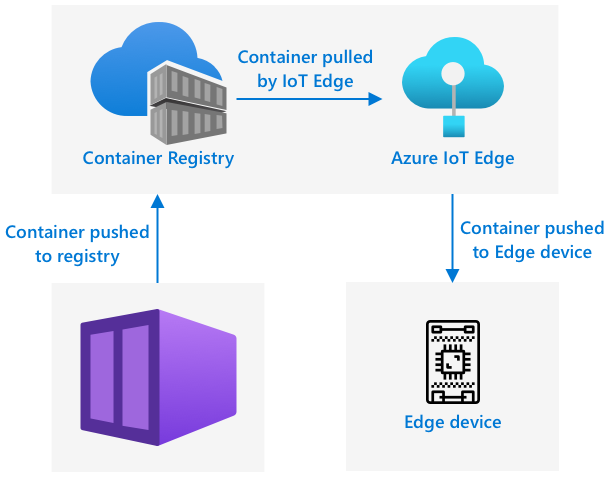
Model ကို download လုပ်ပြီးပါက container အဖြစ် build လုပ်ပြီး container registry သို့ push လုပ်ရန်လိုအပ်ပါသည်။ Container registry သည် container များကိုသိမ်းဆည်းထားနိုင်သော online location ဖြစ်သည်။ IoT Edge သည် registry မှ container ကို download လုပ်ပြီး device သို့ push လုပ်နိုင်ပါသည်။
![]()
ဒီသင်ခန်းစာအတွက် အသုံးပြုမည့် container registry သည် Azure Container Registry ဖြစ်သည်။ ဒါဟာ အခမဲ့ဝန်ဆောင်မှုမဟုတ်သောကြောင့် သင့်ရဲ့ project ကိုပြီးဆုံးပြီးပါက clean up your project လုပ်ရန် သေချာပါစေ။
💁 Azure Container Registry ကိုအသုံးပြုခြင်း၏ကုန်ကျစရိတ်များကို Azure Container Registry pricing page တွင်ကြည့်ရှုနိုင်ပါသည်။
Task - Docker ကို install လုပ်ပါ
Classifier ကို build လုပ်ပြီး deploy လုပ်ရန် Docker ကို install လုပ်ရန်လိုအပ်နိုင်ပါသည်။
IoT Edge ကို install လုပ်သော device မှ container ကို build လုပ်မည်ဆိုပါက Docker ကို install လုပ်ရန်မလိုအပ်ပါ။ IoT Edge ကို install လုပ်သောအခါ Docker ကိုအလိုအလျောက် install လုပ်ပေးပါသည်။
- IoT Edge device မဟုတ်သော device မှ Docker container ကို build လုပ်မည်ဆိုပါက Docker install page တွင်ရှိသော installation လမ်းညွှန်ချက်များကိုလိုက်နာပြီး Docker Desktop သို့မဟုတ် Docker engine ကို install လုပ်ပါ။ Installation ပြီးဆုံးပါက run လုပ်ထားကြောင်းသေချာပါစေ။
Task - container registry resource တစ်ခုဖန်တီးပါ
-
Terminal သို့မဟုတ် command prompt မှာ အောက်ပါ command ကို run လုပ်ပြီး Azure Container Registry resource တစ်ခုဖန်တီးပါ:
az acr create --resource-group fruit-quality-detector \
              --sku Basic \
              --name <Container registry name>
<Container registry name>ကို သင့် container registry အတွက် ထူးခြားသောနာမည်ဖြင့် အစားထိုးပါ။ အက္ခရာနှင့်နံပါတ်များသာအသုံးပြုပါ။fruitqualitydetectorကိုအခြေခံပြီး နာမည်ပေးပါ။ ဒီနာမည်သည် container registry ကို access လုပ်ရန် URL ၏ အစိတ်အပိုင်းဖြစ်လာမည်ဖြစ်ပြီး ကမ္ဘာတစ်ဝှမ်းထူးခြားသောနာမည်ဖြစ်ရပါမည်။ -
အောက်ပါ command ကို run လုပ်ပြီး Azure Container Registry သို့ log in လုပ်ပါ:
az acr login --name <Container registry name><Container registry name>ကို သင့် container registry နာမည်ဖြင့် အစားထိုးပါ။ -
Container registry ကို admin mode သို့ပြောင်းပြီး password တစ်ခုဖန်တီးနိုင်ရန် အောက်ပါ command ကို run လုပ်ပါ:
az acr update --admin-enabled true \
             --name <Container registry name>
<Container registry name>ကို သင့် container registry နာမည်ဖြင့် အစားထိုးပါ။ -
Container registry အတွက် password များကို ဖန်တီးရန် အောက်ပါ command ကို run လုပ်ပါ:
 az acr credential renew --password-name password \
                         --output table \
                         --name <Container registry name>
<Container registry name>ကို သင့် container registry နာမည်ဖြင့် အစားထိုးပါ။PASSWORD၏တန်ဖိုးကို copy လုပ်ထားပါ၊ အနောက်တွင်လိုအပ်ပါမည်။
Task - container ကို build လုပ်ပါ
Custom Vision မှ download လုပ်ထားသော DockerFile သည် container ကို build လုပ်ရန် လမ်းညွှန်ချက်များနှင့် custom vision model ကို host လုပ်ရန် container အတွင်း run လုပ်မည့် application code ပါဝင်သည်။ REST API ကိုအသုံးပြု၍ model ကိုခေါ်နိုင်ပါသည်။ Docker ကိုအသုံးပြု၍ DockerFile မှ tagged container တစ်ခုကို build လုပ်ပြီး container registry သို့ push လုပ်နိုင်ပါသည်။
🎓 Containers များကို tag ပေးပြီး နာမည်နှင့် version ကိုသတ်မှတ်သည်။ Container ကို update လုပ်ရန်လိုအပ်ပါက အတူတူသော tag ဖြင့် build လုပ်ပြီး version အသစ်ကိုအသုံးပြုနိုင်သည်။
-
Terminal သို့မဟုတ် command prompt ကိုဖွင့်ပြီး Custom Vision မှ download လုပ်ထားသော model ကို unzip လုပ်ထားသော folder သို့သွားပါ။
-
အောက်ပါ command ကို run လုပ်ပြီး image ကို build လုပ်ပြီး tag ပေးပါ:
docker build --platform <platform> -t <Container registry name>.azurecr.io/classifier:v1 .<platform>ကို container run လုပ်မည့် platform ဖြင့် အစားထိုးပါ။ IoT Edge ကို Raspberry Pi တွင် run လုပ်နေပါကlinux/armhfသတ်မှတ်ပါ၊ အခြား device တွင် run လုပ်နေပါကlinux/amd64သတ်မှတ်ပါ။💁 IoT Edge ကို run လုပ်နေသော device မှ command ကို run လုပ်နေပါက Raspberry Pi မှ run လုပ်နေသည်ဆိုပါက
--platform <platform>အပိုင်းကို မထည့်ပါနှင့်၊ platform ကိုလက်ရှိ platform အတိုင်း default သတ်မှတ်ပါမည်။<Container registry name>ကို သင့် container registry နာမည်ဖြင့် အစားထိုးပါ။💁 Linux သို့မဟုတ် Raspberry Pi OS တွင် run လုပ်နေပါက command ကို run လုပ်ရန်
sudoအသုံးပြုရန်လိုအပ်နိုင်ပါသည်။Docker သည် image ကို build လုပ်ပြီး လိုအပ်သော software များကို configure လုပ်ပါမည်။ Image ကို
classifier:v1အဖြစ် tag ပေးပါမည်။➜ d4ccc45da0bb478bad287128e1274c3c.DockerFile.Linux docker build --platform linux/amd64 -t fruitqualitydetectorjimb.azurecr.io/classifier:v1 . [+] Building 102.4s (11/11) FINISHED => [internal] load build definition from Dockerfile => => transferring dockerfile: 131B => [internal] load .dockerignore => => transferring context: 2B => [internal] load metadata for docker.io/library/python:3.7-slim => [internal] load build context => => transferring context: 905B => [1/6] FROM docker.io/library/python:3.7-slim@sha256:b21b91c9618e951a8cbca5b696424fa5e820800a88b7e7afd66bba0441a764d6 => => resolve docker.io/library/python:3.7-slim@sha256:b21b91c9618e951a8cbca5b696424fa5e820800a88b7e7afd66bba0441a764d6 => => sha256:b4d181a07f8025e00e0cb28f1cc14613da2ce26450b80c54aea537fa93cf3bda 27.15MB / 27.15MB => => sha256:de8ecf497b753094723ccf9cea8a46076e7cb845f333df99a6f4f397c93c6ea9 2.77MB / 2.77MB => => sha256:707b80804672b7c5d8f21e37c8396f319151e1298d976186b4f3b76ead9f10c8 10.06MB / 10.06MB => => sha256:b21b91c9618e951a8cbca5b696424fa5e820800a88b7e7afd66bba0441a764d6 1.86kB / 1.86kB => => sha256:44073386687709c437586676b572ff45128ff1f1570153c2f727140d4a9accad 1.37kB / 1.37kB => => sha256:3d94f0f2ca798607808b771a7766f47ae62a26f820e871dd488baeccc69838d1 8.31kB / 8.31kB => => sha256:283715715396fd56d0e90355125fd4ec57b4f0773f306fcd5fa353b998beeb41 233B / 233B => => sha256:8353afd48f6b84c3603ea49d204bdcf2a1daada15f5d6cad9cc916e186610a9f 2.64MB / 2.64MB => => extracting sha256:b4d181a07f8025e00e0cb28f1cc14613da2ce26450b80c54aea537fa93cf3bda => => extracting sha256:de8ecf497b753094723ccf9cea8a46076e7cb845f333df99a6f4f397c93c6ea9 => => extracting sha256:707b80804672b7c5d8f21e37c8396f319151e1298d976186b4f3b76ead9f10c8 => => extracting sha256:283715715396fd56d0e90355125fd4ec57b4f0773f306fcd5fa353b998beeb41 => => extracting sha256:8353afd48f6b84c3603ea49d204bdcf2a1daada15f5d6cad9cc916e186610a9f => [2/6] RUN pip install -U pip => [3/6] RUN pip install --no-cache-dir numpy~=1.17.5 tensorflow~=2.0.2 flask~=1.1.2 pillow~=7.2.0 => [4/6] RUN pip install --no-cache-dir mscviplib==2.200731.16 => [5/6] COPY app /app => [6/6] WORKDIR /app => exporting to image => => exporting layers => => writing image sha256:1846b6f134431f78507ba7c079358ed66d944c0e185ab53428276bd822400386 => => naming to fruitqualitydetectorjimb.azurecr.io/classifier:v1
Task - container ကို container registry သို့ push လုပ်ပါ
-
အောက်ပါ command ကိုအသုံးပြု၍ container ကို container registry သို့ push လုပ်ပါ:
docker push <Container registry name>.azurecr.io/classifier:v1<Container registry name>ကို သင့် container registry နာမည်ဖြင့် အစားထိုးပါ။💁 Linux တွင် run လုပ်နေပါက command ကို run လုပ်ရန်
sudoအသုံးပြုရန်လိုအပ်နိုင်ပါသည်။Container ကို container registry သို့ push လုပ်ပါမည်။
➜ d4ccc45da0bb478bad287128e1274c3c.DockerFile.Linux docker push fruitqualitydetectorjimb.azurecr.io/classifier:v1 The push refers to repository [fruitqualitydetectorjimb.azurecr.io/classifier] 5f70bf18a086: Pushed 8a1ba9294a22: Pushed 56cf27184a76: Pushed b32154f3f5dd: Pushed 36103e9a3104: Pushed e2abb3cacca0: Pushed 4213fd357bbe: Pushed 7ea163ba4dce: Pushed 537313a13d90: Pushed 764055ebc9a7: Pushed v1: digest: sha256:ea7894652e610de83a5a9e429618e763b8904284253f4fa0c9f65f0df3a5ded8 size: 2423 -
Push လုပ်ပြီးကြောင်းအတည်ပြုရန် အောက်ပါ command ကို run လုပ်ပြီး registry တွင်ရှိသော containers များကို list လုပ်ပါ:
az acr repository list --output table \
                       --name <Container registry name>
<Container registry name>ကို သင့် container registry နာမည်ဖြင့် အစားထိုးပါ။➜ d4ccc45da0bb478bad287128e1274c3c.DockerFile.Linux az acr repository list --name fruitqualitydetectorjimb --output table Result ---------- classifierOutput တွင် သင့် classifier ကိုတွေ့ပါမည်။
Container ကို deploy လုပ်ပါ
Container ကို IoT Edge device သို့ deploy လုပ်နိုင်ပါပြီ။ Deploy လုပ်ရန် deployment manifest ကိုသတ်မှတ်ရန်လိုအပ်ပါသည် - edge device သို့ deploy လုပ်မည့် modules များကို list လုပ်ထားသော JSON document ဖြစ်သည်။
Task - deployment manifest ဖန်တီးပါ
-
သင့် computer တွင်
deployment.jsonဟုခေါ်သော ဖိုင်အသစ်တစ်ခုဖန်တီးပါ။ -
အောက်ပါအတိုင်း ဖိုင်တွင်ထည့်ပါ:
{
    "content": {
        "modulesContent": {
            "$edgeAgent": {
                "properties.desired": {
                    "schemaVersion": "1.1",
                    "runtime": {
                        "type": "docker",
                        "settings": {
                            "minDockerVersion": "v1.25",
                            "loggingOptions": "",
                            "registryCredentials": {
                                "ClassifierRegistry": {
                                    "username": "<Container registry name>",
                                    "password": "<Container registry password>",
                                    "address": "<Container registry name>.azurecr.io"
                                  }
                            }
                        }
                    },
                    "systemModules": {
                        "edgeAgent": {
                            "type": "docker",
                            "settings": {
                                "image": "mcr.microsoft.com/azureiotedge-agent:1.1",
                                "createOptions": "{}"
                            }
                        },
                        "edgeHub": {
                            "type": "docker",
                            "status": "running",
                            "restartPolicy": "always",
                            "settings": {
                                "image": "mcr.microsoft.com/azureiotedge-hub:1.1",
                                "createOptions": "{\"HostConfig\":{\"PortBindings\":{\"5671/tcp\":[{\"HostPort\":\"5671\"}],\"8883/tcp\":[{\"HostPort\":\"8883\"}],\"443/tcp\":[{\"HostPort\":\"443\"}]}}}"
                            }
                        }
                    },
                    "modules": {
                        "ImageClassifier": {
                            "version": "1.0",
                            "type": "docker",
                            "status": "running",
                            "restartPolicy": "always",
                            "settings": {
                                "image": "<Container registry name>.azurecr.io/classifier:v1",
                                "createOptions": "{\"ExposedPorts\": {\"80/tcp\": {}},\"HostConfig\": {\"PortBindings\": {\"80/tcp\": [{\"HostPort\": \"80\"}]}}}"
                            }
                        }
                    }
                }
            },
            "$edgeHub": {
                "properties.desired": {
                    "schemaVersion": "1.1",
                    "routes": {
                        "upstream": "FROM /messages/* INTO $upstream"
                    },
                    "storeAndForwardConfiguration": {
                        "timeToLiveSecs": 7200
                    }
                }
            }
        }
    }
}
💁 ဒီဖိုင်ကို code-deployment/deployment folder တွင်တွေ့နိုင်ပါသည်။
<Container registry name>ကို သင့် container registry နာမည်ဖြင့် အစားထိုးပါ။ImageClassifiermodule အပိုင်းတွင်တစ်ခု၊registryCredentialsအပိုင်းတွင်နှစ်ခုရှိသည်။<Container registry password>ကိုregistryCredentialsအပိုင်းတွင် သင့် container registry password ဖြင့် အစားထိုးပါ။ -
Deployment manifest ကိုထည့်ထားသော folder မှာ အောက်ပါ command ကို run လုပ်ပါ:
az iot edge set-modules --device-id fruit-quality-detector-edge \ --content deployment.json \ --hub-name <hub_name><hub_name>ကို သင့် IoT Hub နာမည်ဖြင့် အစားထိုးပါ။Image classifier module ကို edge device သို့ deploy လုပ်ပါမည်။
Task - classifier run လုပ်နေကြောင်းအတည်ပြုပါ
-
IoT Edge device သို့ connect လုပ်ပါ:
-
Raspberry Pi တွင် IoT Edge ကို run လုပ်နေပါက terminal မှ ssh အသုံးပြု၍ သို့မဟုတ် VS Code တွင် remote SSH session ဖြင့် connect လုပ်ပါ။
-
Linux container တွင် IoT Edge ကို Windows တွင် run လုပ်နေပါက verify successful configuration guide တွင်ရှိသော လမ်းညွှန်ချက်များကိုလိုက်နာပြီး IoT Edge device သို့ connect လုပ်ပါ။
-
Virtual machine တွင် IoT Edge ကို run လုပ်နေပါက VM ဖန်တီးစဉ် သတ်မှတ်ထားသော
adminUsernameနှင့်passwordကိုအသုံးပြု၍ VM ၏ IP address သို့မဟုတ် DNS name ကိုအသုံးပြု၍ SSH ဖြင့် machine သို့ connect လုပ်နိုင်ပါသည်:ssh <adminUsername>@<IP address>သို့မဟုတ်:
ssh <adminUsername>@<DNS Name>Password ကိုမေးလျှင်ထည့်ပါ။
-
-
Connect လုပ်ပြီးပါက IoT Edge modules များကို list လုပ်ရန် အောက်ပါ command ကို run လုပ်ပါ:
iotedge list💁 Command ကို run လုပ်ရန်
sudoအသုံးပြုရန်လိုအပ်နိုင်ပါသည်။Running modules များကိုတွေ့ပါမည်:
jim@fruit-quality-detector-jimb:~$ iotedge list NAME STATUS DESCRIPTION CONFIG ImageClassifier running Up 42 minutes fruitqualitydetectorjimb.azurecr.io/classifier:v1 edgeAgent running Up 42 minutes mcr.microsoft.com/azureiotedge-agent:1.1 edgeHub running Up 42 minutes mcr.microsoft.com/azureiotedge-hub:1.1 -
Image classifier module ၏ logs ကိုစစ်ဆေးရန် အောက်ပါ command ကို run လုပ်ပါ:
iotedge logs ImageClassifier💁 Command ကို run လုပ်ရန်
sudoအသုံးပြုရန်လိုအပ်နိုင်ပါသည်။jim@fruit-quality-detector-jimb:~$ iotedge logs ImageClassifier 2021-07-05 20:30:15.387144: I tensorflow/core/platform/cpu_feature_guard.cc:142] Your CPU supports instructions that this TensorFlow binary was not compiled to use: AVX2 FMA 2021-07-05 20:30:15.392185: I tensorflow/core/platform/profile_utils/cpu_utils.cc:94] CPU Frequency: 2394450000 Hz 2021-07-05 20:30:15.392712: I tensorflow/compiler/xla/service/service.cc:168] XLA service 0x55ed9ac83470 executing computations on platform Host. Devices: 2021-07-05 20:30:15.392806: I tensorflow/compiler/xla/service/service.cc:175] StreamExecutor device (0): Host, Default Version Loading model...Success! Loading labels...2 found. Success! * Serving Flask app "app" (lazy loading) * Environment: production WARNING: This is a development server. Do not use it in a production deployment. Use a production WSGI server instead. * Debug mode: off * Running on http://0.0.0.0:80/ (Press CTRL+C to quit)
Task - image classifier ကိုစမ်းသပ်ပါ
-
CURL ကိုအသုံးပြု၍ IoT Edge agent run လုပ်နေသော computer ၏ IP address သို့မဟုတ် host name ကိုအသုံးပြု၍ image classifier ကိုစမ်းသပ်နိုင်ပါသည်။ IP address ကိုရှာပါ:
- IoT Edge run လုပ်နေသော machine တွင်ရှိနေပါက host name အဖြစ်
localhostကိုအသုံးပြုနိုင်ပါသည်။ - VM ကိုအသုံးပြုနေပါက VM ၏ IP address သို့မဟုတ် DNS name ကိုအသုံးပြုနိုင်ပါသည်။
- IoT Edge run လုပ်နေသော machine ၏ IP address ကိုရယူရန်:
- Windows 10 တွင် find your IP address guide ကိုလိုက်နာပါ။
- macOS တွင် how to find you IP address on a Mac guide ကိုလိုက်နာပါ။
- Linux တွင် how to find your IP address in Linux guide တွင်ရှိသော private IP address ရှာဖွေရန်အပိုင်းကိုလိုက်နာပါ။
- IoT Edge run လုပ်နေသော machine တွင်ရှိနေပါက host name အဖြစ်
-
CURL command ကို run လုပ်ပြီး local file ကိုအသုံးပြု၍ container ကိုစမ်းသပ်နိုင်ပါသည်:
curl --location \
     --request POST 'http://<IP address or name>/image' \
     --header 'Content-Type: image/png' \
     --data-binary '@<file_Name>'
<IP address or name>ကို IoT Edge run လုပ်နေသော computer ၏ IP address သို့မဟုတ် host name ဖြင့် အစားထိုးပါ။<file_Name>ကို စမ်းသပ်ရန် file နာမည်ဖြင့် အစားထိုးပါ။Output တွင် prediction results ကိုတွေ့ပါမည်:
{
    "created": "2021-07-05T21:44:39.573181",
    "id": "",
    "iteration": "",
    "predictions": [
        {
            "boundingBox": null,
            "probability": 0.9995615482330322,
            "tagId": "",
            "tagName": "ripe"
        },
        {
            "boundingBox": null,
            "probability": 0.0004384400090202689,
            "tagId": "",
            "tagName": "unripe"
        }
    ],
    "project": ""
}
💁 ဒီမှာ Azure resource ကိုအသုံးပြုခြင်းမဟုတ်သောကြောင့် prediction key ကိုပေးရန်မလိုအပ်ပါ။ အစား internal network ၏ internal security လိုအပ်ချက်များအပေါ်အခြေခံပြီး security ကို configure လုပ်မည်ဖြစ်သည်၊ public endpoint နှင့် API key ကိုမူမမှီခိုပါ။
IoT Edge device ကိုအသုံးပြုပါ
Image Classifier ကို IoT Edge device တွင် deploy လုပ်ပြီးပါက IoT device မှအသုံးပြုနိုင်ပါသည်။
Task - IoT Edge device ကိုအသုံးပြုပါ
IoT Edge classifier ကိုအသုံးပြု၍ images များကို classify လုပ်ရန် သက်ဆိုင်သော လမ်းညွှန်ချက်ကိုလိုက်နာပါ:
Model retraining
IoT Edge တွင် image classifiers များကို run လုပ်ခြင်း၏ downside တစ်ခုမှာ Custom Vision project နှင့်ချိတ်ဆက်ထားခြင်းမရှိခြင်းဖြစ်သည်။ Custom Vision တွင် Predictions tab ကိုကြည့်ပါက Edge-based classifier ကိုအသုံးပြု၍ classify လုပ်ထားသော images များကိုမတွေ့ရပါ။
ဒါဟာမျှော်လင့်ထားသောအခြေအနေဖြစ်သည် - images များကို cloud သို့ classification အတွက်မပို့ပါ၊ cloud တွင်မရရှိနိုင်ပါ။ IoT Edge ကိုအသုံးပြုခြင်း၏ upside တစ်ခုမှာ privacy ဖြစ်ပြီး images များကို network မှထွက်မသွားစေရန်အာမခံပေးသည်၊ အခြားတစ်ခုမှာ offline အနေဖြင့်အလုပ်လုပ်နိုင်ခြင်းဖြစ်သည်၊ device တွင် internet connection မရှိသောအခါ images များကို upload လုပ်ရန်မလိုအပ်ပါ။ Downside က model ကိုတိုးတက်အောင်လုပ်ခြင်းဖြစ်သည် - images များကို manually re-classify လုပ်ပြီး image classifier ကိုပြန်လည်လေ့ကျင့်ရန်အခြားနည်းလမ်းတစ်ခုကို implement လုပ်ရန်လိုအပ်ပါမည်။
✅ Classifier ကို retrain လုပ်ရန် images များကို upload လုပ်ရန်နည်းလမ်းများကိုစဉ်းစားပါ။
🚀 Challenge
AI models များကို edge devices တွင် run လုပ်ခြင်းသည် cloud တွင် run လုပ်ခြင်းထက်ပိုမြန်နိုင်သည် - network hop သက်သာသည်။ Hardware သည် cloud ထက်မပြင်းထန်သောကြောင့် ပိုနှေးနိုင်ပါသည်။
Edge device သို့ call လုပ်ခြင်းသည် cloud သို့ call လုပ်ခြင်းထက်ပိုမြန်သို့မဟုတ်ပိုနှေးပါသလားဆိုတာကို timing လုပ်ပြီးနှိုင်းယှဉ်ပါ။ ကွာခြားမှုရှိခြင်း သို့မဟုတ် မရှိခြင်း၏အကြောင်းရင်းများကိုစဉ်းစားပါ။ Edge တွင် AI models များကိုပိုမြန်စွာ run လုပ်ရန် specialized hardware အသုံးပြုနည်းများကိုလေ့လာပါ။
Post-lecture quiz
Review & Self Study
-
Containers အကြောင်းကို OS-level virtualization page on Wikipedia တွင်ပိုမိုဖတ်ရှုပါ။
-
5G က edge computing ကို ဘယ်လိုတိုးချဲ့နိုင်မလဲဆိုတာအပေါ်အထူးအလေးပေးပြီး edge computing အကြောင်းနဲ့ အရေးကြီးတဲ့အကြောင်းကို NetworkWorld ရဲ့ what is edge computing and why does it matter? ဆောင်းပါး မှာ ဖတ်ရှုပါ။
-
IoT Edge မှာ AI services တွေကို ဘယ်လို run လုပ်ရမလဲဆိုတာကို Microsoft Channel9 ရဲ့ Learn Live အစီအစဉ်မှာ Learn how to use Azure IoT Edge on a pre-built AI service on the Edge to do language detection အပိုင်း ကိုကြည့်ပြီး လေ့လာပါ။
လုပ်ငန်း
Run other services on the edge
အကြောင်းကြားချက်:
ဤစာရွက်စာတမ်းကို AI ဘာသာပြန်ဝန်ဆောင်မှု Co-op Translator ကို အသုံးပြု၍ ဘာသာပြန်ထားပါသည်။ ကျွန်ုပ်တို့သည် တိကျမှုအတွက် ကြိုးစားနေသော်လည်း၊ အလိုအလျောက် ဘာသာပြန်မှုများတွင် အမှားများ သို့မဟုတ် မတိကျမှုများ ပါဝင်နိုင်သည်ကို သတိပြုပါ။ မူရင်းဘာသာစကားဖြင့် ရေးသားထားသော စာရွက်စာတမ်းကို အာဏာတရ အရင်းအမြစ်အဖြစ် သတ်မှတ်သင့်ပါသည်။ အရေးကြီးသော အချက်အလက်များအတွက် လူက ဘာသာပြန်မှုကို အသုံးပြုရန် အကြံပြုပါသည်။ ဤဘာသာပြန်မှုကို အသုံးပြုခြင်းမှ ဖြစ်ပေါ်လာသော အလွဲအလွတ်များ သို့မဟုတ် အနားယူမှုမှားများအတွက် ကျွန်ုပ်တို့သည် တာဝန်မယူပါ။