9.8 KiB
ပုံတစ်ပုံကို အမျိုးအစားခွဲခြားခြင်း - အတု IoT စက်ပစ္စည်းနှင့် Raspberry Pi
ဒီသင်ခန်းစာအပိုင်းမှာ ကင်မရာက ရိုက်ယူထားတဲ့ပုံကို Custom Vision ဝန်ဆောင်မှုဆီသို့ ပို့ပြီး အမျိုးအစားခွဲခြားပါမည်။
ပုံများကို Custom Vision ဆီသို့ ပို့ခြင်း
Custom Vision ဝန်ဆောင်မှုတွင် ပုံများကို အမျိုးအစားခွဲခြားရန် အသုံးပြုနိုင်သော Python SDK ရှိပါသည်။
လုပ်ငန်း - ပုံများကို Custom Vision ဆီသို့ ပို့ခြင်း
-
VS Code တွင်
fruit-quality-detectorဖိုလ်ဒါကို ဖွင့်ပါ။ အတု IoT စက်ပစ္စည်းကို အသုံးပြုနေပါက terminal တွင် virtual environment ကို run လုပ်ထားပါ။ -
Custom Vision ကို ပုံများပို့ရန် အသုံးပြုနိုင်သော Python SDK သည် Pip package အနေဖြင့် ရရှိနိုင်ပါသည်။ အောက်ပါ command ဖြင့် install လုပ်ပါ။
pip3 install azure-cognitiveservices-vision-customvision -
app.pyဖိုင်၏ အပေါ်ပိုင်းတွင် အောက်ပါ import statements များကို ထည့်ပါ။from msrest.authentication import ApiKeyCredentials from azure.cognitiveservices.vision.customvision.prediction import CustomVisionPredictionClientCustom Vision libraries မှ module များကို ယူဆောင်လာပြီး၊ prediction key ဖြင့် authentication ပြုလုပ်ရန်နှင့် Custom Vision ကို ခေါ်ရန် prediction client class ကို ပေးသည်။
-
ဖိုင်၏ အဆုံးတွင် အောက်ပါ code ကို ထည့်ပါ။
prediction_url = '<prediction_url>' prediction_key = '<prediction key>'<prediction_url>ကို ဒီသင်ခန်းစာ၏ အစိတ်အပိုင်းတွင် Prediction URL dialog မှ ကူးယူထားသော URL ဖြင့် အစားထိုးပါ။<prediction key>ကို အတူတူ dialog မှ ကူးယူထားသော prediction key ဖြင့် အစားထိုးပါ။ -
Prediction URL dialog မှ ပေးထားသော prediction URL သည် REST endpoint ကို တိုက်ရိုက်ခေါ်ရန်အတွက် ရည်ရွယ်ထားပါသည်။ Python SDK သည် URL ၏ အစိတ်အပိုင်းများကို အခြားနေရာများတွင် အသုံးပြုသည်။ URL ကို အောက်ပါ code ဖြင့် အစိတ်အပိုင်းများအဖြစ် ခွဲထုတ်ပါ။
parts = prediction_url.split('/')
endpoint = 'https://' + parts[2]
project_id = parts[6]
iteration_name = parts[9]
URL ကို ခွဲထုတ်ပြီး
https://<location>.api.cognitive.microsoft.comendpoint, project ID, နှင့် published iteration ၏ နာမည်ကို ရယူပါသည်။ -
အောက်ပါ code ဖြင့် prediction ပြုလုပ်ရန် predictor object တစ်ခုကို ဖန်တီးပါ။
prediction_credentials = ApiKeyCredentials(in_headers={"Prediction-key": prediction_key}) predictor = CustomVisionPredictionClient(endpoint, prediction_credentials)prediction_credentialsသည် prediction key ကို wrap လုပ်သည်။ ထို့နောက် endpoint ကို ညွှန်းထားသော prediction client object ကို ဖန်တီးရန် အသုံးပြုသည်။ -
အောက်ပါ code ဖြင့် ပုံကို Custom Vision ဆီသို့ ပို့ပါ။
image.seek(0)
results = predictor.classify_image(project_id, iteration_name, image)
ပုံကို အစမှ ပြန်လည် rewind လုပ်ပြီး၊ prediction client ကို ပို့သည်။
-
နောက်ဆုံးတွင် အောက်ပါ code ဖြင့် ရလဒ်များကို ပြပါ။
for prediction in results.predictions:
    print(f'{prediction.tag_name}:\t{prediction.probability * 100:.2f}%')
ပြန်လည်ရရှိသော prediction များအားလုံးကို loop လုပ်ပြီး terminal တွင် ပြသပါမည်။ ပြန်လည်ရရှိသော probabilities သည် 0-1 အတွင်းရှိ floating point numbers ဖြစ်ပြီး၊ 0 သည် tag နှင့် ကိုက်ညီမှု 0% ဖြစ်သည်ကို ဆိုလိုသည်၊ 1 သည် tag နှင့် ကိုက်ညီမှု 100% ဖြစ်သည်ကို ဆိုလိုသည်။
💁 ပုံအမျိုးအစားခွဲခြားသူများသည် အသုံးပြုထားသော tag အားလုံးအတွက် percentage များကို ပြန်လည်ပေးပါမည်။ ပုံသည် tag နှင့် ကိုက်ညီမှုရှိသည်ဟု ဆိုနိုင်သော probability ကို tag တစ်ခုစီအတွက် ရရှိပါမည်။
-
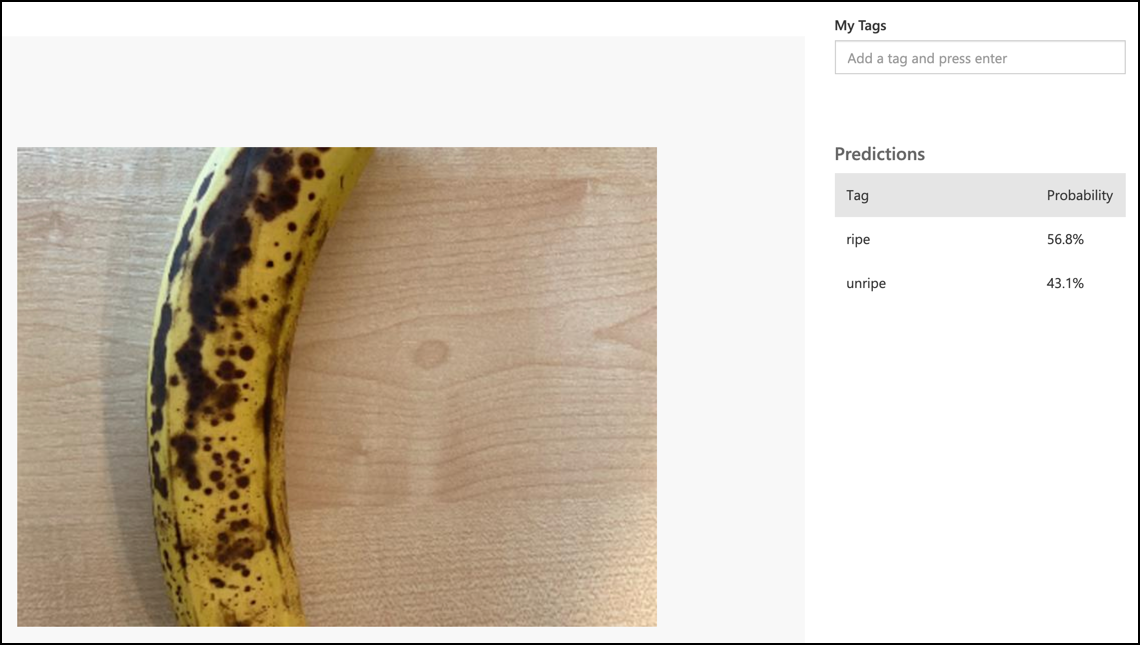
သင့် code ကို run လုပ်ပါ၊ သင့်ကင်မရာကို သစ်သီးများ၊ သို့မဟုတ် သင့် webcam တွင် သင့်လျော်သောပုံများ၊ သို့မဟုတ် သစ်သီးများကို မြင်နိုင်အောင် pointing လုပ်ပါ။ console တွင် output ကို မြင်နိုင်ပါမည်။
(.venv) ➜  fruit-quality-detector python app.py
ripe:   56.84%
unripe: 43.16%
ရိုက်ယူထားသောပုံကို မြင်နိုင်ပြီး၊ Custom Vision ၏ Predictions tab တွင် ဤတန်ဖိုးများကို မြင်နိုင်ပါမည်။
💁 ဤ code ကို code-classify/pi သို့မဟုတ် code-classify/virtual-iot-device ဖိုလ်ဒါတွင် ရှာနိုင်ပါသည်။
😀 သင့်သစ်သီးအရည်အသွေးခွဲခြားသူအစီအစဉ်သည် အောင်မြင်ခဲ့ပါသည်!
ဝက်ဘ်ဆိုက်မှတ်ချက်:
ဤစာရွက်စာတမ်းကို AI ဘာသာပြန်ဝန်ဆောင်မှု Co-op Translator ကို အသုံးပြု၍ ဘာသာပြန်ထားပါသည်။ ကျွန်ုပ်တို့သည် တိကျမှန်ကန်မှုအတွက် ကြိုးစားနေပါသော်လည်း၊ အလိုအလျောက်ဘာသာပြန်ဆိုမှုများတွင် အမှားများ သို့မဟုတ် မမှန်ကန်မှုများ ပါဝင်နိုင်သည်ကို ကျေးဇူးပြု၍ သတိပြုပါ။ မူရင်းစာရွက်စာတမ်းကို ၎င်း၏ မူလဘာသာစကားဖြင့် အာဏာတည်သောရင်းမြစ်အဖြစ် သတ်မှတ်ရန် လိုအပ်ပါသည်။ အရေးကြီးသော အချက်အလက်များအတွက် လူ့ဘာသာပြန်ပညာရှင်များမှ အတည်ပြုထားသော ဘာသာပြန်ဆိုမှုကို အသုံးပြုရန် အကြံပြုပါသည်။ ဤဘာသာပြန်ဆိုမှုကို အသုံးပြုခြင်းမှ ဖြစ်ပေါ်လာသော နားလည်မှုမှားများ သို့မဟုတ် အဓိပ္ပာယ်မှားများအတွက် ကျွန်ုပ်တို့သည် တာဝန်မယူပါ။