7.3 KiB
Measure temperature - Virtual IoT Hardware
In this part of the lesson, you will add a temperature sensor to your virtual IoT device.
Virtual Hardware
The virtual IoT device will use a simulated Grove Digital Humidity and Temperature sensor. This keeps this lab consistent with using a Raspberry Pi with a physical Grove DHT11 sensor.
The sensor combines a temperature sensor with a humidity sensor, but in this lab, you will focus only on the temperature sensor component. In a physical IoT device, the temperature sensor would be a thermistor, which measures temperature by detecting changes in resistance as the temperature changes. Temperature sensors are typically digital sensors that internally convert the measured resistance into a temperature in degrees Celsius (or Kelvin, or Fahrenheit).
Add the sensors to CounterFit
To use a virtual humidity and temperature sensor, you need to add the two sensors to the CounterFit app.
Task - Add the sensors to CounterFit
Add the humidity and temperature sensors to the CounterFit app.
-
Create a new Python app on your computer in a folder called
temperature-sensorwith a single file namedapp.py, set up a Python virtual environment, and add the CounterFit pip packages.⚠️ You can refer to the instructions for creating and setting up a CounterFit Python project in lesson 1 if needed.
-
Install an additional pip package to add a CounterFit shim for the DHT11 sensor. Make sure you install this from a terminal with the virtual environment activated.
pip install counterfit-shims-seeed-python-dht -
Ensure the CounterFit web app is running.
-
Create a humidity sensor:
-
In the Create sensor box in the Sensors pane, open the Sensor type dropdown and select Humidity.
-
Leave the Units set to Percentage.
-
Ensure the Pin is set to 5.
-
Click the Add button to create the humidity sensor on Pin 5.
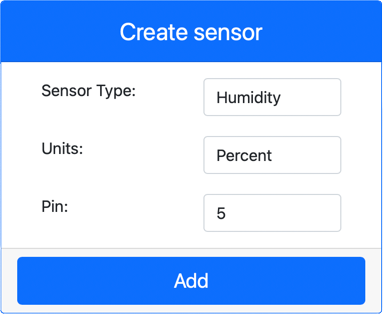
The humidity sensor will be created and appear in the sensors list.
-
-
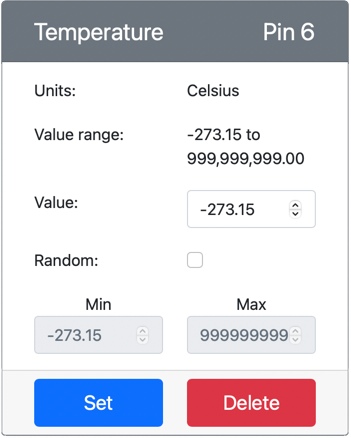
Create a temperature sensor:
-
In the Create sensor box in the Sensors pane, open the Sensor type dropdown and select Temperature.
-
Leave the Units set to Celsius.
-
Ensure the Pin is set to 6.
-
Click the Add button to create the temperature sensor on Pin 6.

The temperature sensor will be created and appear in the sensors list.
-
Program the temperature sensor app
The temperature sensor app can now be programmed using the CounterFit sensors.
Task - Program the temperature sensor app
Program the temperature sensor app.
-
Ensure the
temperature-sensorapp is open in VS Code. -
Open the
app.pyfile. -
Add the following code to the top of
app.pyto connect the app to CounterFit:from counterfit_connection import CounterFitConnection CounterFitConnection.init('127.0.0.1', 5000) -
Add the following code to the
app.pyfile to import the required libraries:import time from counterfit_shims_seeed_python_dht import DHTThe
from seeed_dht import DHTstatement imports theDHTsensor class to interact with a virtual Grove temperature sensor using a shim from thecounterfit_shims_seeed_python_dhtmodule. -
Add the following code after the code above to create an instance of the class that manages the virtual humidity and temperature sensor:
sensor = DHT("11", 5)This declares an instance of the
DHTclass that manages the virtual Digital Humidity and Temperature sensor. The first parameter specifies that the sensor being used is a virtual DHT11 sensor. The second parameter specifies that the sensor is connected to port5.💁 CounterFit simulates this combined humidity and temperature sensor by connecting to two sensors: a humidity sensor on the pin specified when the
DHTclass is created, and a temperature sensor that runs on the next pin. If the humidity sensor is on pin 5, the shim expects the temperature sensor to be on pin 6. -
Add an infinite loop after the code above to poll the temperature sensor value and print it to the console:
while True:
    _, temp = sensor.read()
    print(f'Temperature {temp}°C')
The call to
sensor.read()returns a tuple of humidity and temperature. You only need the temperature value, so the humidity is ignored. The temperature value is then printed to the console. -
Add a small sleep of ten seconds at the end of the
loopsince temperature levels don't need to be checked continuously. A sleep reduces the power consumption of the device.time.sleep(10) -
From the VS Code Terminal with an activated virtual environment, run the following to execute your Python app:
python app.py -
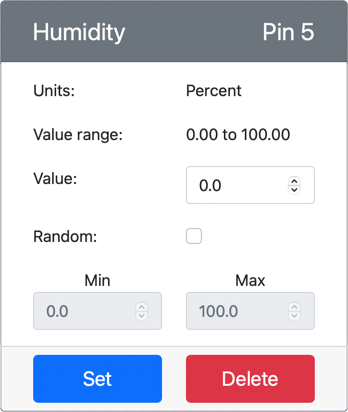
From the CounterFit app, change the value of the temperature sensor that will be read by the app. You can do this in one of two ways:
-
Enter a number in the Value box for the temperature sensor, then click the Set button. The number you enter will be the value returned by the sensor.
-
Check the Random checkbox, and enter a Min and Max value, then click the Set button. Every time the sensor reads a value, it will read a random number between Min and Max.
You should see the values you set appearing in the console. Change the Value or the Random settings to see the value change.
(.venv) ➜ temperature-sensor python app.py Temperature 28.25°C Temperature 30.71°C Temperature 25.17°C -
💁 You can find this code in the code-temperature/virtual-device folder.
😀 Your temperature sensor program was a success!
Disclaimer:
This document has been translated using the AI translation service Co-op Translator. While we aim for accuracy, please note that automated translations may include errors or inaccuracies. The original document in its native language should be regarded as the authoritative source. For critical information, professional human translation is advised. We are not responsible for any misunderstandings or misinterpretations resulting from the use of this translation.