|
|
# 一、商品上架功能
|
|
|
|
|
|
在线笔记:https://dpb-bobokaoya-sm.blog.csdn.net/
|
|
|
|
|
|
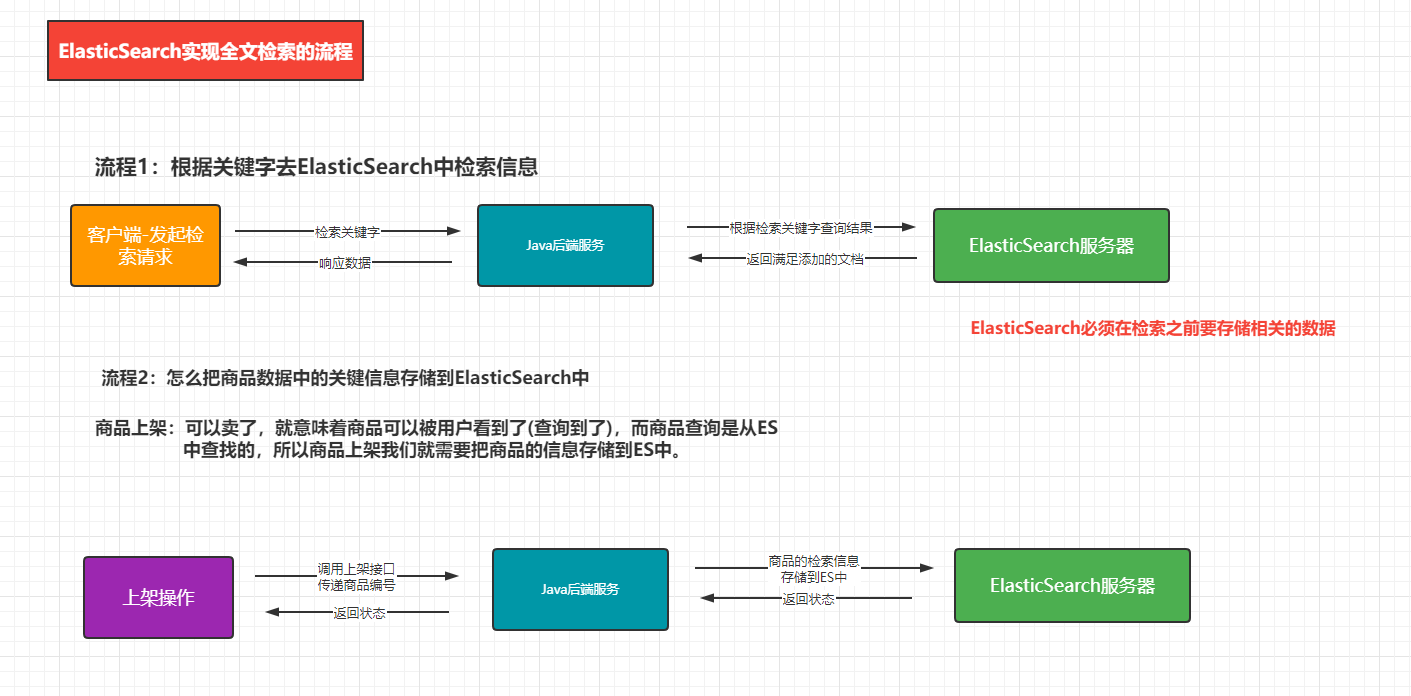
ElasticSearch实现商城系统中全文检索的流程。
|
|
|
|
|
|
|
|
|
|
|
|
## 1.商品ES模型
|
|
|
|
|
|
商品的映射关系
|
|
|
|
|
|
```json
|
|
|
PUT product
|
|
|
{
|
|
|
"mappings": {
|
|
|
"properties": {
|
|
|
"skuId": {
|
|
|
"type": "long"
|
|
|
},
|
|
|
"spuId": {
|
|
|
"type": "keyword"
|
|
|
},
|
|
|
"skuTitle": {
|
|
|
"type": "text",
|
|
|
"analyzer": "ik_smart"
|
|
|
},
|
|
|
"skuPrice": {
|
|
|
"type": "keyword"
|
|
|
},
|
|
|
"skuImg": {
|
|
|
"type": "keyword",
|
|
|
"index": "false",
|
|
|
"doc_values": "false"
|
|
|
},
|
|
|
"saleCount": {
|
|
|
"type": "long"
|
|
|
},
|
|
|
"hasStock": {
|
|
|
"type": "boolean"
|
|
|
},
|
|
|
"hotScore": {
|
|
|
"type": "long"
|
|
|
},
|
|
|
"brandId": {
|
|
|
"type": "long"
|
|
|
},
|
|
|
"catalogId": {
|
|
|
"type": "long"
|
|
|
},
|
|
|
"brandName": {
|
|
|
"type": "keyword",
|
|
|
"index": "false",
|
|
|
"doc_values": "false"
|
|
|
},
|
|
|
"brandImg": {
|
|
|
"type": "keyword",
|
|
|
"index": "false",
|
|
|
"doc_values": "false"
|
|
|
},
|
|
|
"catalogName": {
|
|
|
"type": "keyword",
|
|
|
"index": "false",
|
|
|
"doc_values": "false"
|
|
|
},
|
|
|
"attrs": {
|
|
|
"type": "nested",
|
|
|
"properties": {
|
|
|
"attrId": {
|
|
|
"type": "long"
|
|
|
},
|
|
|
"attrName": {
|
|
|
"type": "keyword",
|
|
|
"index": "false",
|
|
|
"doc_values": "false"
|
|
|
},
|
|
|
"attrValue": {
|
|
|
"type": "keyword"
|
|
|
}
|
|
|
}
|
|
|
}
|
|
|
}
|
|
|
}
|
|
|
}
|
|
|
|
|
|
```
|
|
|
|
|
|
## 2.netsted数据类型
|
|
|
|
|
|
参考官网地址:https://www.elastic.co/guide/en/elasticsearch/reference/7.4/nested.html
|
|
|
|
|
|
在线笔记:https://dpb-bobokaoya-sm.blog.csdn.net/
|
|
|
|
|
|
## 3.实现上架功能
|
|
|
|
|
|
### 3.1 创建ESModel
|
|
|
|
|
|
点击上架功能传递spuId到后台,我们需要根据SpuID查询对应的信息,然后封装到自定义的Model对象中,然后将该对象传递给mall-search服务,所以我们需要先定义这样一个Model对象
|
|
|
|
|
|
```java
|
|
|
@Data
|
|
|
public class SkuESModel {
|
|
|
private Long skuId;
|
|
|
private Long spuId;
|
|
|
private String subTitle;
|
|
|
private BigDecimal skuPrice;
|
|
|
private String skuImg;
|
|
|
private Long saleCount;
|
|
|
private Boolean hasStock;
|
|
|
private Long hotScore;
|
|
|
private Long brandId;
|
|
|
private Long catalogId;
|
|
|
private String brandName;
|
|
|
private String brandImg;
|
|
|
private String catalogName;
|
|
|
private List<Attrs> attrs;
|
|
|
|
|
|
@Data
|
|
|
public static class Attrs{
|
|
|
private Long attrId;
|
|
|
private String attrName;
|
|
|
private String attrValue;
|
|
|
}
|
|
|
|
|
|
}
|
|
|
```
|
|
|
|
|
|
### 3.2 上架逻辑实现
|
|
|
|
|
|
```java
|
|
|
/**
|
|
|
* 实现商品上架--》商品相关数据存储到ElasticSearch中
|
|
|
* 1.根据SpuID查询出相关的信息
|
|
|
* 封装到对应的对象中
|
|
|
* 2.将封装的数据存储到ElasticSearch中--》调用mall-search的远程接口
|
|
|
* 3.更新SpuID对应的状态--》上架
|
|
|
*
|
|
|
* @param spuId
|
|
|
*/
|
|
|
@Override
|
|
|
public void up(Long spuId) {
|
|
|
// 1.根据spuId查询相关的信息 封装到SkuESModel对象中
|
|
|
List<SkuESModel> skuEs = new ArrayList<>();
|
|
|
// 根据spuID找到对应的SKU信息
|
|
|
List<SkuInfoEntity> skus = skuInfoService.getSkusBySpuId(spuId);
|
|
|
|
|
|
// 对应的规格参数 根据spuId来查询规格参数信息
|
|
|
List<SkuESModel.Attrs> attrsModel = getAttrsModel(spuId);
|
|
|
// 需要根据所有的skuId获取对应的库存信息---》远程调用
|
|
|
List<Long> skuIds = skus.stream().map(sku -> {
|
|
|
return sku.getSkuId();
|
|
|
}).collect(Collectors.toList());
|
|
|
Map<Long, Boolean> skusHasStockMap = getSkusHasStock(skuIds);
|
|
|
// 2.远程调用mall-search的服务,将SukESModel中的数据存储到ES中
|
|
|
List<SkuESModel> skuESModels = skus.stream().map(item -> {
|
|
|
SkuESModel model = new SkuESModel();
|
|
|
// 先实现属性的复制
|
|
|
BeanUtils.copyProperties(item,model);
|
|
|
model.setSubTitle(item.getSkuTitle());
|
|
|
model.setSkuPrice(item.getPrice());
|
|
|
|
|
|
// hasStock 是否有库存 --》 库存系统查询 一次远程调用获取所有的skuId对应的库存信息
|
|
|
if(skusHasStockMap == null){
|
|
|
model.setHasStock(true);
|
|
|
}else{
|
|
|
model.setHasStock(skusHasStockMap.get(item.getSkuId()));
|
|
|
}
|
|
|
// hotScore 热度分 --> 默认给0即可
|
|
|
model.setHotScore(0l);
|
|
|
// 品牌和类型的名称
|
|
|
BrandEntity brand = brandService.getById(item.getBrandId());
|
|
|
CategoryEntity category = categoryService.getById(item.getCatalogId());
|
|
|
model.setBrandName(brand.getName());
|
|
|
model.setBrandImg(brand.getLogo());
|
|
|
model.setCatalogName(category.getName());
|
|
|
// 需要存储的规格数据
|
|
|
model.setAttrs(attrsModel);
|
|
|
|
|
|
return model;
|
|
|
}).collect(Collectors.toList());
|
|
|
// 将SkuESModel中的数据存储到ES中
|
|
|
R r = searchFeginService.productStatusUp(skuESModels);
|
|
|
// 3.更新SPUID对应的状态
|
|
|
// 根据对应的状态更新商品的状态
|
|
|
log.info("----->ES操作完成:{}" ,r.getCode());
|
|
|
System.out.println("-------------->"+r.getCode());
|
|
|
if(r.getCode() == 0){
|
|
|
// 远程调用成功 更新商品的状态为 上架
|
|
|
baseMapper.updateSpuStatusUp(spuId, ProductConstant.StatusEnum.SPU_UP.getCode());
|
|
|
}else{
|
|
|
// 远程调用失败
|
|
|
}
|
|
|
}
|
|
|
```
|
|
|
|
|
|
# 二、三级分类数据
|
|
|
|
|
|
## 1.一级分类的数据
|
|
|
|
|
|
加载商城首页的时候就需要获取一级分类的数据
|
|
|
|
|
|
```java
|
|
|
@GetMapping({"/","/index.html","/home","/home.html"})
|
|
|
public String index(Model model){
|
|
|
// 查询出所有的一级分类的信息
|
|
|
List<CategoryEntity> list = categoryService.getLeve1Category();
|
|
|
model.addAttribute("categorys",list);
|
|
|
// classPath:/templates/
|
|
|
// .html
|
|
|
return "index";
|
|
|
}
|
|
|
```
|
|
|
|
|
|
在Service中的实现
|
|
|
|
|
|
```java
|
|
|
/**
|
|
|
* 查询出所有的商品大类(一级分类)
|
|
|
* @return
|
|
|
*/
|
|
|
@Override
|
|
|
public List<CategoryEntity> getLeve1Category() {
|
|
|
List<CategoryEntity> list = baseMapper.queryLeve1Category();
|
|
|
return list;
|
|
|
}
|
|
|
```
|
|
|
|
|
|
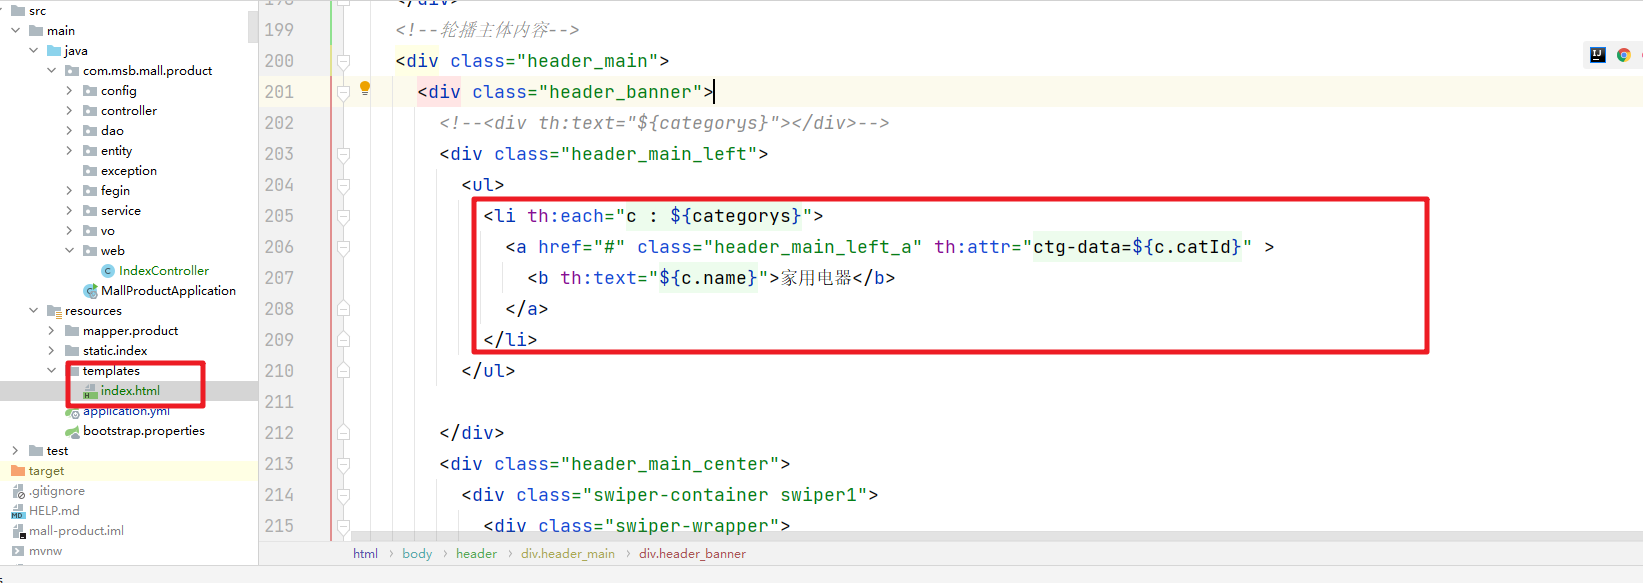
然后在index.html中处理
|
|
|
|
|
|
|
|
|
|
|
|
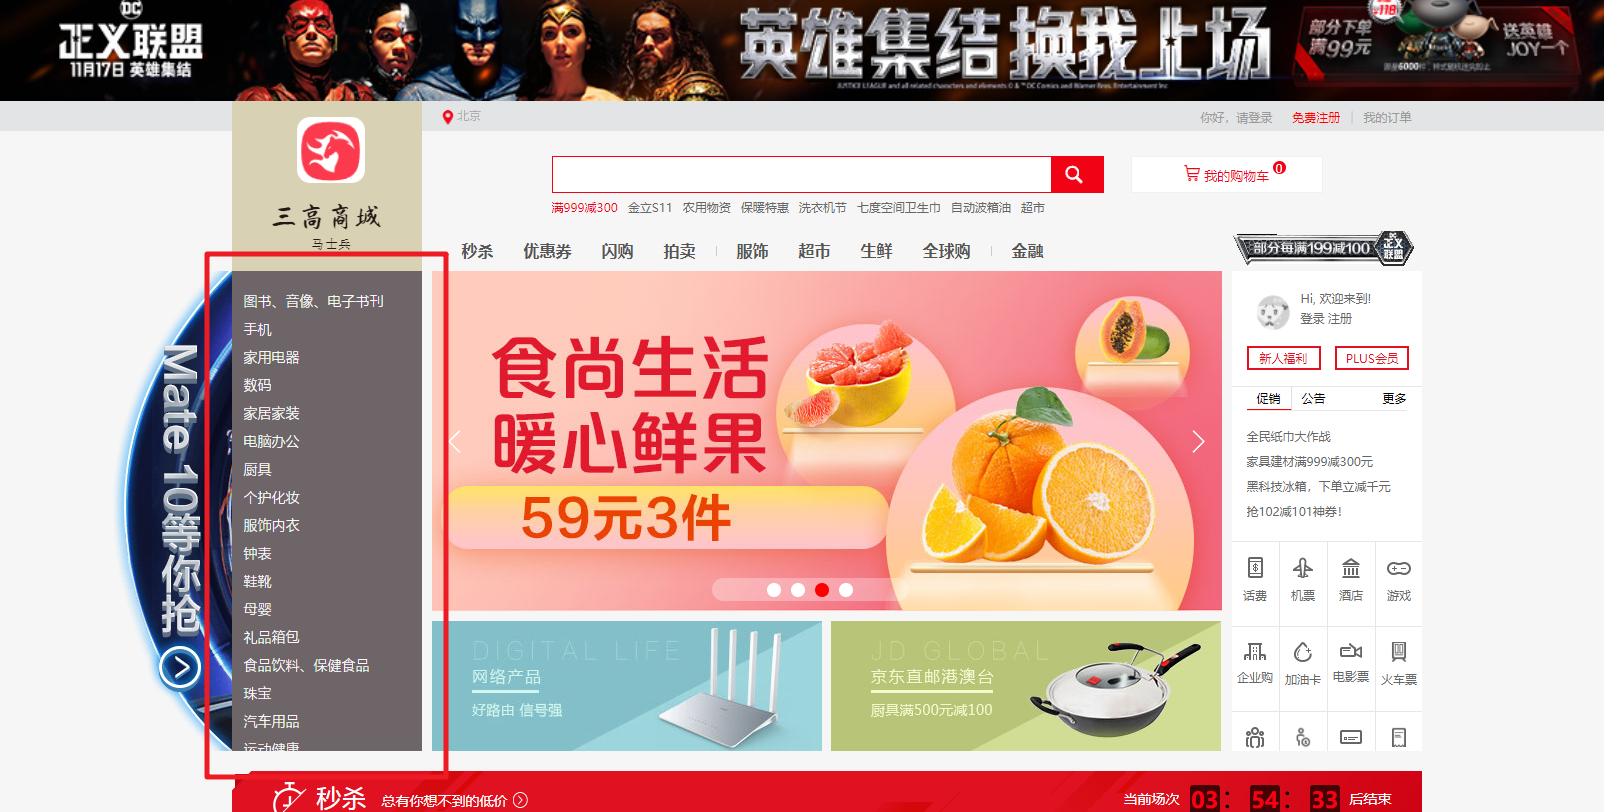
然后访问页面的效果
|
|
|
|
|
|
|
|
|
|
|
|
## 2.二三级分类数据
|
|
|
|
|
|
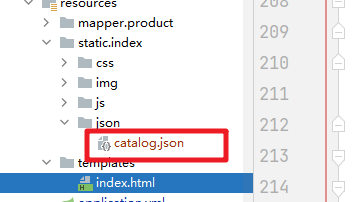
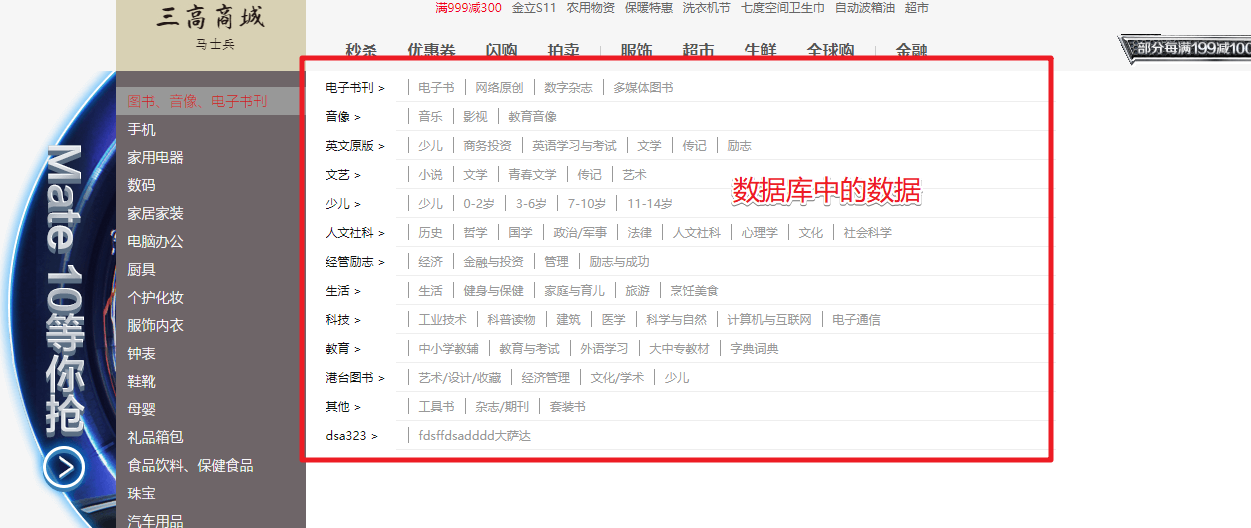
在默认的情况下其实加载的是写死的JSON文件
|
|
|
|
|
|
|
|
|
|
|
|
结合这个文件我们创建了对应的VO对象来封装对应的数据
|
|
|
|
|
|
```java
|
|
|
package com.msb.mall.product.vo;
|
|
|
|
|
|
import lombok.AllArgsConstructor;
|
|
|
import lombok.Data;
|
|
|
import lombok.NoArgsConstructor;
|
|
|
|
|
|
import java.util.List;
|
|
|
|
|
|
/**
|
|
|
* 二级分类需要展示的数据VO
|
|
|
*/
|
|
|
@NoArgsConstructor
|
|
|
@AllArgsConstructor
|
|
|
@Data
|
|
|
public class Catalog2VO {
|
|
|
|
|
|
private String catalog1Id; // 二级分类对应的一级父类的编号
|
|
|
private List<Catalog3VO> catalog3List; // 二级分类对应的三级分类的数据
|
|
|
private String id; // 二级分类的编号
|
|
|
private String name ; // 二级分类对应的类别名称
|
|
|
|
|
|
|
|
|
/**
|
|
|
* 三级分类
|
|
|
*/
|
|
|
@NoArgsConstructor
|
|
|
@AllArgsConstructor
|
|
|
@Data
|
|
|
public static class Catalog3VO{
|
|
|
|
|
|
private String catalog2Id ; // 三级分类对应的二级分类的编号
|
|
|
private String id; // 三级分类编号
|
|
|
private String name; // 三级分类名称
|
|
|
|
|
|
}
|
|
|
}
|
|
|
|
|
|
```
|
|
|
|
|
|
然后我们在服务端查询对应的数据
|
|
|
|
|
|
```java
|
|
|
@ResponseBody
|
|
|
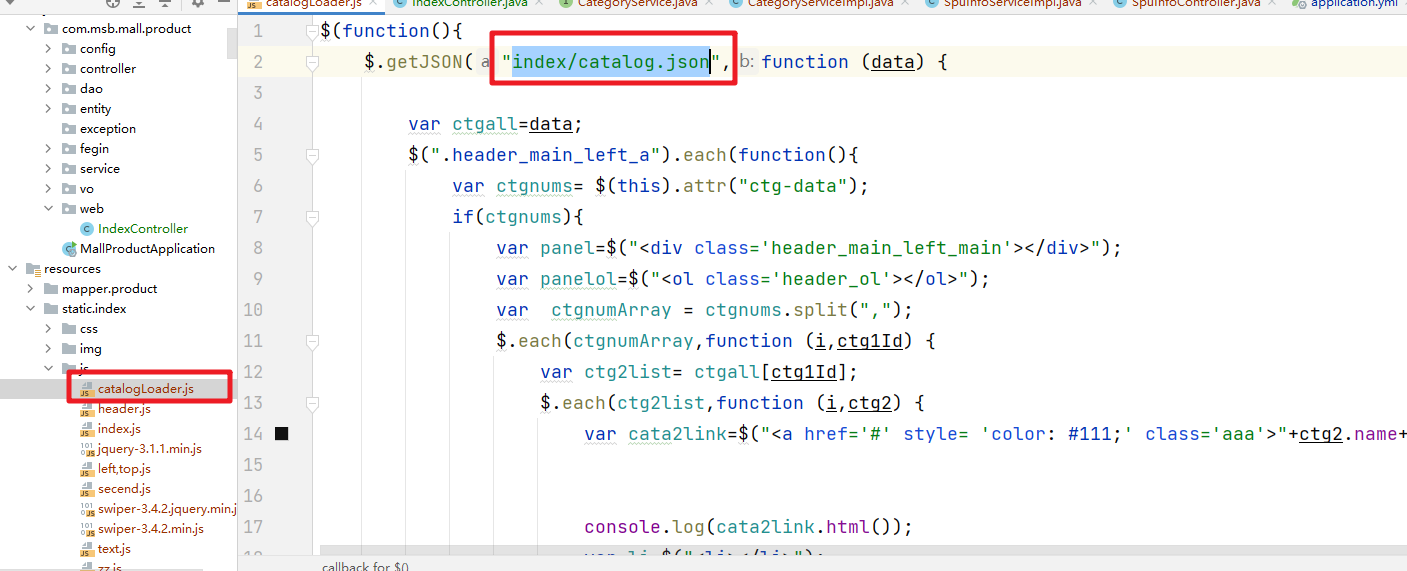
@RequestMapping("/index/catalog.json")
|
|
|
public Map<String, List<Catalog2VO>> getCatalog2JSON(){
|
|
|
Map<String, List<Catalog2VO>> map = categoryService.getCatelog2JSON();
|
|
|
return map;
|
|
|
}
|
|
|
```
|
|
|
|
|
|
然后在service中完成对应的逻辑
|
|
|
|
|
|
```java
|
|
|
/**
|
|
|
* 查询出所有的二级和三级分类的数据
|
|
|
* 并封装为Map<String, Catalog2VO>对象
|
|
|
* @return
|
|
|
*/
|
|
|
@Override
|
|
|
public Map<String, List<Catalog2VO>> getCatelog2JSON() {
|
|
|
// 获取所有的一级分类的数据
|
|
|
List<CategoryEntity> leve1Category = this.getLeve1Category();
|
|
|
// 把一级分类的数据转换为Map容器 key就是一级分类的编号, value就是一级分类对应的二级分类的数据
|
|
|
Map<String, List<Catalog2VO>> map = leve1Category.stream().collect(Collectors.toMap(
|
|
|
key -> key.getCatId().toString()
|
|
|
, value -> {
|
|
|
// 根据一级分类的编号,查询出对应的二级分类的数据
|
|
|
List<CategoryEntity> l2Catalogs = baseMapper
|
|
|
.selectList(new QueryWrapper<CategoryEntity>().eq("parent_cid", value.getCatId()));
|
|
|
List<Catalog2VO> Catalog2VOs =null;
|
|
|
if(l2Catalogs != null){
|
|
|
Catalog2VOs = l2Catalogs.stream().map(l2 -> {
|
|
|
// 需要把查询出来的二级分类的数据填充到对应的Catelog2VO中
|
|
|
Catalog2VO catalog2VO = new Catalog2VO(l2.getParentCid().toString(), null, l2.getCatId().toString(), l2.getName());
|
|
|
// 根据二级分类的数据找到对应的三级分类的信息
|
|
|
List<CategoryEntity> l3Catelogs = baseMapper.selectList(new QueryWrapper<CategoryEntity>().eq("parent_cid", catalog2VO.getId()));
|
|
|
if(l3Catelogs != null){
|
|
|
// 获取到的二级分类对应的三级分类的数据
|
|
|
List<Catalog2VO.Catalog3VO> catalog3VOS = l3Catelogs.stream().map(l3 -> {
|
|
|
Catalog2VO.Catalog3VO catalog3VO = new Catalog2VO.Catalog3VO(l3.getParentCid().toString(), l3.getCatId().toString(), l3.getName());
|
|
|
return catalog3VO;
|
|
|
}).collect(Collectors.toList());
|
|
|
// 三级分类关联二级分类
|
|
|
catalog2VO.setCatalog3List(catalog3VOS);
|
|
|
}
|
|
|
return catalog2VO;
|
|
|
}).collect(Collectors.toList());
|
|
|
}
|
|
|
|
|
|
return Catalog2VOs;
|
|
|
}
|
|
|
));
|
|
|
return map;
|
|
|
}
|
|
|
```
|
|
|
|
|
|
修改js中的访问路径
|
|
|
|
|
|
|
|
|
|
|
|
然后访问即可
|
|
|
|
|
|
|
|
|
|
|
|
# 三、Nginx域名
|
|
|
|
|
|
## 1.hosts文件
|
|
|
|
|
|
在c:/window/system32/drivers/etc/hosts文件,我们在这个文件中添加
|
|
|
|
|
|
```hosts
|
|
|
192.168.56.100 msb.mall.com
|
|
|
```
|
|
|
|
|
|
注意如果是没有操作权限,那么点击该文件右击属性,去掉只读属性即可
|
|
|
|
|
|
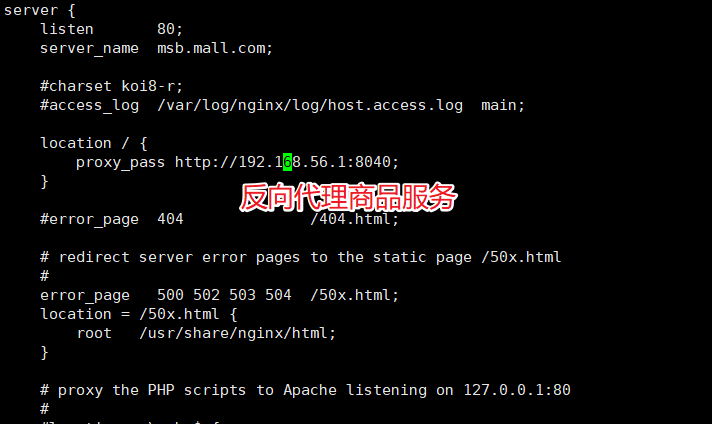
通过这个域名访问到Nginx服务
|
|
|
|
|
|
## 2.Nginx的方向代理
|
|
|
|
|
|

|
|
|
|
|
|
|
|
|
|
|
|
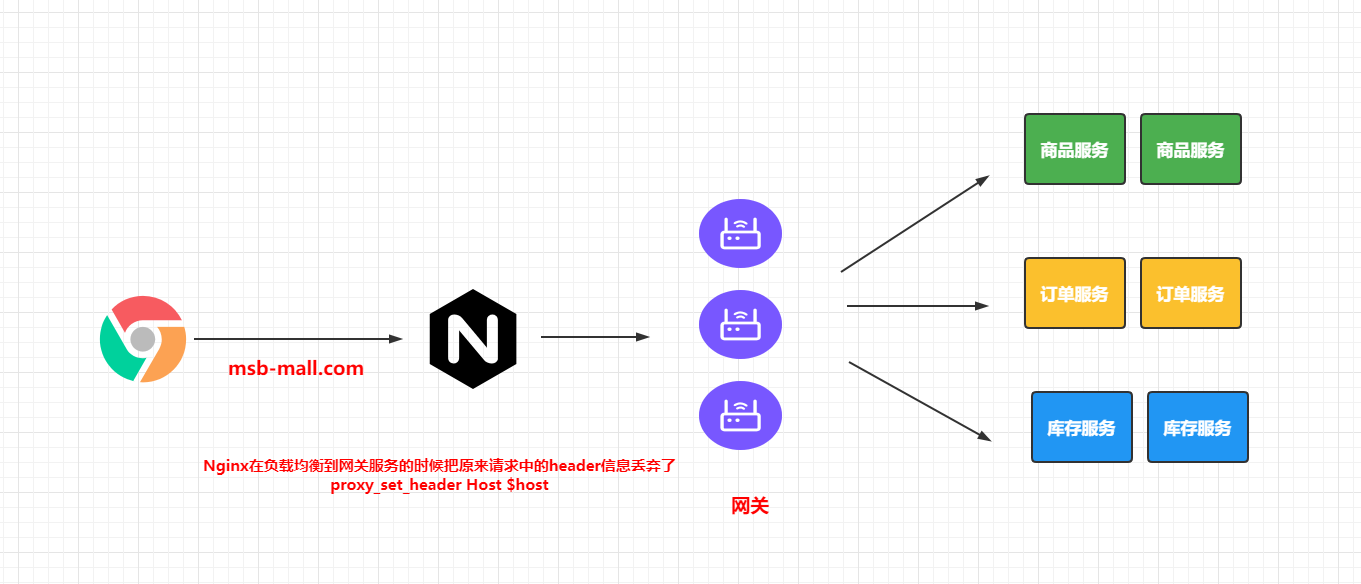
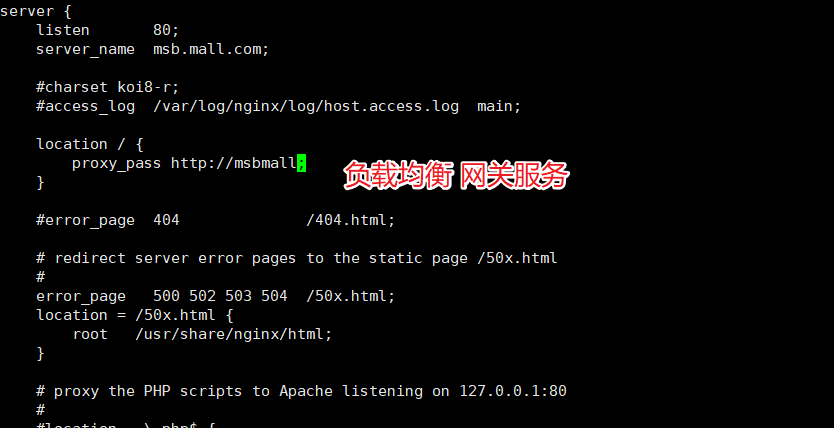
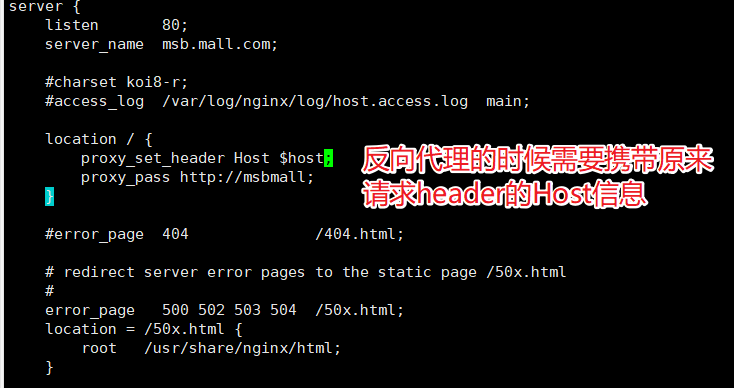
## 3.Nginx的负载均衡
|
|
|
|
|
|
|
|
|
|
|
|
|
|
|
|
|
|
|
|
|
|
|
|
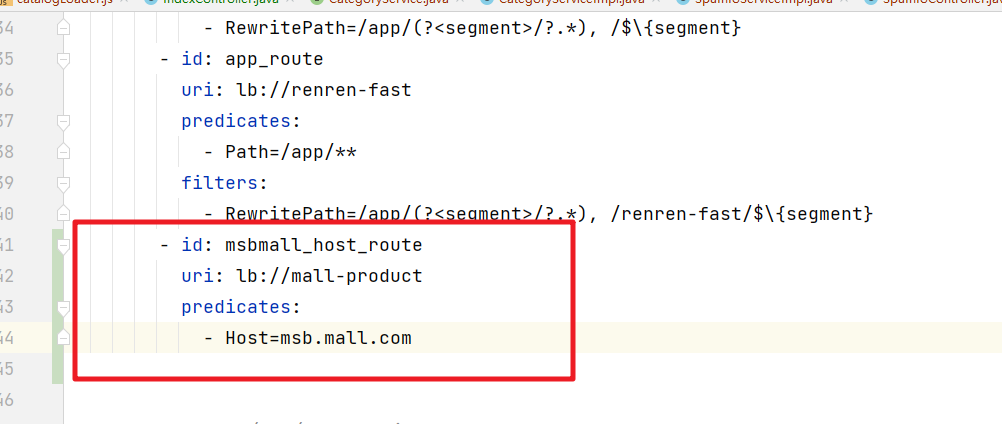
对应的需要修改网关的配置
|
|
|
|
|
|
|
|
|
|
|
|
然后即可通过域名来访问商城的首页
|
|
|
|
|
|

|