|
|
# 项目环境准备
|
|
|
|
|
|
在线笔记:https://dpb-bobokaoya-sm.blog.csdn.net/
|
|
|
|
|
|
## 1.虚拟机环境
|
|
|
|
|
|
我们可以通过VMWare来安装,但是通过VMWare安装大家经常会碰到网络ip连接问题,为了减少额外的环境因素影响,Docker内容的讲解我们会通过VirtualBox结合Vagrant来安装虚拟机。
|
|
|
|
|
|
VirtualBox官网:[https://www.virtualbox.org/](https://www.virtualbox.org/)
|
|
|
|
|
|
Vagrant官网:[https://www.vagrantup.com/](https://www.vagrantup.com/)
|
|
|
|
|
|
Vagrant镜像仓库:[https://app.vagrantup.com/boxes/search](https://app.vagrantup.com/boxes/search)
|
|
|
|
|
|
安装VirtualBox和Vagrant,傻瓜式安装。安装完成后需要重启计算机。
|
|
|
|
|
|
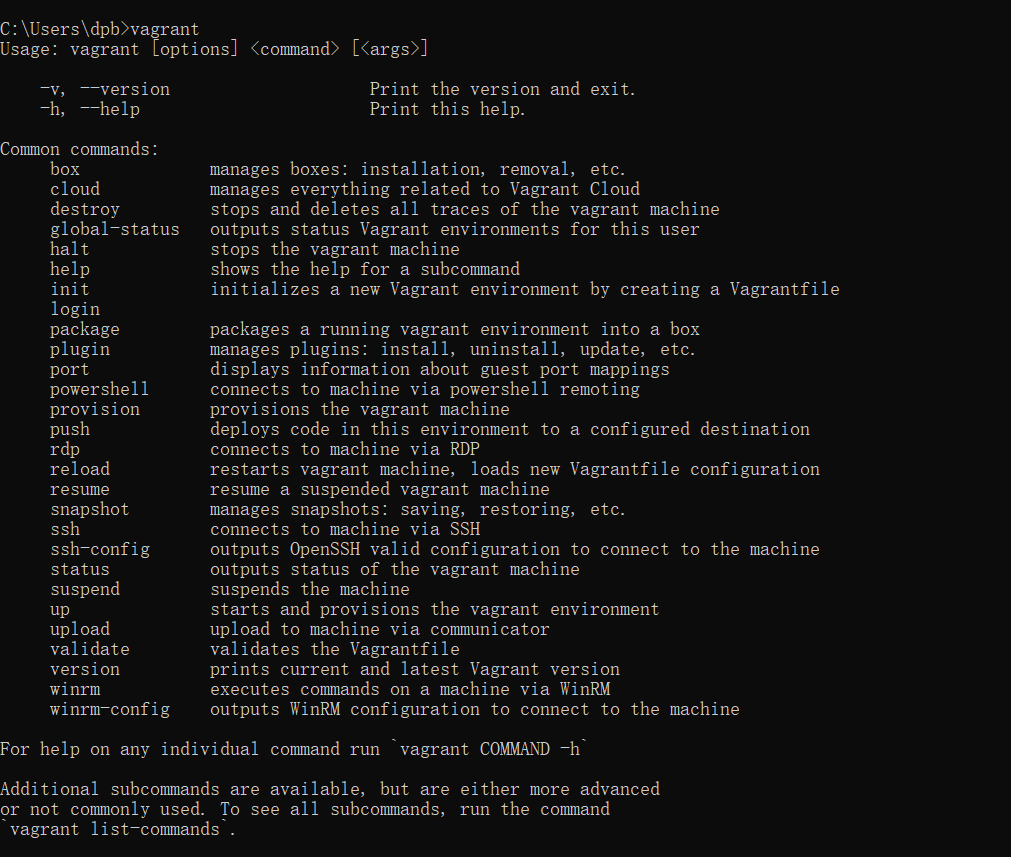
在cmd命令窗口输入 `vagrant` 命令弹出如下内容表示 `vagrant` 安装成功
|
|
|
|
|
|
|
|
|
|
|
|
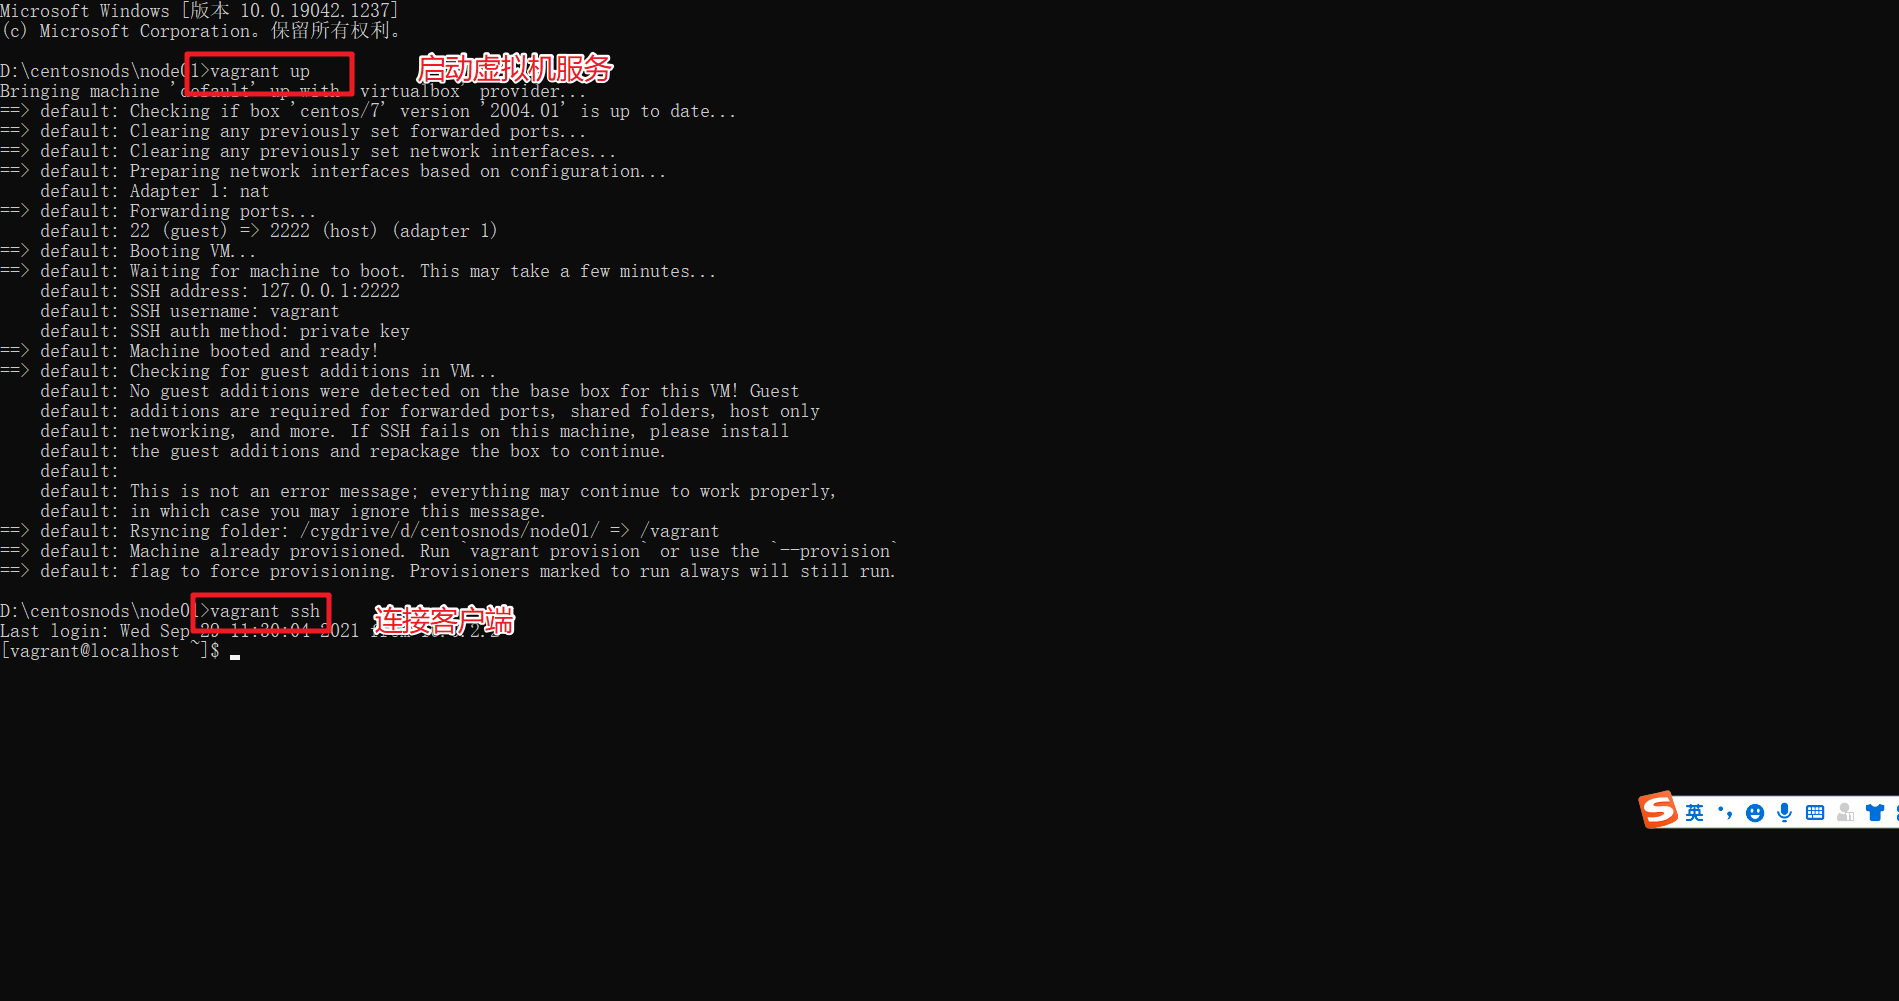
通过Vagrant安装虚拟机:
|
|
|
|
|
|
* 创建一个空的目录,cmd切换到该目录中,然后执行 `vagrant init centos/7` 会创建Vagrantfile文件
|
|
|
* 执行 `vagrant up` 第一次执行的时候会远程下相关的镜像文件,并启动虚拟机。
|
|
|
* 连接虚拟机通过 `vagrant ssh` 连接
|
|
|
|
|
|
|
|
|
|
|
|
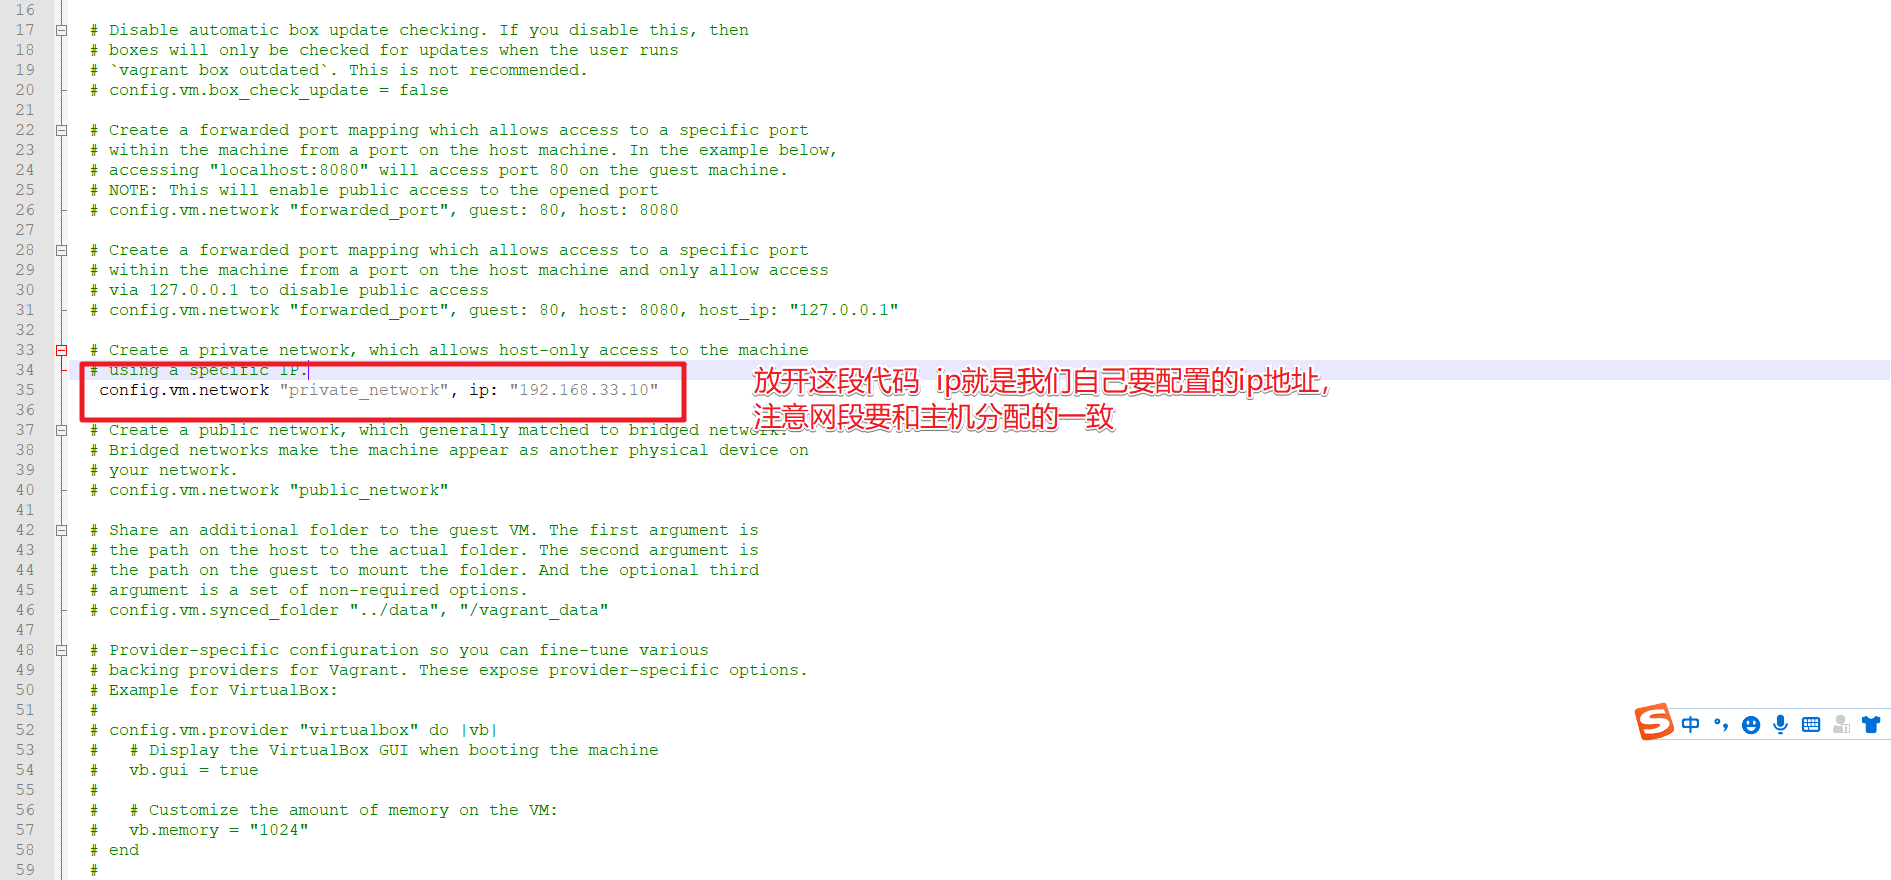
**网络配置**:
|
|
|
|
|
|
找到对应的Vagrantfile文件
|
|
|
|
|
|
|
|
|
|
|
|
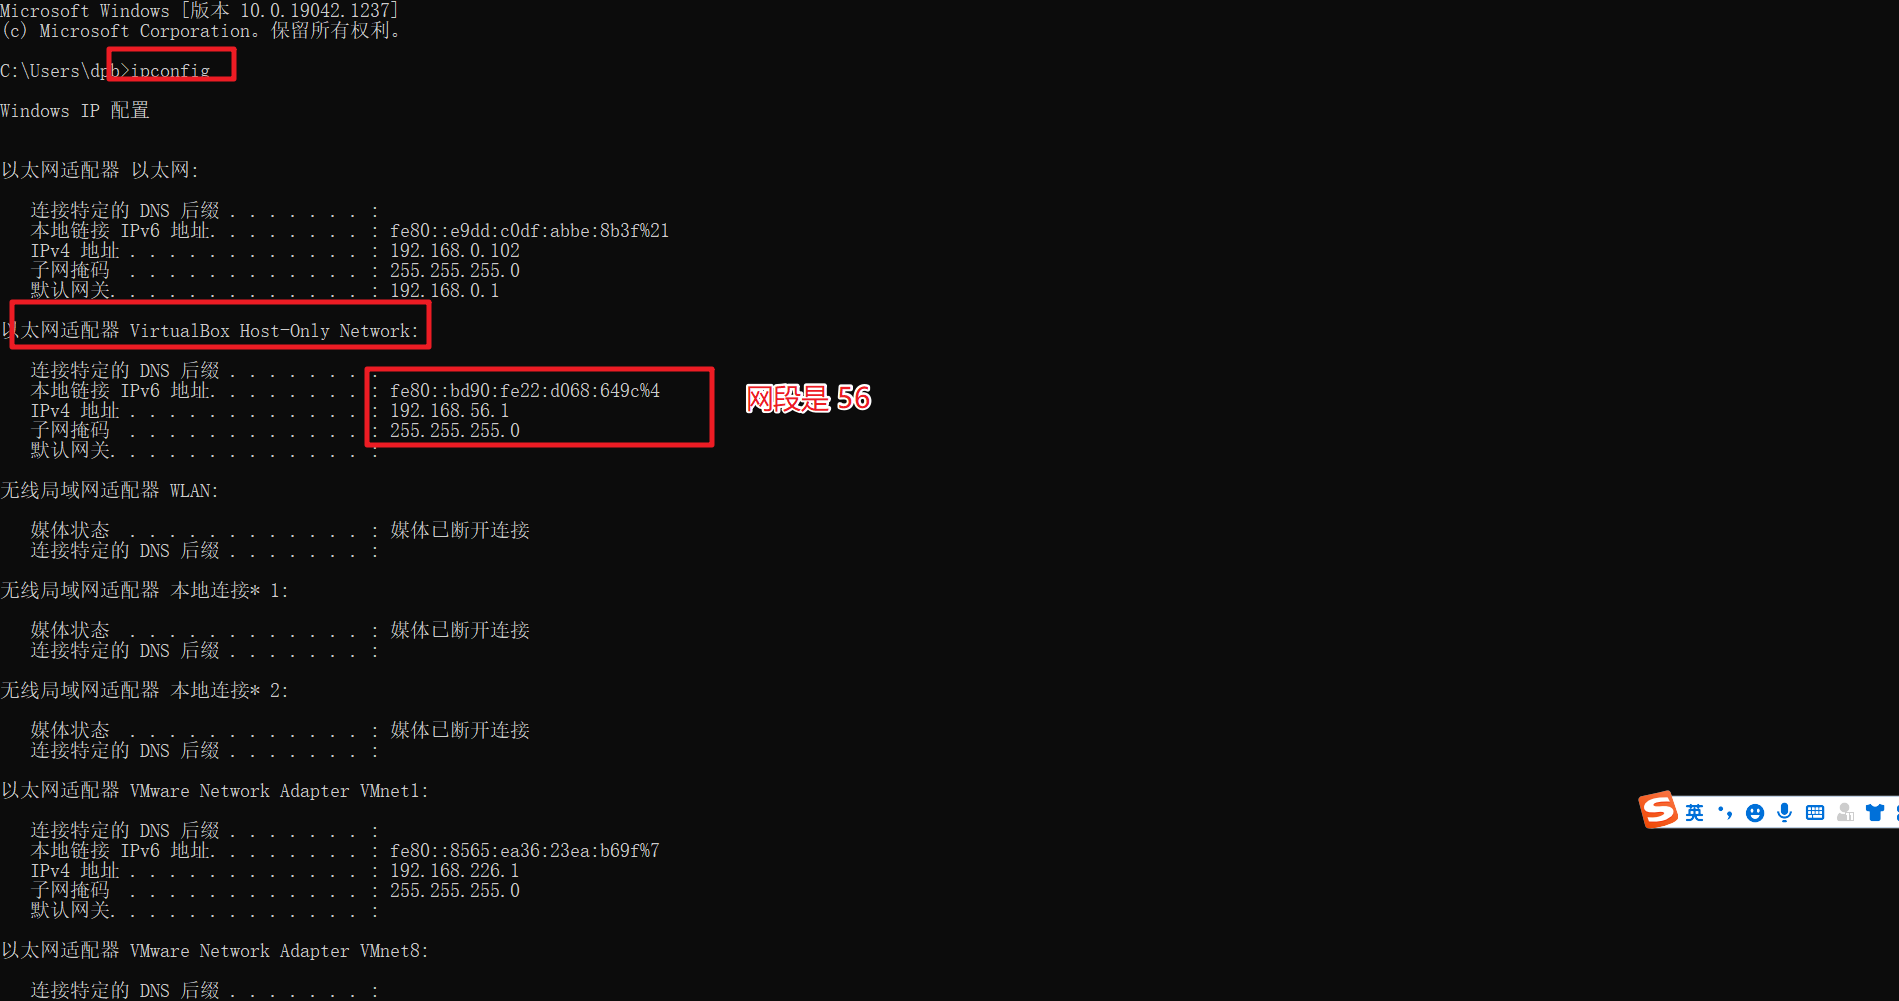
查看当前主机给虚拟机分配的网关的网段:
|
|
|
|
|
|
|
|
|
|
|
|
所以修改后的ip为:192.168.56.10
|
|
|
|
|
|
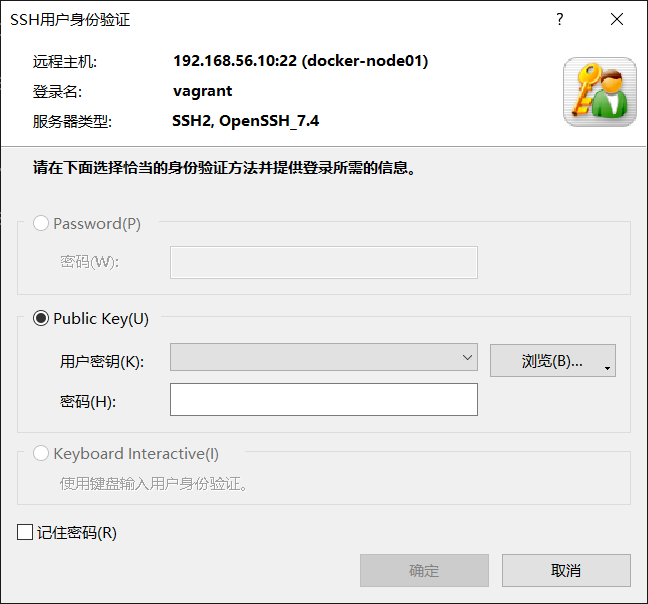
重启测试:需要提供私钥
|
|
|
|
|
|
|
|
|
|
|
|
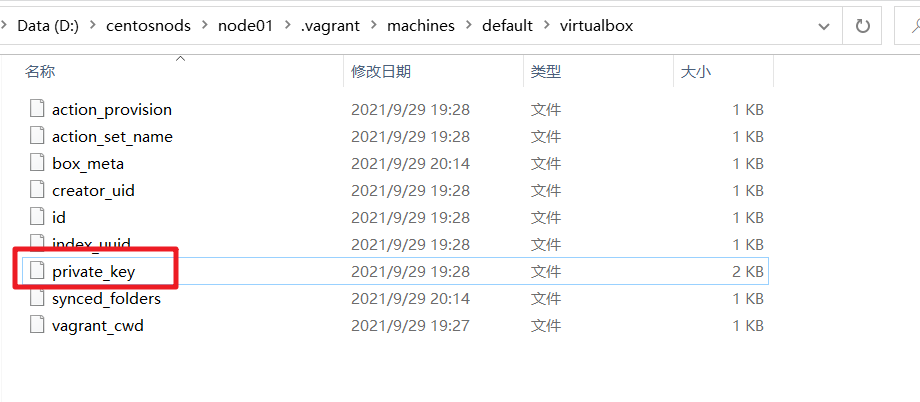
私钥地址:
|
|
|
|
|
|
|
|
|
|
|
|
搞定
|
|
|
|
|
|
## 2.Docker环境
|
|
|
|
|
|
|
|
|
|
|
|
参考官方文档安装:[https://docs.docker.com/engine/install/centos/](https://docs.docker.com/engine/install/centos/)
|
|
|
|
|
|
卸载原有的环境:
|
|
|
|
|
|
```
|
|
|
sudo yum remove docker \
|
|
|
docker-client \
|
|
|
docker-client-latest \
|
|
|
docker-common \
|
|
|
docker-latest \
|
|
|
docker-latest-logrotate \
|
|
|
docker-logrotate \
|
|
|
docker-engine
|
|
|
```
|
|
|
|
|
|
安装对应的依赖环境和镜像地址
|
|
|
|
|
|
```
|
|
|
sudo yum install -y yum-utils
|
|
|
sudo yum-config-manager \
|
|
|
--add-repo \
|
|
|
https://download.docker.com/linux/centos/docker-ce.repo
|
|
|
```
|
|
|
|
|
|
安装过慢设置镜像
|
|
|
|
|
|
```
|
|
|
yum-config-manager --add-repo http://mirrors.aliyun.com/docker-ce/linux/centos/docker-ce.repo
|
|
|
```
|
|
|
|
|
|
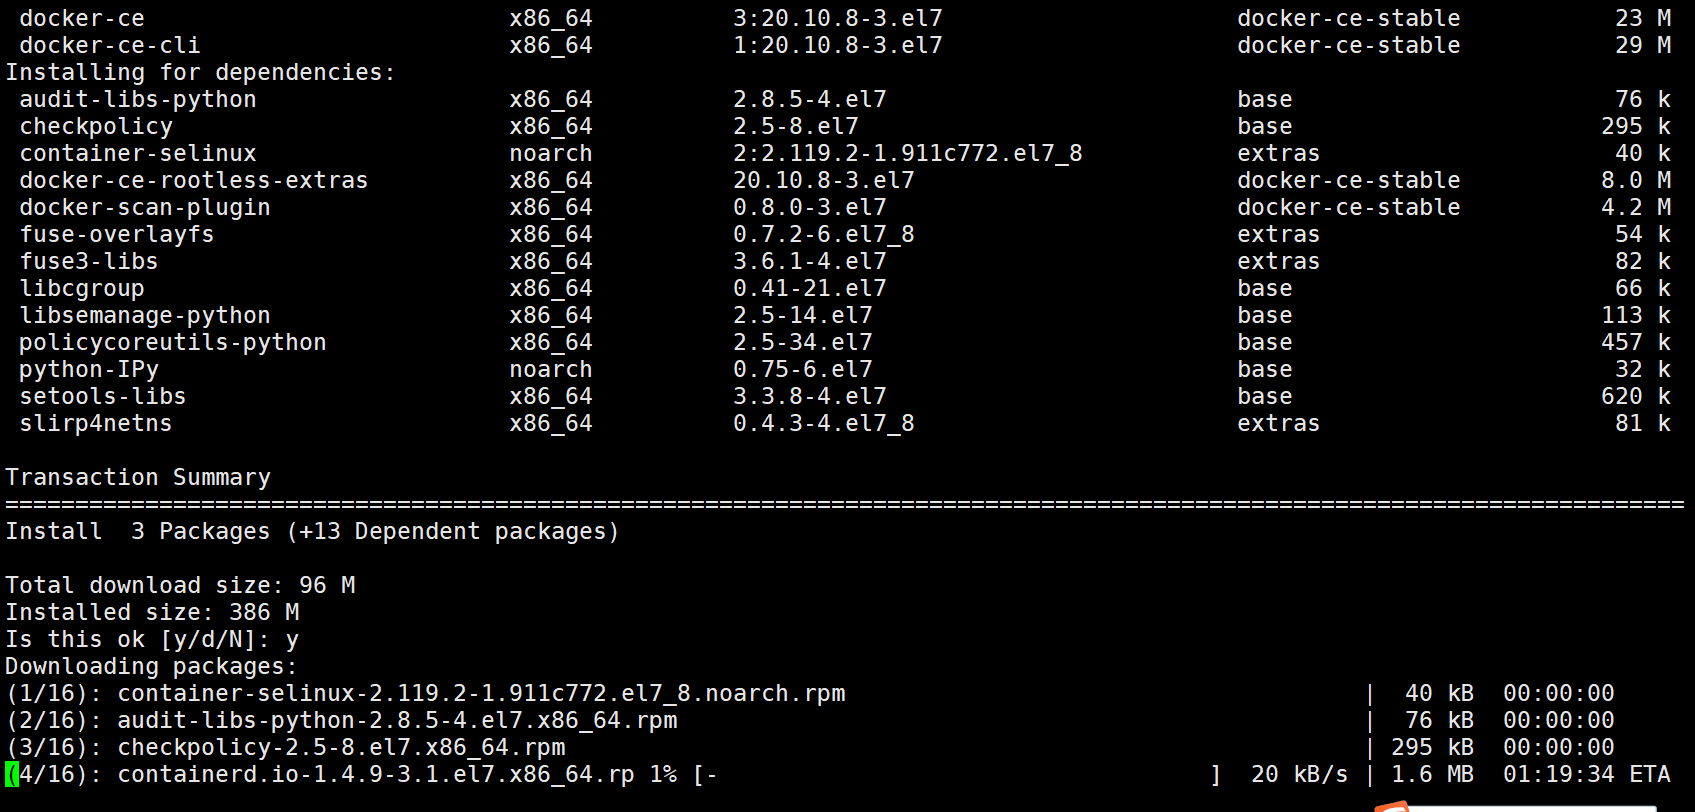
直接安装docker CE
|
|
|
|
|
|
```
|
|
|
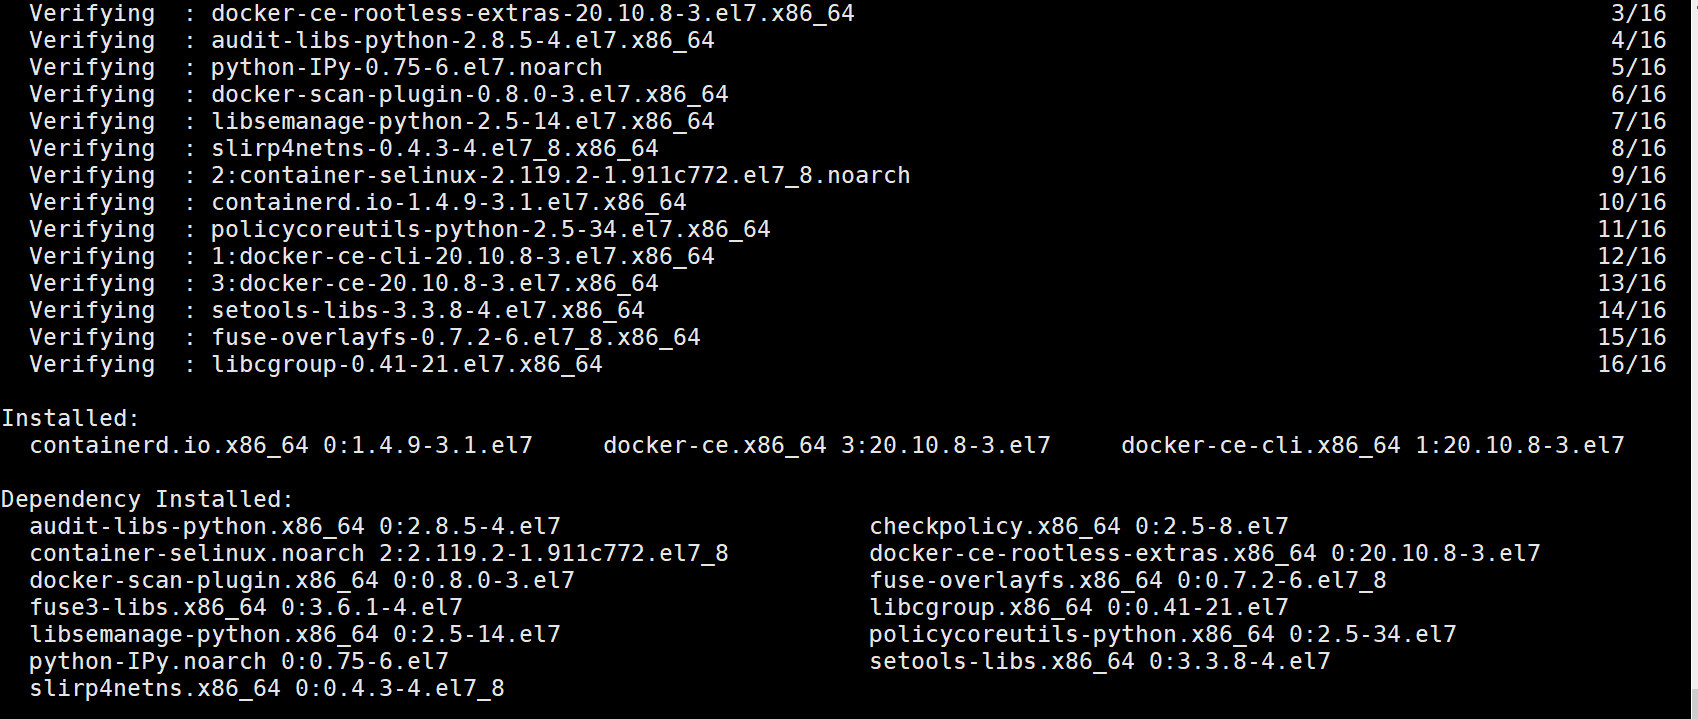
sudo yum install -y docker-ce docker-ce-cli containerd.io
|
|
|
```
|
|
|
|
|
|
|
|
|
|
|
|
|
|
|
|
|
|
表示安装成功
|
|
|
|
|
|
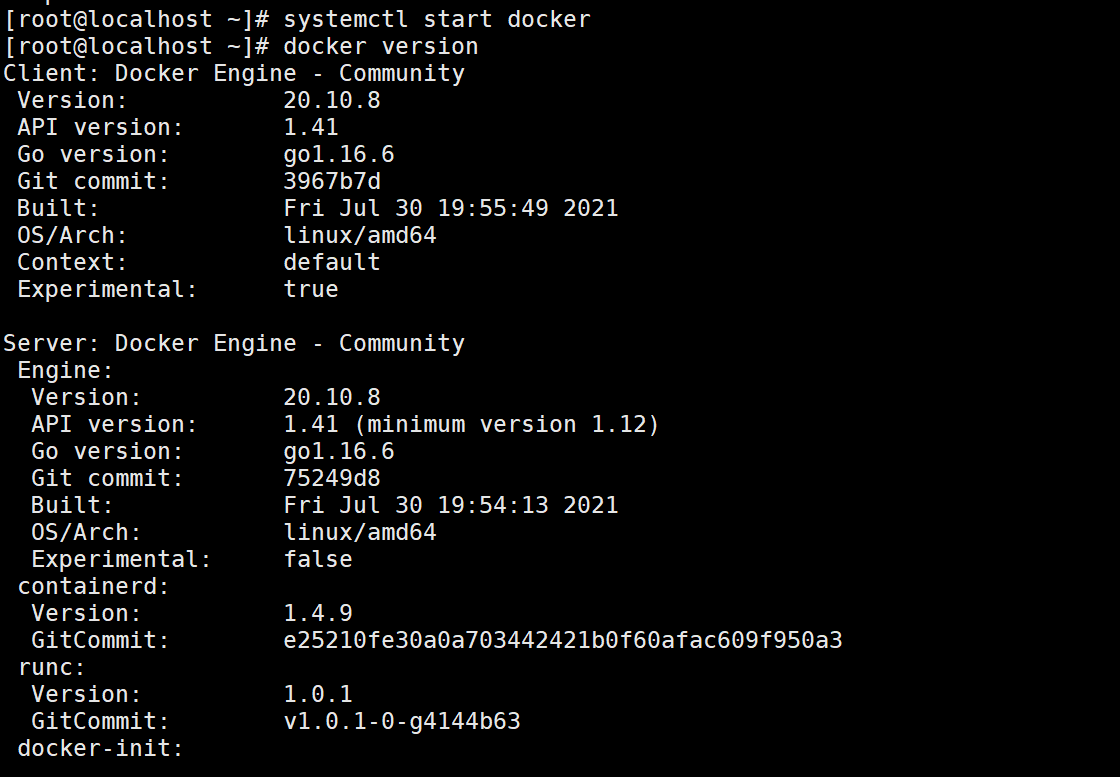
启动docker服务
|
|
|
|
|
|
```
|
|
|
sudo systemctl start docker
|
|
|
```
|
|
|
|
|
|
查看docker的版本
|
|
|
|
|
|
```
|
|
|
sudo docker version
|
|
|
```
|
|
|
|
|
|
|
|
|
|
|
|
补充:通过官方的镜像地址下载docker会比较慢,
|
|
|
|
|
|
配置阿里云的镜像地址:
|
|
|
|
|
|
```
|
|
|
yum-config-manager --add-repo http://mirrors.aliyun.com/docker-ce/linux/centos/docker-ce.repo
|
|
|
```
|
|
|
|
|
|
yum更新下即可:
|
|
|
|
|
|
```
|
|
|
yum makecache fast
|
|
|
```
|
|
|
|
|
|
开机启动docker
|
|
|
|
|
|
```
|
|
|
sudo systemctl enable docker
|
|
|
```
|
|
|
|
|
|
## 3.基本软件安装
|
|
|
|
|
|
### 3.1 MySQL数据库安装
|
|
|
|
|
|
项目软件统一安装在 `/mydata` 目录下
|
|
|
|
|
|
docker拉取镜像命令
|
|
|
|
|
|
```shell
|
|
|
docker pull mysql:5.7
|
|
|
```
|
|
|
|
|
|
docker安装MySQL命令
|
|
|
|
|
|
```shell
|
|
|
docker run -p 3306:3306 --name mysql -v /mydata/mysql/log:/var/log/mysql -v /mydata/mysql/data:/var/lib/mysql -v /mydata/mysql/conf:/etc/mysql -e MYSQL_ROOT_PASSWORD=root -d mysql:5.7
|
|
|
```
|
|
|
|
|
|
修改MySQL的配置文件 vim /mydata/mysql/conf/my.cnf
|
|
|
|
|
|
```xml
|
|
|
[client]
|
|
|
default-character-set=utf8
|
|
|
|
|
|
[mysql]
|
|
|
default-character-set=utf8
|
|
|
|
|
|
[mysqld]
|
|
|
init_connect="SET collation_connection = utf8_unicode_ci"
|
|
|
init_connect="SET NAMES utf8"
|
|
|
character-set-server=utf8
|
|
|
collation-server=utf8_unicode_ci
|
|
|
skip-character-set-client-handshake
|
|
|
skip-name-resolve
|
|
|
```
|
|
|
|
|
|
### 3.2 Redis安装
|
|
|
|
|
|
拉取Redis最新版本镜像
|
|
|
|
|
|
```shell
|
|
|
docker pull redis
|
|
|
```
|
|
|
|
|
|
先创建对应的Redis的映射配置文件
|
|
|
|
|
|
```shell
|
|
|
mkdir -p /mydata/redis/conf
|
|
|
touch /mydata/redis/conf/redis.conf
|
|
|
```
|
|
|
|
|
|
创建容器命令
|
|
|
|
|
|
```shell
|
|
|
docker run -d -p 6379:6379 --name mall-redis -v /mydata/redis/data:/data -v /mydata/redis/conf:/etc/redis redis redis-server /etc/redis/redis.conf
|
|
|
```
|
|
|
|
|
|
启动后测试连接:
|
|
|
|
|
|
```
|
|
|
[root@manager-node conf]# docker exec -it 4e redis-cli
|
|
|
127.0.0.1:6379> keys *
|
|
|
(empty array)
|
|
|
127.0.0.1:6379>
|
|
|
```
|
|
|
|
|
|
更新redis配置文件:见课程附件
|
|
|
|
|
|
设置容器自启动
|
|
|
|
|
|
```shell
|
|
|
[root@localhost ~]# docker update --restart=always mysql
|
|
|
mysql
|
|
|
[root@localhost ~]# docker update --restart=always mall-redis
|
|
|
mall-redis
|
|
|
|
|
|
```
|
|
|
|
|
|
## 4.开发环境
|
|
|
|
|
|
### 4.1 环境版本
|
|
|
|
|
|
JDK环境
|
|
|
|
|
|

|
|
|
|
|
|
开发工具:IDEA2021 VSCode
|
|
|
|
|
|

|
|
|
|
|
|
### 4.2 Git安装
|
|
|
|
|
|
配置信息
|
|
|
|
|
|
```
|
|
|
git config --global user.name "bobo"
|
|
|
git config --global user.email "dengpbs@163.com"
|
|
|
```
|
|
|
|
|
|
关联Gitee码云
|
|
|
|
|
|
```
|
|
|
ssh-keygen -t rsa -C "dengpbs@163.com"
|
|
|
```
|
|
|
|
|
|
生成对应的公钥和私钥,在用户目录下
|
|
|
|
|
|
```
|
|
|
$ ssh-keygen -t rsa -C "dengpbs@163.com"
|
|
|
Generating public/private rsa key pair.
|
|
|
Enter file in which to save the key (/c/Users/dpb/.ssh/id_rsa):
|
|
|
Enter passphrase (empty for no passphrase):
|
|
|
Enter same passphrase again:
|
|
|
Your identification has been saved in /c/Users/dpb/.ssh/id_rsa
|
|
|
Your public key has been saved in /c/Users/dpb/.ssh/id_rsa.pub
|
|
|
The key fingerprint is:
|
|
|
SHA256:O+fr8mOR1GSB0GHJXS5s3ZYbq3qX9vvkCq4immGzCv8 dengpbs@163.com
|
|
|
The key's randomart image is:
|
|
|
+---[RSA 3072]----+
|
|
|
| .+o=.o. |
|
|
|
| .=.+o ..|
|
|
|
| ++ ooo|
|
|
|
| .... .+|
|
|
|
| S. . o |
|
|
|
| .o . |
|
|
|
|. + o .... o|
|
|
|
| o . =. o+o..o * |
|
|
|
| ooE. . **=o +oB|
|
|
|
+----[SHA256]-----+
|
|
|
|
|
|
```
|
|
|
|
|
|
然后把公钥中的内容复制到码云中去
|
|
|
|
|
|

|
|
|
|
|
|
保存即可
|
|
|
|
|
|
然后通过 `ssh -T git@gitee.com`来连接测试
|
|
|
|
|
|
```
|
|
|
dpb@DESKTOP-NM4KFCE MINGW64 /d/desktop
|
|
|
$ ssh -T git@gitee.com
|
|
|
The authenticity of host 'gitee.com (180.97.125.228)' can't be established.
|
|
|
ED25519 key fingerprint is SHA256:+ULzij2u99B9eWYFTw1Q4ErYG/aepHLbu96PAUCoV88.
|
|
|
This key is not known by any other names
|
|
|
Are you sure you want to continue connecting (yes/no/[fingerprint])? yes
|
|
|
Warning: Permanently added 'gitee.com' (ED25519) to the list of known hosts.
|
|
|
Hi 邓澎波! You've successfully authenticated, but GITEE.COM does not provide shell access.
|
|
|
```
|
|
|
|
|
|
### 4.3 后台服务创建
|
|
|
|
|
|
#### 4.3.1 码云创建基本项目
|
|
|
|
|
|
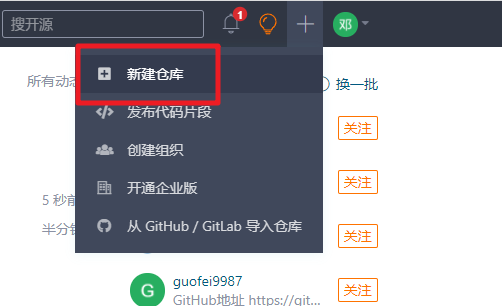
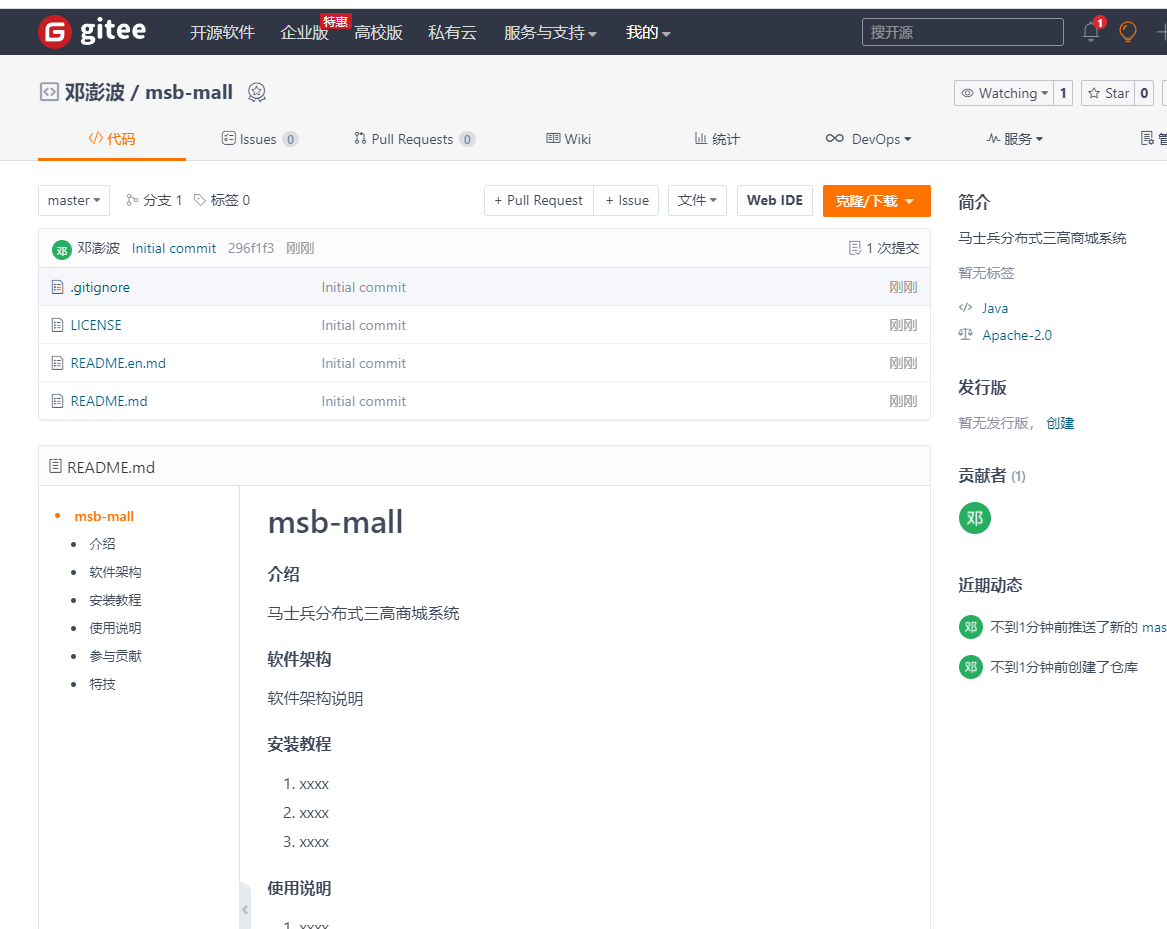
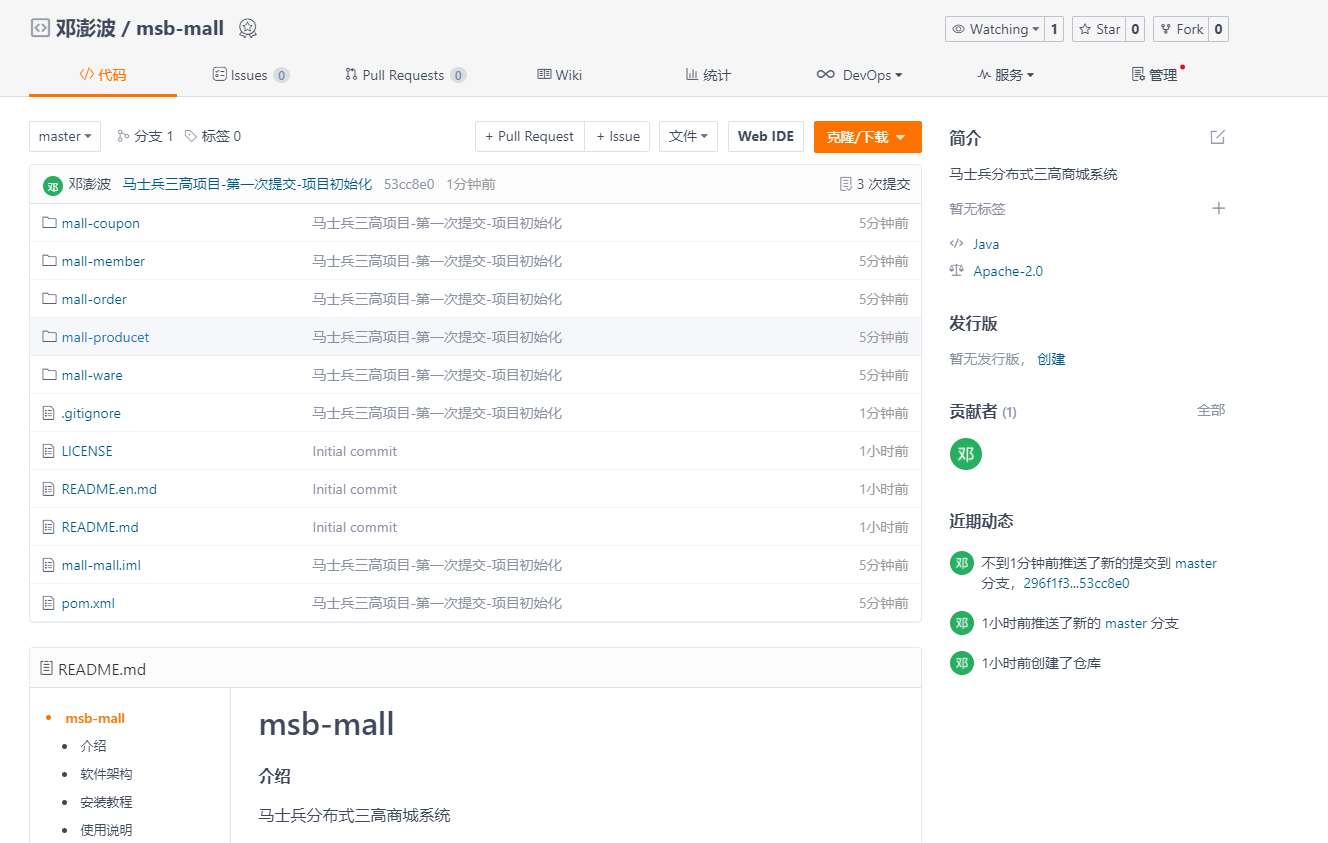
在码云上创建整个聚合工程的父工程,创建一个新的仓库
|
|
|
|
|
|
|
|
|
|
|
|
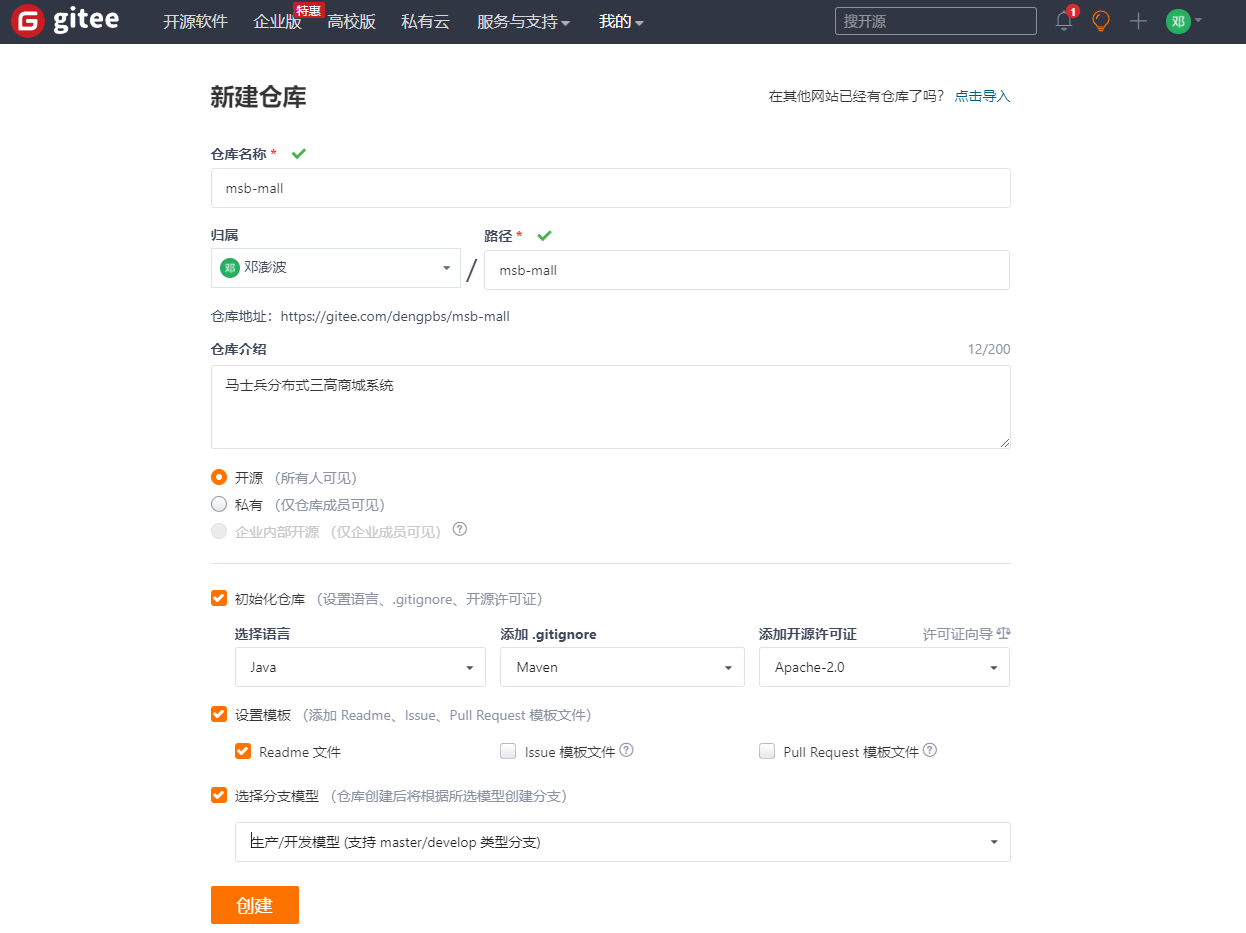
设置仓库的相关信息
|
|
|
|
|
|
|
|
|
|
|
|
创建完成
|
|
|
|
|
|
|
|
|
|
|
|
#### 4.3.2 IDEA关联
|
|
|
|
|
|
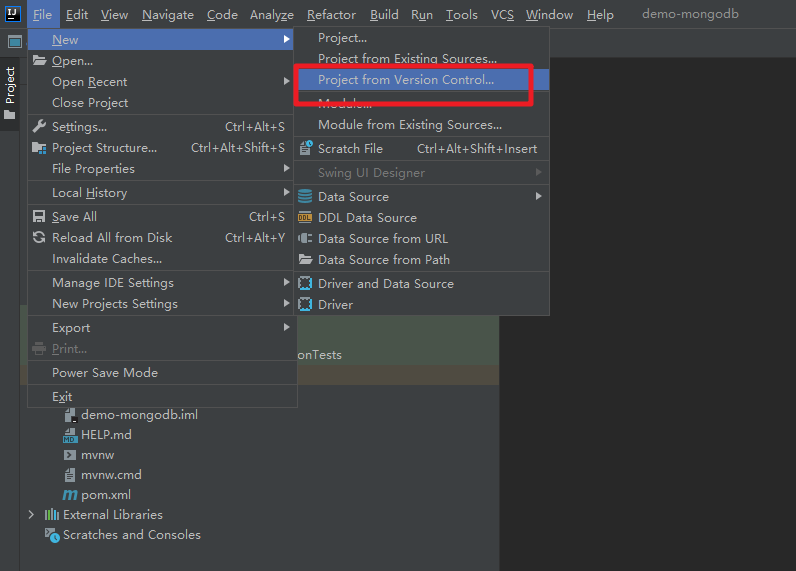
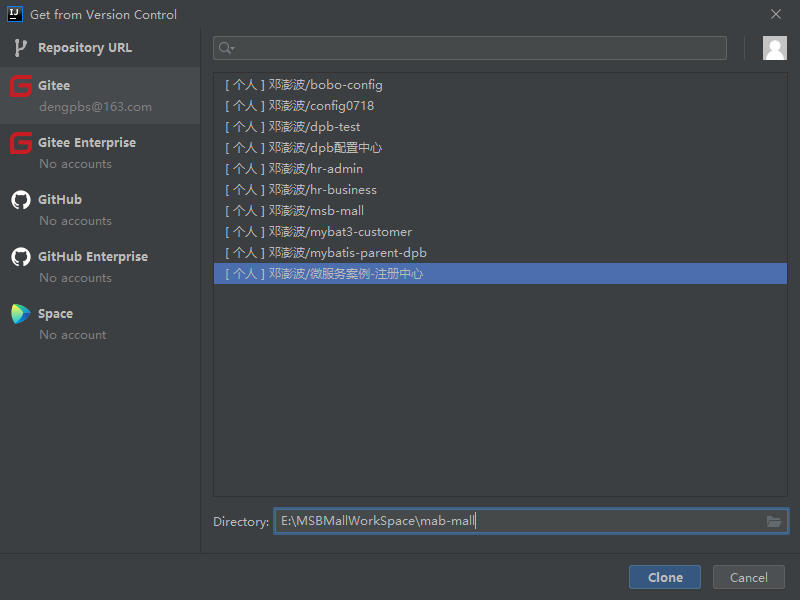
创建的父工程项目导入到IDEA中,两种方式,第一个是直接下载后导入,第二个是通过IDEA直接克隆
|
|
|
|
|
|
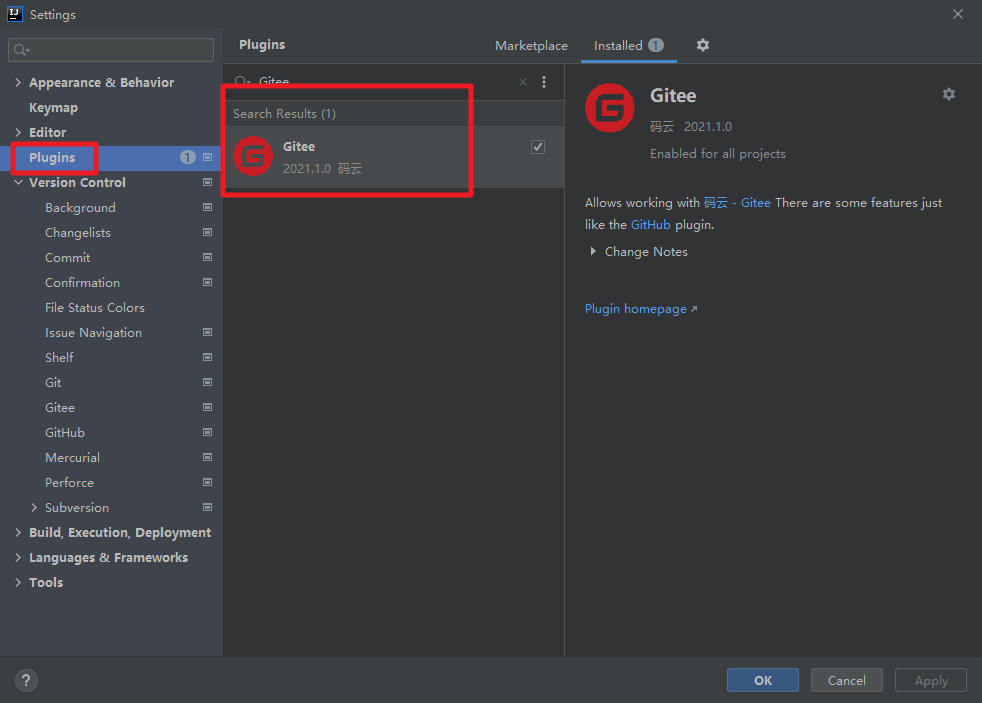
首先在IDEA中下载gitee的插件
|
|
|
|
|
|
|
|
|
|
|
|
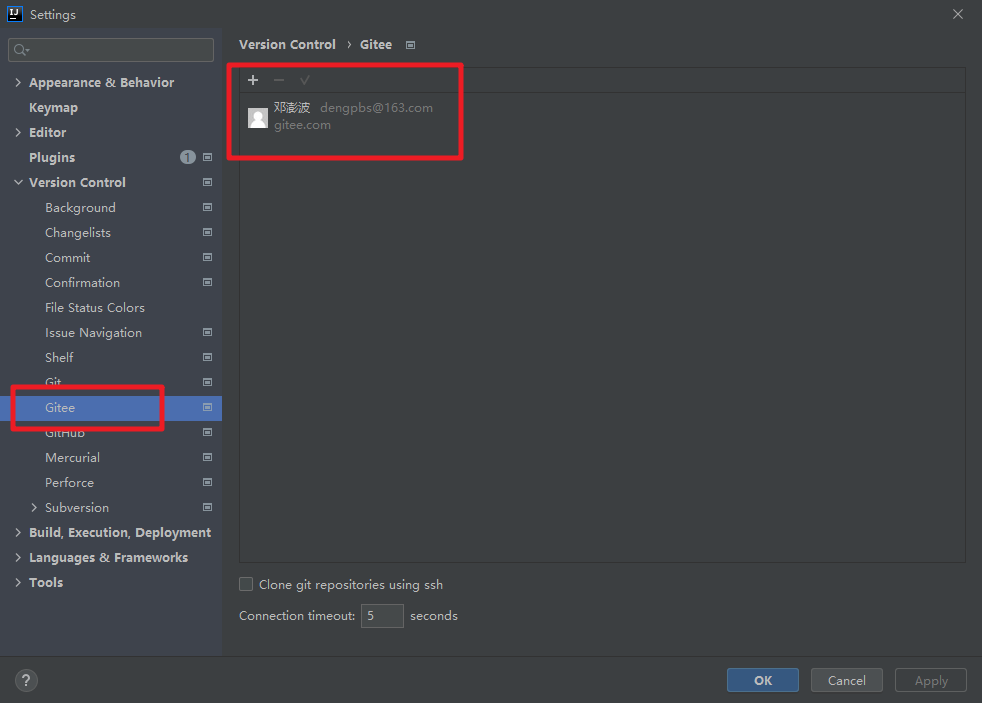
然后我们需要登录
|
|
|
|
|
|
|
|
|
|
|
|
clone操作
|
|
|
|
|
|
|
|
|
|
|
|
|
|
|
|
|
|
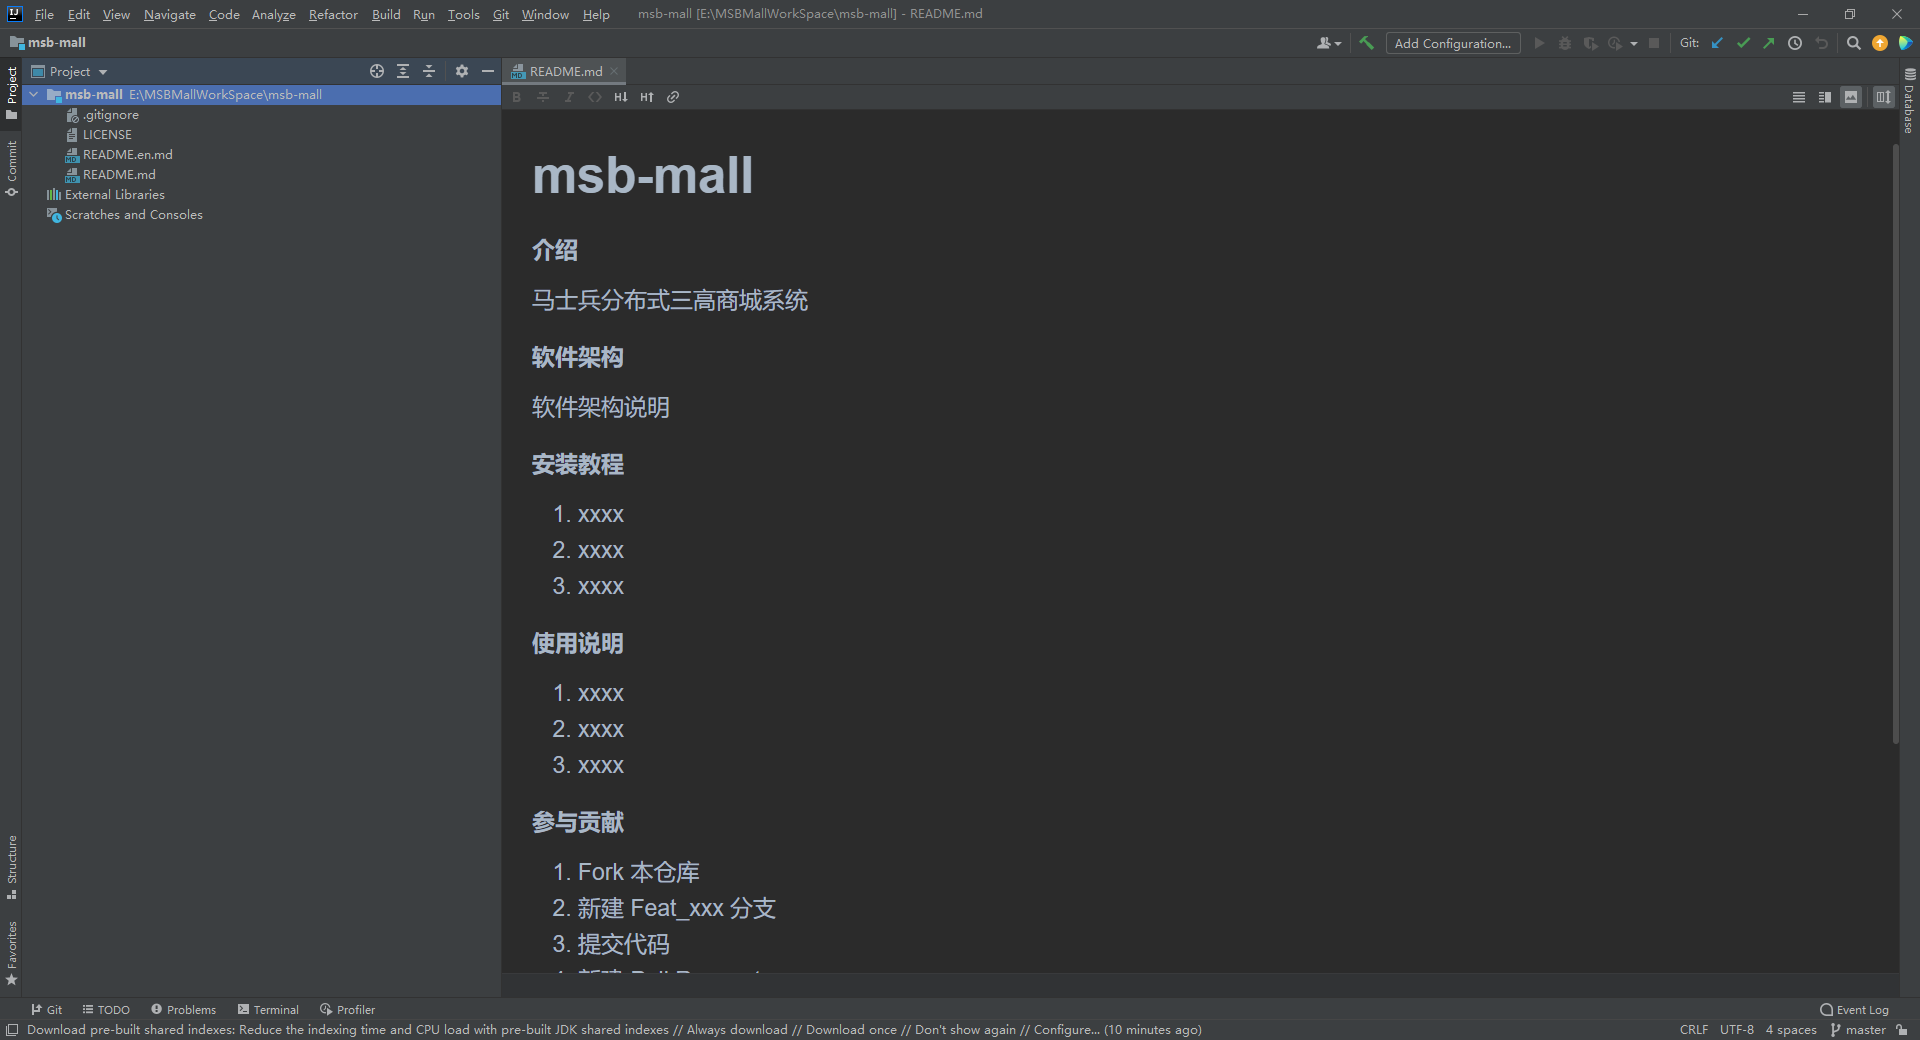
克隆成功的项目
|
|
|
|
|
|
|
|
|
|
|
|
#### 4.3.3 创建微服务
|
|
|
|
|
|
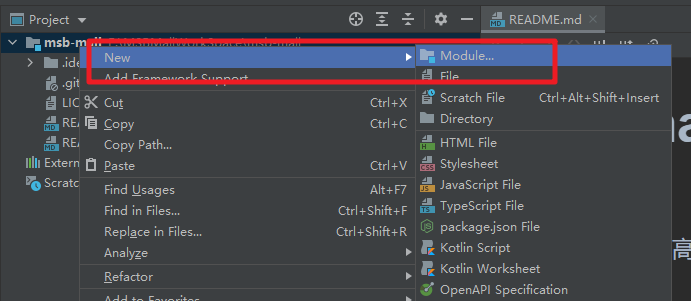
我们首先创建几个基础的微服务(商品,订单,会员,库存,活动)
|
|
|
|
|
|
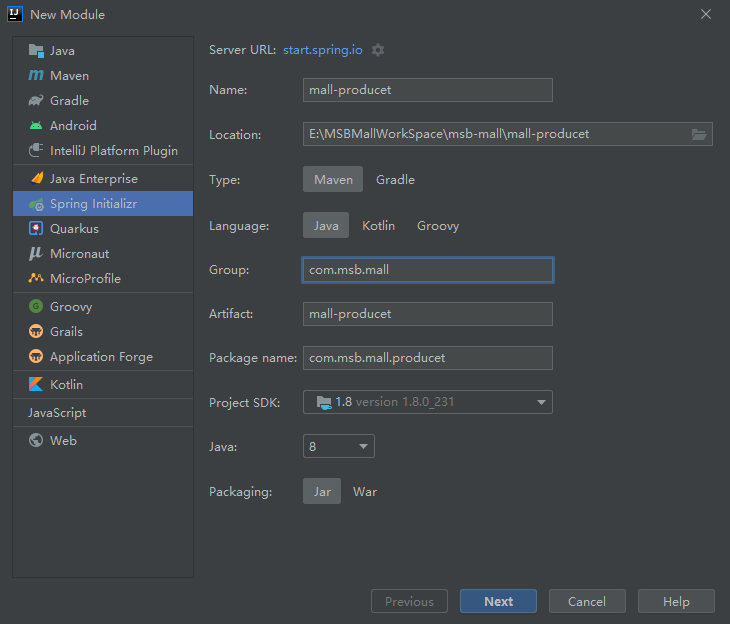
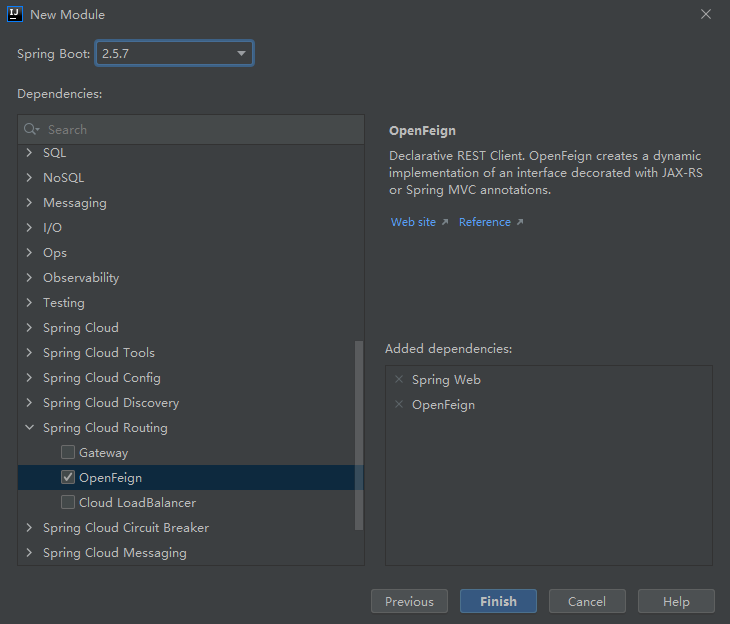
**创建商品模块**
|
|
|
|
|
|
|
|
|
|
|
|
对应的项目信息
|
|
|
|
|
|
|
|
|
|
|
|
关联对应的依赖:web和OpenFegin的依赖
|
|
|
|
|
|
|
|
|
|
|
|
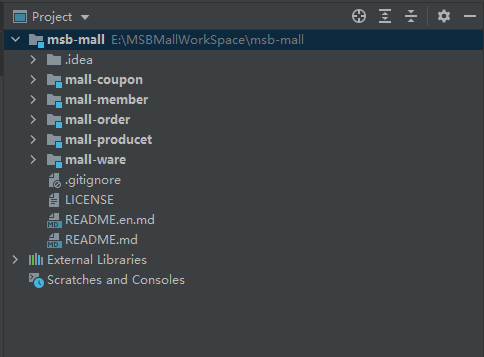
按照相同的步骤完成其他几个模块的创建
|
|
|
|
|
|
|
|
|
|
|
|
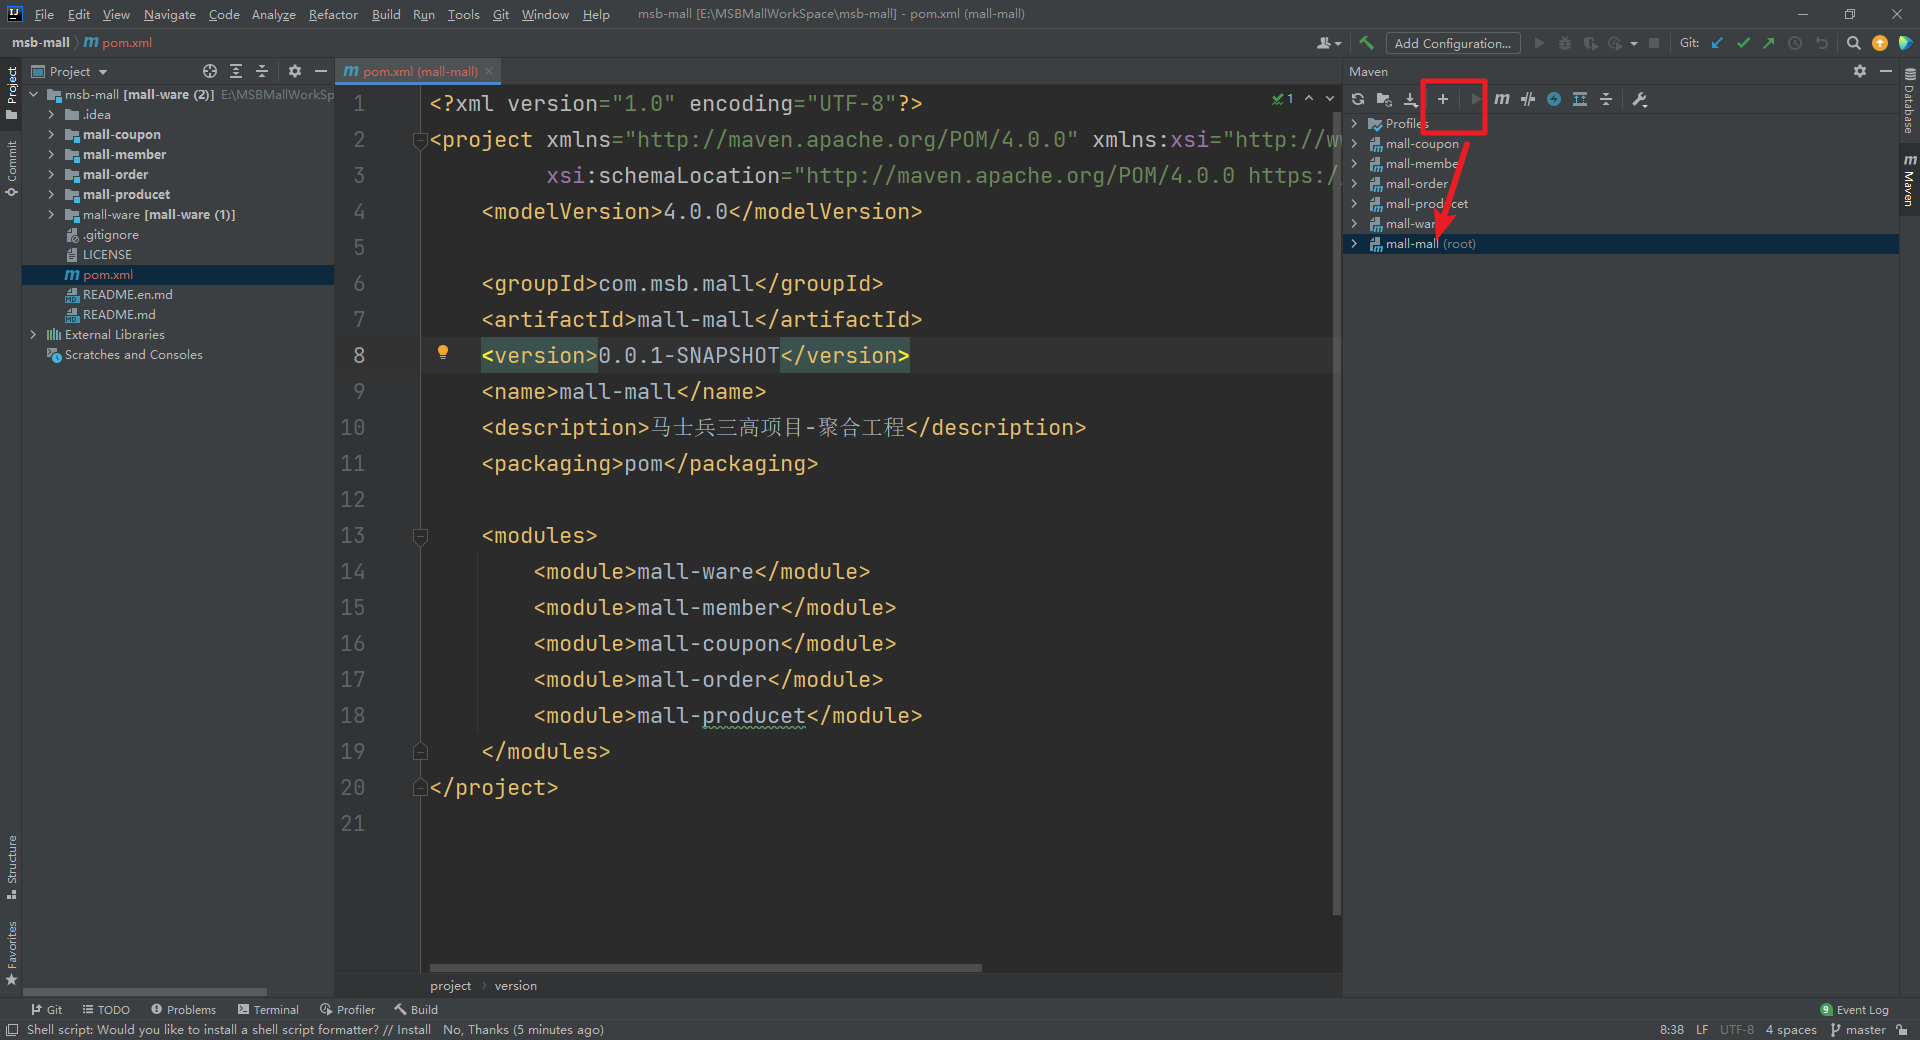
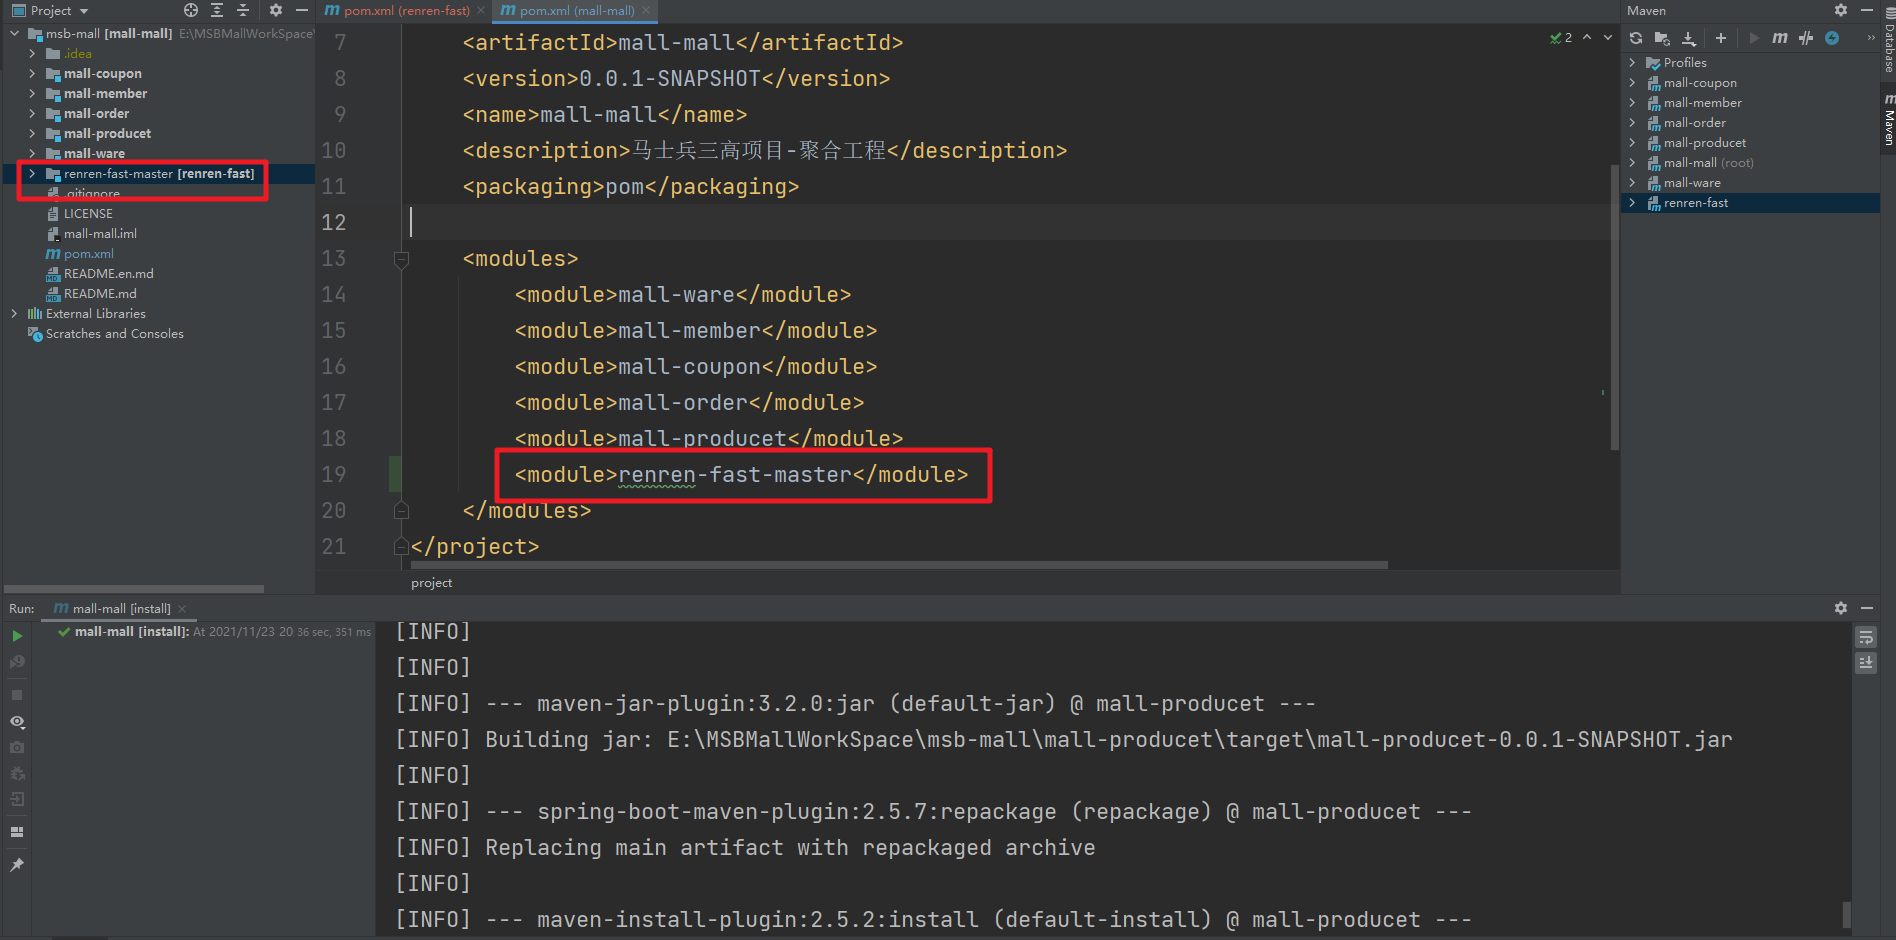
这是一个聚合工程,那么我们需要在父工程中完成对应的设置,去任意一个项目中拷贝pom.xml文件到父工程的根目录下,并完成相关的设置
|
|
|
|
|
|
```xml
|
|
|
<?xml version="1.0" encoding="UTF-8"?>
|
|
|
<project xmlns="http://maven.apache.org/POM/4.0.0" xmlns:xsi="http://www.w3.org/2001/XMLSchema-instance"
|
|
|
xsi:schemaLocation="http://maven.apache.org/POM/4.0.0 https://maven.apache.org/xsd/maven-4.0.0.xsd">
|
|
|
<modelVersion>4.0.0</modelVersion>
|
|
|
|
|
|
<groupId>com.msb.mall</groupId>
|
|
|
<artifactId>mall-ware</artifactId>
|
|
|
<version>0.0.1-SNAPSHOT</version>
|
|
|
<name>mall-ware</name>
|
|
|
<description>马士兵三高项目-聚合工程</description>
|
|
|
<packaging>pom</packaging>
|
|
|
|
|
|
<modules>
|
|
|
<module>mall-ware</module>
|
|
|
<module>mall-member</module>
|
|
|
<module>mall-coupon</module>
|
|
|
<module>mall-order</module>
|
|
|
<module>mall-producet</module>
|
|
|
</modules>
|
|
|
</project>
|
|
|
|
|
|
```
|
|
|
|
|
|
然后完成maven项目的配置
|
|
|
|
|
|
|
|
|
|
|
|
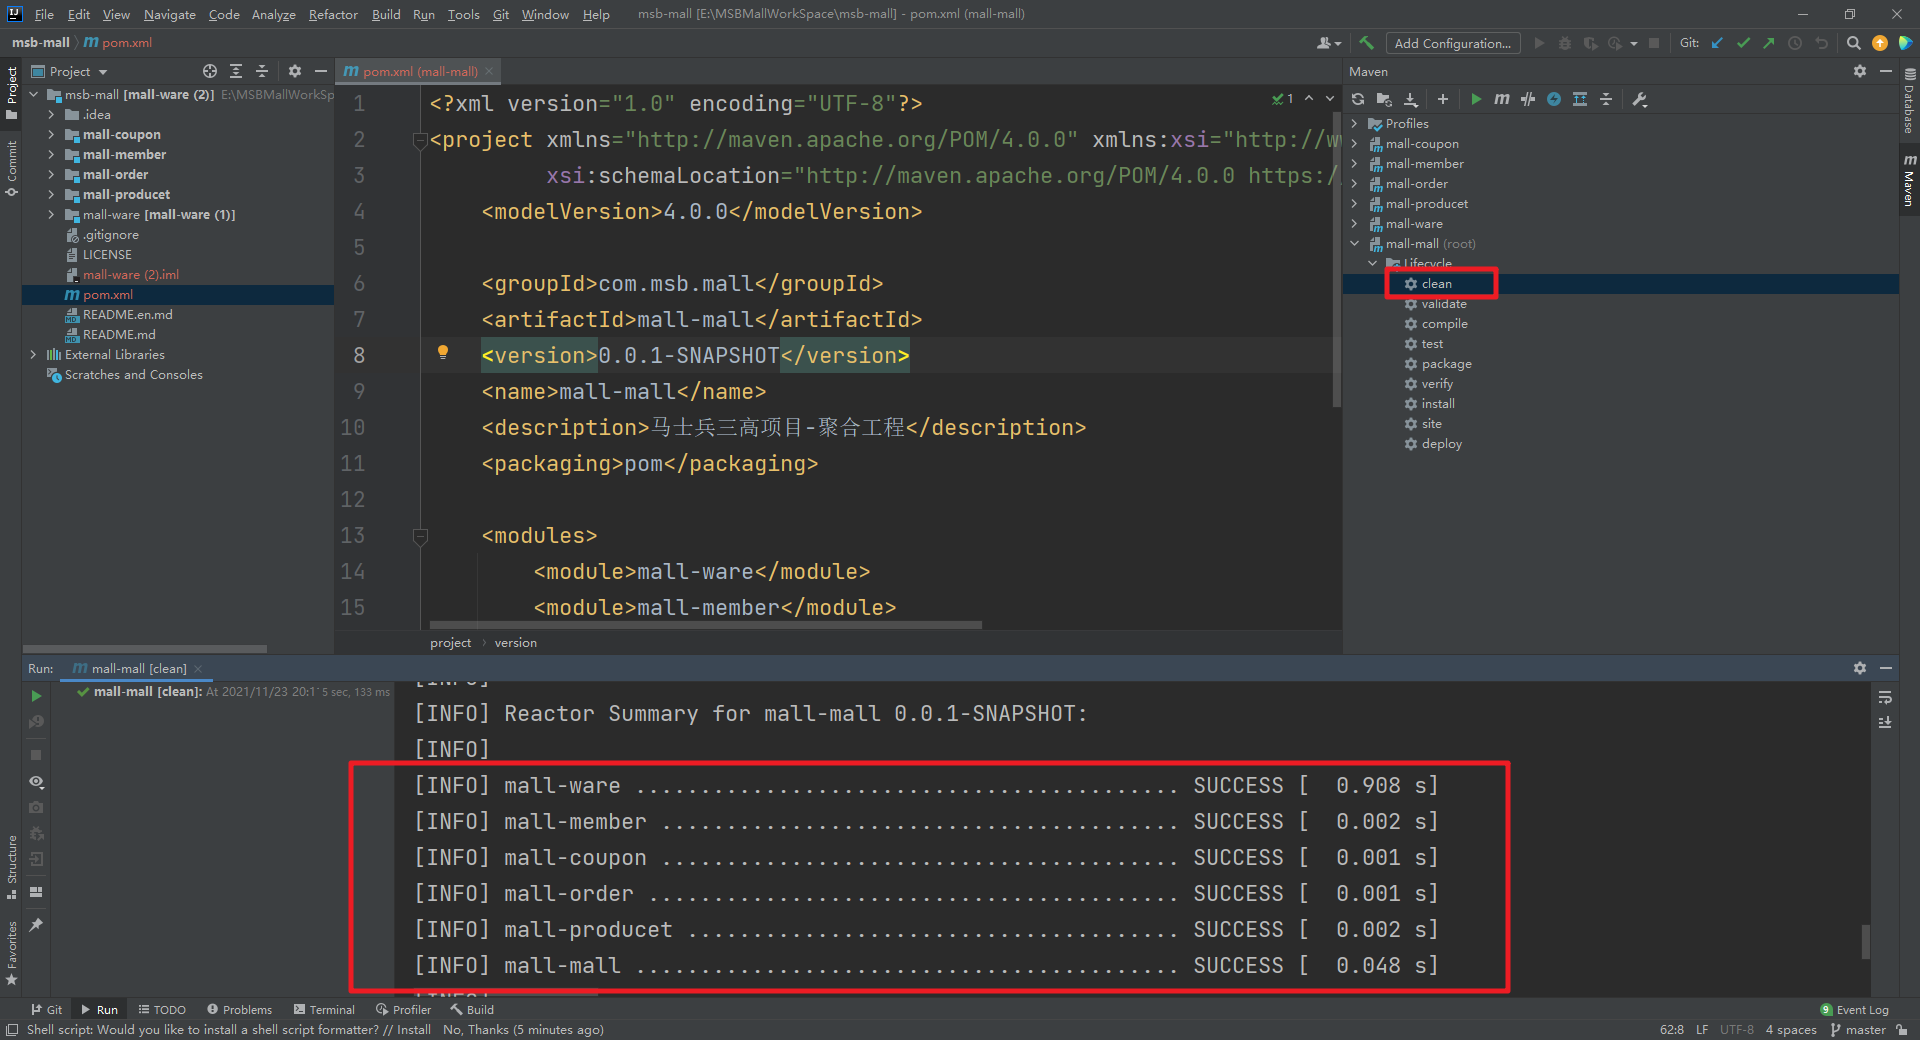
然后可以通过父工程来统一管理
|
|
|
|
|
|
|
|
|
|
|
|
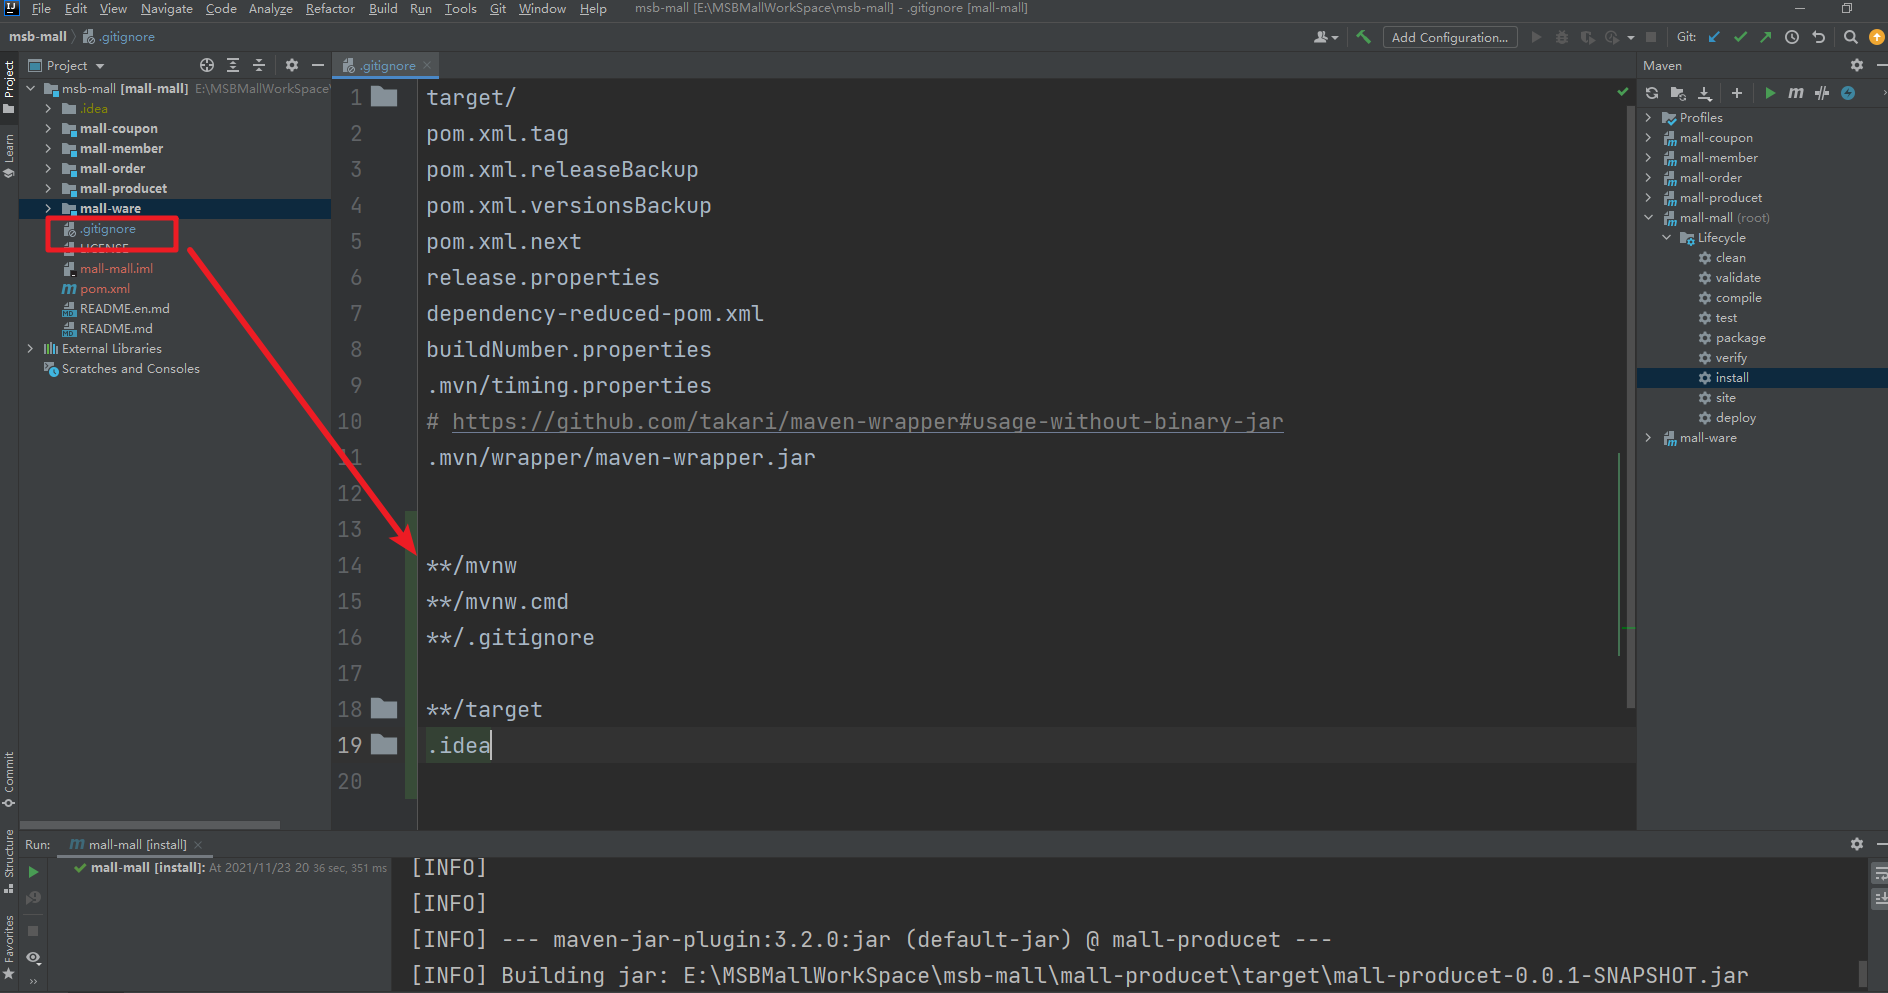
#### 4.3.4 版本忽略信息
|
|
|
|
|
|
|
|
|
|
|
|
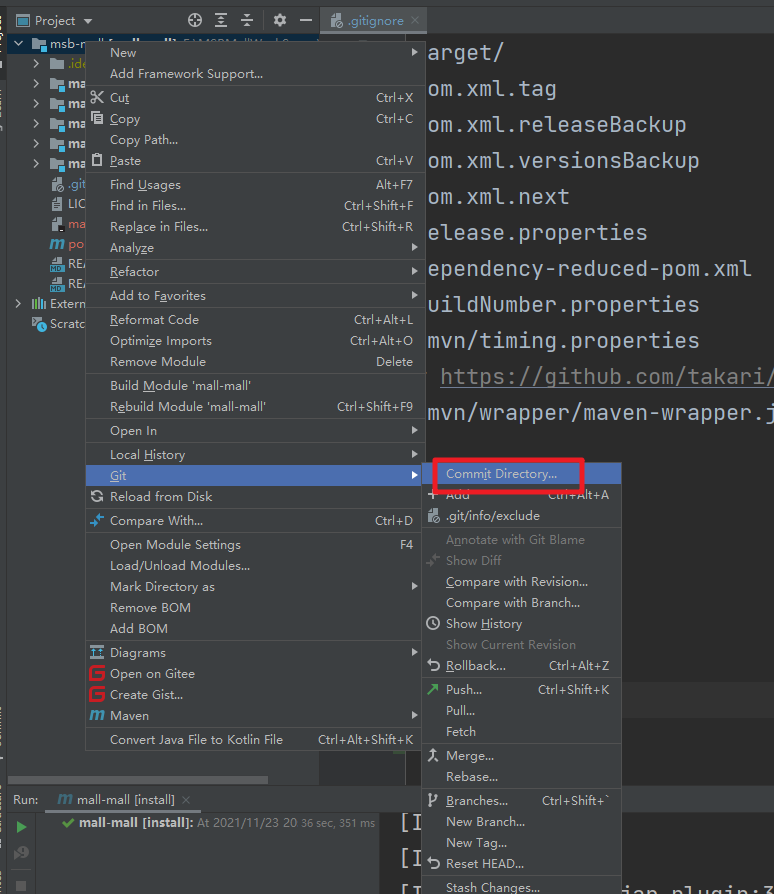
#### 4.3.5 提交微服务到码云
|
|
|
|
|
|
|
|
|
|
|
|
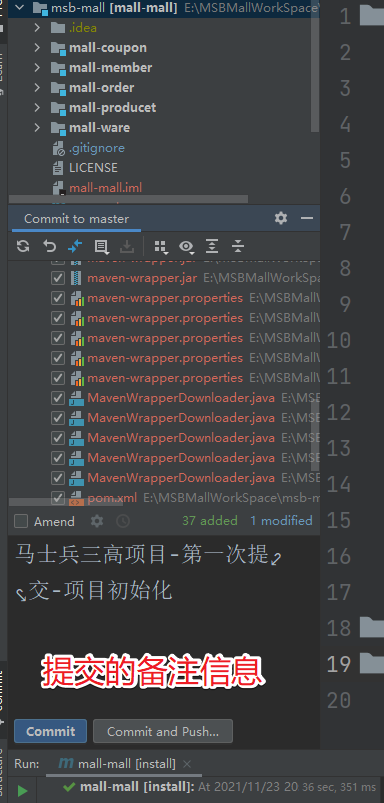
commit
|
|
|
|
|
|
|
|
|
|
|
|
|
|
|
|
|
|
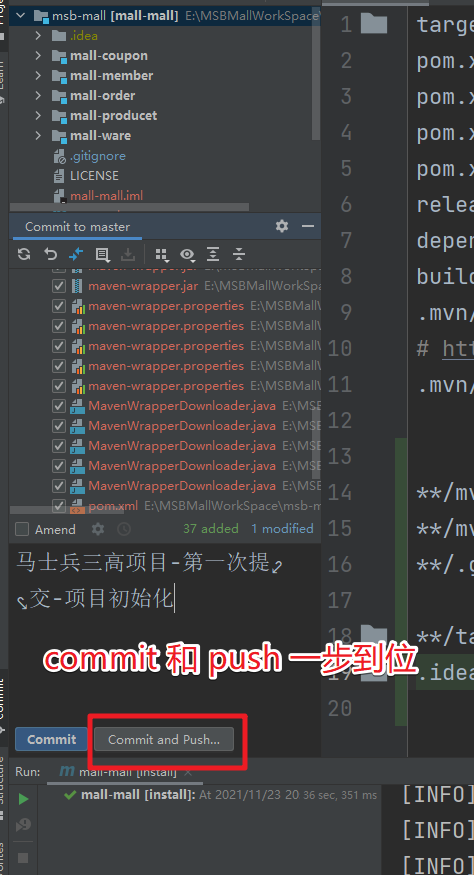
弹出检查窗口,直接提交
|
|
|
|
|
|

|
|
|
|
|
|
提交到了码云服务中
|
|
|
|
|
|
|
|
|
|
|
|
#### 4.3.6 微服务相关表结构
|
|
|
|
|
|
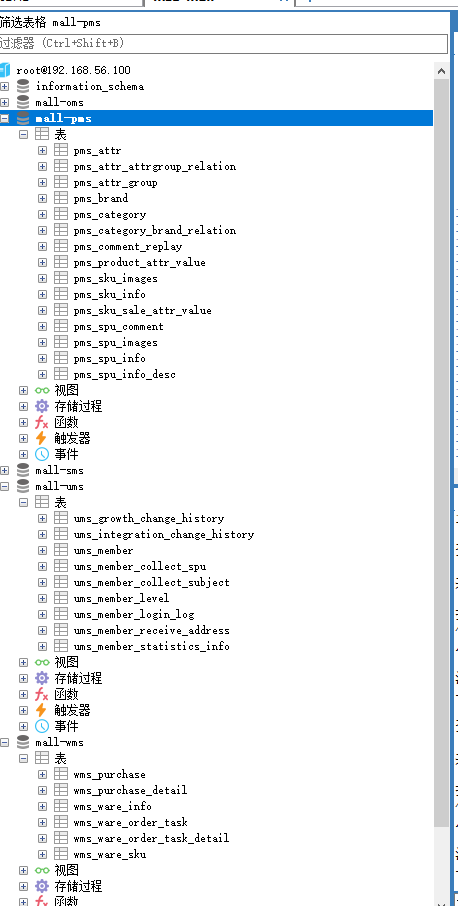
维护微服务相关的数据库表结构,首先创建对应的5个数据库
|
|
|
|
|
|

|
|
|
|
|
|
然后创建相关的表结构。将对应提供的sql脚本文件运行即可
|
|
|
|
|
|
|
|
|
|
|
|
### 4.4 后台管理系统搭建
|
|
|
|
|
|
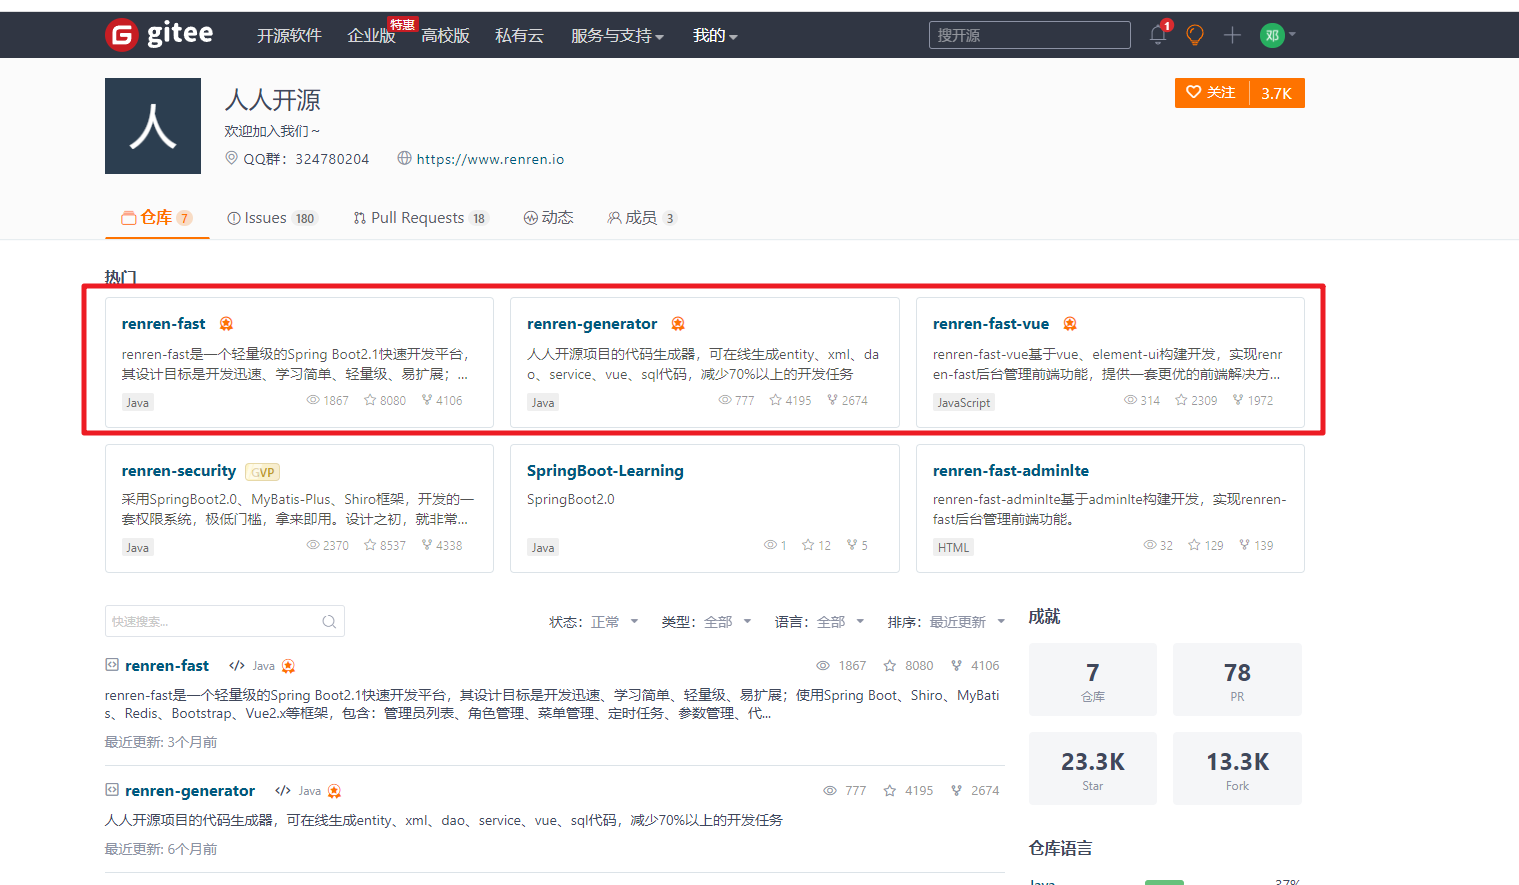
前端:Vue+ElementUI
|
|
|
|
|
|
后端:SpringBoot+MyBatisPlus+SpringMVC
|
|
|
|
|
|
我们在本项目中会通过人人开源中提供的模板项目来快速的实现项目的构建:https://gitee.com/renrenio
|
|
|
|
|
|
|
|
|
|
|
|
#### 4.4.1 后端项目
|
|
|
|
|
|
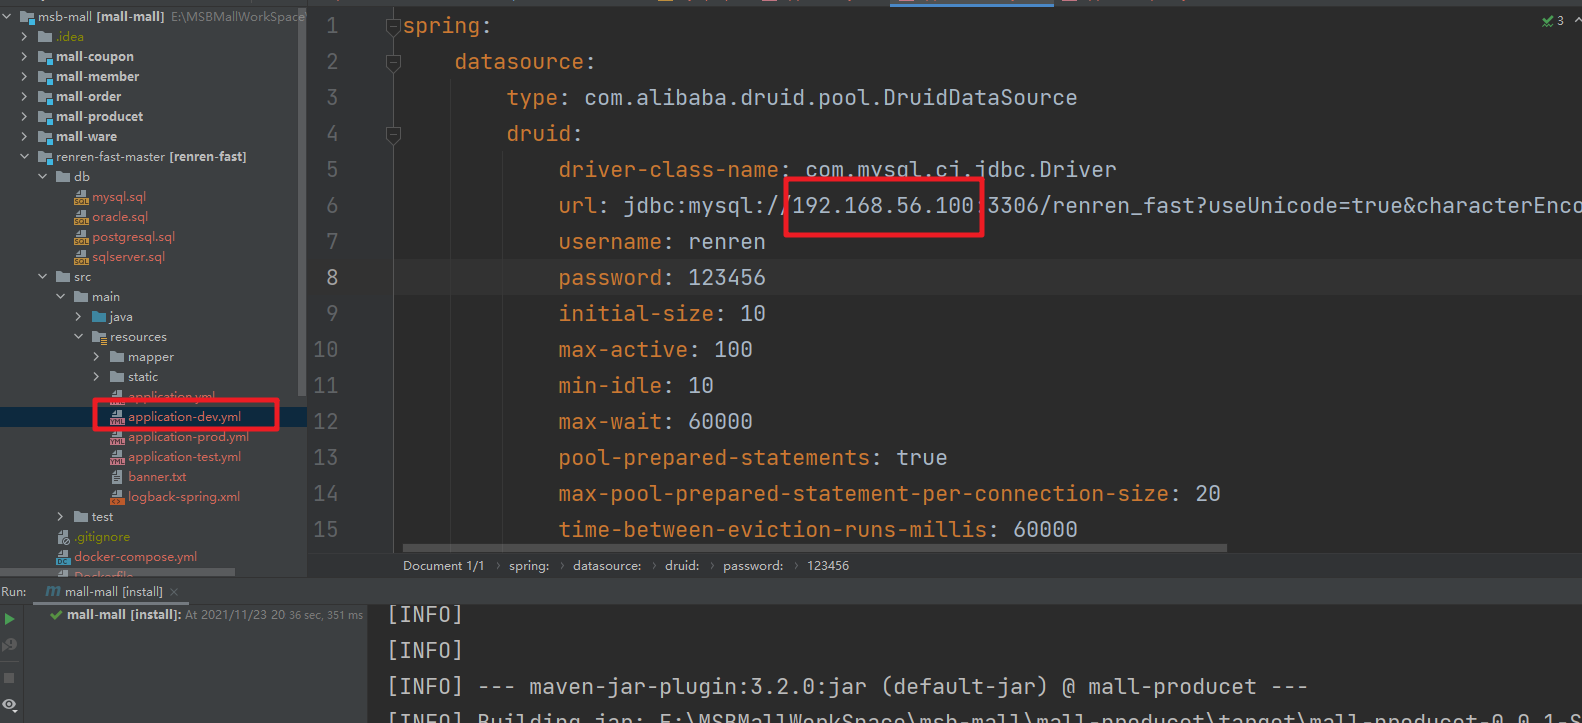
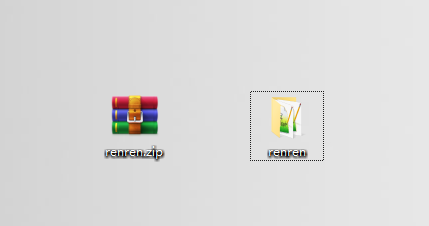
下载下来的renren-fast解压后拷贝到项目的父工程的根目录下
|
|
|
|
|
|
|
|
|
|
|
|
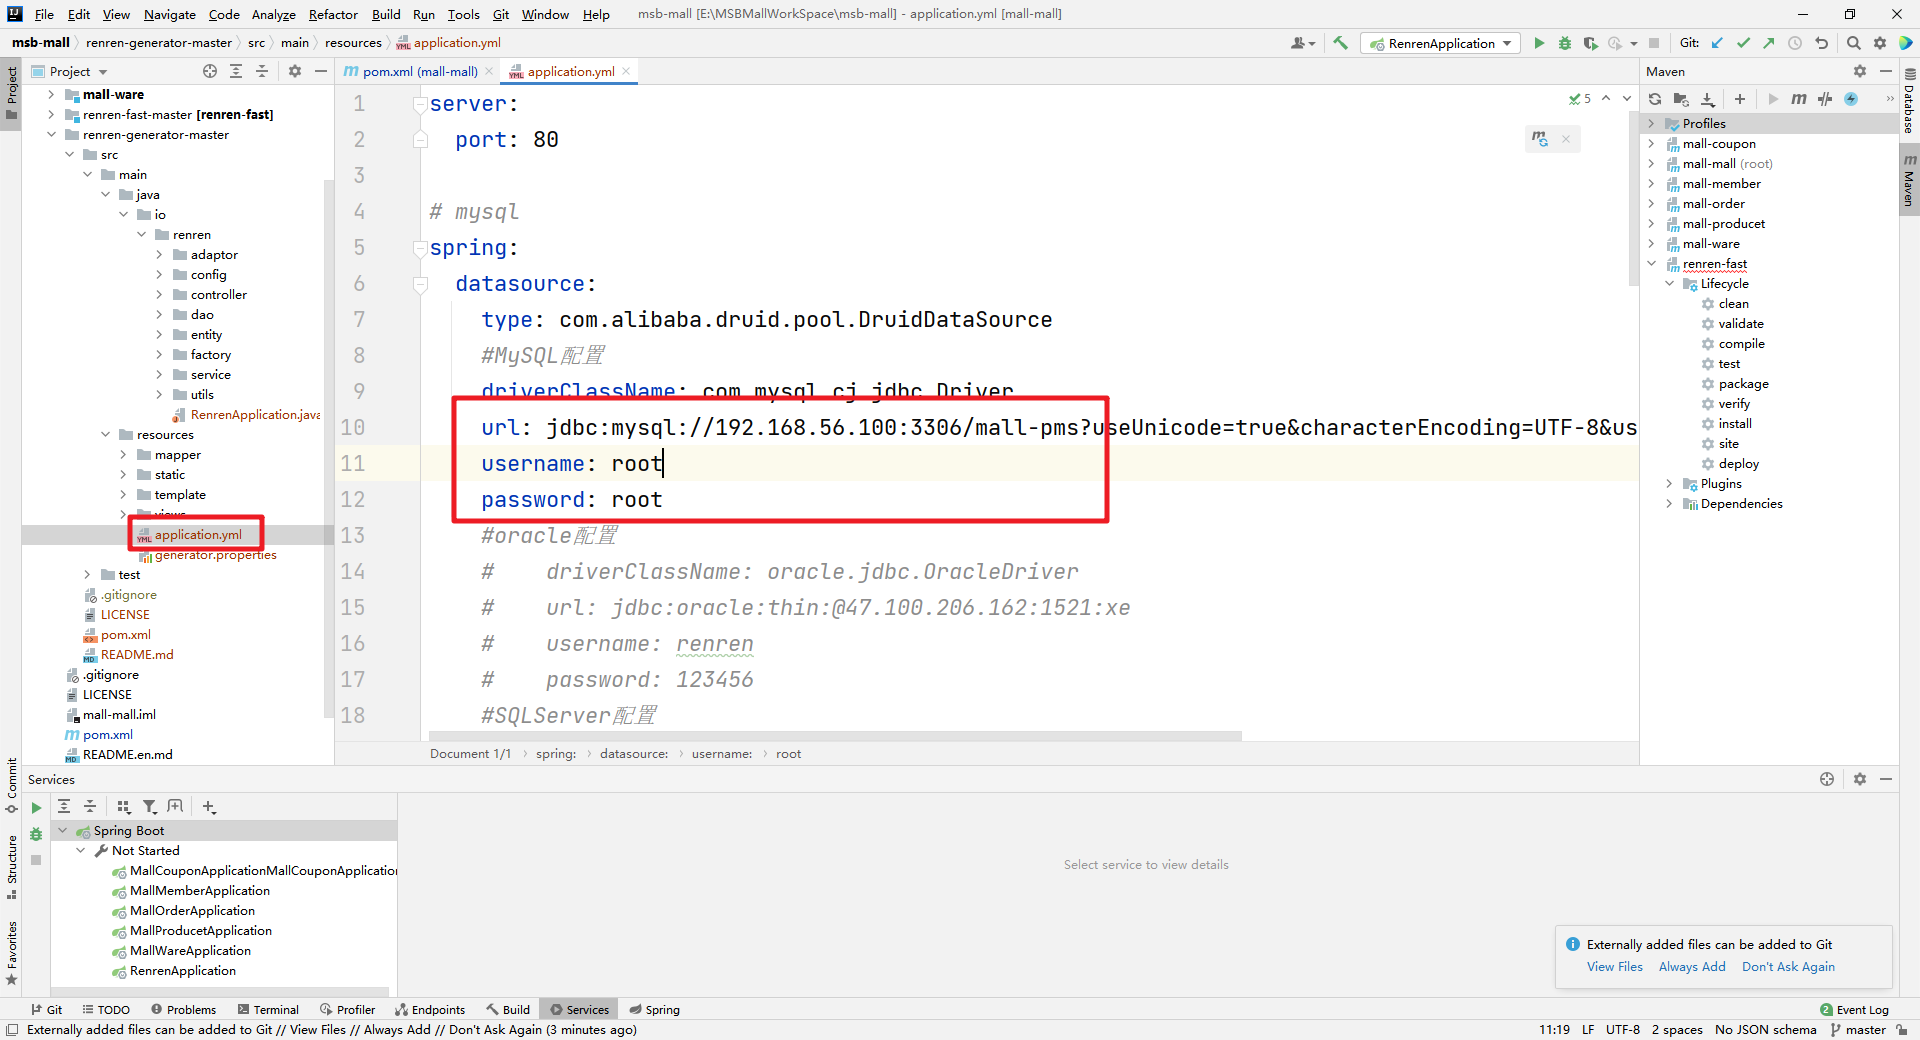
修改人人-fast相关的数据库配置信息,查看数据库的连接信息,并修改
|
|
|
|
|
|
|
|
|
|
|
|
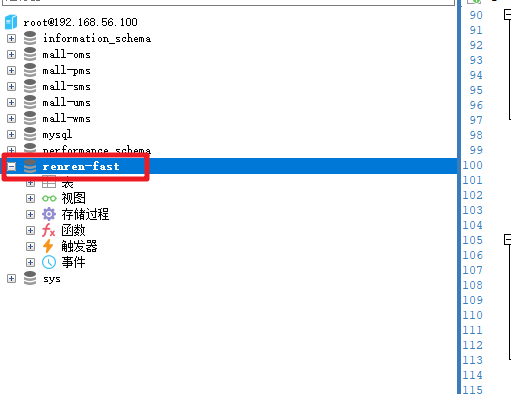
然后创建对应的数据库,名称为 renren_fast
|
|
|
|
|
|
|
|
|
|
|
|
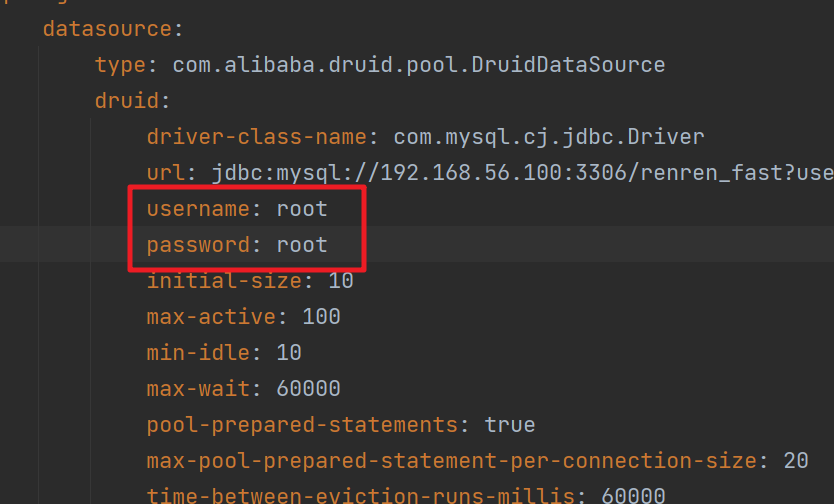
同步更新对应的账号密码
|
|
|
|
|
|
|
|
|
|
|
|
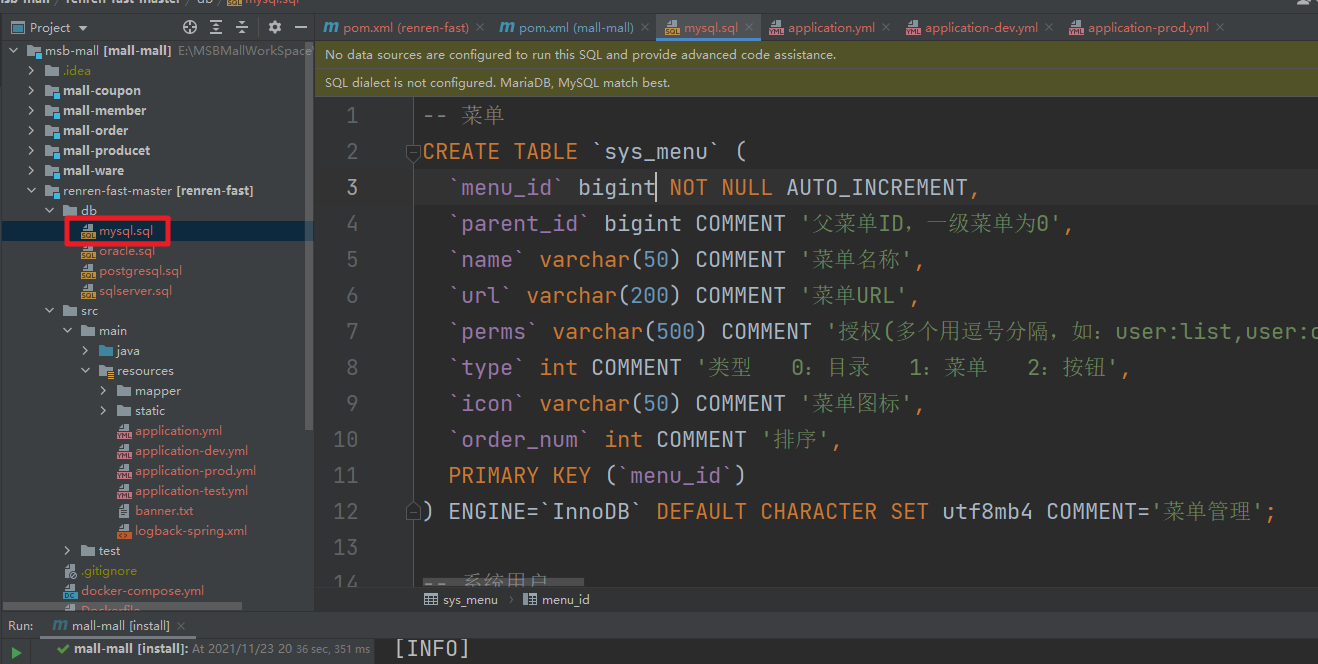
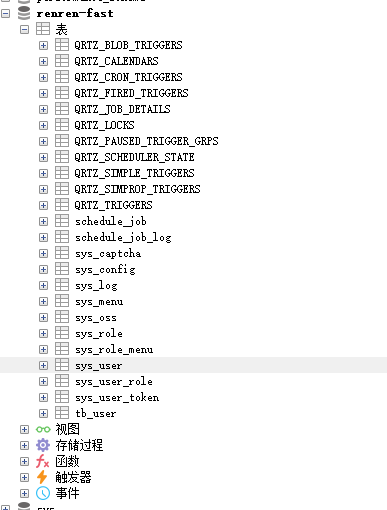
然后跟进renren-fast中提供的sql脚本,创建对应的表结构
|
|
|
|
|
|
|
|
|
|
|
|
|
|
|
|
|
|
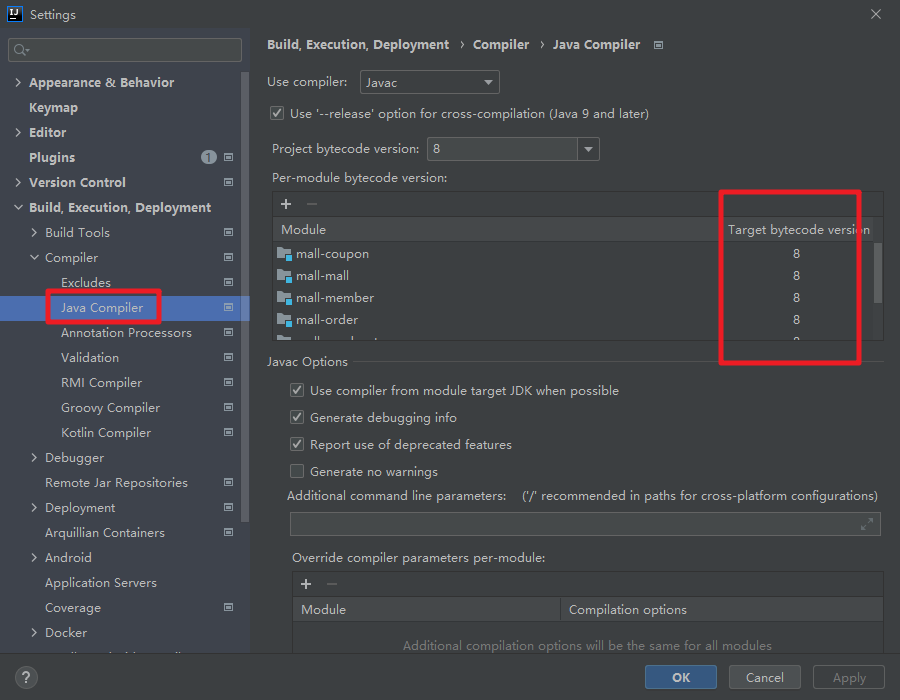
项目java版本5的调整
|
|
|
|
|
|
|
|
|
|
|
|

|
|
|
|
|
|
有可能设置失效多检查下,把其他数据库的驱动依赖注销掉。
|
|
|
|
|
|

|
|
|
|
|
|
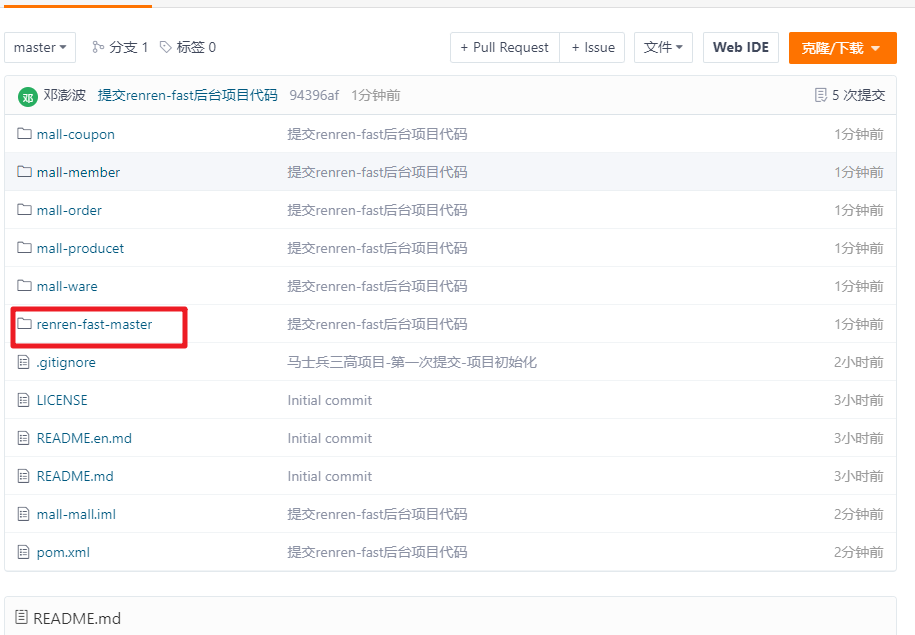
然后将renren-fast的代码提交到码云中
|
|
|
|
|
|
|
|
|
|
|
|
#### 4.4.2 前端服务
|
|
|
|
|
|
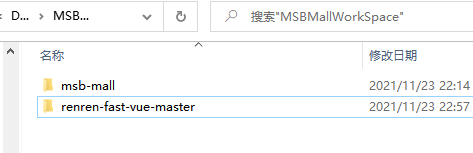
将下载的renren-fast-vue 项目解压出来后放置在对应的目录下
|
|
|
|
|
|
|
|
|
|
|
|
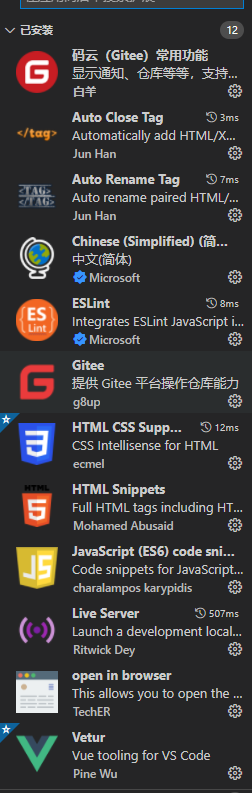
通过VSCode来作为前端项目的开发工具,对应安装相关的插件
|
|
|
|
|
|
|
|
|
|
|
|
前提必须自己安装node.js
|
|
|
|
|
|
Vue项目的开始与安装:https://github.com/renrenio/renren-fast-vue/wiki/Getting-started
|
|
|
|
|
|
设置代理镜像
|
|
|
|
|
|
```xml
|
|
|
npm install -g cnpm --registry=https://registry.npm.taobao.org
|
|
|
```
|
|
|
|
|
|
初始化
|
|
|
|
|
|
```xml
|
|
|
cnpm install
|
|
|
```
|
|
|
|
|
|
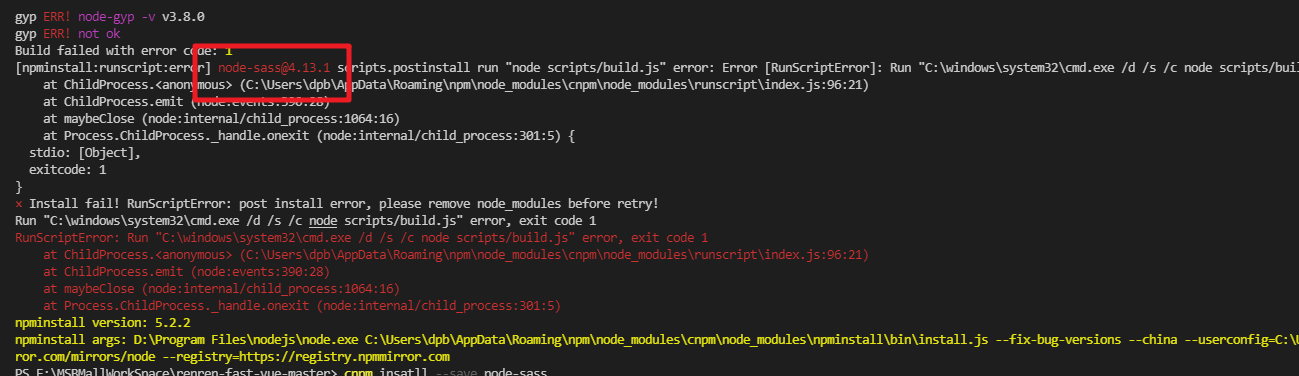
安装中如果出现了sass错误提示
|
|
|
|
|
|
|
|
|
|
|
|
那么通过
|
|
|
|
|
|
cnpm install --save node-sass
|
|
|
|
|
|

|
|
|
|
|
|
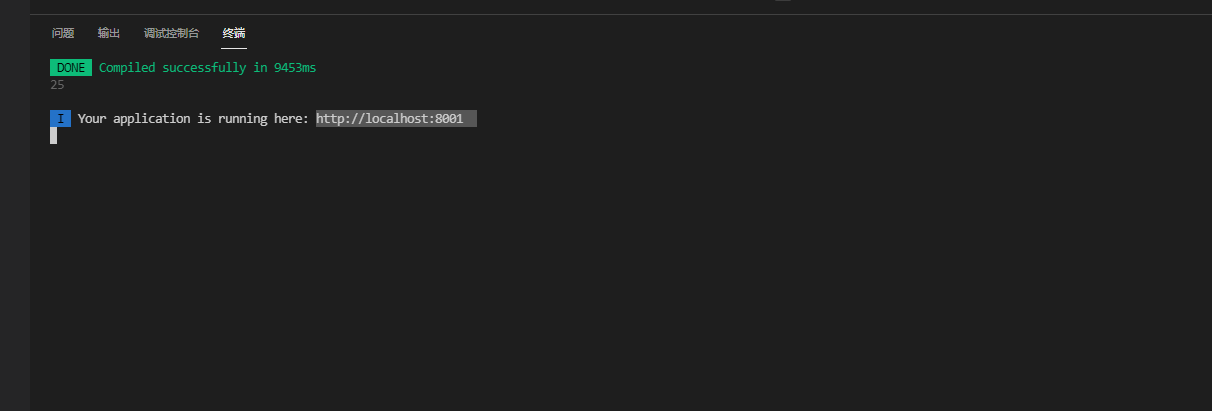
然后通过
|
|
|
|
|
|
npm run dev
|
|
|
|
|
|
启动成功
|
|
|
|
|
|
|
|
|
|
|
|
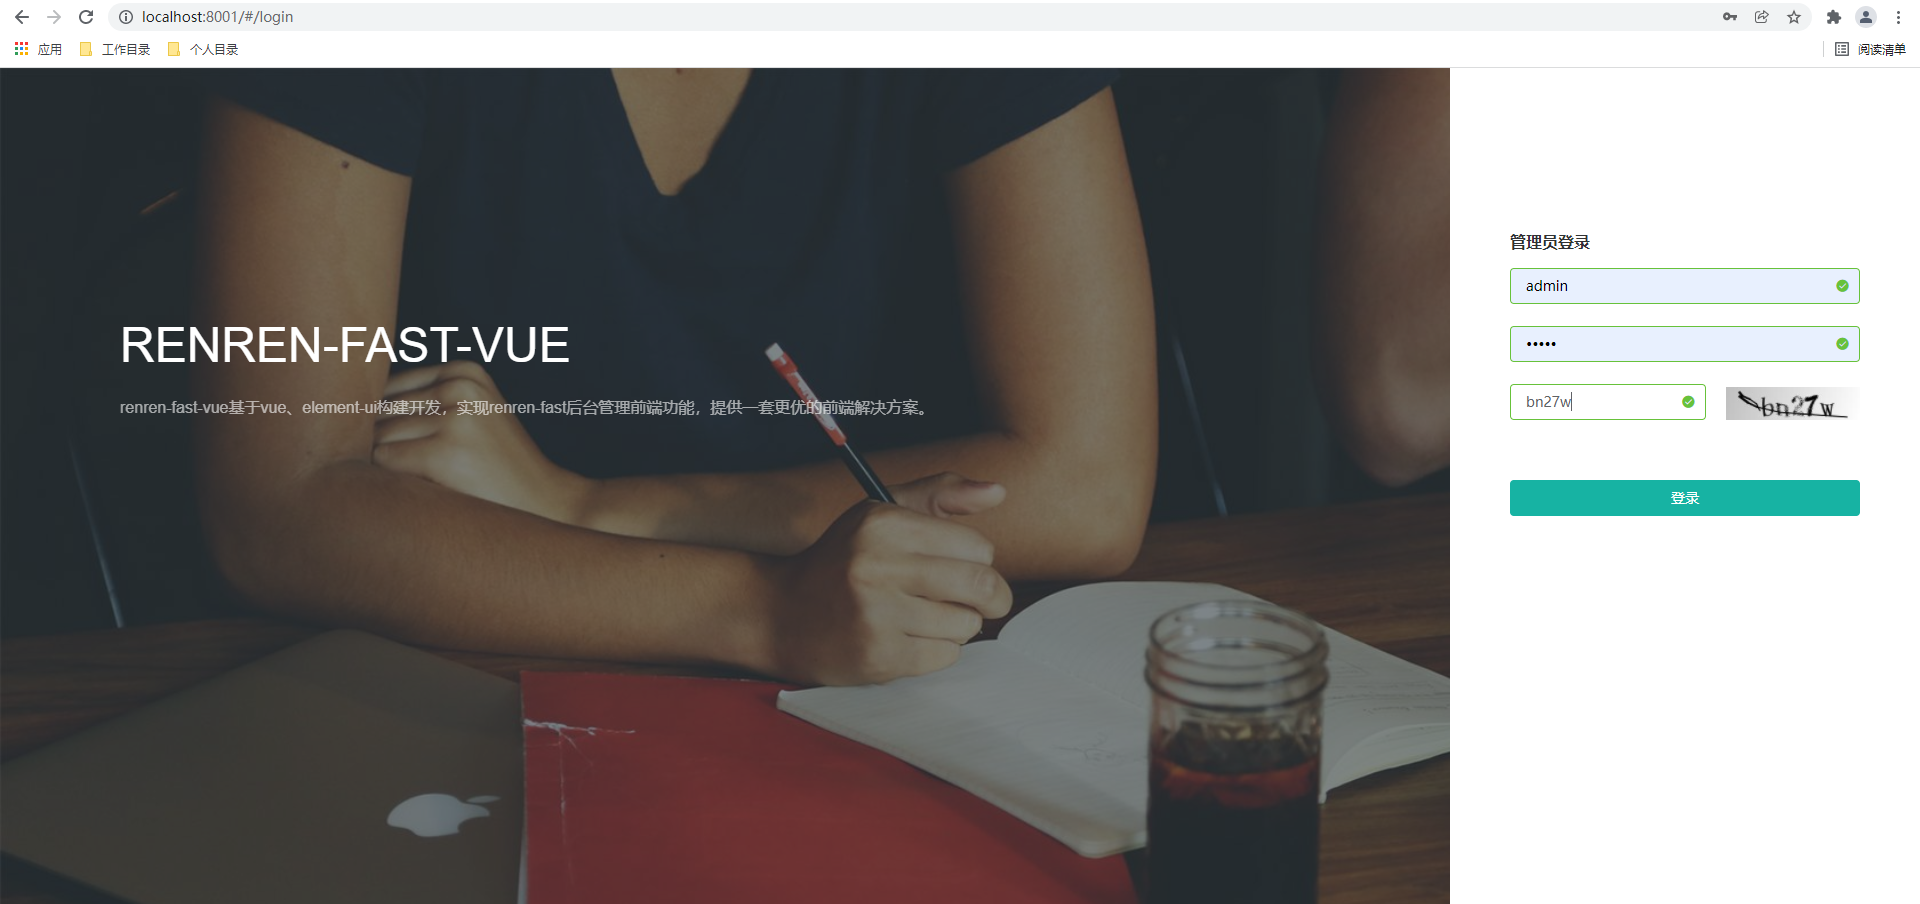
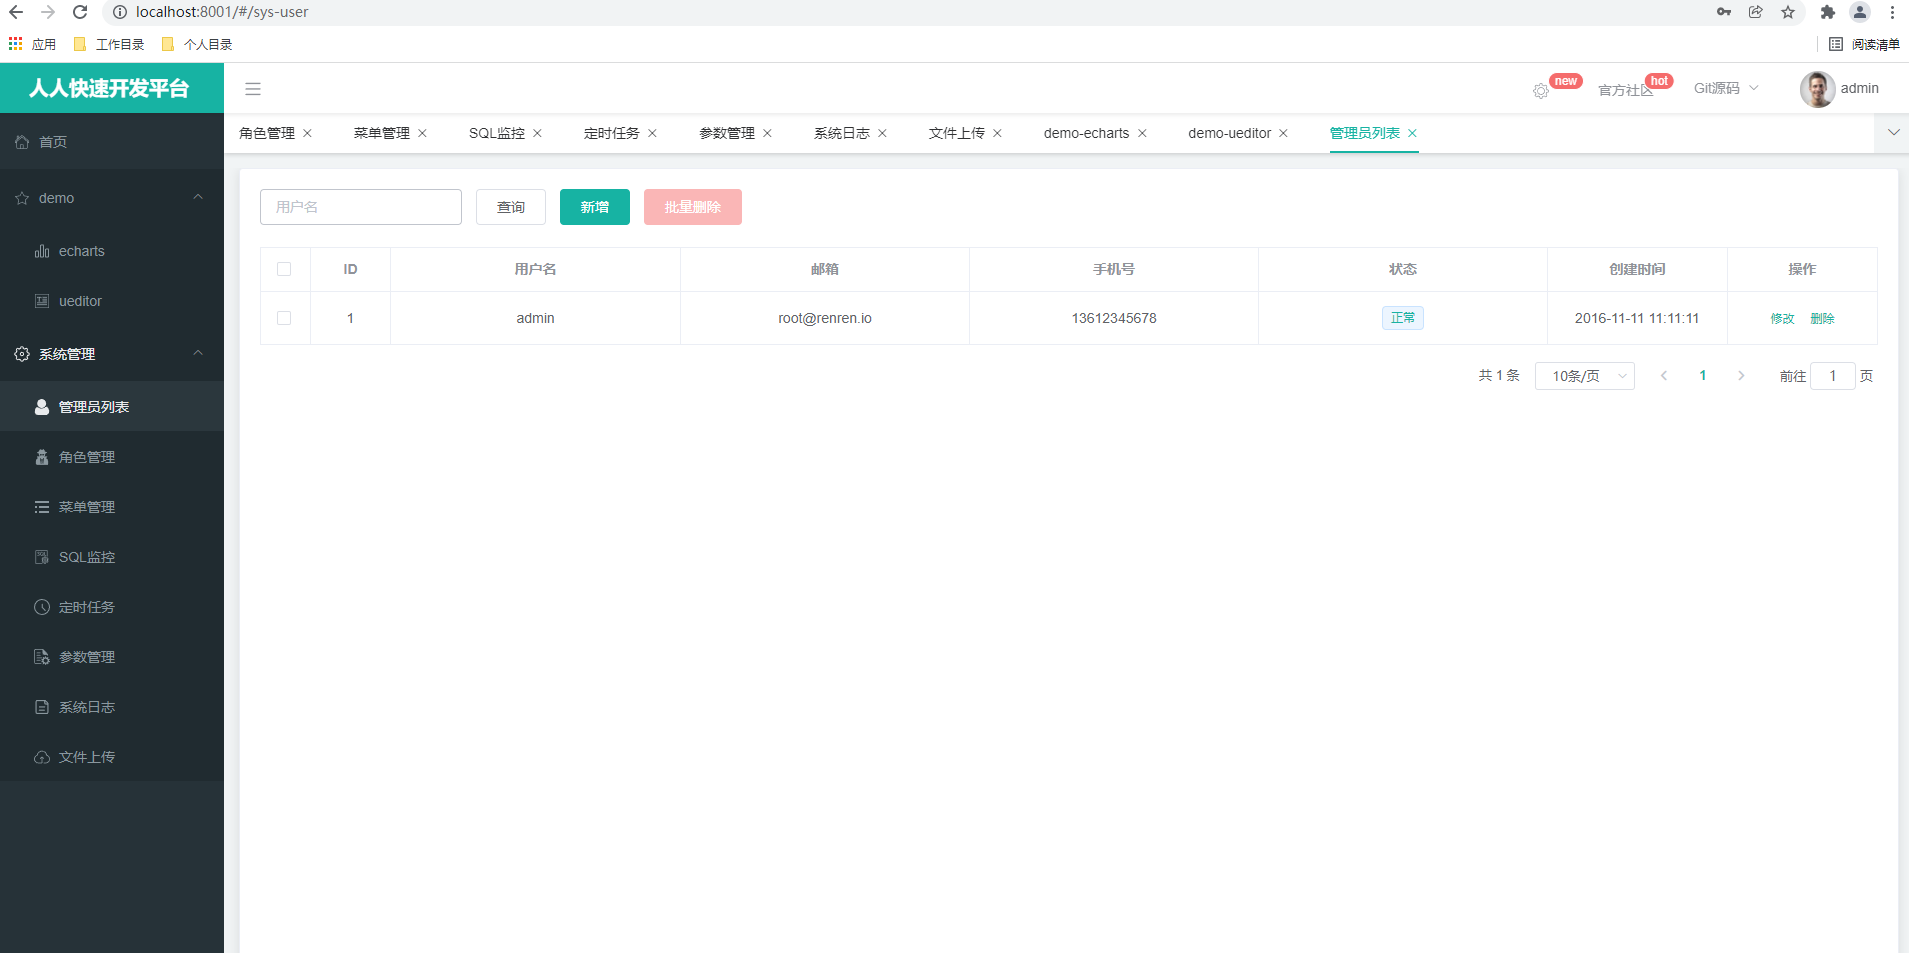
访问的页面
|
|
|
|
|
|
|
|
|
|
|
|
管理页面信息
|
|
|
|
|
|
|
|
|
|
|
|
#### 4.4.3 generator项目
|
|
|
|
|
|
导入人人-generator项目,来实现快速生成相关的模板代码。
|
|
|
|
|
|

|
|
|
|
|
|
调整对应的数据库的配置
|
|
|
|
|
|
|
|
|
|
|
|
设置生成的模板文件相关的基础信息
|
|
|
|
|
|

|
|
|
|
|
|
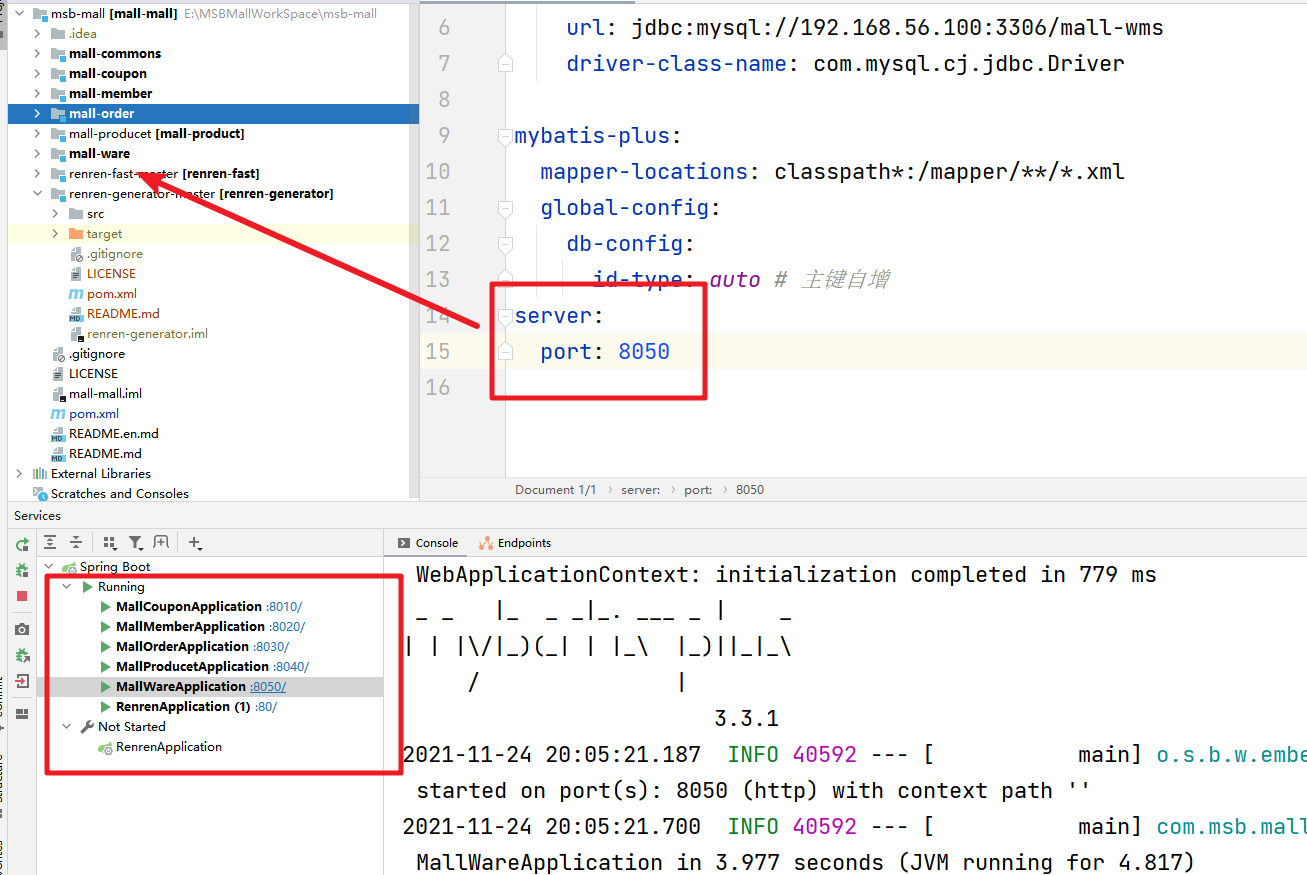
启动项目,生成对应的模板代码,启动后的项目的端口 80
|
|
|
|
|
|

|
|
|
|
|
|
点击生成
|
|
|
|
|
|
|
|
|
|
|
|
#### 4.4.4 商品系统调试
|
|
|
|
|
|
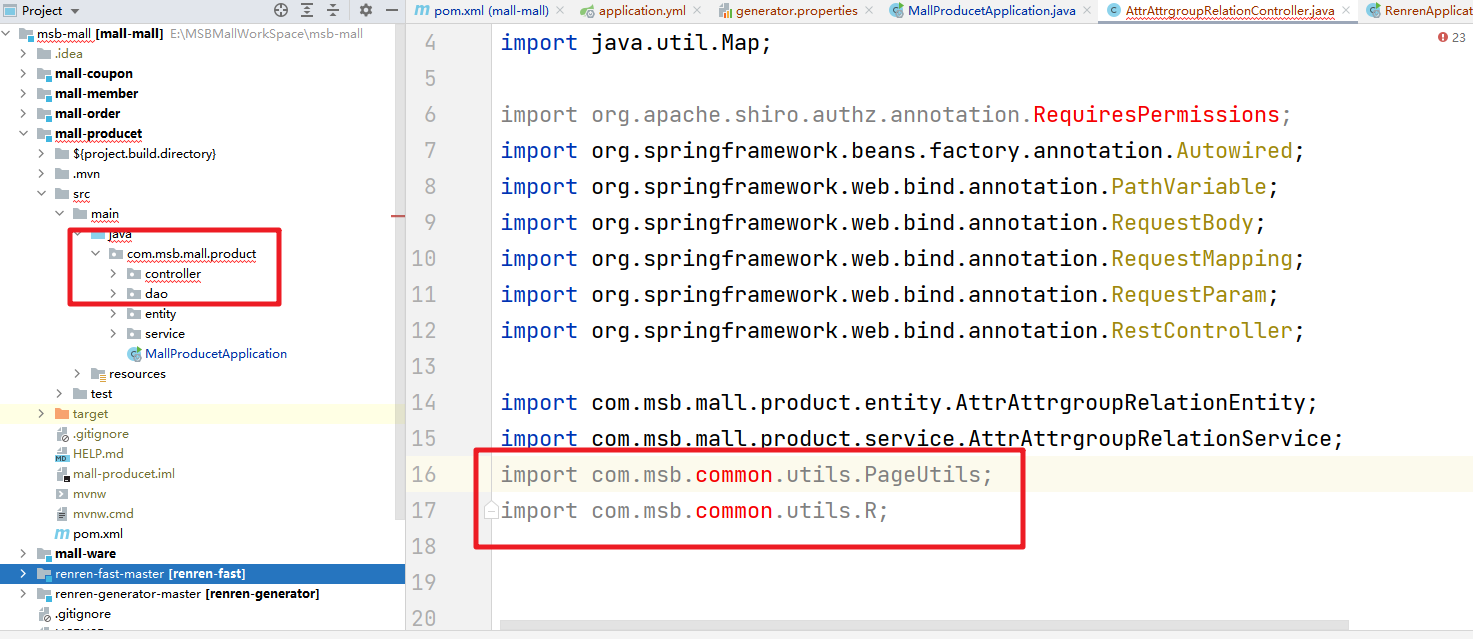
首先把生成的相关的模板文件拷贝到商品模块中。然后我们会发现代码有相关的错误提示,原因是缺少了renren-fast中的相关的依赖
|
|
|
|
|
|
|
|
|
|
|
|
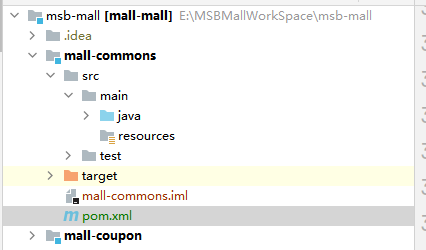
针对这个情况,我们可以创建一个commons模块来存放所有的微服务需要的公共内容
|
|
|
|
|
|
|
|
|
|
|
|
创建的项目我们需要添加的依赖
|
|
|
|
|
|
```xml
|
|
|
<dependencies>
|
|
|
<!-- 引入MyBatisPlus的依赖 -->
|
|
|
<!-- https://mvnrepository.com/artifact/com.baomidou/mybatis-plus -->
|
|
|
<dependency>
|
|
|
<groupId>com.baomidou</groupId>
|
|
|
<artifactId>mybatis-plus</artifactId>
|
|
|
<version>3.4.3.4</version>
|
|
|
</dependency>
|
|
|
<!-- 添加lombok的依赖 -->
|
|
|
<dependency>
|
|
|
<groupId>org.projectlombok</groupId>
|
|
|
<artifactId>lombok</artifactId>
|
|
|
<version>1.18.22</version>
|
|
|
</dependency>
|
|
|
|
|
|
<dependency>
|
|
|
<groupId>commons-lang</groupId>
|
|
|
<artifactId>commons-lang</artifactId>
|
|
|
<version>2.6</version>
|
|
|
</dependency>
|
|
|
|
|
|
<dependency>
|
|
|
<groupId>org.apache.httpcomponents</groupId>
|
|
|
<artifactId>httpcore</artifactId>
|
|
|
<version>4.4.14</version>
|
|
|
</dependency>
|
|
|
</dependencies>
|
|
|
|
|
|
```
|
|
|
|
|
|
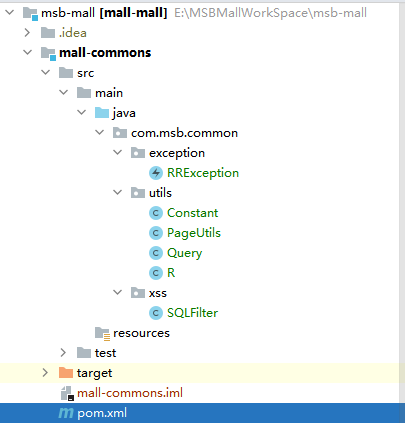
需要添加的工具类
|
|
|
|
|
|
|
|
|
|
|
|
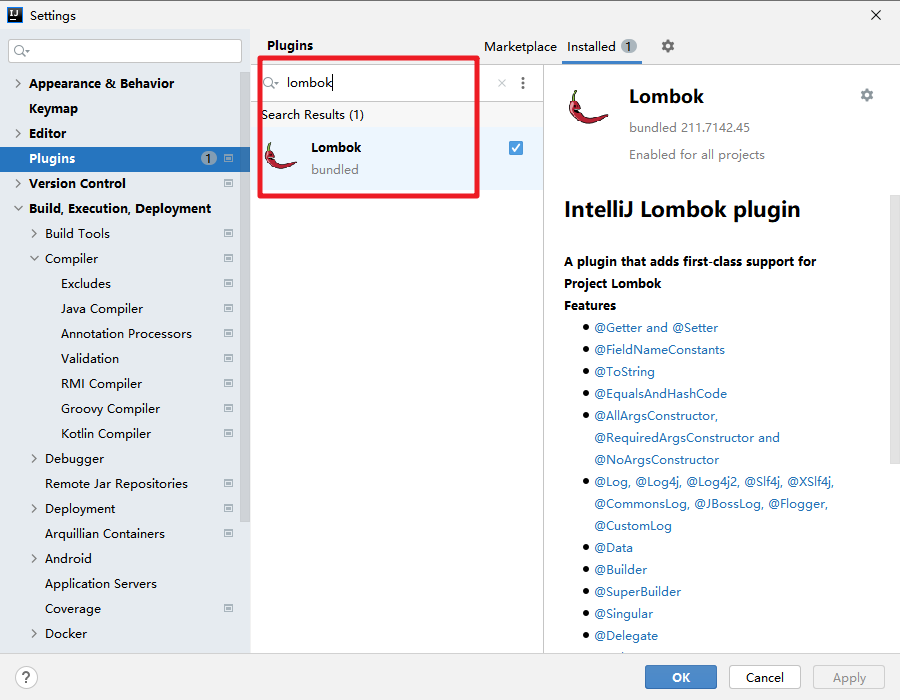
lombok插件安装
|
|
|
|
|
|
|
|
|
|
|
|
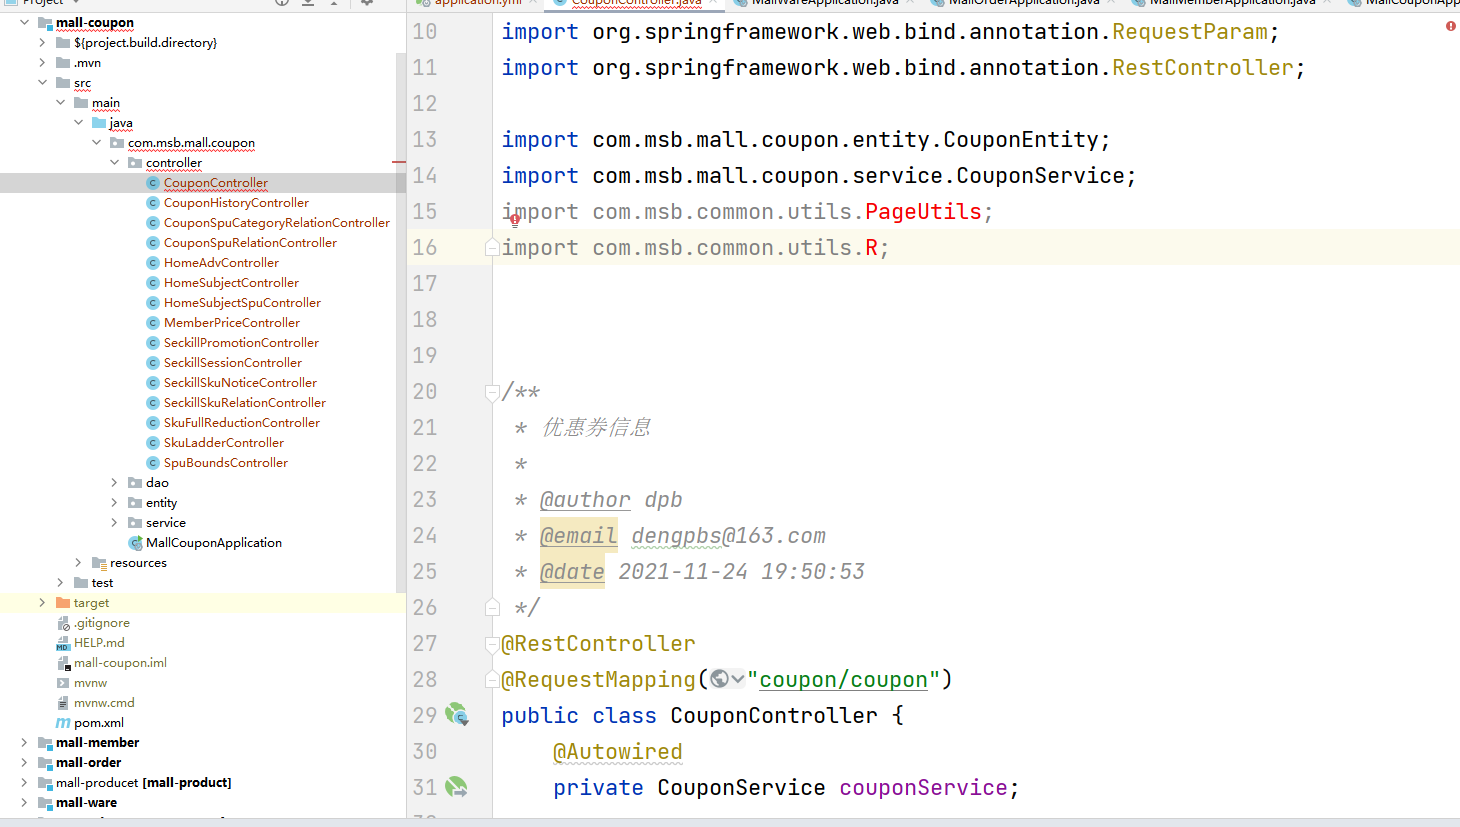
最后我们在product项目中引入commons的依赖
|
|
|
|
|
|

|
|
|
|
|
|
#### 4.4.5 MyBatisPlus整合
|
|
|
|
|
|
需要添加相关的MyBatisPlus的依赖
|
|
|
|
|
|
```xml
|
|
|
<dependency>
|
|
|
<groupId>com.baomidou</groupId>
|
|
|
<artifactId>mybatis-plus-boot-starter</artifactId>
|
|
|
<version>3.3.1</version>
|
|
|
</dependency>
|
|
|
|
|
|
<!-- mysql依赖 -->
|
|
|
<dependency>
|
|
|
<groupId>mysql</groupId>
|
|
|
<artifactId>mysql-connector-java</artifactId>
|
|
|
<version>8.0.11</version>
|
|
|
</dependency>
|
|
|
```
|
|
|
|
|
|
然后完成mybatisPlus的相关配置
|
|
|
|
|
|
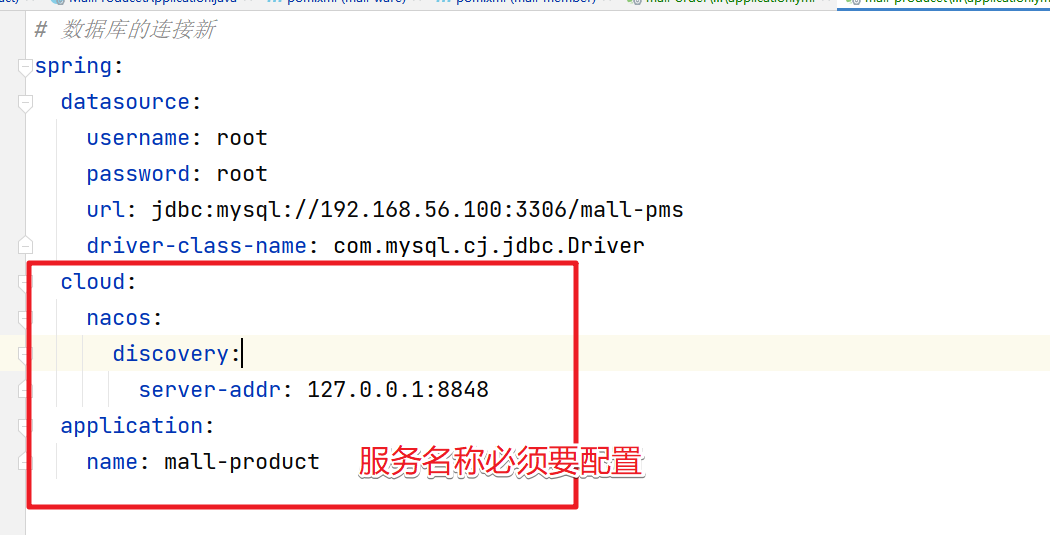
数据库的相关连接信息配置
|
|
|
|
|
|
```yml
|
|
|
# 数据库的连接新
|
|
|
spring:
|
|
|
datasource:
|
|
|
username: root
|
|
|
password: root
|
|
|
url: jdbc:mysql://192.168.56.100:3306/mall-pms
|
|
|
driver-class-name: com.mysql.cj.jdbc.Driver
|
|
|
```
|
|
|
|
|
|
制定Mapper接口的路径
|
|
|
|
|
|
```java
|
|
|
@SpringBootApplication
|
|
|
// 指定Mapper接口对应的路径
|
|
|
@MapperScan("com.msb.mall.product.dao")
|
|
|
public class MallProducetApplication {
|
|
|
|
|
|
public static void main(String[] args) {
|
|
|
SpringApplication.run(MallProducetApplication.class, args);
|
|
|
}
|
|
|
|
|
|
}
|
|
|
```
|
|
|
|
|
|
还需要制定Mapper映射文件的路径
|
|
|
|
|
|
```yml
|
|
|
mybatis-plus:
|
|
|
mapper-locations: classpath*:/mapper/**/*.xml
|
|
|
global-config:
|
|
|
db-config:
|
|
|
id-type: auto # 主键自增
|
|
|
```
|
|
|
|
|
|
测试
|
|
|
|
|
|
```java
|
|
|
@SpringBootTest(classes = MallProducetApplication.class)
|
|
|
class MallProducetApplicationTests {
|
|
|
|
|
|
@Autowired
|
|
|
BrandService brandService;
|
|
|
|
|
|
@Test
|
|
|
void contextLoads() {
|
|
|
BrandEntity entity = new BrandEntity();
|
|
|
entity.setName("魅族");
|
|
|
brandService.save(entity);
|
|
|
}
|
|
|
|
|
|
@Test
|
|
|
void selectAll() {
|
|
|
List<BrandEntity> list = brandService.list();
|
|
|
for (BrandEntity entity : list) {
|
|
|
System.out.println(entity);
|
|
|
}
|
|
|
}
|
|
|
|
|
|
@Test
|
|
|
void selectById() {
|
|
|
List<BrandEntity> list = brandService
|
|
|
.list(new QueryWrapper<BrandEntity>().eq("brand_id",2));
|
|
|
for (BrandEntity entity : list) {
|
|
|
System.out.println(entity);
|
|
|
}
|
|
|
}
|
|
|
|
|
|
}
|
|
|
|
|
|
```
|
|
|
|
|
|
#### 4.4.6 生成其他模块代码
|
|
|
|
|
|
通过generator代码生成其他模块的代码
|
|
|
|
|
|
|
|
|
|
|
|
但同时也会因为没有依赖commons项目所有有报错,那么每个微服务我们都让其依赖commons项目,然后每个项目都需要整合MyBatisPlus,按照product模块的方式实现即可。
|
|
|
|
|
|
然后分别给每个服务设置对应的端口
|
|
|
|
|
|
|
|
|
|
|
|
能正常运行那么说明微服务中的各个生成的模板代码没有问题。搞定!
|
|
|
|
|
|
## 5.微服务环境
|
|
|
|
|
|
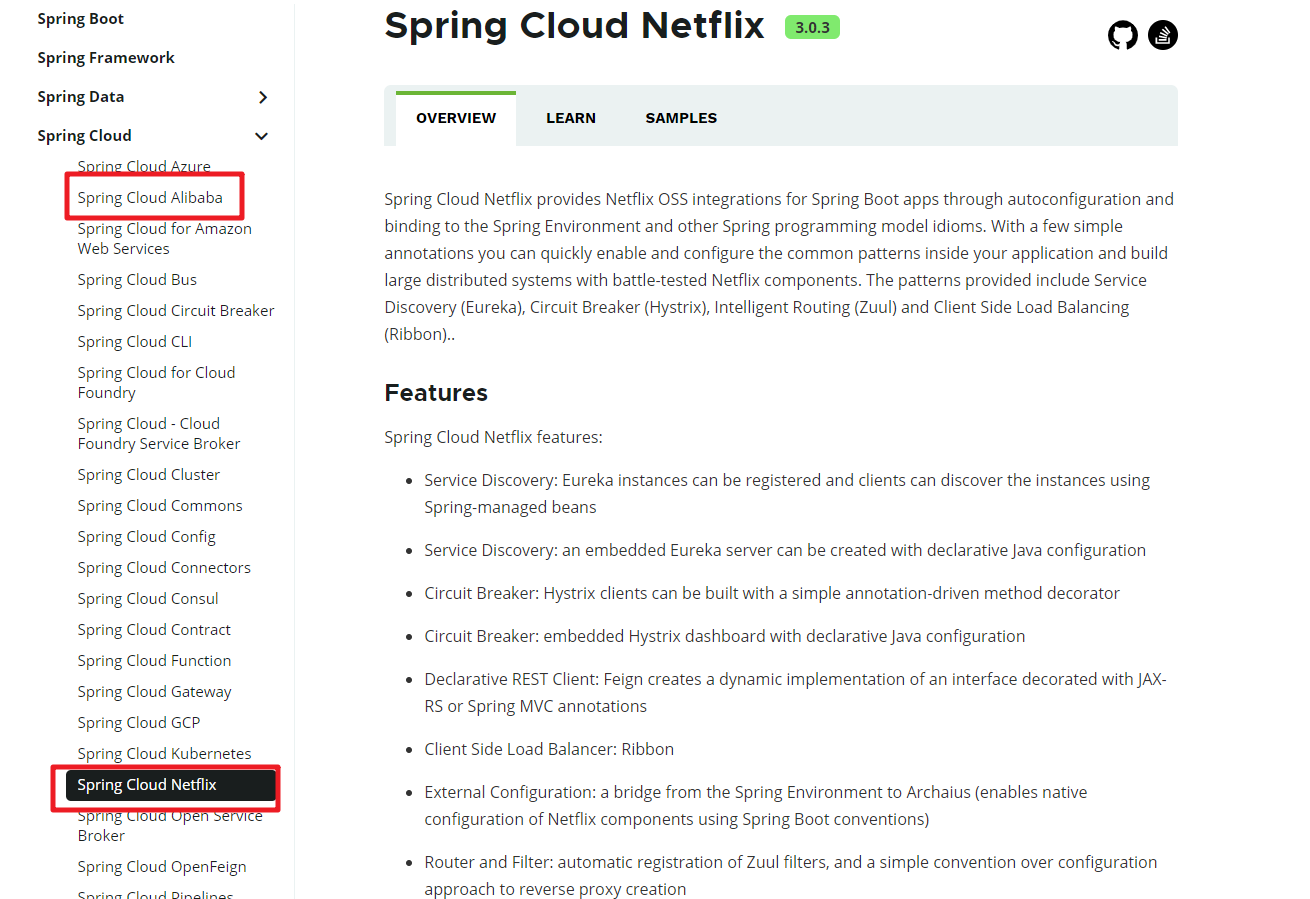
在SpringCloud出现之前,微服务架构我们也能够解决。但是选择五花八门,比较乱,针对这种情况,SpringCloud整合一套微服务的解决方案。
|
|
|
|
|
|
SpringCloud生态提供了快速构建微服务的技术组件。[https://spring.io/projects/spring-cloud-netflix](https://spring.io/projects/spring-cloud-netflix)
|
|
|
|
|
|
|
|
|
|
|
|
版本 关键词描述
|
|
|
|
|
|
* SR (发行版)
|
|
|
* RC (后续发行版本)
|
|
|
* M1/M2(PRE) 里程碑
|
|
|
* GA 稳定版
|
|
|
* BUILD-XXX 开发版
|
|
|
|
|
|
SpringCloud和SpringBoot的关联关系
|
|
|
|
|
|
大版本对应:
|
|
|
|
|
|
| Spring Cloud | Spring Boot |
|
|
|
| ------------------------ | ---------------------------------------------- |
|
|
|
| Angel版本 | 兼容Spring Boot 1.2.x |
|
|
|
| Brixton版本 | 兼容Spring Boot 1.3.x,也兼容Spring Boot 1.4.x |
|
|
|
| Camden版本 | 兼容Spring Boot 1.4.x,也兼容Spring Boot 1.5.x |
|
|
|
| Dalston版本、Edgware版本 | 兼容Spring Boot 1.5.x,不兼容Spring Boot 2.0.x |
|
|
|
| Finchley版本 | 兼容Spring Boot 2.0.x,不兼容Spring Boot 1.5.x |
|
|
|
| Greenwich版本 | 兼容Spring Boot 2.1.x |
|
|
|
| Hoxtonl版本 | 兼容Spring Boot 2.2.x |
|
|
|
|
|
|
在实际开发过程中,我们需要更详细的版本对应:
|
|
|
|
|
|
| **Spring Boot** | **Spring Cloud** |
|
|
|
| ---------------------------- | ----------------------- |
|
|
|
| 1.5.2.RELEASE | Dalston.RC1 |
|
|
|
| 1.5.9.RELEASE | Edgware.RELEASE |
|
|
|
| 2.0.2.RELEASE | Finchley.BUILD-SNAPSHOT |
|
|
|
| 2.0.3.RELEASE | Finchley.RELEASE |
|
|
|
| 2.1.0.RELEASE-2.1.14.RELEASE | Greenwich.SR5 |
|
|
|
| 2.2.0.M4 | Hoxton.SR4 |
|
|
|
|
|
|
SpringCloud版本是和SpringBoot有关联关系的,官网中可以查看:[https://docs.spring.io/spring-cloud/docs/current/reference/html/](https://docs.spring.io/spring-cloud/docs/current/reference/html/)
|
|
|
|
|
|
### 5.1 SpringCloudAlibaba介绍
|
|
|
|
|
|
SpringCloudAlibaba GitHub地址:https://github.com/alibaba/spring-cloud-alibaba/
|
|
|
|
|
|
中文网站对应的地址:https://github.com/alibaba/spring-cloud-alibaba/blob/master/README-zh.md
|
|
|
|
|
|
* 注册中心:Nacos
|
|
|
* 配置中心:Nacos
|
|
|
* 负载均衡:Ribbon
|
|
|
* 声明式服务调用:OpenFegin
|
|
|
* 服务容错:Sentinel
|
|
|
* 网关服务:Gateway
|
|
|
* 链路监控:Sleuth
|
|
|
* 分布式事务:Seata
|
|
|
|
|
|
SpringCloudAlibaba和SpringBoot的对应版本
|
|
|
|
|
|

|
|
|
|
|
|
针对于SpringCloudAlibaba的版本关系,我们需要调整SpringBoot和SpringCloud的版本
|
|
|
|
|
|

|
|
|
|
|
|
然后我们在commons服务中设置SpringCloudAlibaba的依赖管理
|
|
|
|
|
|
```xml
|
|
|
<dependencyManagement>
|
|
|
<dependencies>
|
|
|
<dependency>
|
|
|
<groupId>com.alibaba.cloud</groupId>
|
|
|
<artifactId>spring-cloud-alibaba-dependencies</artifactId>
|
|
|
<version>2021.1</version>
|
|
|
<type>pom</type>
|
|
|
<scope>import</scope>
|
|
|
</dependency>
|
|
|
</dependencies>
|
|
|
</dependencyManagement>
|
|
|
```
|
|
|
|
|
|
### 5.2 Nacos注册中心
|
|
|
|
|
|
#### 5.2.1 Nacos服务搭建
|
|
|
|
|
|
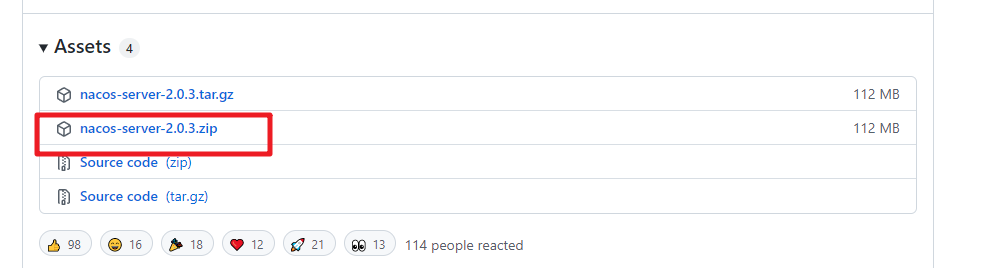
我们首先在Nacos的GitHub中下载相关的安装文件。https://github.com/alibaba/nacos/releases
|
|
|
|
|
|
|
|
|
|
|
|
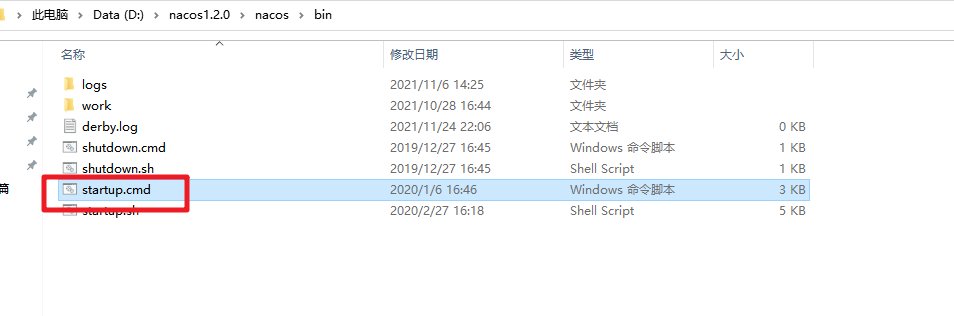
但是因为服务器在国外,所以我们直接给大家提供了对应的安装文件。直接解压缩到非中文的目录下,然后启动即可
|
|
|
|
|
|
|
|
|
|
|
|
|
|
|
|
|
|
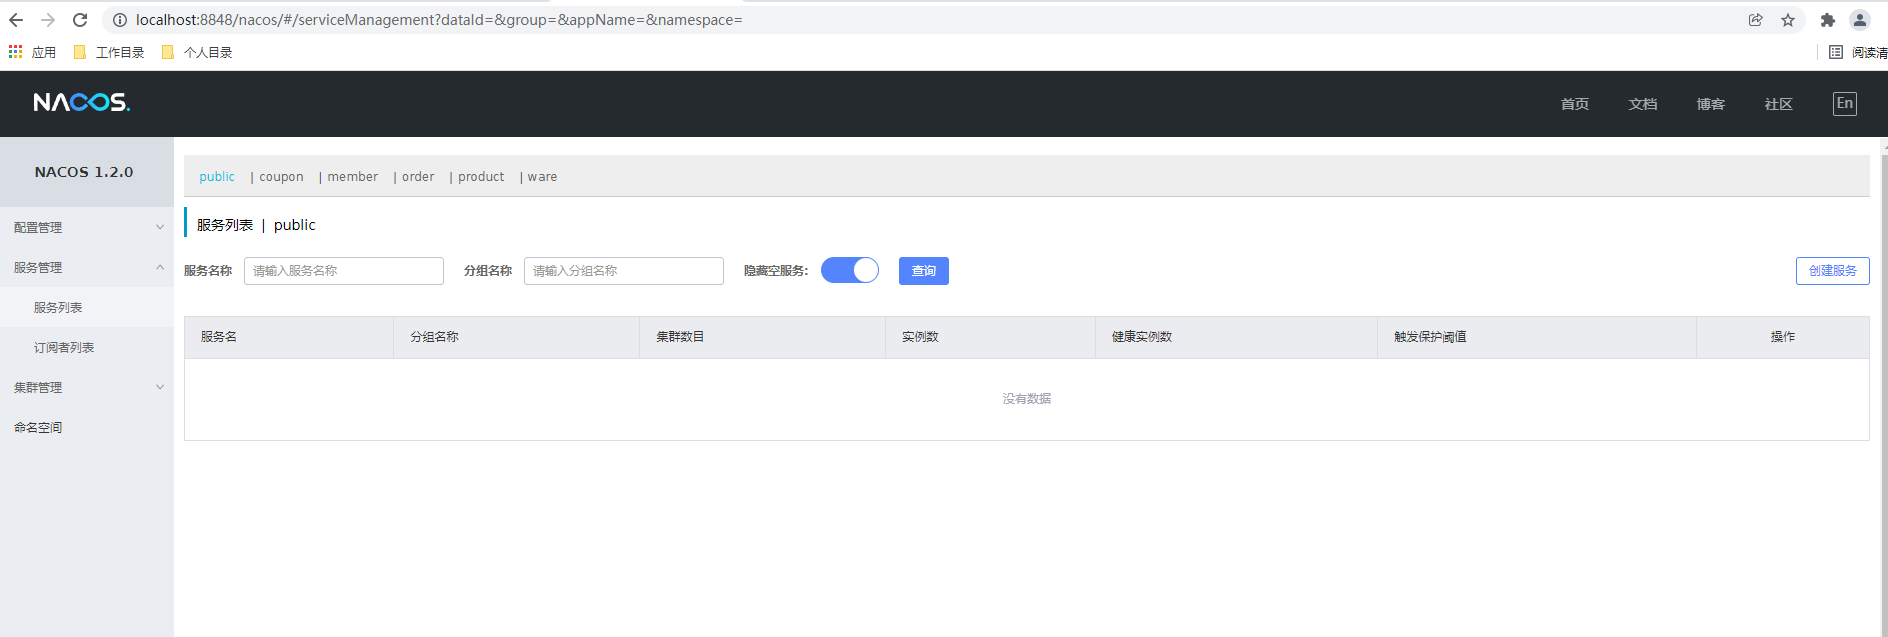
服务访问的地址是:http://localhost:8848/nacos
|
|
|
|
|
|
|
|
|
|
|
|
#### 5.2.2 Nacos服务注册
|
|
|
|
|
|
引入相关的依赖文件:
|
|
|
|
|
|
```xml
|
|
|
<dependency>
|
|
|
<groupId>com.alibaba.cloud</groupId>
|
|
|
<artifactId>spring-cloud-starter-alibaba-nacos-discovery</artifactId>
|
|
|
</dependency>
|
|
|
|
|
|
```
|
|
|
|
|
|
放开注册中心:@EnableDiscoveryClient
|
|
|
|
|
|
```java
|
|
|
// 放开注册中心
|
|
|
@EnableDiscoveryClient
|
|
|
@SpringBootApplication
|
|
|
// 指定Mapper接口对应的路径
|
|
|
@MapperScan("com.msb.mall.product.dao")
|
|
|
public class MallProducetApplication {
|
|
|
|
|
|
public static void main(String[] args) {
|
|
|
SpringApplication.run(MallProducetApplication.class, args);
|
|
|
}
|
|
|
|
|
|
}
|
|
|
```
|
|
|
|
|
|
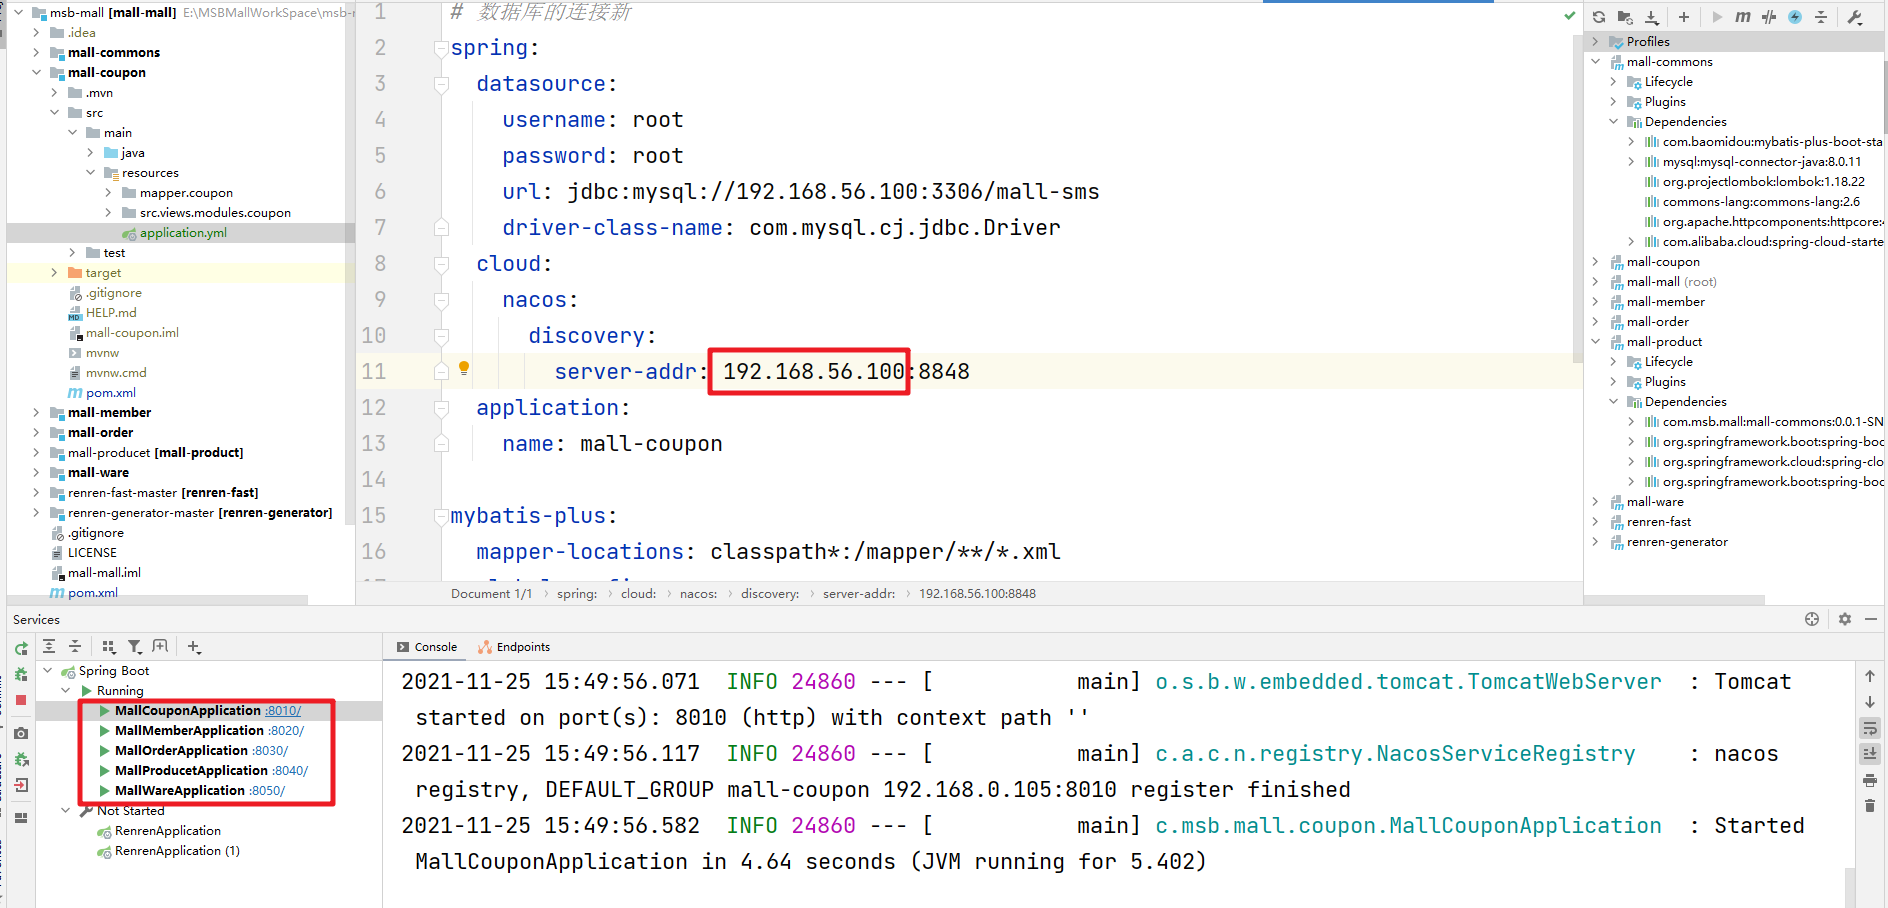
然后需要在配置问中配置注册中心的相关信息
|
|
|
|
|
|
|
|
|
|
|
|
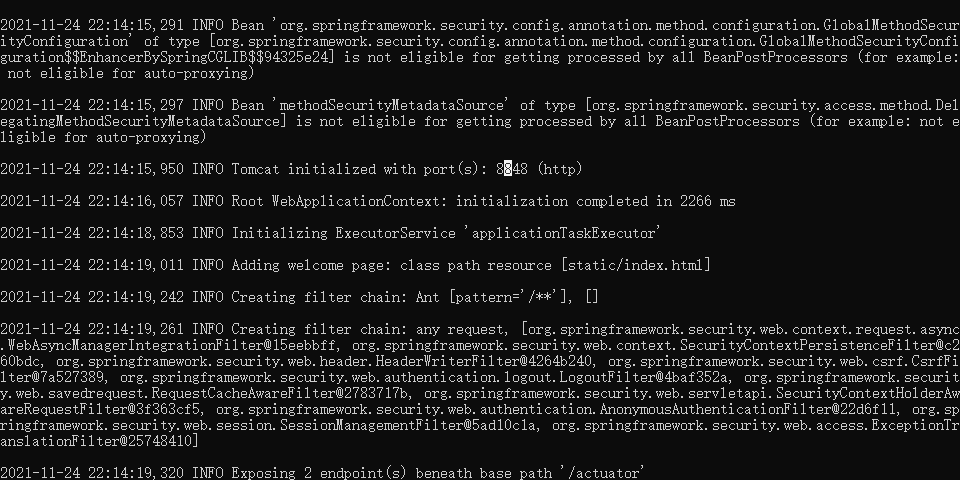
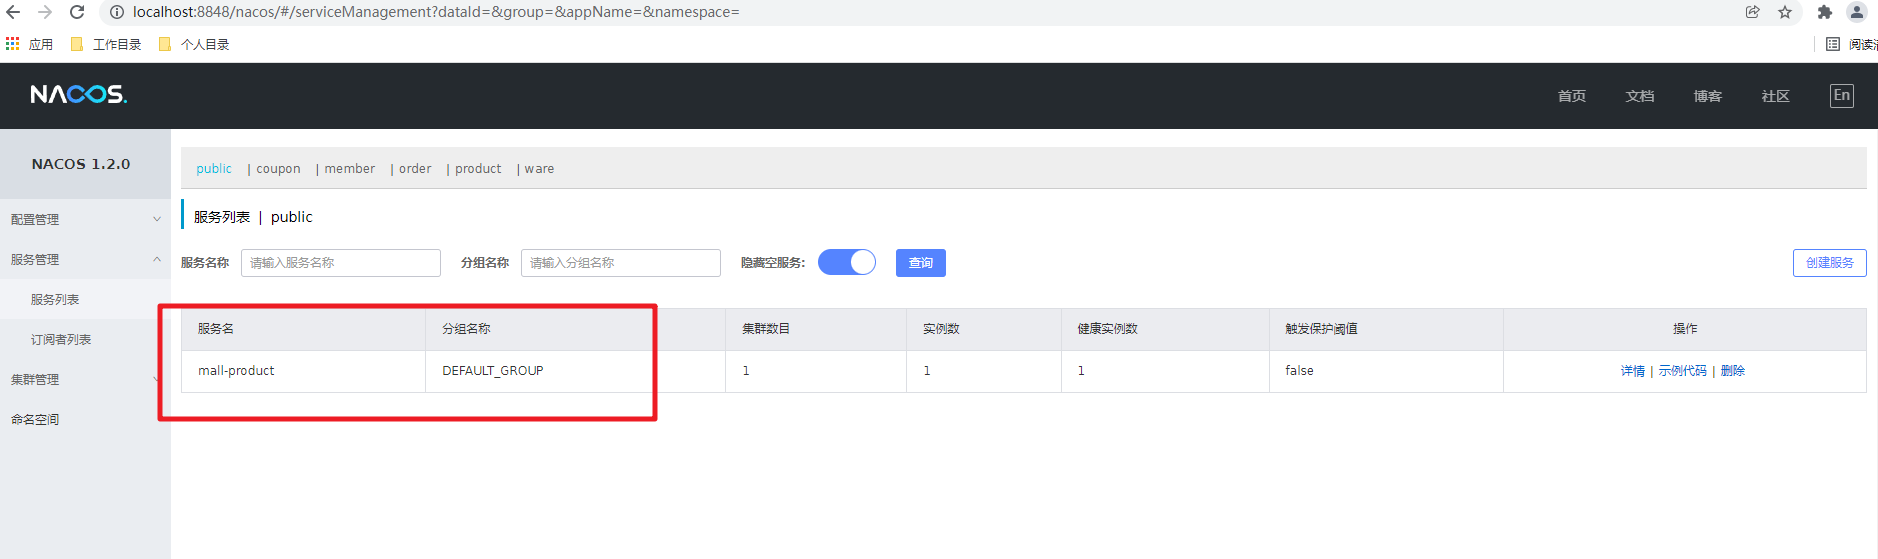
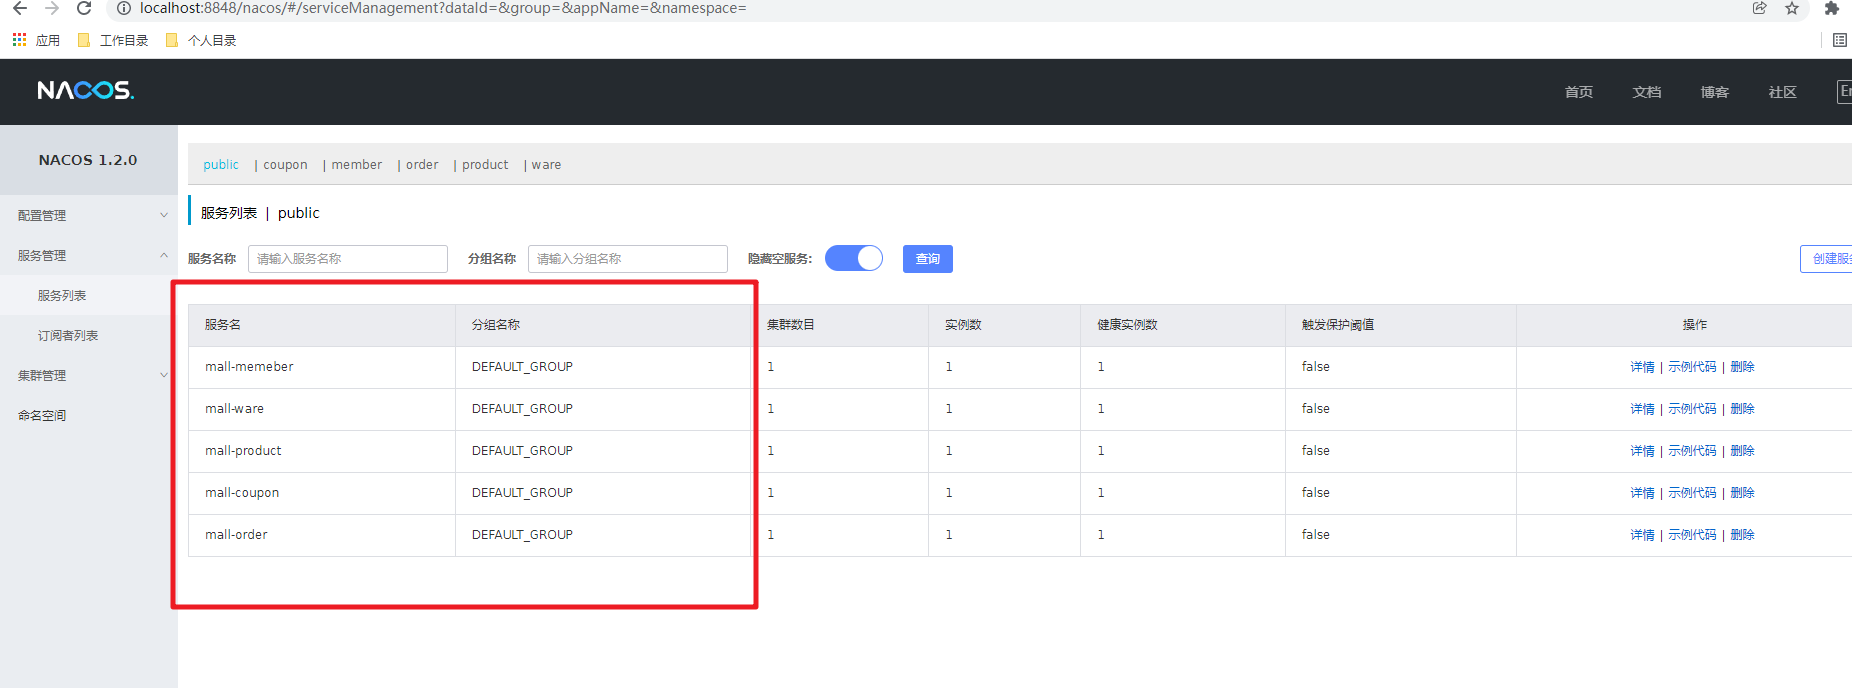
然后重启服务,我们就可以在注册中心中发现对应的服务注册信息了
|
|
|
|
|
|
|
|
|
|
|
|
那么安装相同的步骤,完成其他几个微服务的注册
|
|
|
|
|
|
|
|
|
|
|
|
#### 5.2.3 Nacos容器中安装
|
|
|
|
|
|
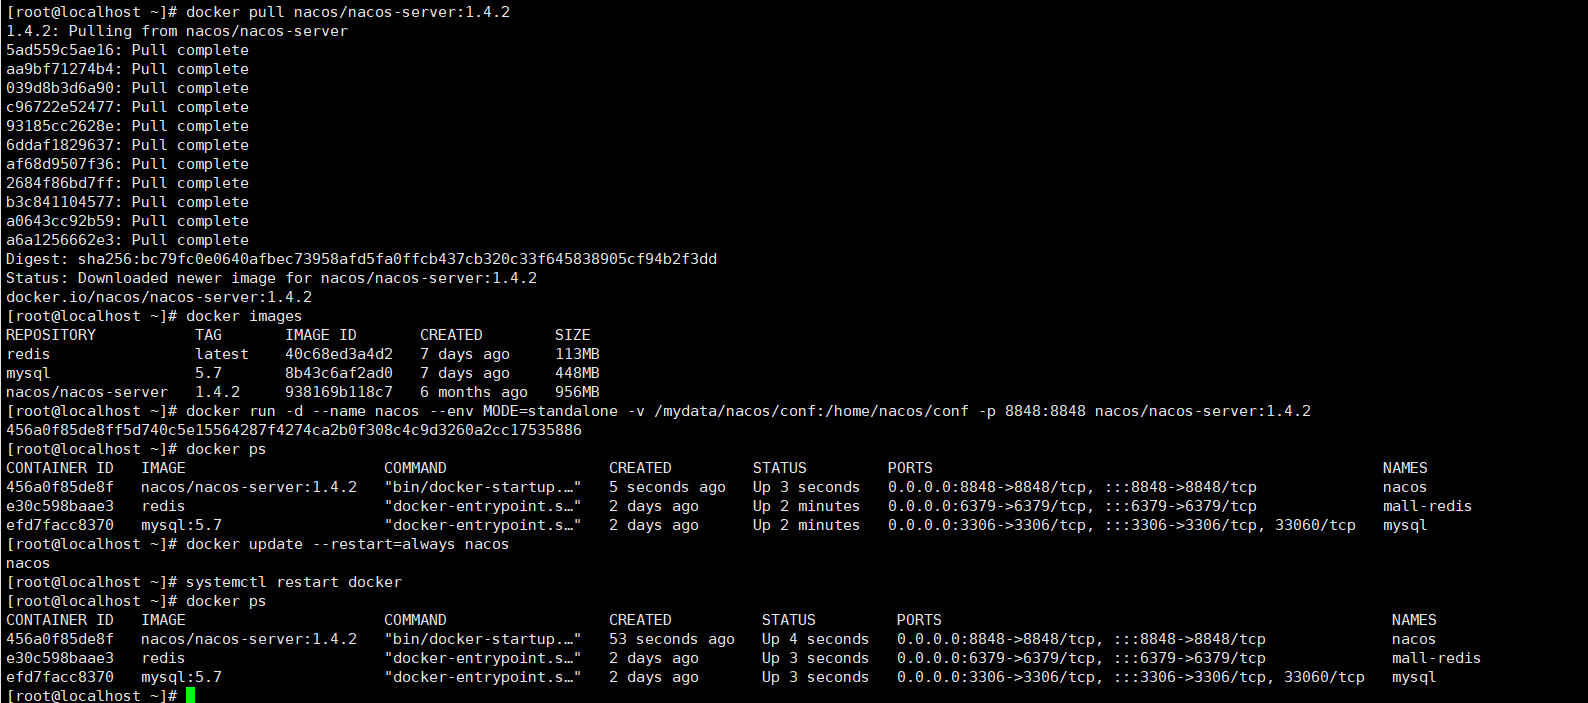
为了使用的方便,我们将Nacos安装到Docker容器中
|
|
|
|
|
|
首先我们需要拉取对应的镜像文件
|
|
|
|
|
|
```shell
|
|
|
docker pull nacos/nacos-server:1.4.2
|
|
|
```
|
|
|
|
|
|
通过镜像文件运行nacos容器
|
|
|
|
|
|
```shell
|
|
|
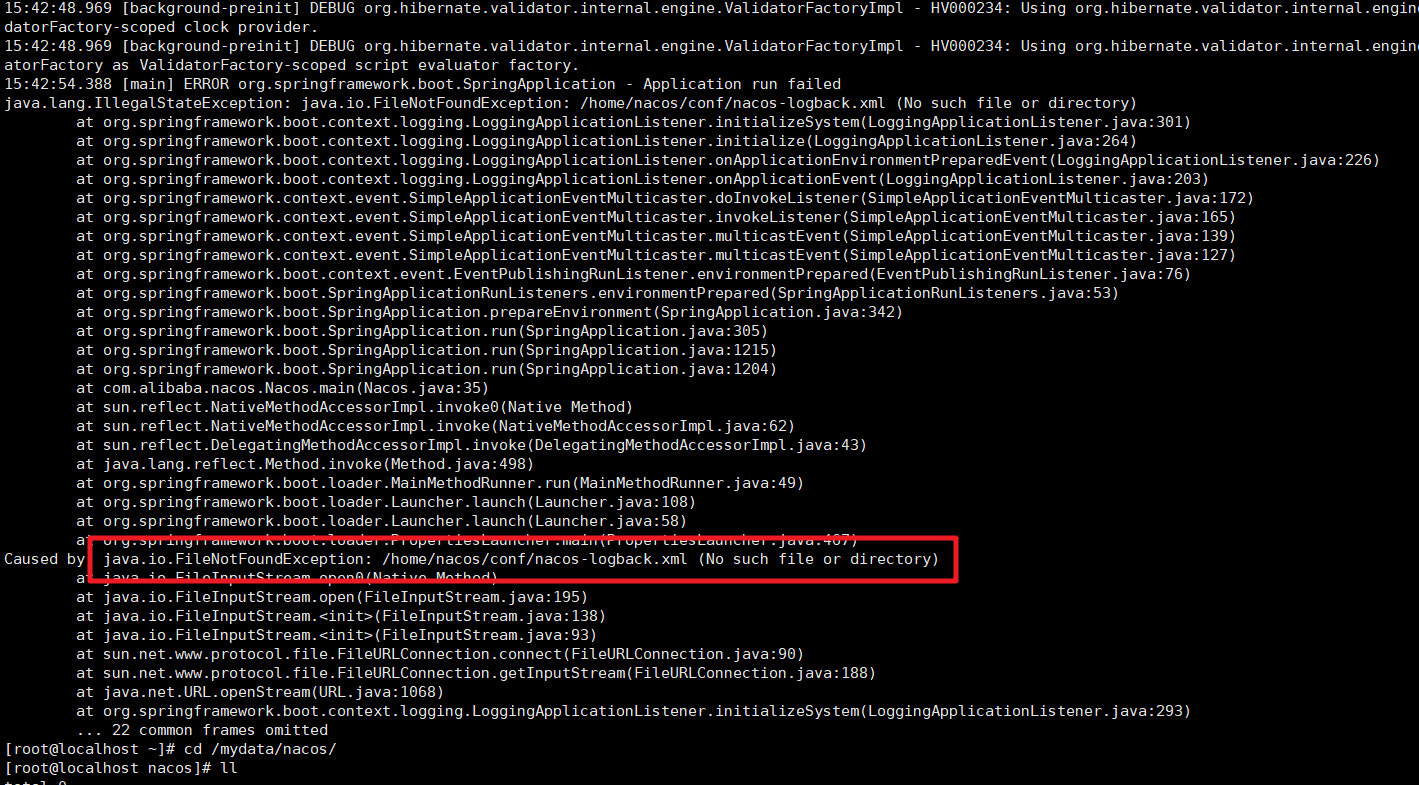
docker run -d --env MODE=standalone --name nacos -v /mydata/nacos/conf:/home/nacos/conf -p 8848:8848 nacos/nacos-server:1.4.2
|
|
|
```
|
|
|
|
|
|
安装中如果出现了如下的提示
|
|
|
|
|
|
|
|
|
|
|
|
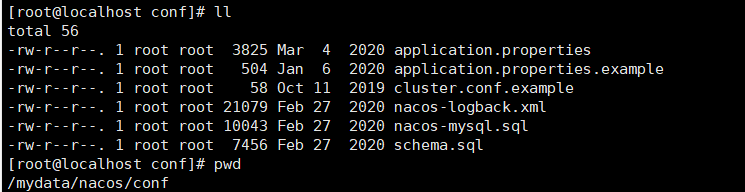
那么就把windows中的安装文件中的conf目录的文件上传到虚拟机中
|
|
|
|
|
|
|
|
|
|
|
|
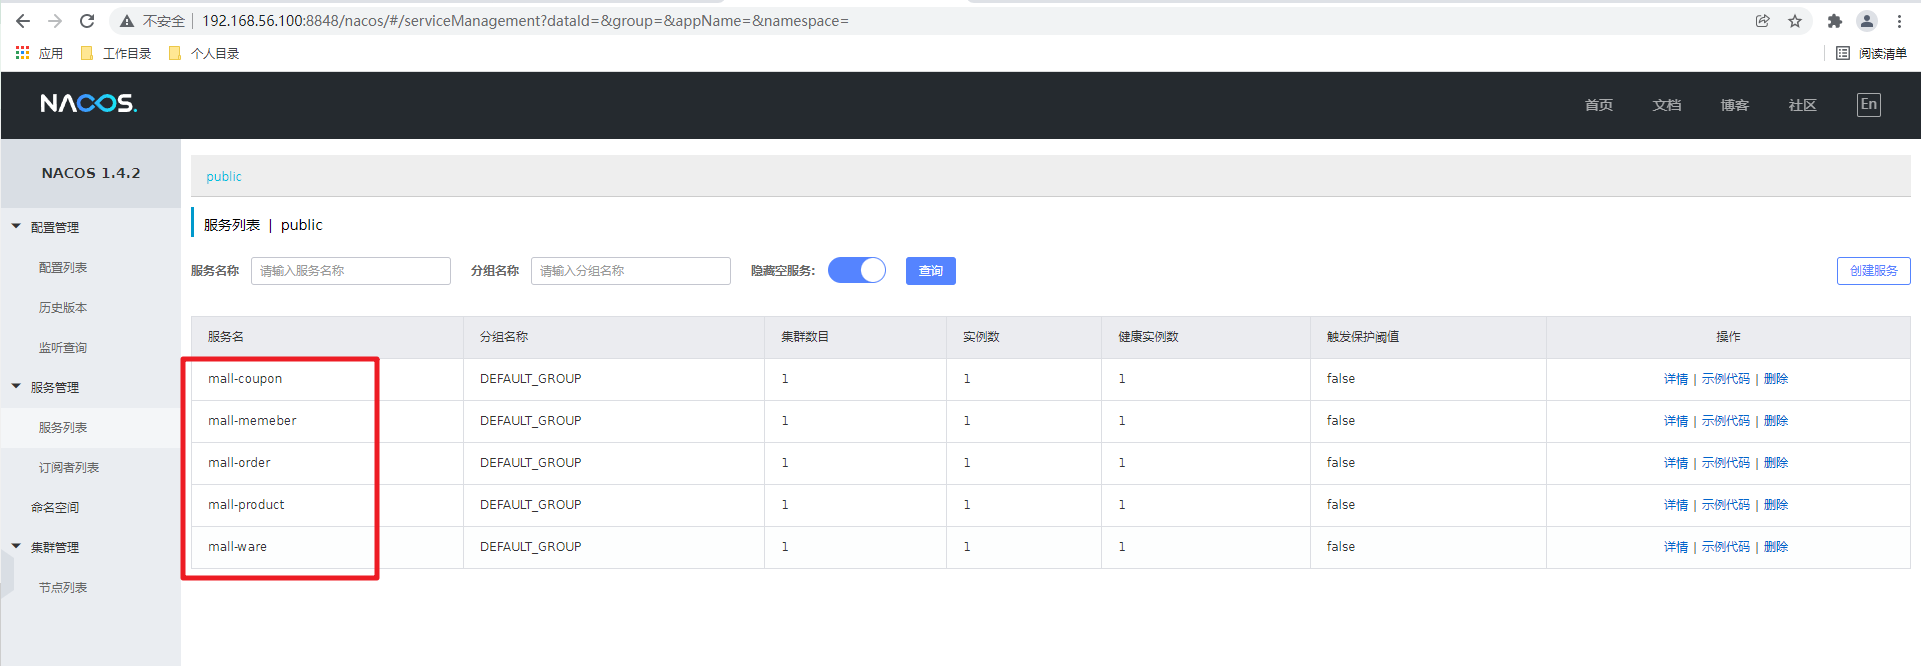
服务启动时间比较长,耐心等待一会
|
|
|
|
|
|
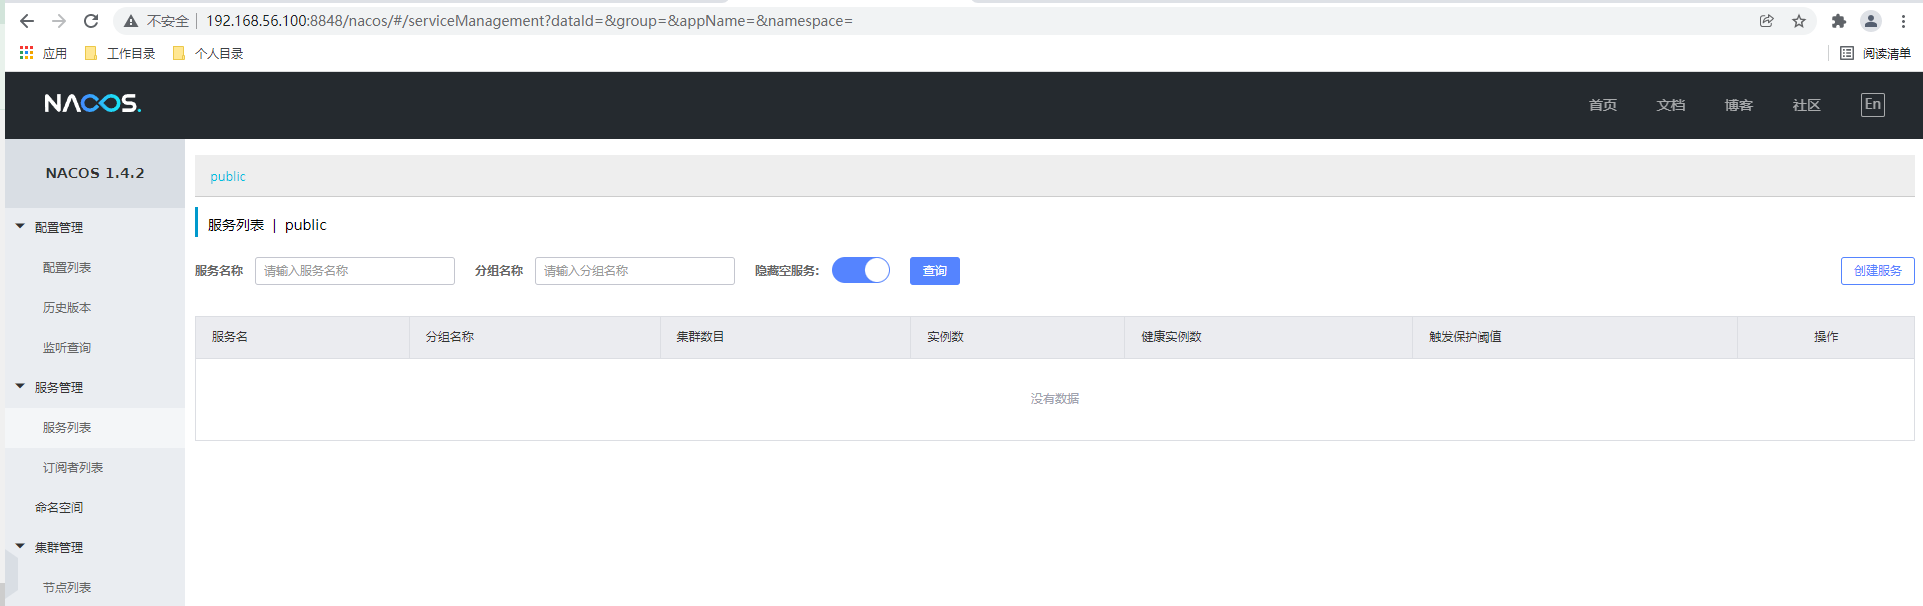
启动容器后,测试访问:
|
|
|
|
|
|
http://192.168.56.100:8848/nacos 默认的账号密码:nacos nacos
|
|
|
|
|
|
|
|
|
|
|
|
设置nacos服务自启动
|
|
|
|
|
|
```shell
|
|
|
docker update --restart=always nacos
|
|
|
```
|
|
|
|
|
|
|
|
|
|
|
|
然后将众多的微服务的注册中心地址修改为docker容器中的注册中心地址:
|
|
|
|
|
|
|
|
|
|
|
|
看到注册信息就表示操作成功了
|
|
|
|
|
|
|
|
|
|
|
|
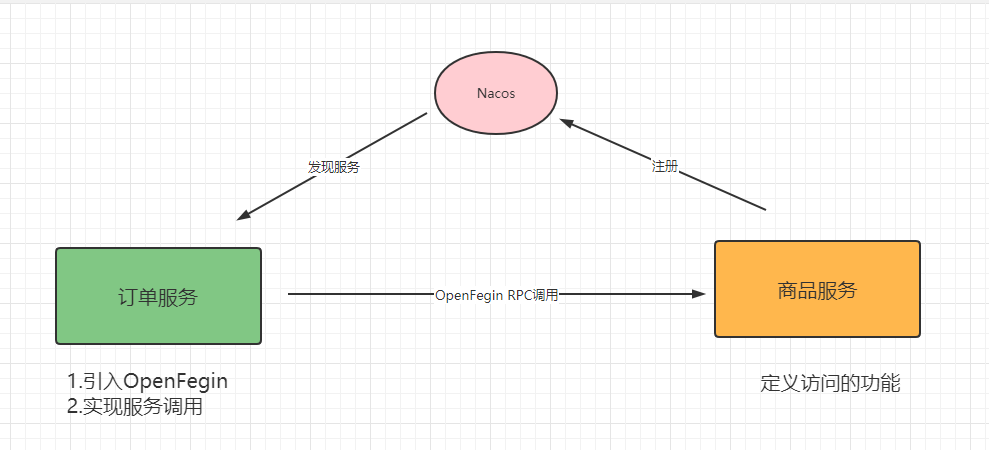
### 5.3 OpenFegin服务调用
|
|
|
|
|
|
OpenFegin是一个声明式的服务调用组件。本质上是封装的Ribbon实现的。
|
|
|
|
|
|
|
|
|
|
|
|
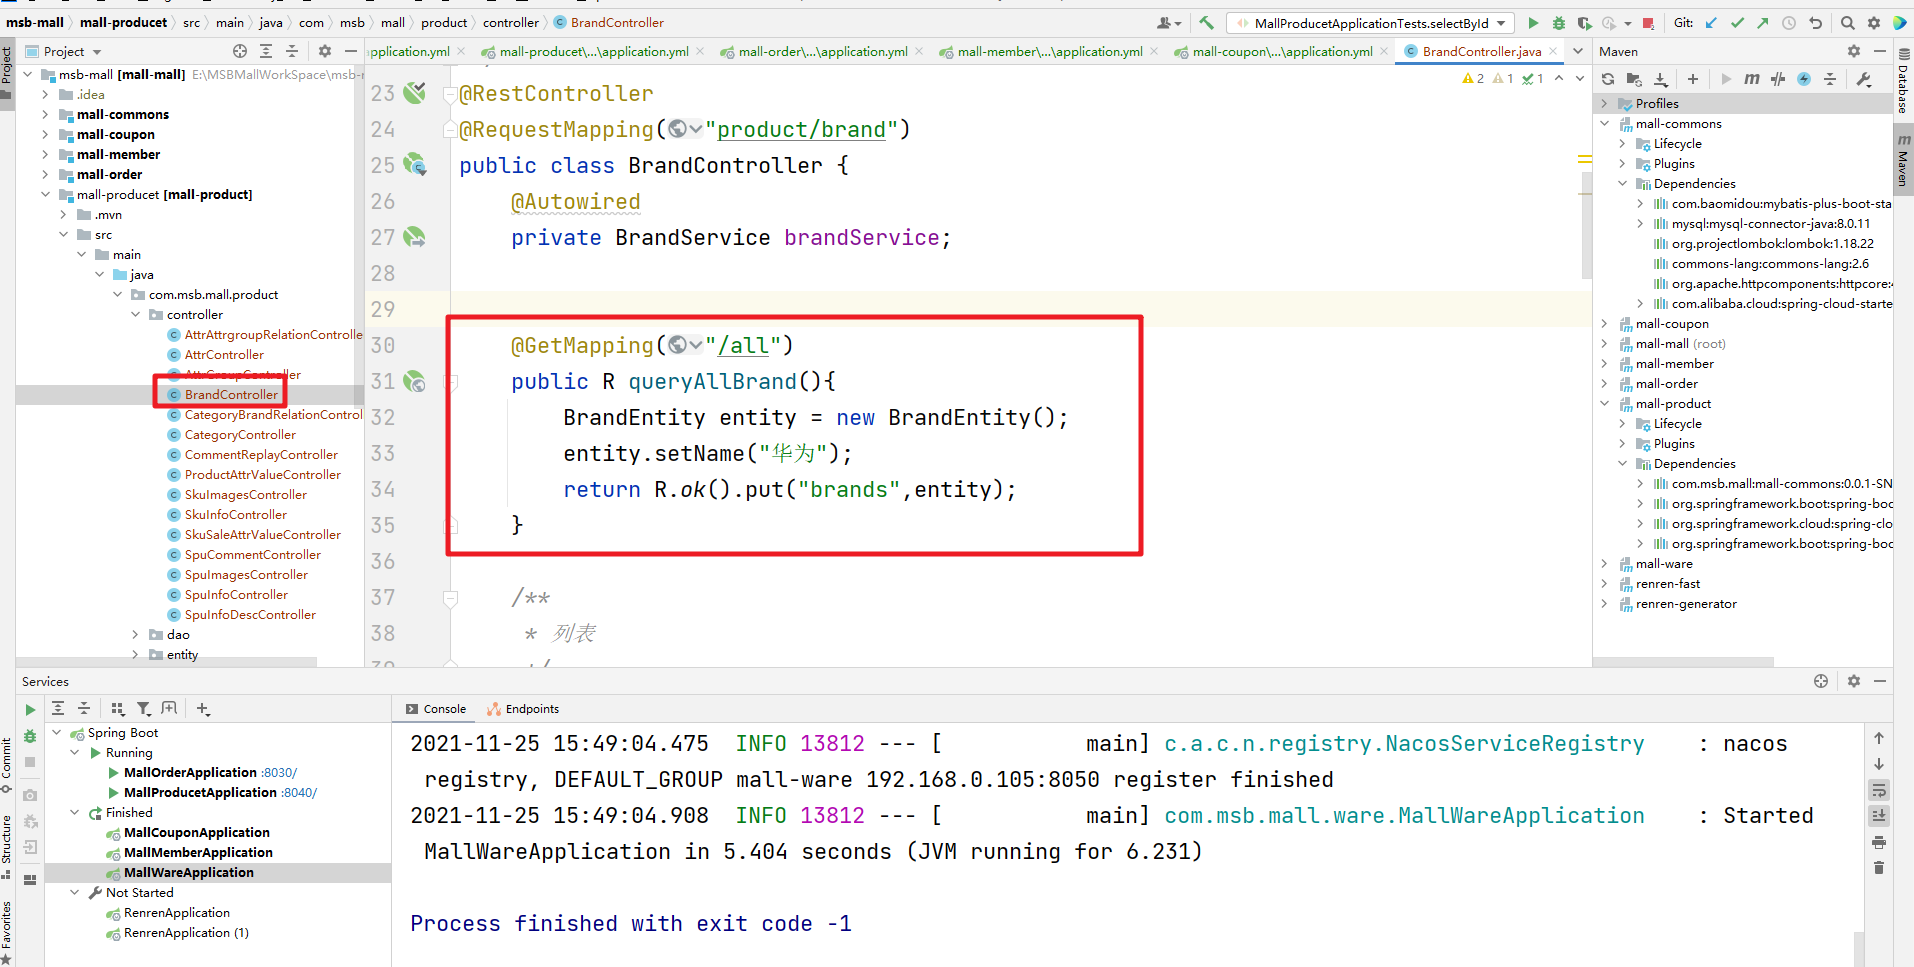
#### 5.3.1 商品服务定义接口
|
|
|
|
|
|
我们在商品服务中定义一个对外提供功能的接口
|
|
|
|
|
|
|
|
|
|
|
|
#### 5.3.2 订单服务中调用
|
|
|
|
|
|
我们在订单服务中集成OpenFegin,完成对应的商品服务调用
|
|
|
|
|
|
引入相关的依赖
|
|
|
|
|
|
```xml
|
|
|
<dependency>
|
|
|
<groupId>org.springframework.cloud</groupId>
|
|
|
<artifactId>spring-cloud-starter-openfeign</artifactId>
|
|
|
</dependency>
|
|
|
```
|
|
|
|
|
|
然后创建对应的Fegin接口
|
|
|
|
|
|
```java
|
|
|
/**
|
|
|
* @FeignClient 指明我们要从注册中心中发现的服务的名称
|
|
|
*/
|
|
|
@FeignClient(name = "mall-product")
|
|
|
public interface ProductService {
|
|
|
|
|
|
/**
|
|
|
* 需要访问的远程方法
|
|
|
* @return
|
|
|
*/
|
|
|
@GetMapping("/product/brand/all")
|
|
|
public R queryAllBrand();
|
|
|
}
|
|
|
```
|
|
|
|
|
|
还需要在启动类中开启远程调用
|
|
|
|
|
|
```java
|
|
|
/**
|
|
|
* basePackages 制定Fegin接口的路径
|
|
|
*/
|
|
|
@EnableFeignClients(basePackages = "com.msb.mall.order.fegin")
|
|
|
@EnableDiscoveryClient
|
|
|
@SpringBootApplication
|
|
|
@MapperScan("com.msb.mall.order.dao")
|
|
|
public class MallOrderApplication {
|
|
|
|
|
|
public static void main(String[] args) {
|
|
|
SpringApplication.run(MallOrderApplication.class, args);
|
|
|
}
|
|
|
|
|
|
}
|
|
|
```
|
|
|
|
|
|
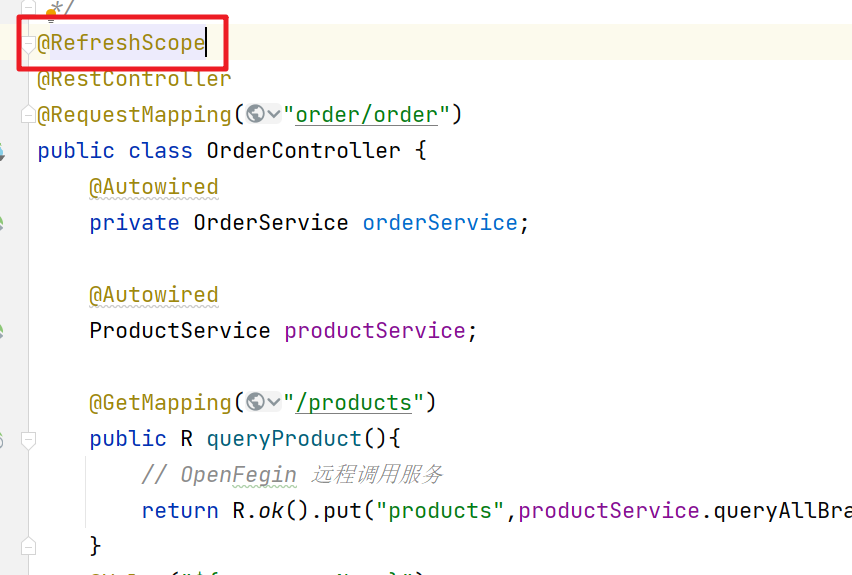
然后在Order的控制期中完成商品服务的调用
|
|
|
|
|
|
```java
|
|
|
@Autowired
|
|
|
ProductService productService;
|
|
|
|
|
|
@GetMapping("/products")
|
|
|
public R queryProduct(){
|
|
|
// OpenFegin 远程调用服务
|
|
|
return R.ok().put("products",productService.queryAllBrand());
|
|
|
}
|
|
|
```
|
|
|
|
|
|
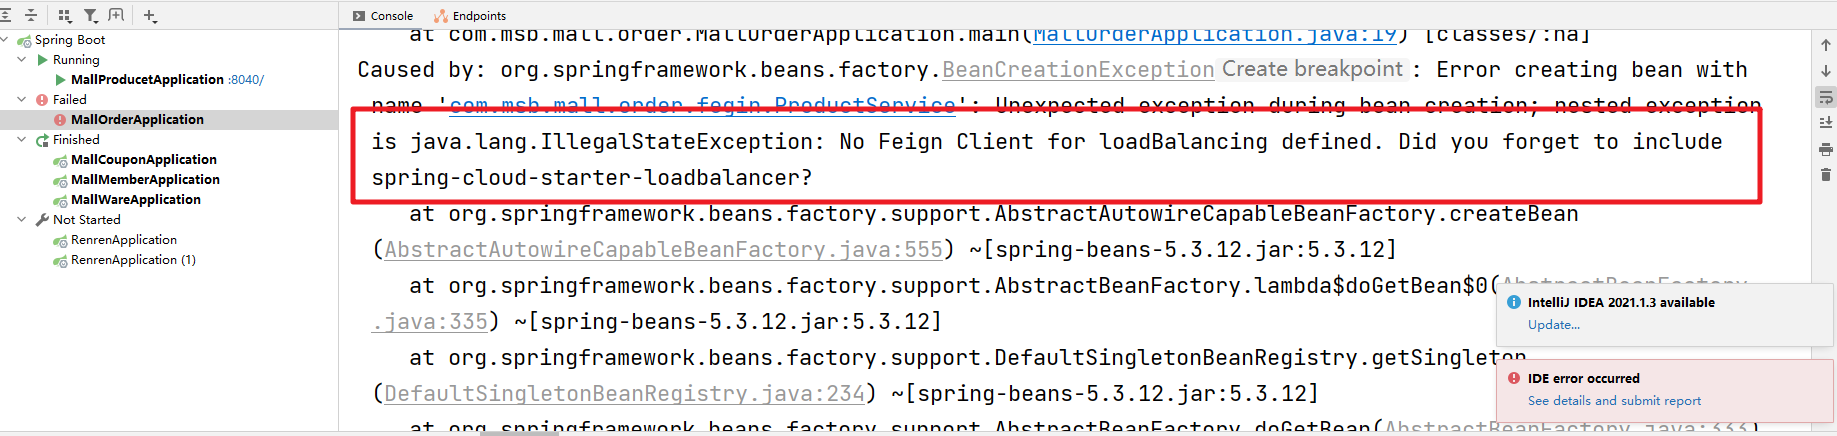
启动服务报错
|
|
|
|
|
|
|
|
|
|
|
|
然后就把相关的依赖添加上就可以了
|
|
|
|
|
|
```xml
|
|
|
<dependency>
|
|
|
<groupId>org.springframework.cloud</groupId>
|
|
|
<artifactId>spring-cloud-starter-loadbalancer</artifactId>
|
|
|
</dependency>
|
|
|
```
|
|
|
|
|
|

|
|
|
|
|
|
通过@RefreshScope来动态的刷新配置数据,注解的位置写在Controller中
|
|
|
|
|
|
|
|
|
|
|
|
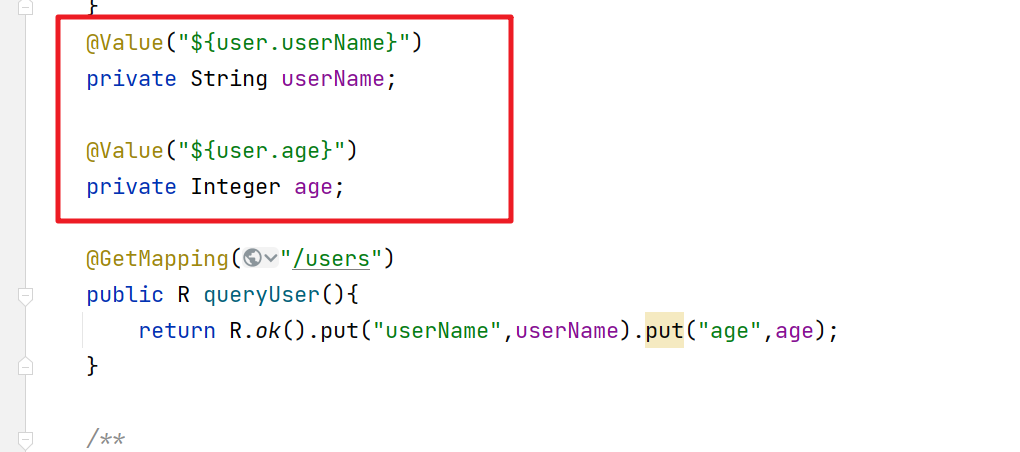
最后我们通过@Value("#{}") 来获取配置中心中的数据,配置中心的数据优先于application.yml中的属性信息
|
|
|
|
|
|
|
|
|
|
|
|
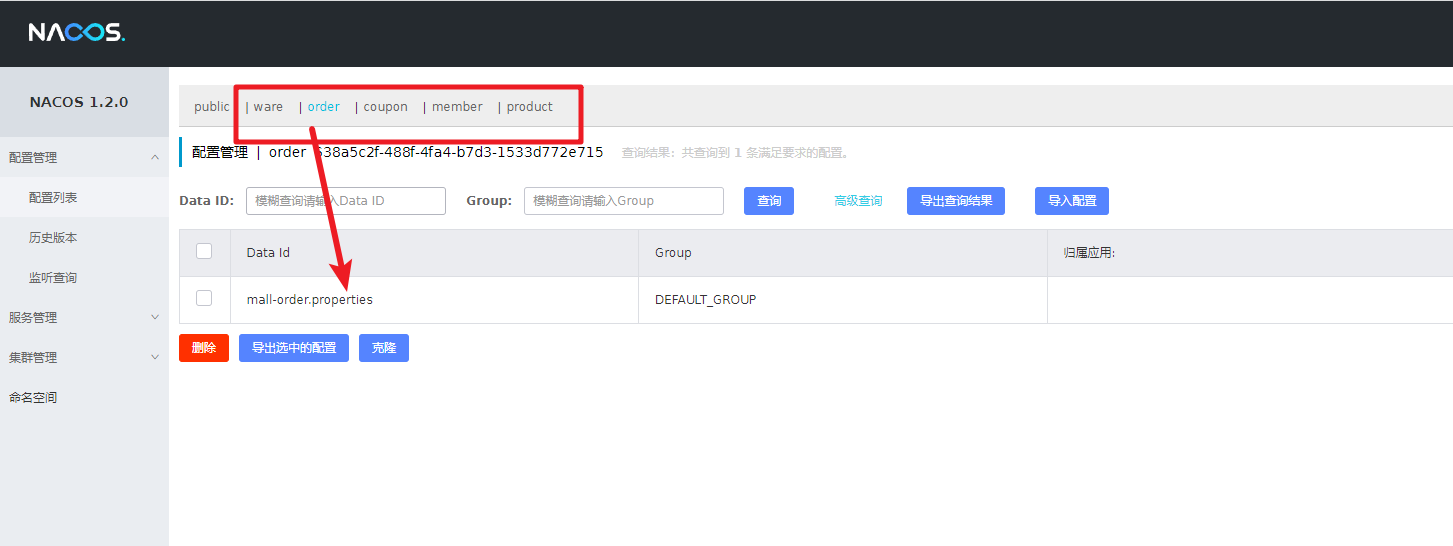
在对应的命名空间下创建对应的配置文件
|
|
|
|
|
|
|
|
|
|
|
|
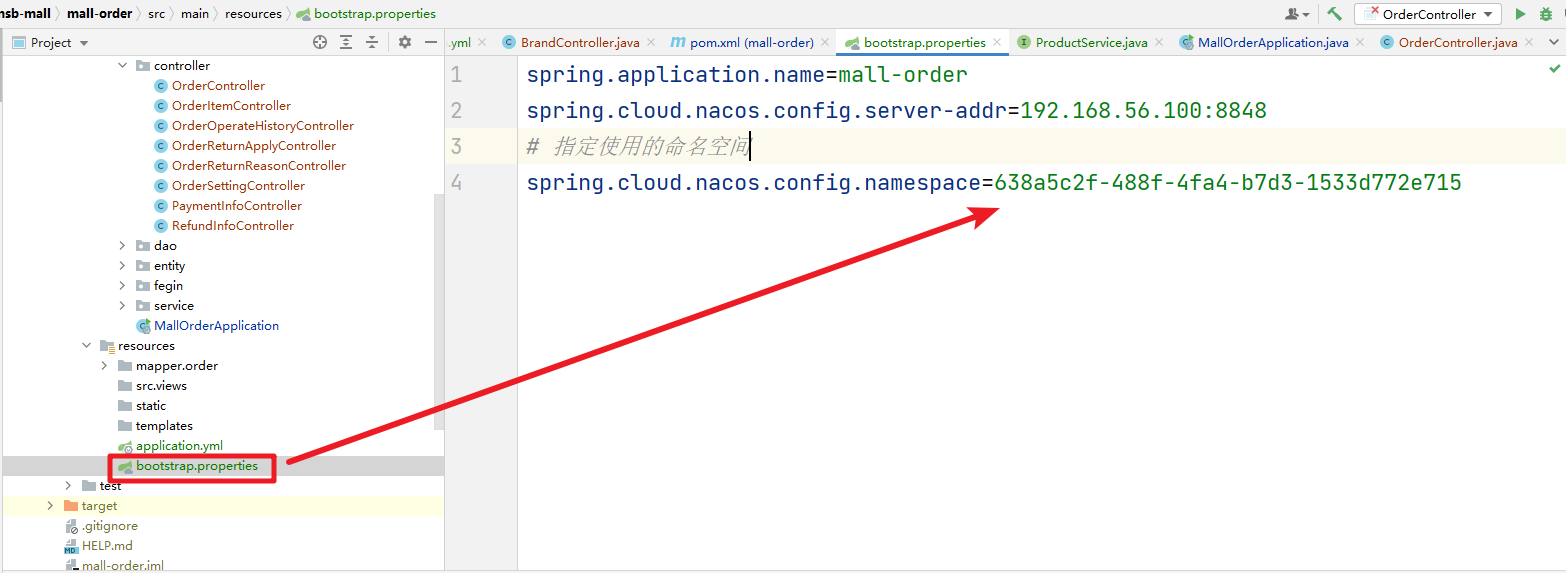
默认使用的public命名空间,如果要使用特定的命名空间的话,我们需要在bootstrap.properties中显示的指定使用的命名空间
|
|
|
|
|
|
|
|
|
|
|
|
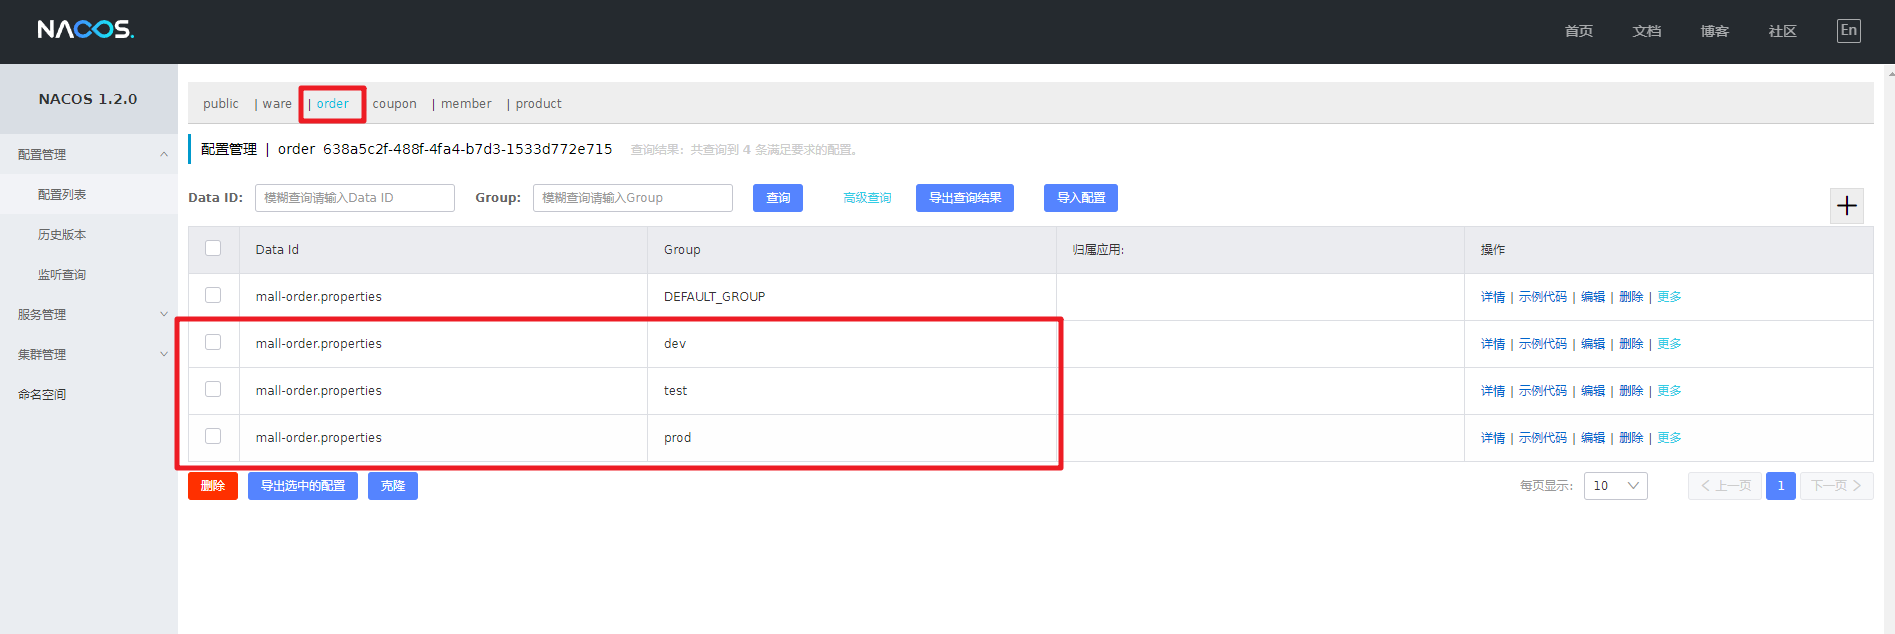
然后通过配置分组来区分不同的开发环境【开发环境dev,测试环境test,生产环境prod】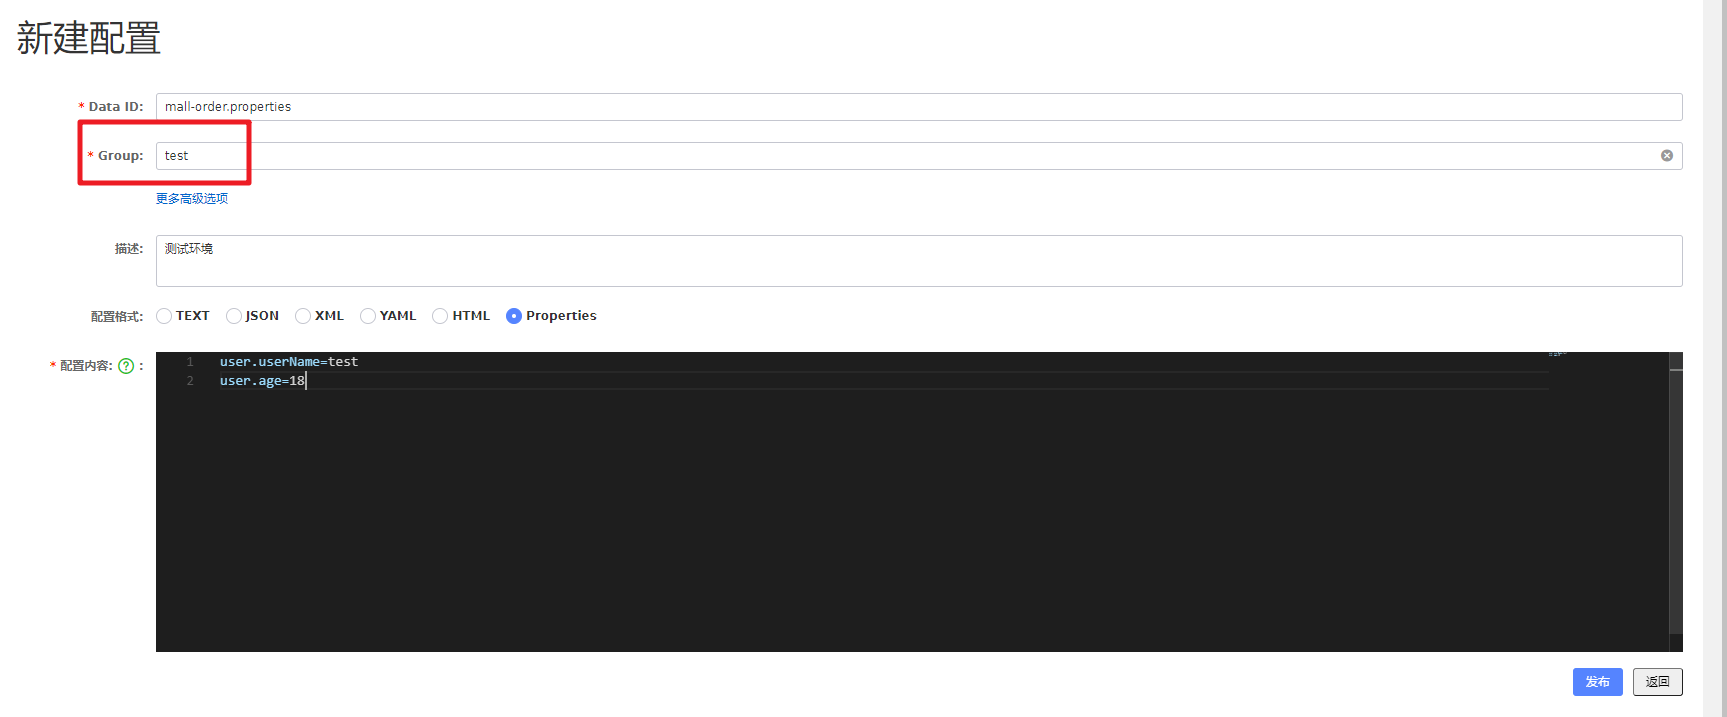
|
|
|
|
|
|
也就在具体的命名空间下我们创建的多个环境对应的配置文件
|
|
|
|
|
|
|
|
|
|
|
|
### 5.4 Nacos配置中心
|
|
|
|
|
|
#### 5.4.1 配置中心的基本使用
|
|
|
|
|
|
首先添加对应的依赖,因为其他的微服务也需要向配置中心中获取配置信息,所以对应的依赖我们添加在了commons模块中
|
|
|
|
|
|
```xml
|
|
|
<dependency>
|
|
|
<groupId>com.alibaba.cloud</groupId>
|
|
|
<artifactId>spring-cloud-starter-alibaba-nacos-config</artifactId>
|
|
|
</dependency>
|
|
|
|
|
|
<dependency>
|
|
|
<groupId>org.springframework.cloud</groupId>
|
|
|
<artifactId>spring-cloud-starter-bootstrap</artifactId>
|
|
|
<version>3.0.3</version>
|
|
|
</dependency>
|
|
|
```
|
|
|
|
|
|
创建bootsrap.properties文件,这个文件会优先于application.yml文件加载
|
|
|
|
|
|
```xml
|
|
|
spring.application.name=mall-order
|
|
|
spring.cloud.nacos.config.server-addr=192.168.56.100:8848
|
|
|
```
|
|
|
|
|
|
在nacos服务中创建对应的数据集,名称是应用名称.properties ,mall-order.properties
|
|
|
|
|
|

|
|
|
|
|
|
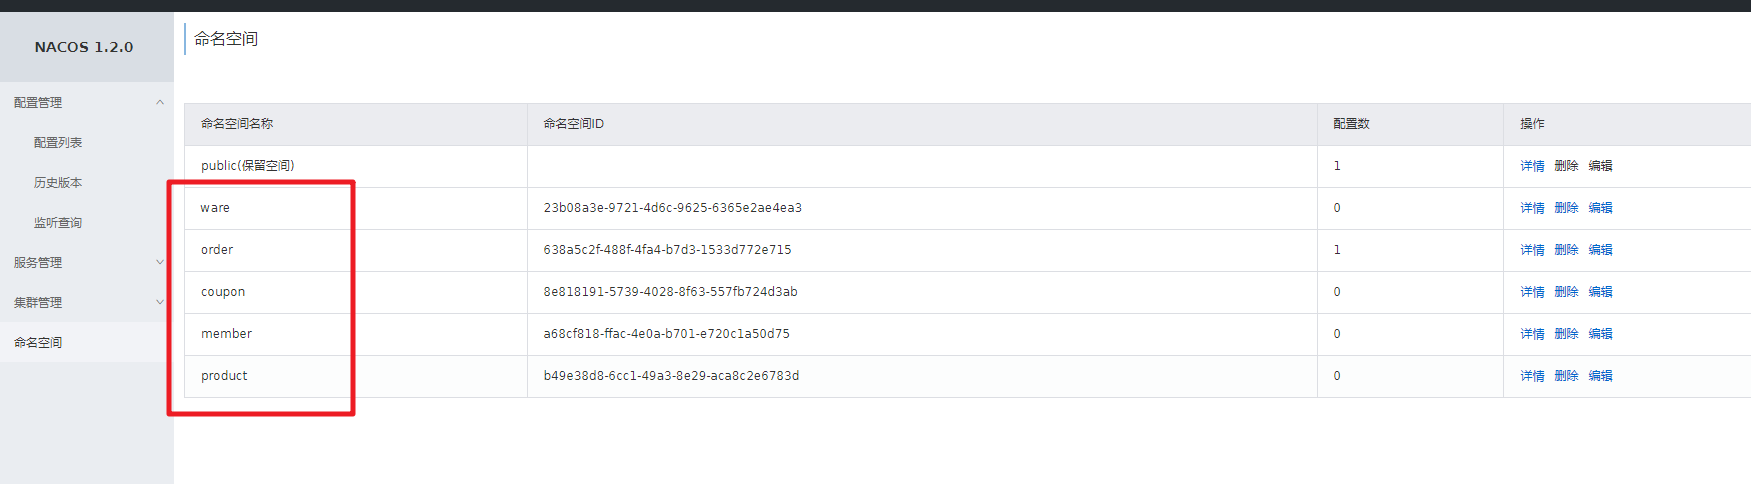
#### 5.4.2 命名空间和配置分组
|
|
|
|
|
|
我们在Nacos配置中心中是通过命名空间和配置分组来管理我们众多的配置信息
|
|
|
|
|
|
首先我们通过命名空间来隔离服务,给每一个服务创建一个对应的命名空间
|
|
|
|
|
|
|
|
|
|
|
|
如果我们需要加载对应的配置组中的信息,那么同样的需要在bootstrap.properties中设置对应的配置组信息
|
|
|
|
|
|
|
|
|
|
|
|
#### 5.4.3 配置拆分
|
|
|
|
|
|
我们现在是将某个服务中的所有的配置都写在了同一个配置文件中。为了方便管理,我们可以将配置信息拆分到配置中心中。
|
|
|
|
|
|
我们可以将配置文件中的数据源,mybatis的配置信息以及其他的信息拆分开来
|
|
|
|
|
|

|
|
|
|
|
|
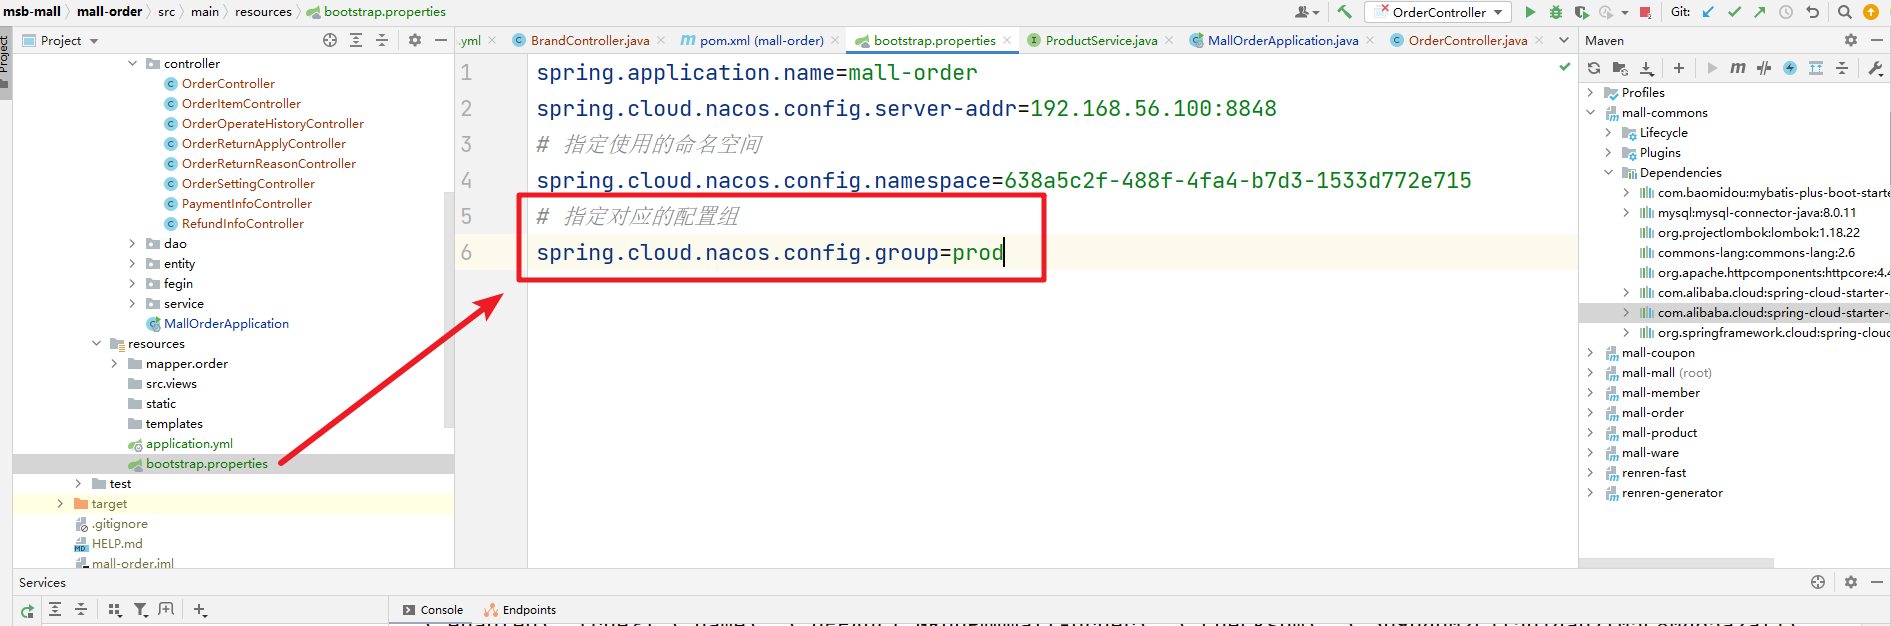
然后在bootstrap.properties中的指定
|
|
|
|
|
|
```properties
|
|
|
|
|
|
spring.application.name=mall-order
|
|
|
spring.cloud.nacos.config.server-addr=192.168.56.100:8848
|
|
|
# 指定使用的命名空间
|
|
|
spring.cloud.nacos.config.namespace=638a5c2f-488f-4fa4-b7d3-1533d772e715
|
|
|
# 指定对应的配置组
|
|
|
spring.cloud.nacos.config.group=prod
|
|
|
|
|
|
# 配置多个配置集
|
|
|
spring.cloud.nacos.config.ext-config[0].data-id=mybats.yml
|
|
|
spring.cloud.nacos.config.ext-config[0].group=prod
|
|
|
spring.cloud.nacos.config.ext-config[0].refresh=false
|
|
|
|
|
|
spring.cloud.nacos.config.ext-config[1].data-id=datasourc.yml
|
|
|
spring.cloud.nacos.config.ext-config[1].group=prod
|
|
|
spring.cloud.nacos.config.ext-config[1].refresh=false
|
|
|
|
|
|
spring.cloud.nacos.config.ext-config[2].data-id=other.yml
|
|
|
spring.cloud.nacos.config.ext-config[2].group=prod
|
|
|
spring.cloud.nacos.config.ext-config[2].refresh=false
|
|
|
```
|
|
|
|
|
|
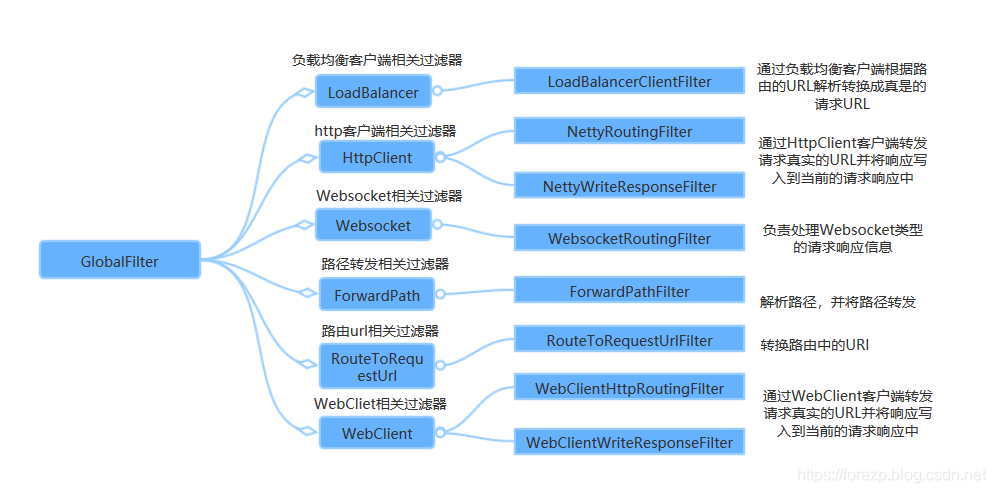
### 5.5 网关Gateway
|
|
|
|
|
|
#### 5.5.1 网关基本介绍
|
|
|
|
|
|
  在微服务架构里,服务的粒度被进一步细分,各个业务服务可以被独立的设计、开发、测试、部署和管理。这时,各个独立部署单元可以用不同的开发测试团队维护,可以使用不同的编程语言和技术平台进行设计,这就要求必须使用一种语言和平台无关的服务协议作为各个单元间的通讯方式。
|
|
|
|
|
|
|
|
|
|
|
|
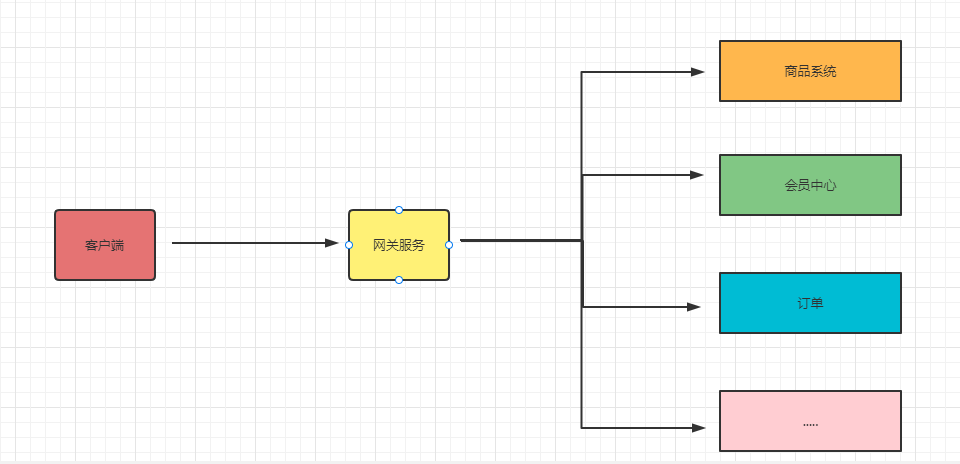
  本系统中我们选择的是Gateway作为我们的网关组件,Spring Cloud Gateway是Spring官方基于Spring 5.0,Spring Boot 2.0和Project Reactor等技术开发的网关,Spring Cloud Gateway旨在为微服务架构提供一种简单而有效的统一的API路由管理方式。Spring Cloud Gateway作为Spring Cloud生态系中的网关,目标是替代ZUUL,其不仅提供统一的路由方式,并且基于Filter链的方式提供了网关基本的功能,例如:安全,监控/埋点,和限流等。
|
|
|
|
|
|
  网关有几个非常重要的概念:
|
|
|
|
|
|
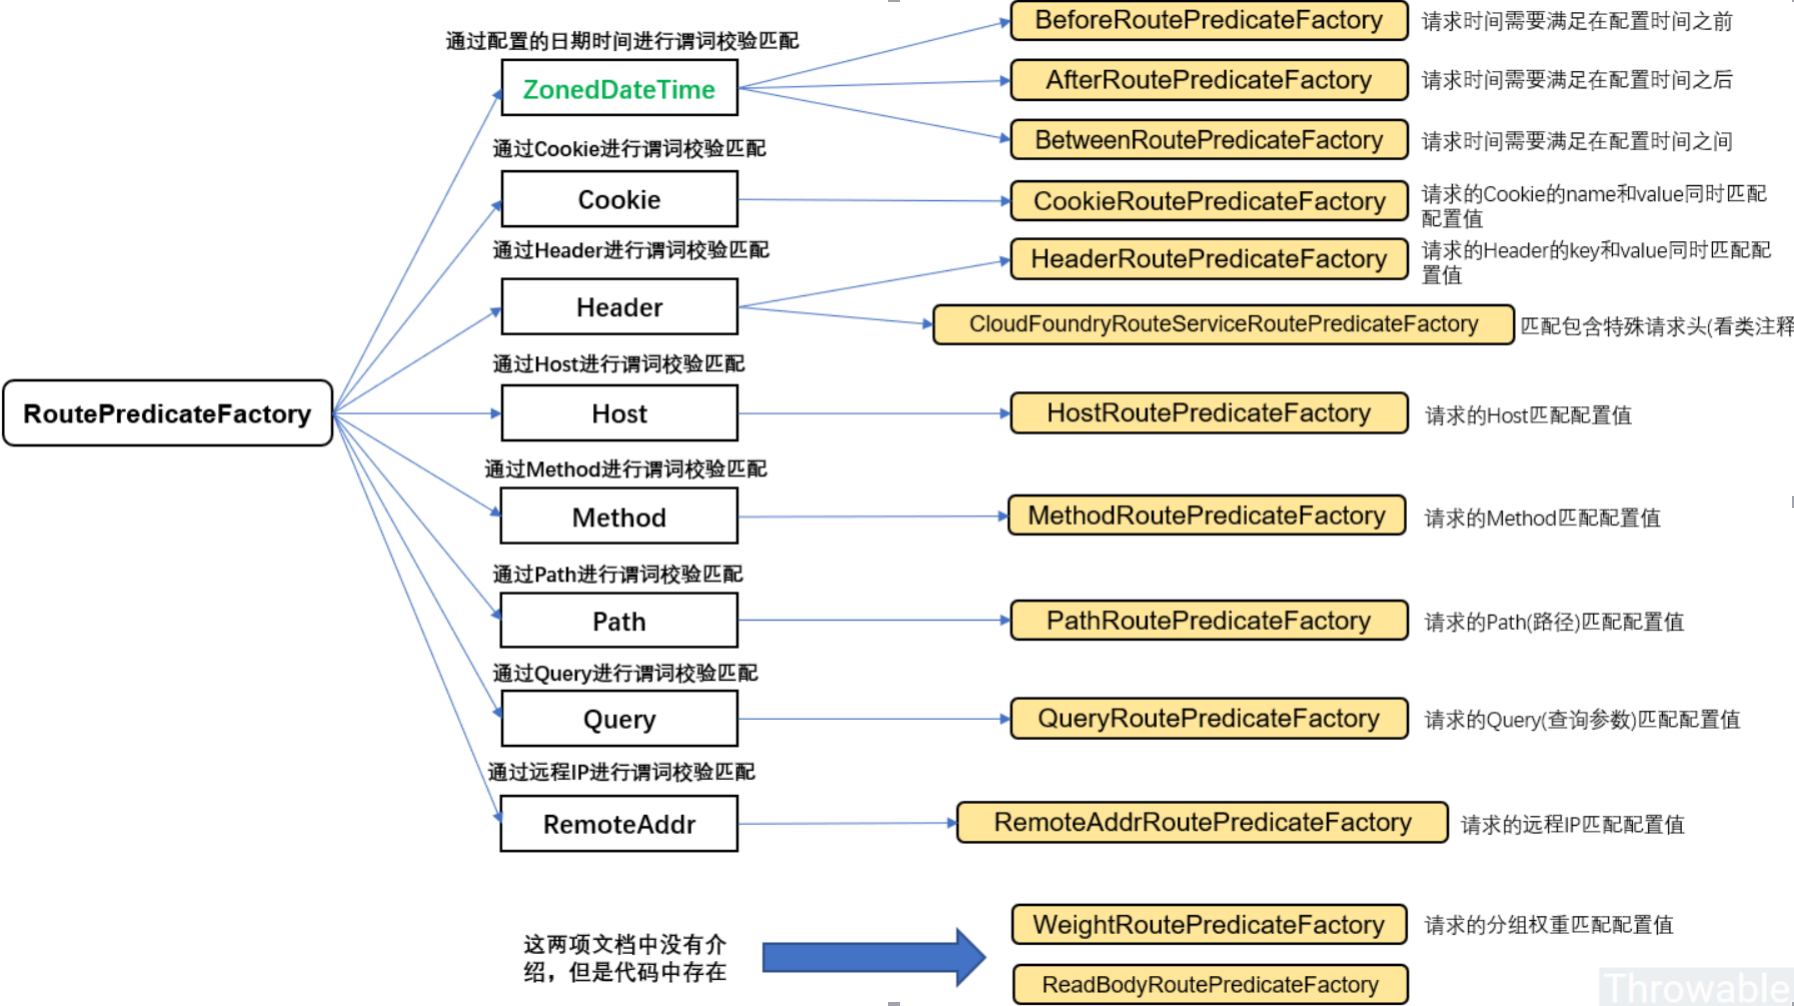
* Route(路由):这是网关的基本构建块,它由一个ID,一个目标URI,一组断言和一组过滤器定义,如果断言为真,则路由匹配
|
|
|
* Predicate(断言):是Java8中提供的函数式接口,用来判断是否路由匹配的
|
|
|
* Filter(过滤器):对断言匹配的请求和响应进行修改处理
|
|
|
|
|
|
|
|
|
|
|
|
|
|
|
|
|
|
#### 5.5.2 网关应用
|
|
|
|
|
|
创建网关API服务,修改SpringBoot和SpringCloud相关版本和其他的微服务保持一致。
|
|
|
|
|
|
然后添加对应的依赖
|
|
|
|
|
|
```xml
|
|
|
<dependency>
|
|
|
<groupId>com.msb.mall</groupId>
|
|
|
<artifactId>mall-commons</artifactId>
|
|
|
<version>0.0.1-SNAPSHOT</version>
|
|
|
</dependency>
|
|
|
<dependency>
|
|
|
<groupId>org.springframework.cloud</groupId>
|
|
|
<artifactId>spring-cloud-starter-gateway</artifactId>
|
|
|
</dependency>
|
|
|
```
|
|
|
|
|
|
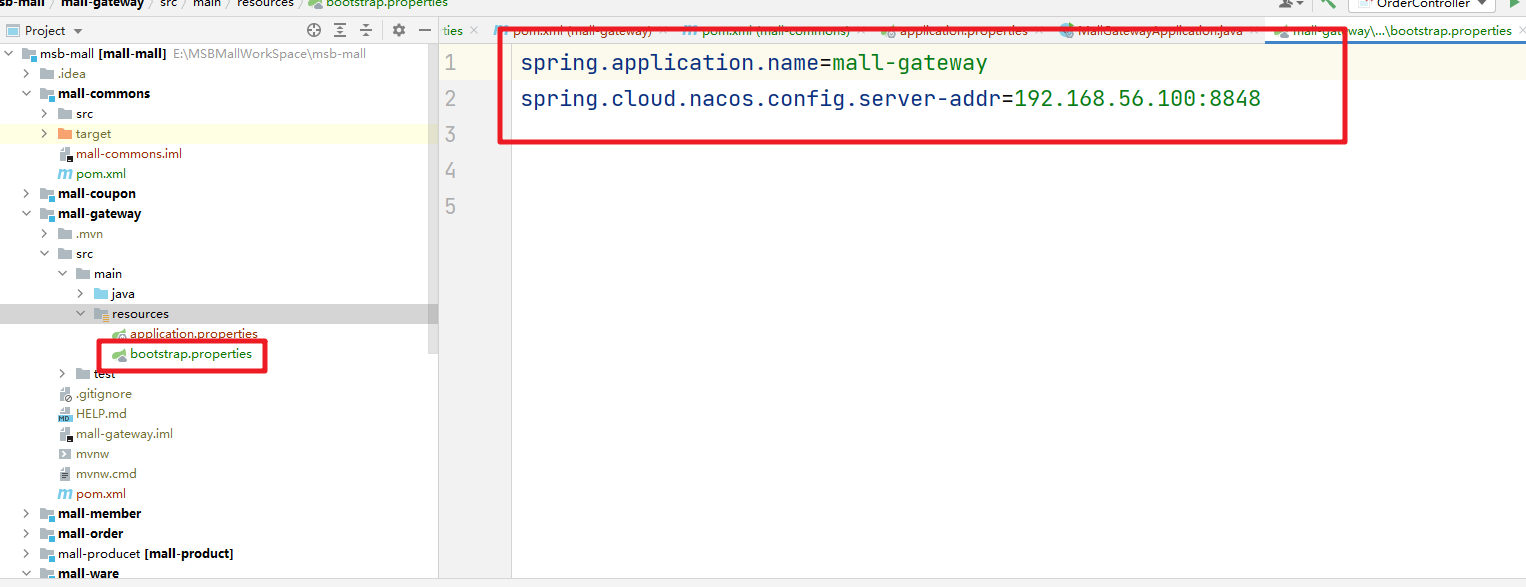
因为网关服务路由的时候需要去注册中心中发现相关的服务所以需要完成Nacos注册中心的配置
|
|
|
|
|
|
```properties
|
|
|
# 注册中心的配置
|
|
|
spring.application.name=mall-gateway
|
|
|
spring.cloud.nacos.discovery.server-addr=192.168.56.100:8848
|
|
|
|
|
|
# 指定注册中心的服务端口
|
|
|
server.port=8070
|
|
|
```
|
|
|
|
|
|
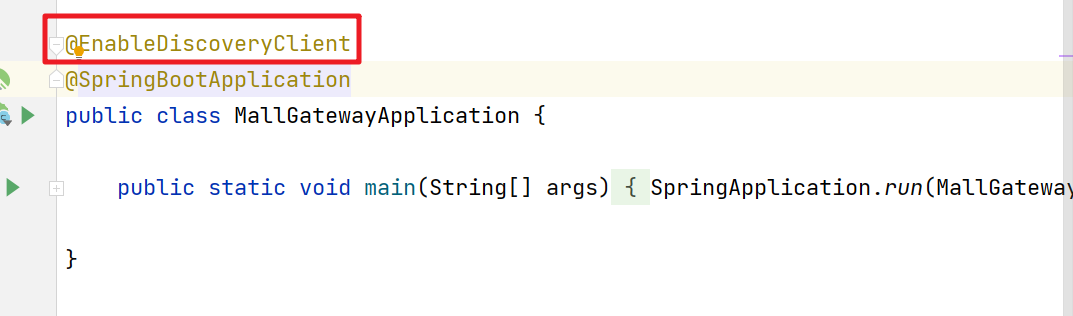
放开注解
|
|
|
|
|
|
|
|
|
|
|
|
同样的网关中的相关配置我们也需要添加到Nacos的配置中心中,所以也需要整合Nacos配置中心
|
|
|
|
|
|
|
|
|
|
|
|
然后我们测试路由规则是否可行
|
|
|
|
|
|
```yml
|
|
|
spring:
|
|
|
application:
|
|
|
name: mall-gateway
|
|
|
cloud:
|
|
|
nacos:
|
|
|
discovery:
|
|
|
server-addr: 192.168.56.100:8848
|
|
|
gateway:
|
|
|
routes:
|
|
|
- id: route1
|
|
|
uri: http://www.baidu.com
|
|
|
predicates:
|
|
|
- Query=url,baidu
|
|
|
- id: route2
|
|
|
uri: http://www.jd.com
|
|
|
predicates:
|
|
|
- Query=url,jd
|
|
|
```
|
|
|
|
|
|
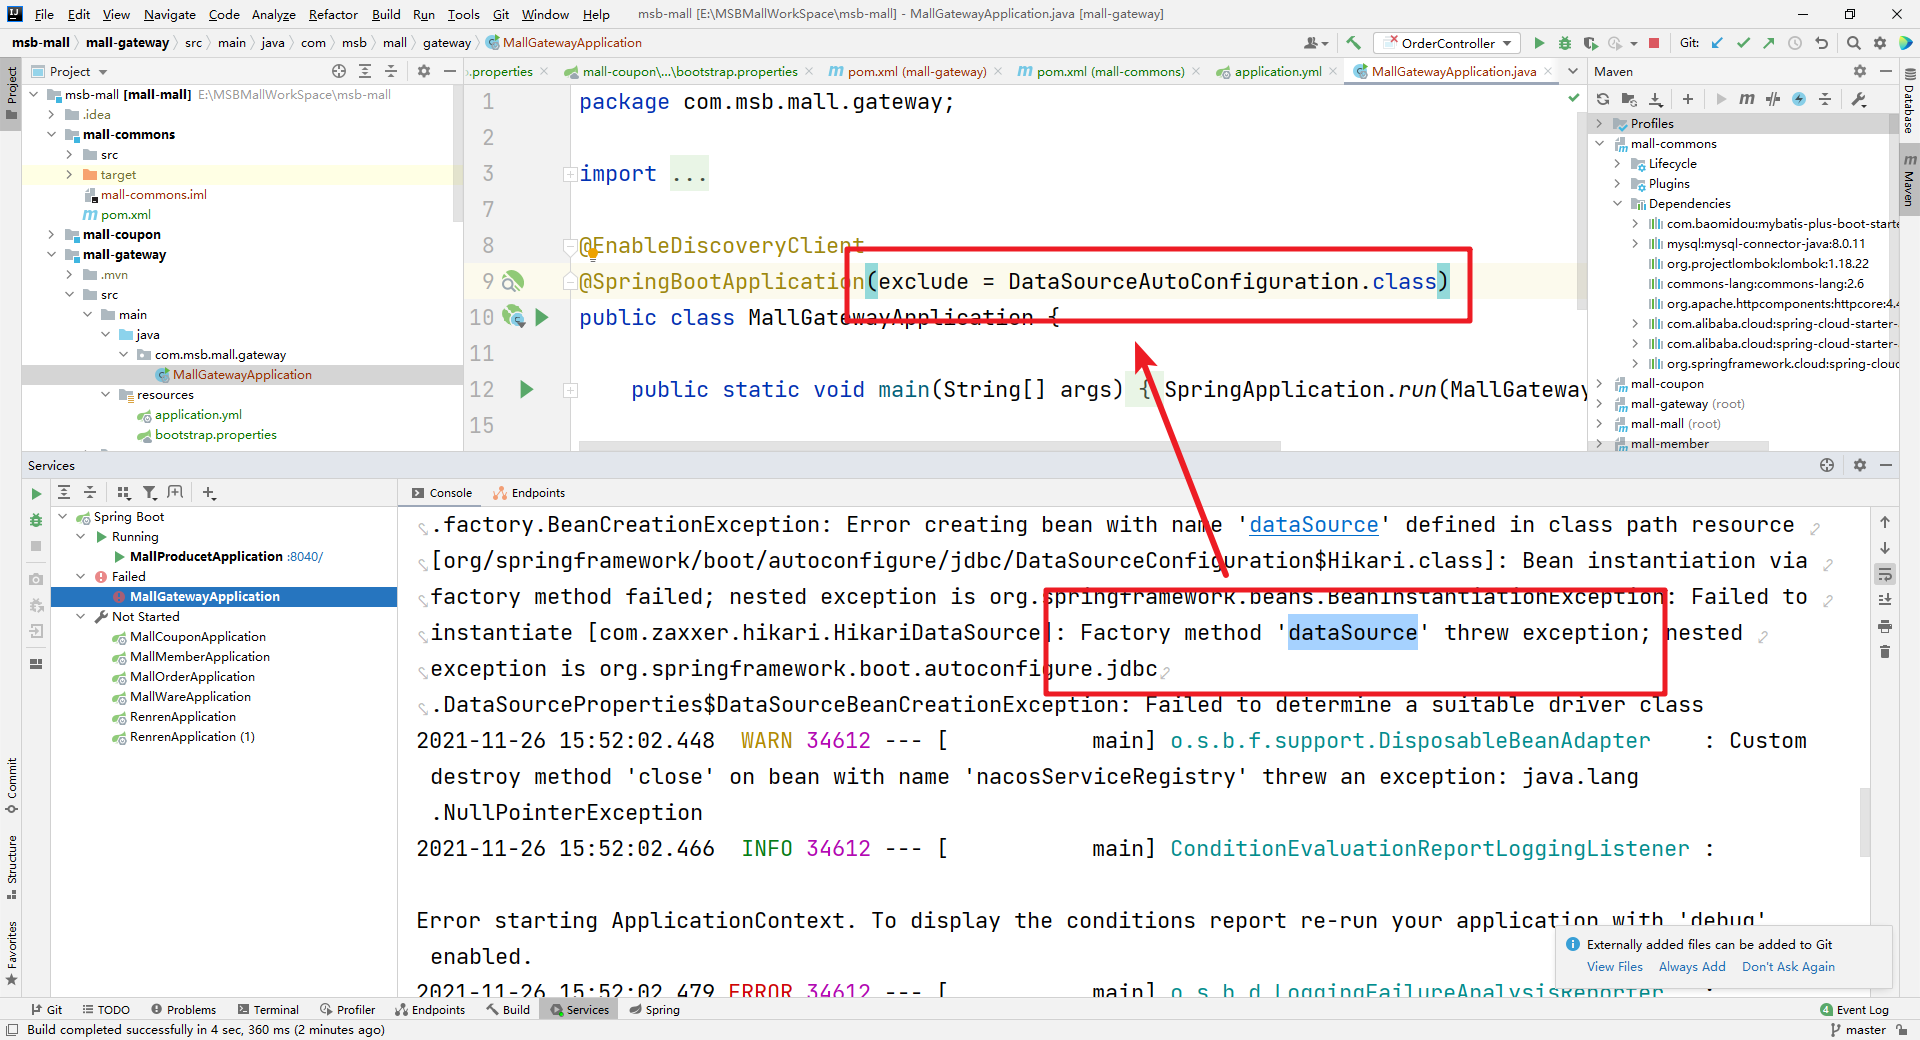
启动时候因为依赖的commons服务中有MyBatis的依赖,那么在网关API服务中也需要数据源的相关配置,那么没有就抛异常,这时我们可以在启动类的SpringBootApplication注解中排除DataSourceAutoConfiguration的自动注入。
|
|
|
|
|
|
|
|
|
|
|
|
然后根据对应的路由规则测试即可:
|
|
|
|
|
|
http://localhost:8070/?url=baidu
|
|
|
|
|
|
http://localhost:8070/?url=jd
|