5.7 KiB
Getting Started
Try It Online
You can try VitePress directly in your browser on StackBlitz.
Installation
Prerequisites
- Node.js version 16 or higher.
- Terminal for accessing VitePress via its command line interface (CLI).
- Text Editor with Markdown syntax support.
- VSCode is recommended, along with the official Vue extension.
VitePress can be used on its own, or be installed into an existing project. In both cases, you can install it with:
::: code-group
$ npm install -D vitepress
$ pnpm add -D vitepress
$ yarn add -D vitepress
:::
::: details Getting missing peer deps warnings?
If using PNPM, you will notice a missing peer warning for @docsearch/js. This does not prevent VitePress from working. If you wish to suppress this warning, add the following to your package.json:
"pnpm": {
  "peerDependencyRules": {
    "ignoreMissing": [
      "@algolia/client-search",
      "search-insights"
    ]
  }
}
:::
Setup Wizard
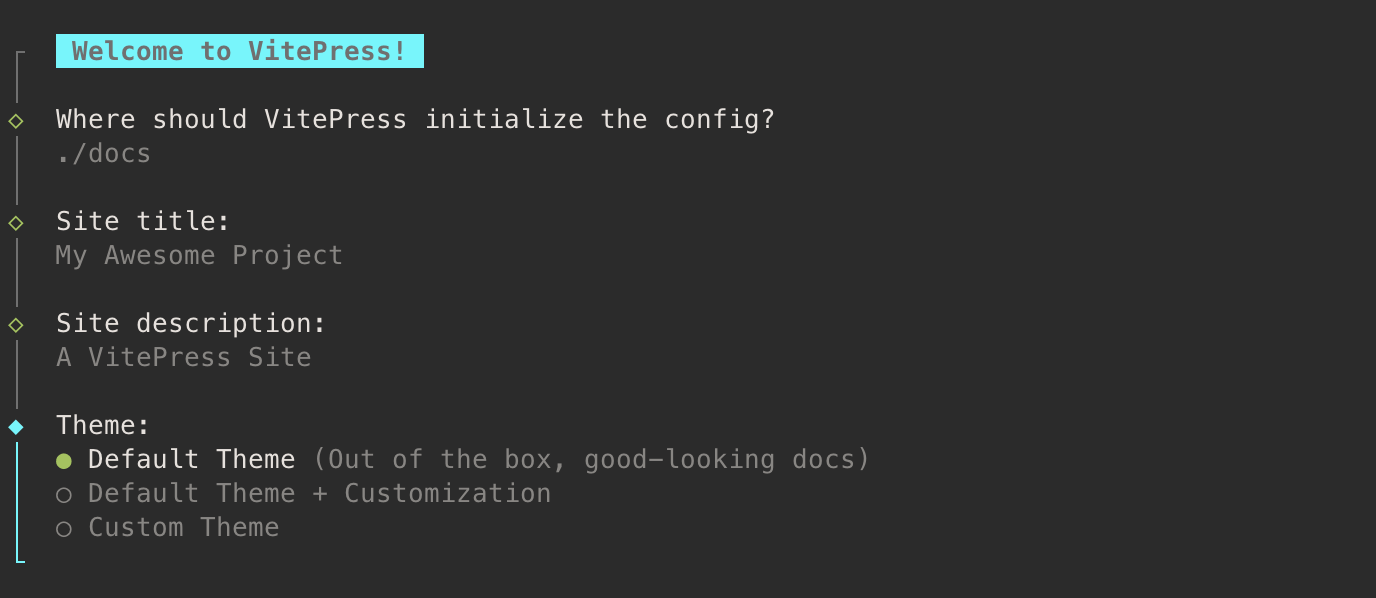
VitePress ships with a command line setup wizard that will help you scaffold a basic project. After installation, start the wizard by running:
::: code-group
$ npx vitepress init
$ pnpm dlx vitepress init
:::
You will be greeted with a few simple questions:

::: tip Vue as Peer Dependency
If you intend to perform customization that uses Vue components or APIs, you should also explicitly install vue as a peer dependency.
:::
File Structure
If you are building a standalone VitePress site, you can scaffold the site in your current directory (./). However, if you are installing VitePress in an existing project alongside other source code, it is recommended to scaffold the site in a nested directory (e.g. ./docs) so that it is separate from the rest of the project.
Assuming you chose to scaffold the VitePress project in ./docs, the generated file structure should look like this:
.
├─ docs
│  ├─ .vitepress
│  │  └─ config.js
│  ├─ api-examples.md
│  ├─ markdown-examples.md
│  └─ index.md
└─ package.json
The docs directory is considered the project root of the VitePress site. The .vitepress directory is a reserved location for VitePress' config file, dev server cache, build output, and optional theme customization code.
::: tip
By default, VitePress stores its dev server cache in .vitepress/cache, and the production build output in .vitepress/dist. If using Git, you should add them to your .gitignore file. These locations can also be configured.
:::
The Config File
The config file (.vitepress/config.js) allows you to customize various aspects of your VitePress site, with the most basic options being the title and description of the site:
// .vitepress/config.js
export default {
  // site-level options
  title: 'VitePress',
  description: 'Just playing around.',

  themeConfig: {
    // theme-level options
  }
}
You can also configure the behavior of the theme via the themeConfig option. Consult the Config Reference for full details on all config options.
Source Files
Markdown files outside the .vitepress directory are considered source files.
VitePress uses file-based routing: each .md file is compiled into a corresponding .html file with the same path. For example, index.md will be compiled into index.html, and can be visited at the root path / of the resulting VitePress site.
VitePress also provides the ability to generate clean URLs, rewrite paths, and dynamically generate pages. These will be covered in the Routing Guide.
Up and Running
The tool should have also injected the following npm scripts to your package.json if you allowed it to do so during the setup process:
{
  ...
  "scripts": {
    "docs:dev": "vitepress dev docs",
    "docs:build": "vitepress build docs",
    "docs:preview": "vitepress preview docs"
  },
  ...
}
The docs:dev script will start a local dev server with instant hot updates. Run it with the following command:
::: code-group
$ npm run docs:dev
$ pnpm run docs:dev
$ yarn docs:dev
:::
Instead of npm scripts, you can also invoke VitePress directly with:
::: code-group
$ npx vitepress dev docs
$ pnpm exec vitepress dev docs
:::
More command line usage is documented in the CLI Reference.
The dev server should be running at http://localhost:5173. Visit the URL in your browser to see your new site in action!
What's Next?
-
To better understand how markdown files are mapped to generated HTML, proceed to the Routing Guide.
-
To discover more about what you can do on the page, such as writing markdown content or using Vue Component, refer to the "Writing" section of the guide. A great place to start would be to learn about Markdown Extensions.
-
To explore the features provided by the default documentation theme, check out the Default Theme Config Reference.
-
If you want to further customize the appearance of your site, explore how to either Extend the Default Theme or Build a Custom Theme.
-
Once your documentation site takes shape, make sure to read the Deployment Guide.