# GOFLY [唯一客服]基于Golang语言和MySQL实现的WEB在线客服系统。
中文 |
English |
Gitee
### 请注意当前项目仅供个人学习测试,禁止一切线上商用行为,禁止一切违法使用!!!
## 主要技术栈
gin + jwt-go + websocket + go.uuid + gorm + cobra + VueJS + ElementUI + MySQL
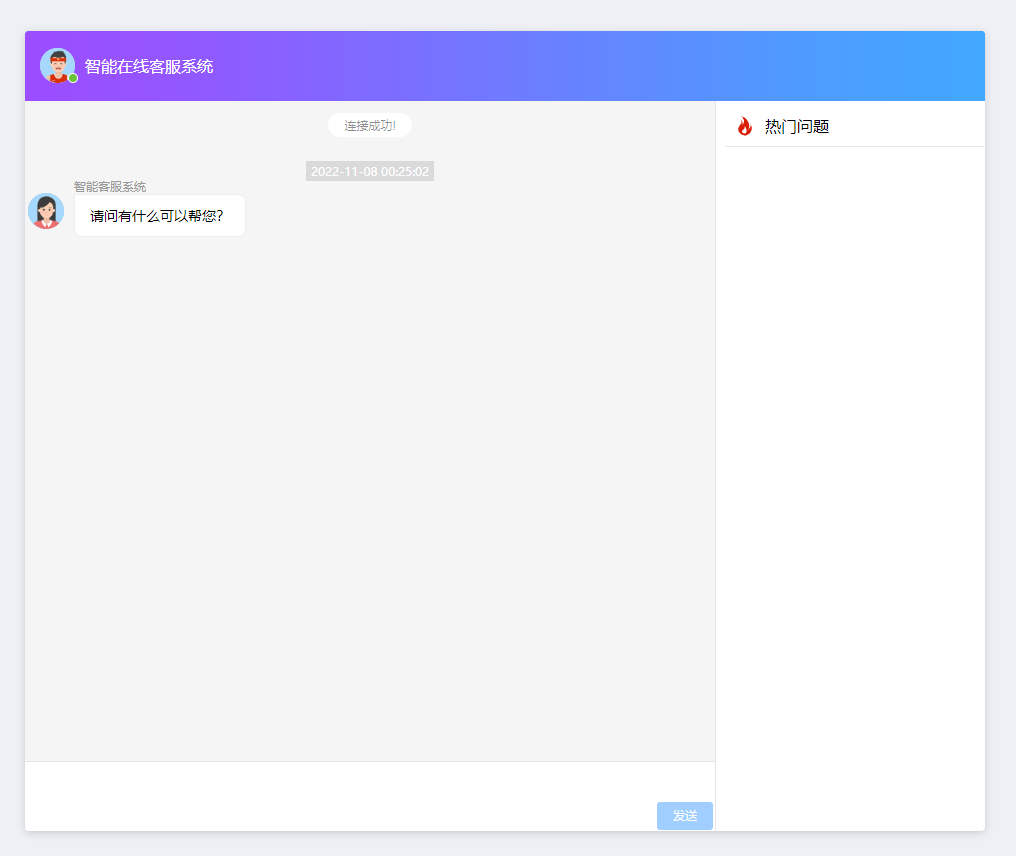
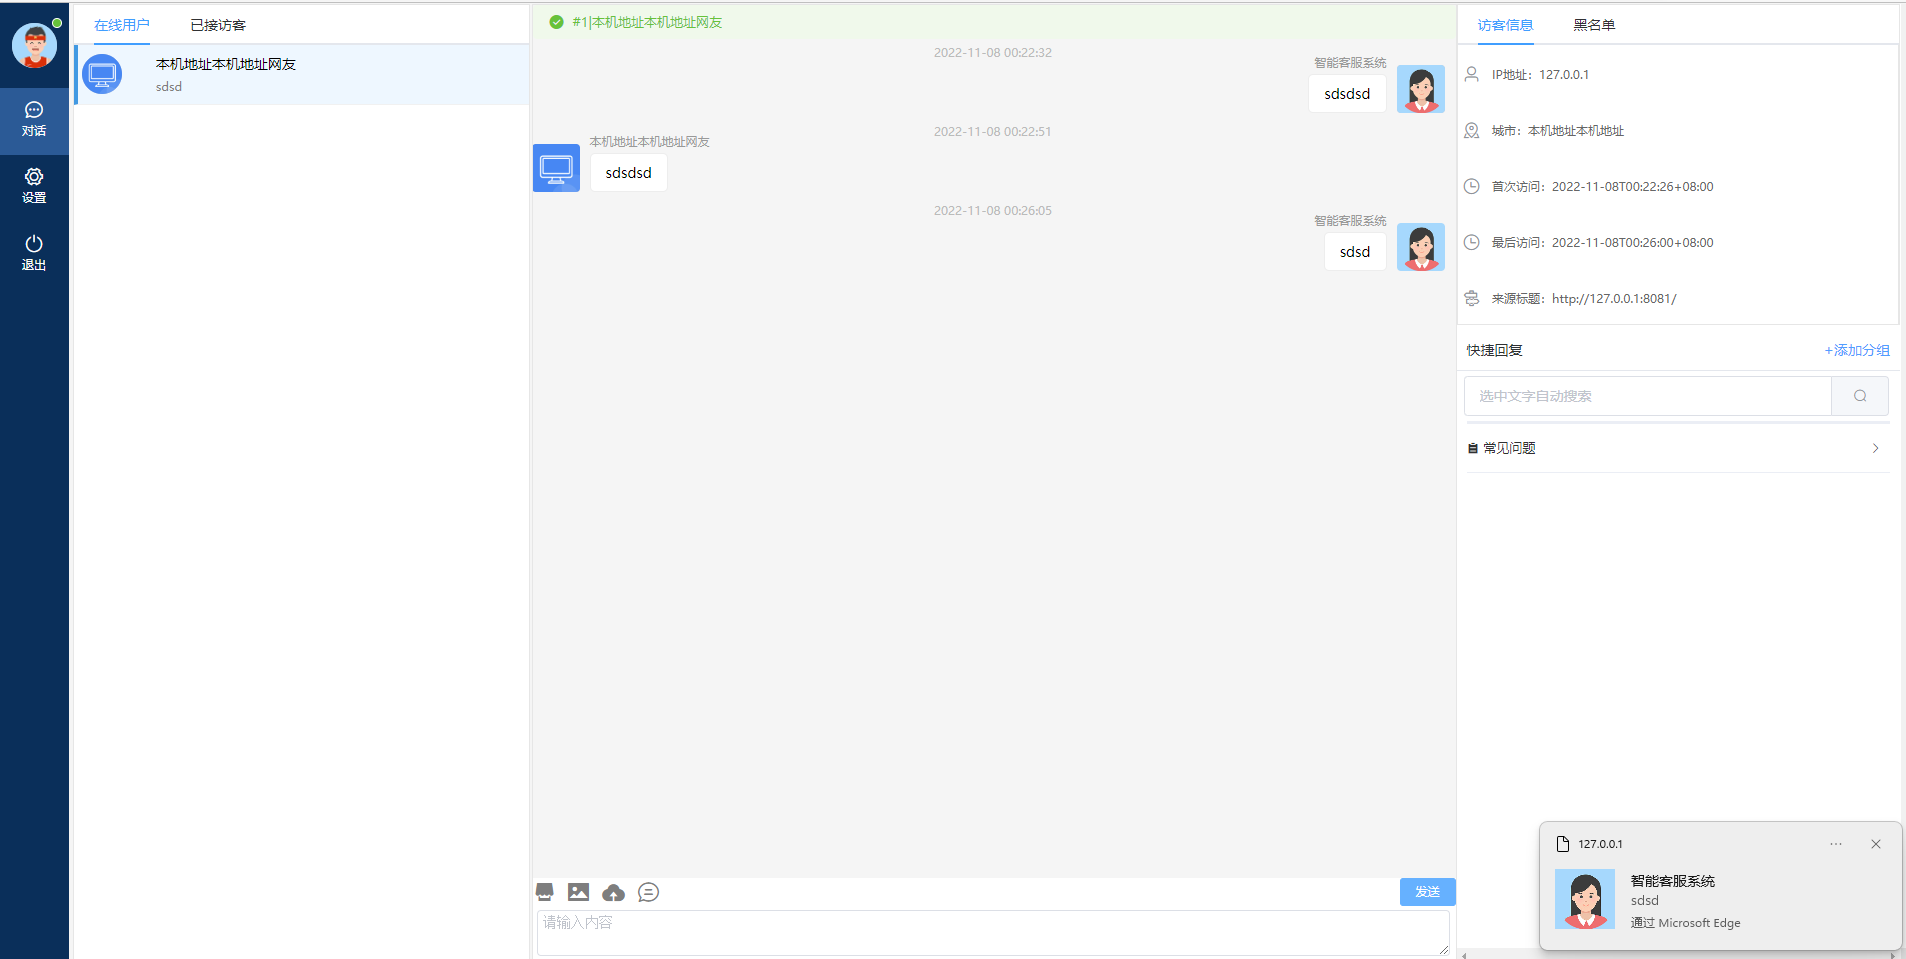
### 项目预览

### 安装使用
#### 1. 先安装和运行mysql >=5.5版本 , 创建gofly数据库.
create database gofly charset utf8;
在config目录mysql.json中配置数据库
```php
{
"Server":"127.0.0.1",
"Port":"3306",
"Database":"gofly",
"Username":"go-fly",
"Password":"go-fly"
}
```
#### 2. 源码运行
1. 基于go module使用
go env -w GO111MODULE=on
go env -w GOPROXY=https://goproxy.cn,direct
在任意目录 git clone https://github.com/taoshihan1991/go-fly.git
进入go-fly 目录
2. 源码运行 go run go-fly.go server
3. 源码打包 go build go-fly.go 会生成go-fly可以执行文件
4. 导入数据库(会删除表清空数据) ./go-fly install
5. 二进制文件运行
linux: ./go-fly server [可选 -p 8082 -d]
windows: go-fly.exe server [可选 -p 8082 -d]
6. 关闭程序
./go-fly stop
linux下使用ps命令结合kill命令杀掉进程
ps -ef|grep go-fly 看到父子进程id
kill 进程父进程id ; kill 进程子进程id
#### 3. 网页使用
1.服务端安装成功后可把域名换成自己的域名或IP
2.默认访问本地http://127.0.0.1:8081
```php
//下面js路径和GOFLY_URL 都要改成自己的
```
### nginx部署
访问:https://gofly.sopans.com
1.参考支持https的部署示例 , 注意反向代理的端口号和证书地址 , 不使用https也可以访问 , 只是不会有浏览器通知弹窗
2.尽量按照下面的配置处理, 配置独立域名或者二级域名, 不建议在主域名加端口访问, 不建议主域名加目录访问
3.如果遇到域名跨域错误问题, 检查下面配置中add_header Access-Control-Allow-Origin这俩header头是否添加.
代码里已经解决跨域 , nginx里不要加跨域头,否则会冲突报错
```php
server {
listen 443 ssl http2;
ssl on;
ssl_certificate conf.d/cert/4263285_gofly.sopans.com.pem;
ssl_certificate_key conf.d/cert/4263285_gofly.sopans.com.key;
ssl_session_timeout 5m;
ssl_ciphers ECDHE-RSA-AES128-GCM-SHA256:ECDHE:ECDH:AES:HIGH:!NULL:!aNULL:!MD5:!ADH:!RC4;
ssl_protocols TLSv1 TLSv1.1 TLSv1.2;
ssl_prefer_server_ciphers on;
#listen 80;
server_name gofly.sopans.com;
access_log /var/log/nginx/gofly.sopans.com.access.log main;
location /static {
root /var/www/html/go-fly;//自己的部署路径,静态文件直接nginx响应
}
location / {
proxy_pass http://127.0.0.1:8081;
proxy_http_version 1.1;
proxy_set_header X-Real-IP $remote_addr;
proxy_set_header Upgrade $http_upgrade;
proxy_set_header Connection "upgrade";
proxy_set_header Origin "";
}
}
server{
listen 80;
server_name gofly.sopans.com;
access_log /var/log/nginx/gofly.sopans.com.access.log main;
location /static {
root /var/www/html/go-fly;//自己的部署路径,静态文件直接nginx响应
}
location / {
proxy_pass http://127.0.0.1:8081;
proxy_http_version 1.1;
proxy_set_header X-Real-IP $remote_addr;
proxy_set_header Upgrade $http_upgrade;
proxy_set_header Connection "upgrade";
proxy_set_header Origin "";
}
}
```
### 宝塔部署
原文地址:https://www.zqcnc.cn/post/99.html
#### 宝塔环境
1. 创建一个静态站点,地址为想要访问的域名
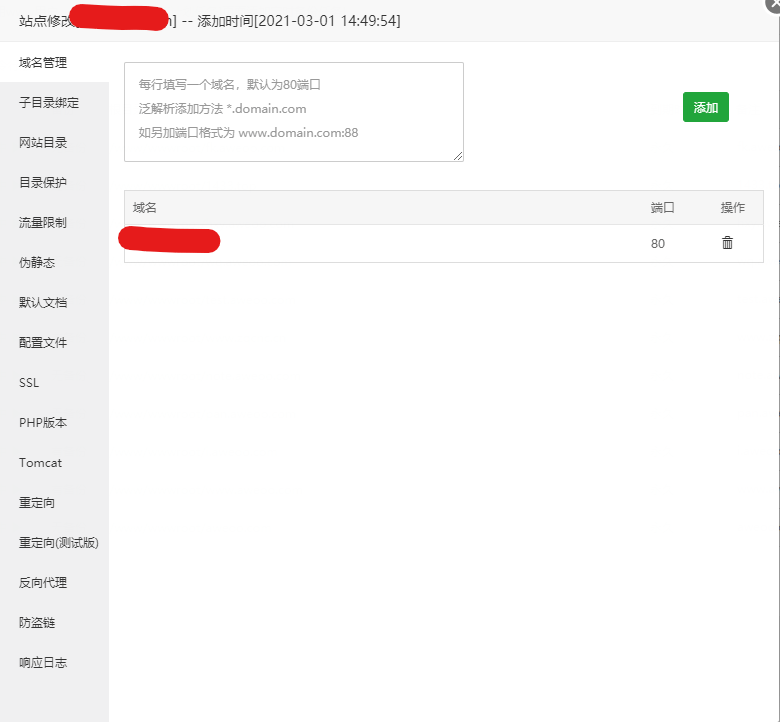
2. 为该站点配置证书
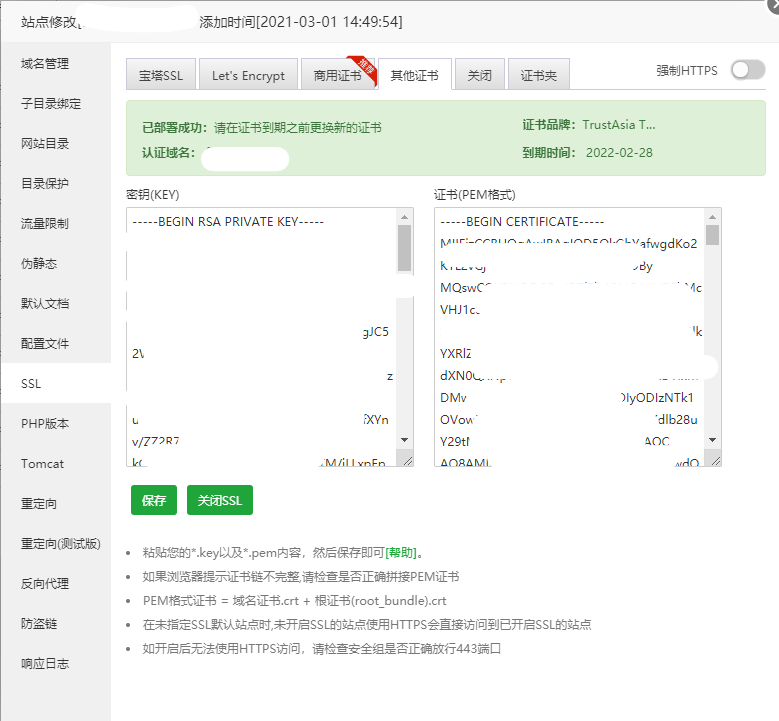
3. 设置反向代理
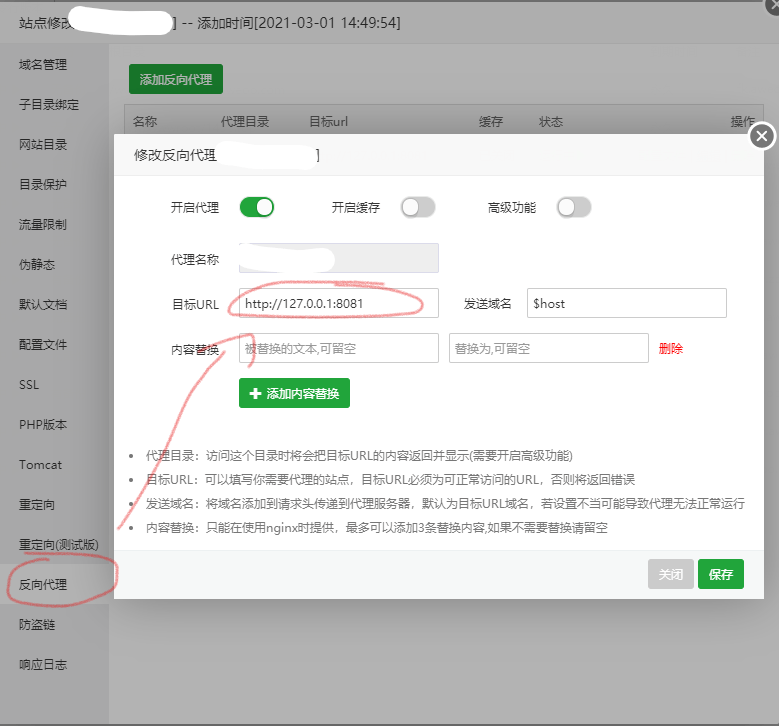
4. 修改反代配置
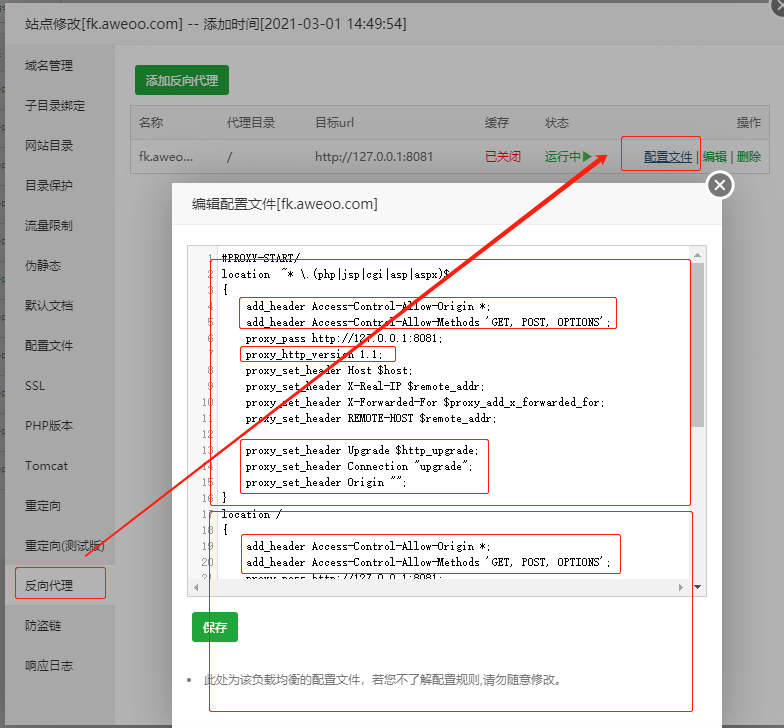
**按照图示,将对应代码加入到配置文件中**
```shell
#PROXY-START/
location /
{
proxy_pass http://127.0.0.1:8081;
proxy_http_version 1.1;
proxy_set_header Host $host;
proxy_set_header X-Real-IP $remote_addr;
proxy_set_header X-Forwarded-For $proxy_add_x_forwarded_for;
proxy_set_header REMOTE-HOST $remote_addr;
proxy_set_header Upgrade $http_upgrade;
proxy_set_header Connection "upgrade";
proxy_set_header Origin "";
add_header X-Cache $upstream_cache_status;
#Set Nginx Cache
add_header Cache-Control no-cache;
expires 12h;
}
#PROXY-END/
```
### 如果在登录到后台后,出现了需要认证的弹窗,请前往官网注册账户并绑定手机。填入绑定的手机+自己的密码可以通过认证。如果没有中国手机号,请在官网联系我获取测试手机号和密码
### 版权声明
当前项目是完整功能代码 , 但是仍然仅支持个人演示测试 , 不包含线上使用 ,禁止一切商用行为。
使用本软件时,请遵守当地法律法规,任何违法用途一切后果请自行承担.