14 KiB
Build a Banking App Part 4: Concepts of State Management
Pre-Lecture Quiz
Introduction
As a web application grows, managing data flows becomes increasingly challenging. Which code retrieves the data, which page uses it, where and when it needs to be updated...it’s easy to end up with messy code that’s hard to maintain. This is especially true when you need to share data across different pages of your app, such as user information. The concept of state management has always been present in all types of programs, but as web apps grow in complexity, it has become a critical aspect to consider during development.
In this final part, we’ll revisit the app we built to improve how the state is managed, enabling browser refresh support at any point and ensuring data persists across user sessions.
Prerequisite
You need to have completed the data fetching section of the web app for this lesson. Additionally, you need to install Node.js and run the server API locally to manage account data.
You can verify that the server is running correctly by executing this command in a terminal:
curl http://localhost:5000/api
# -> should return "Bank API v1.0.0" as a result
Rethink state management
In the previous lesson, we introduced a basic concept of state in our app using the global account variable, which holds the bank data for the currently logged-in user. However, our current implementation has some shortcomings. Try refreshing the page while on the dashboard. What happens?
There are three issues with the current code:
- The state is not persistent, so refreshing the browser takes you back to the login page.
- Multiple functions modify the state, which can make tracking changes difficult as the app grows. It’s easy to forget to update one.
- The state is not cleared properly, meaning that when you click Logout, the account data remains even though you’re on the login page.
We could address these issues one by one, but that would lead to more code duplication and make the app harder to maintain. Alternatively, we could pause for a moment and rethink our approach.
What problems are we really trying to solve here?
State management is about finding a good strategy to address these two key challenges:
- How to keep the data flows in an app easy to understand?
- How to ensure the state data is always synchronized with the user interface (and vice versa)?
Once these challenges are addressed, other issues may either be resolved or become easier to tackle. There are many ways to approach these problems, but we’ll use a common solution that involves centralizing the data and the methods to modify it. The data flows would look like this:
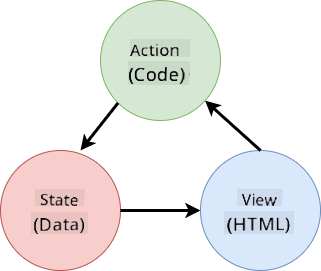
We won’t cover the part where data automatically triggers view updates here, as it involves more advanced concepts of Reactive Programming. It’s a great topic for a deeper dive if you’re interested.
✅ There are many libraries with different approaches to state management, Redux being a popular choice. Exploring its concepts and patterns can help you understand potential issues in large web apps and how to solve them.
Task
Let’s start with some refactoring. Replace the account declaration:
let account = null;
With:
let state = {
  account: null
};
The idea is to centralize all app data into a single state object. For now, we only have account in the state, so this change doesn’t make a big difference, but it sets the stage for future enhancements.
We also need to update the functions that use it. In the register() and login() functions, replace account = ... with state.account = ...;
At the top of the updateDashboard() function, add this line:
const account = state.account;
This refactoring doesn’t bring significant improvements on its own, but it lays the groundwork for the next changes.
Track data changes
Now that we’ve introduced the state object to store our data, the next step is to centralize updates. This makes it easier to track changes and when they occur.
To prevent direct modifications to the state object, it’s a good practice to treat it as immutable, meaning it cannot be altered directly. Instead, you create a new state object whenever you want to make changes. This approach helps avoid unwanted side effects and opens up possibilities for features like undo/redo functionality, while also simplifying debugging. For instance, you could log every state change and maintain a history to trace the source of a bug.
In JavaScript, you can use Object.freeze() to make an object immutable. Attempting to modify an immutable object will raise an exception.
✅ Do you know the difference between a shallow and a deep immutable object? You can learn more here.
Task
Let’s create a new updateState() function:
function updateState(property, newData) {
  state = Object.freeze({
    ...state,
    [property]: newData
  });
}
In this function, we create a new state object and copy data from the previous state using the spread (...) operator. Then, we override a specific property of the state object with new data using the bracket notation [property]. Finally, we lock the object to prevent modifications using Object.freeze(). Currently, the state only contains the account property, but this approach allows you to add more properties as needed.
We’ll also update the state initialization to ensure the initial state is frozen:
let state = Object.freeze({
  account: null
});
Next, update the register function by replacing state.account = result; with:
updateState('account', result);
Do the same for the login function, replacing state.account = data; with:
updateState('account', data);
Now, let’s address the issue of account data not being cleared when the user clicks Logout.
Create a new function logout():
function logout() {
  updateState('account', null);
  navigate('/login');
}
In updateDashboard(), replace the redirection return navigate('/login'); with return logout();
Try registering a new account, logging out, and logging back in to ensure everything works correctly.
Tip: You can monitor all state changes by adding
console.log(state)at the bottom ofupdateState()and opening the browser’s developer tools console.
Persist the state
Most web apps need to persist data to function properly. Critical data is typically stored in a database and accessed via a server API, like the user account data in our case. However, sometimes it’s useful to persist some data on the client side for a better user experience or improved loading performance.
When deciding to persist data in the browser, consider these questions:
- Is the data sensitive? Avoid storing sensitive data on the client, such as user passwords.
- How long do you need to keep this data? Will the data be used only for the current session, or should it be stored indefinitely?
There are various ways to store information in a web app, depending on your goals. For example, you can use URLs to store a search query and make it shareable. You can also use HTTP cookies for data that needs to be shared with the server, such as authentication information.
Another option is to use browser APIs for storing data. Two particularly useful ones are:
localStorage: A Key/Value store that persists data specific to the current website across sessions. The data never expires.sessionStorage: Similar tolocalStorage, but the data is cleared when the browser session ends.
Both APIs only allow storing strings. To store complex objects, you’ll need to serialize them using JSON.stringify().
✅ If you want to create a web app without a server, you can use the IndexedDB API to create a client-side database. This is suitable for advanced use cases or when storing large amounts of data, though it’s more complex to use.
Task
We want users to stay logged in until they explicitly click the Logout button, so we’ll use localStorage to store the account data. First, define a key for storing the data:
const storageKey = 'savedAccount';
Then, add this line at the end of the updateState() function:
localStorage.setItem(storageKey, JSON.stringify(state.account));
This ensures the user account data is persisted and always up-to-date, thanks to the centralized state updates we implemented earlier. This is where the benefits of our refactoring start to show 🙂.
Since the data is saved, we also need to restore it when the app loads. To organize the initialization code, create a new init function that includes the previous code at the bottom of app.js:
function init() {
  const savedAccount = localStorage.getItem(storageKey);
  if (savedAccount) {
    updateState('account', JSON.parse(savedAccount));
  }

  // Our previous initialization code
  window.onpopstate = () => updateRoute();
  updateRoute();
}

init();
Here, we retrieve the saved data and update the state if any is found. It’s important to do this before updating the route, as some code may rely on the state during page updates.
We can also make the Dashboard page the default page of the app, as account data is now persisted. If no data is found, the dashboard will redirect to the Login page. In updateRoute(), replace the fallback return navigate('/login'); with return navigate('/dashboard');.
Now log in to the app and try refreshing the page. You should remain on the dashboard. With this update, we’ve resolved all the initial issues...
Refresh the data
...But we may have introduced a new one. Oops!
Go to the dashboard using the test account, then run this command in a terminal to create a new transaction:
curl --request POST \
     --header "Content-Type: application/json" \
     --data "{ \"date\": \"2020-07-24\", \"object\": \"Bought book\", \"amount\": -20 }" \
     http://localhost:5000/api/accounts/test/transactions
Now refresh the dashboard page in the browser. What happens? Do you see the new transaction?
The state is persisted indefinitely thanks to localStorage, but it’s never updated until you log out and log back in!
One way to fix this is to reload the account data every time the dashboard is loaded, ensuring the data stays fresh.
Task
Create a new function updateAccountData:
async function updateAccountData() {
  const account = state.account;
  if (!account) {
    return logout();
  }

  const data = await getAccount(account.user);
  if (data.error) {
    return logout();
  }

  updateState('account', data);
}
This function checks if the user is logged in and reloads the account data from the server.
Create another function named refresh:
async function refresh() {
  await updateAccountData();
  updateDashboard();
}
This function updates the account data and refreshes the HTML of the dashboard page. It should be called whenever the dashboard route is loaded. Update the route definition with:
const routes = {
  '/login': { templateId: 'login' },
  '/dashboard': { templateId: 'dashboard', init: refresh }
};
Now refresh the dashboard, and it should display the updated account data.
🚀 Challenge
Now that we reload the account data whenever the dashboard is loaded, do you think it’s still necessary to persist all the account data?
Work together to modify what is saved and loaded from localStorage to include only the data absolutely required for the app to function.
Post-Lecture Quiz
Assignment
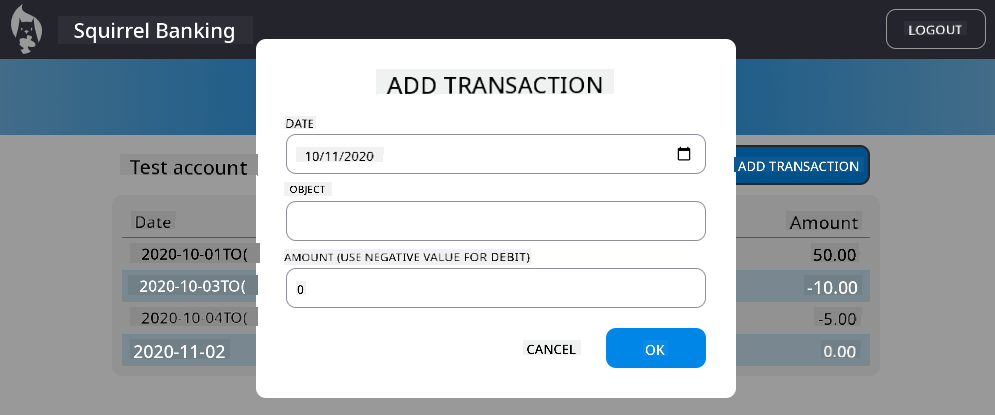
Implement "Add transaction" dialog
Here's an example result after completing the assignment:
Disclaimer:
This document has been translated using the AI translation service Co-op Translator. While we aim for accuracy, please note that automated translations may include errors or inaccuracies. The original document in its native language should be regarded as the authoritative source. For critical information, professional human translation is advised. We are not responsible for any misunderstandings or misinterpretations resulting from the use of this translation.