8.1 KiB
Build a Space Game Part 2: Draw Hero and Monsters to Canvas
Pre-Lecture Quiz
The Canvas
The canvas is an HTML element that starts off empty; it's essentially a blank space. You can add content to it by drawing on it.
✅ Read more about the Canvas API on MDN.
Here's how it's typically defined as part of the page's body:
<canvas id="myCanvas" width="200" height="100"></canvas>
In the code above, we are setting the id, width, and height.
id: This allows you to reference the canvas when you need to interact with it.width: Specifies the width of the canvas element.height: Specifies the height of the canvas element.
Drawing simple geometry
The canvas uses a Cartesian coordinate system for drawing. This means it uses an x-axis and y-axis to determine the position of elements. The point 0,0 is located at the top-left corner, while the bottom-right corner corresponds to the WIDTH and HEIGHT you set for the canvas.
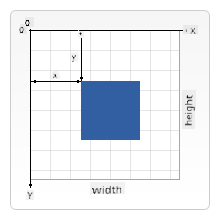
Image from MDN
To draw on the canvas, follow these steps:
- Get a reference to the canvas element.
- Get a reference to the context object associated with the canvas.
- Perform drawing operations using the context object.
The code for these steps typically looks like this:
// draws a red rectangle
//1. get the canvas reference
canvas = document.getElementById("myCanvas");

//2. set the context to 2D to draw basic shapes
ctx = canvas.getContext("2d");

//3. fill it with the color red
ctx.fillStyle = 'red';

//4. and draw a rectangle with these parameters, setting location and size
ctx.fillRect(0,0, 200, 200) // x,y,width, height
✅ The Canvas API is primarily designed for 2D shapes, but you can also create 3D elements on a webpage using the WebGL API.
With the Canvas API, you can draw various elements, such as:
- Geometric shapes: We've already shown how to draw a rectangle, but there are many other shapes you can create.
- Text: You can draw text in any font and color you choose.
- Images: You can display images from assets like .jpg or .png files.
✅ Try it! Now that you know how to draw a rectangle, can you draw a circle on the page? Check out some creative Canvas drawings on CodePen. Here's a particularly impressive example.
Load and draw an image asset
To load an image asset, create an Image object and set its src property. Then, listen for the load event to know when the image is ready to use. Here's the code:
Load asset
const img = new Image();
img.src = 'path/to/my/image.png';
img.onload = () => {
  // image loaded and ready to be used
}
Load asset pattern
It's a good idea to wrap the above code in a structure like this, making it easier to use and ensuring you only manipulate the image once it's fully loaded:
function loadAsset(path) {
  return new Promise((resolve) => {
    const img = new Image();
    img.src = path;
    img.onload = () => {
      // image loaded and ready to be used
      resolve(img);
    }
  })
}

// use like so

async function run() {
  const heroImg = await loadAsset('hero.png')
  const monsterImg = await loadAsset('monster.png')
}
To draw game assets on the screen, your code might look like this:
async function run() {
  const heroImg = await loadAsset('hero.png')
  const monsterImg = await loadAsset('monster.png')

  canvas = document.getElementById("myCanvas");
  ctx = canvas.getContext("2d");
  ctx.drawImage(heroImg, canvas.width/2,canvas.height/2);
  ctx.drawImage(monsterImg, 0,0);
}
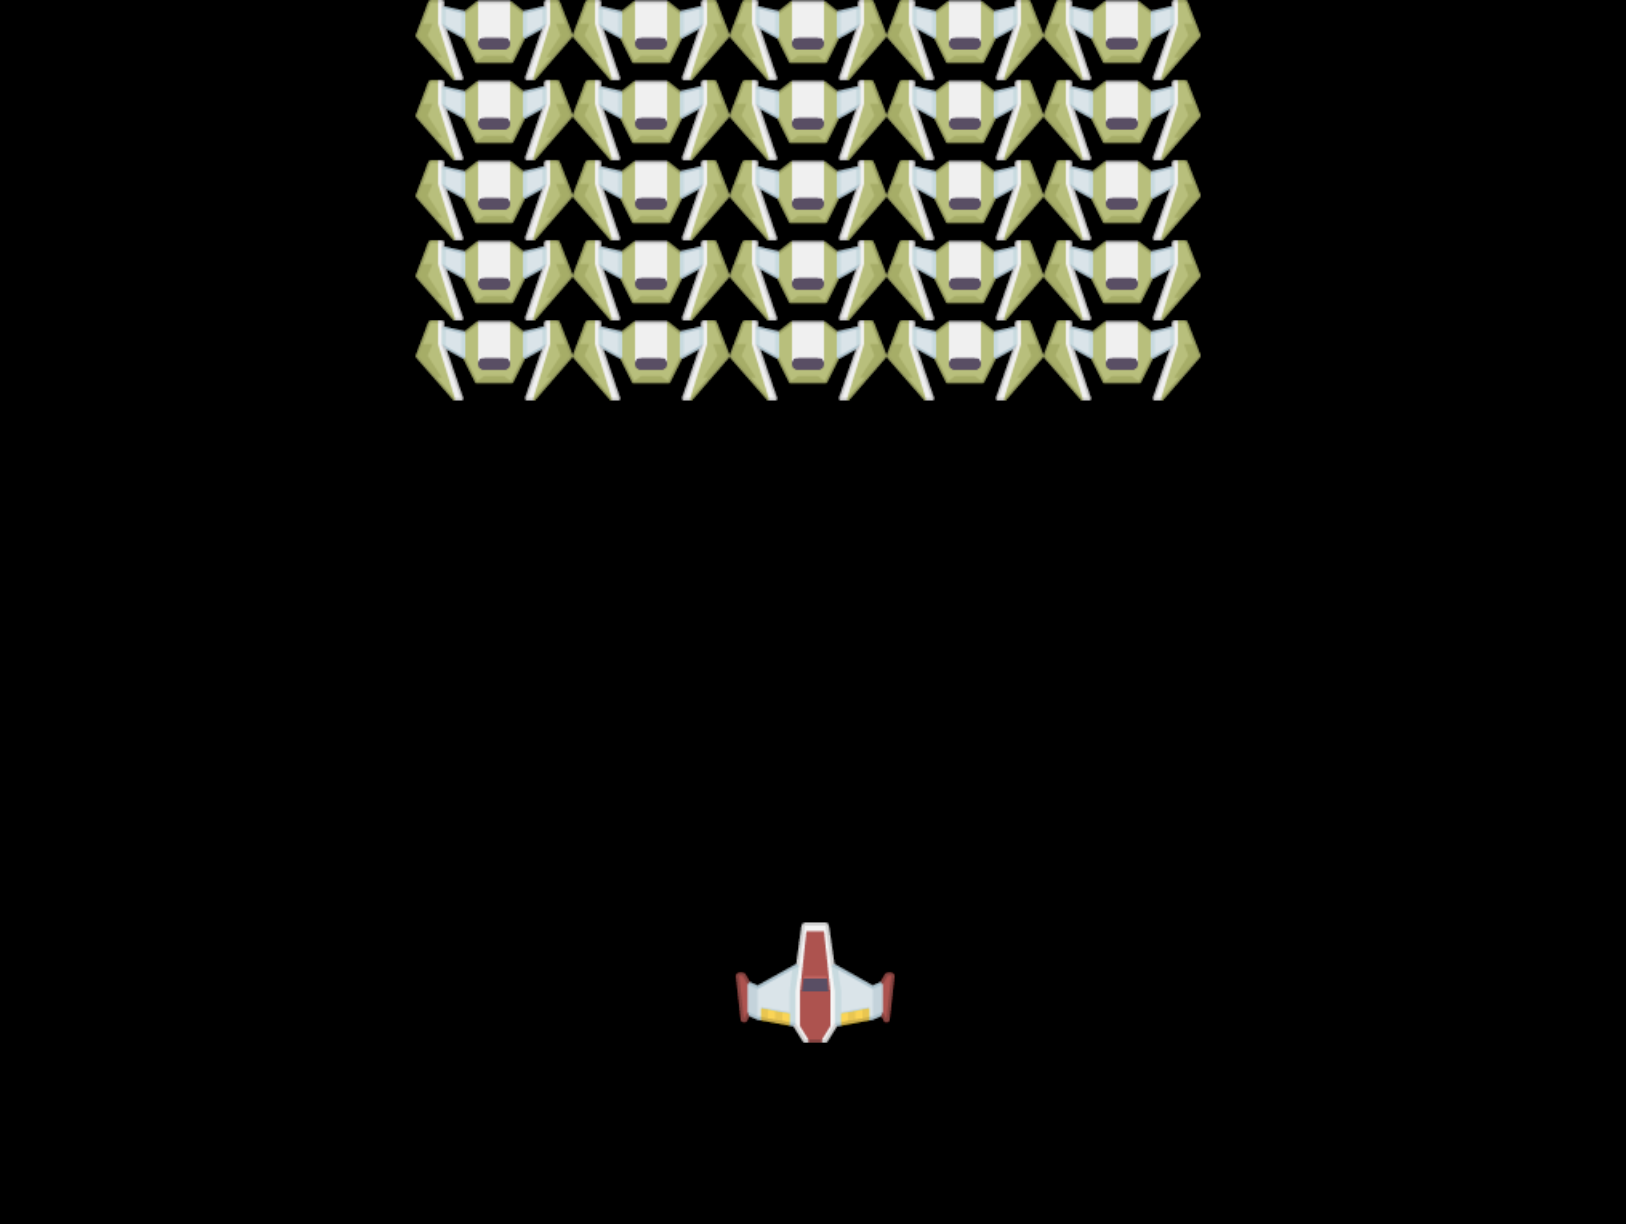
Now it's time to start building your game
What to build
You will create a webpage with a canvas element that displays a black screen with dimensions 1024*768. We've provided two images for you:
-
Hero ship

-
5x5 monster grid

Recommended steps to start development
Locate the files provided for you in the your-work subfolder. It should contain the following:
-| assets
  -| enemyShip.png
  -| player.png
-| index.html
-| app.js
-| package.json
Open this folder in Visual Studio Code. Make sure you have a local development environment set up, preferably with Visual Studio Code, NPM, and Node installed. If you don't have npm installed, here's how to set it up.
Start your project by navigating to the your_work folder:
cd your-work
npm start
This will start an HTTP server at http://localhost:5000. Open a browser and enter that address. You'll see a blank page for now, but that will change.
Note: Refresh your browser to see updates on the screen.
Add code
Add the necessary code to your-work/app.js to complete the following tasks:
-
Draw a canvas with a black background.
Tip: Add two lines under the appropriate TODO in
/app.js, setting thectxelement to black and positioning the top-left corner at0,0with the height and width matching the canvas dimensions. -
Load textures.
Tip: Use
await loadTextureto load the player and enemy images by passing their file paths. You won't see them on the screen yet! -
Draw the hero in the center of the screen's bottom half.
Tip: Use the
drawImageAPI to displayheroImgon the screen, positioning it atcanvas.width / 2 - 45andcanvas.height - canvas.height / 4. -
Draw a 5x5 grid of monsters.
Tip: Uncomment the code to draw enemies on the screen. Then, complete the
createEnemiesfunction.Start by defining some constants:
const MONSTER_TOTAL = 5;
const MONSTER_WIDTH = MONSTER_TOTAL * 98;
const START_X = (canvas.width - MONSTER_WIDTH) / 2;
const STOP_X = START_X + MONSTER_WIDTH;
Next, create a loop to draw the array of monsters on the screen:
for (let x = START_X; x < STOP_X; x += 98) {
    for (let y = 0; y < 50 * 5; y += 50) {
      ctx.drawImage(enemyImg, x, y);
    }
  }
Result
The final result should look like this:
Solution
Try solving it yourself first, but if you get stuck, check out the solution.
🚀 Challenge
Now that you've learned about drawing with the 2D-focused Canvas API, explore the WebGL API and try creating a 3D object.
Post-Lecture Quiz
Review & Self Study
Learn more about the Canvas API by reading about it.
Assignment
Disclaimer:
This document has been translated using the AI translation service Co-op Translator. While we aim for accuracy, please note that automated translations may include errors or inaccuracies. The original document in its native language should be regarded as the authoritative source. For critical information, professional human translation is advised. We are not responsible for any misunderstandings or misinterpretations resulting from the use of this translation.