11 KiB
Terrarium Project Part 1: Introduction to HTML
Sketchnote by Tomomi Imura
Pre-Lecture Quiz
Watch the video

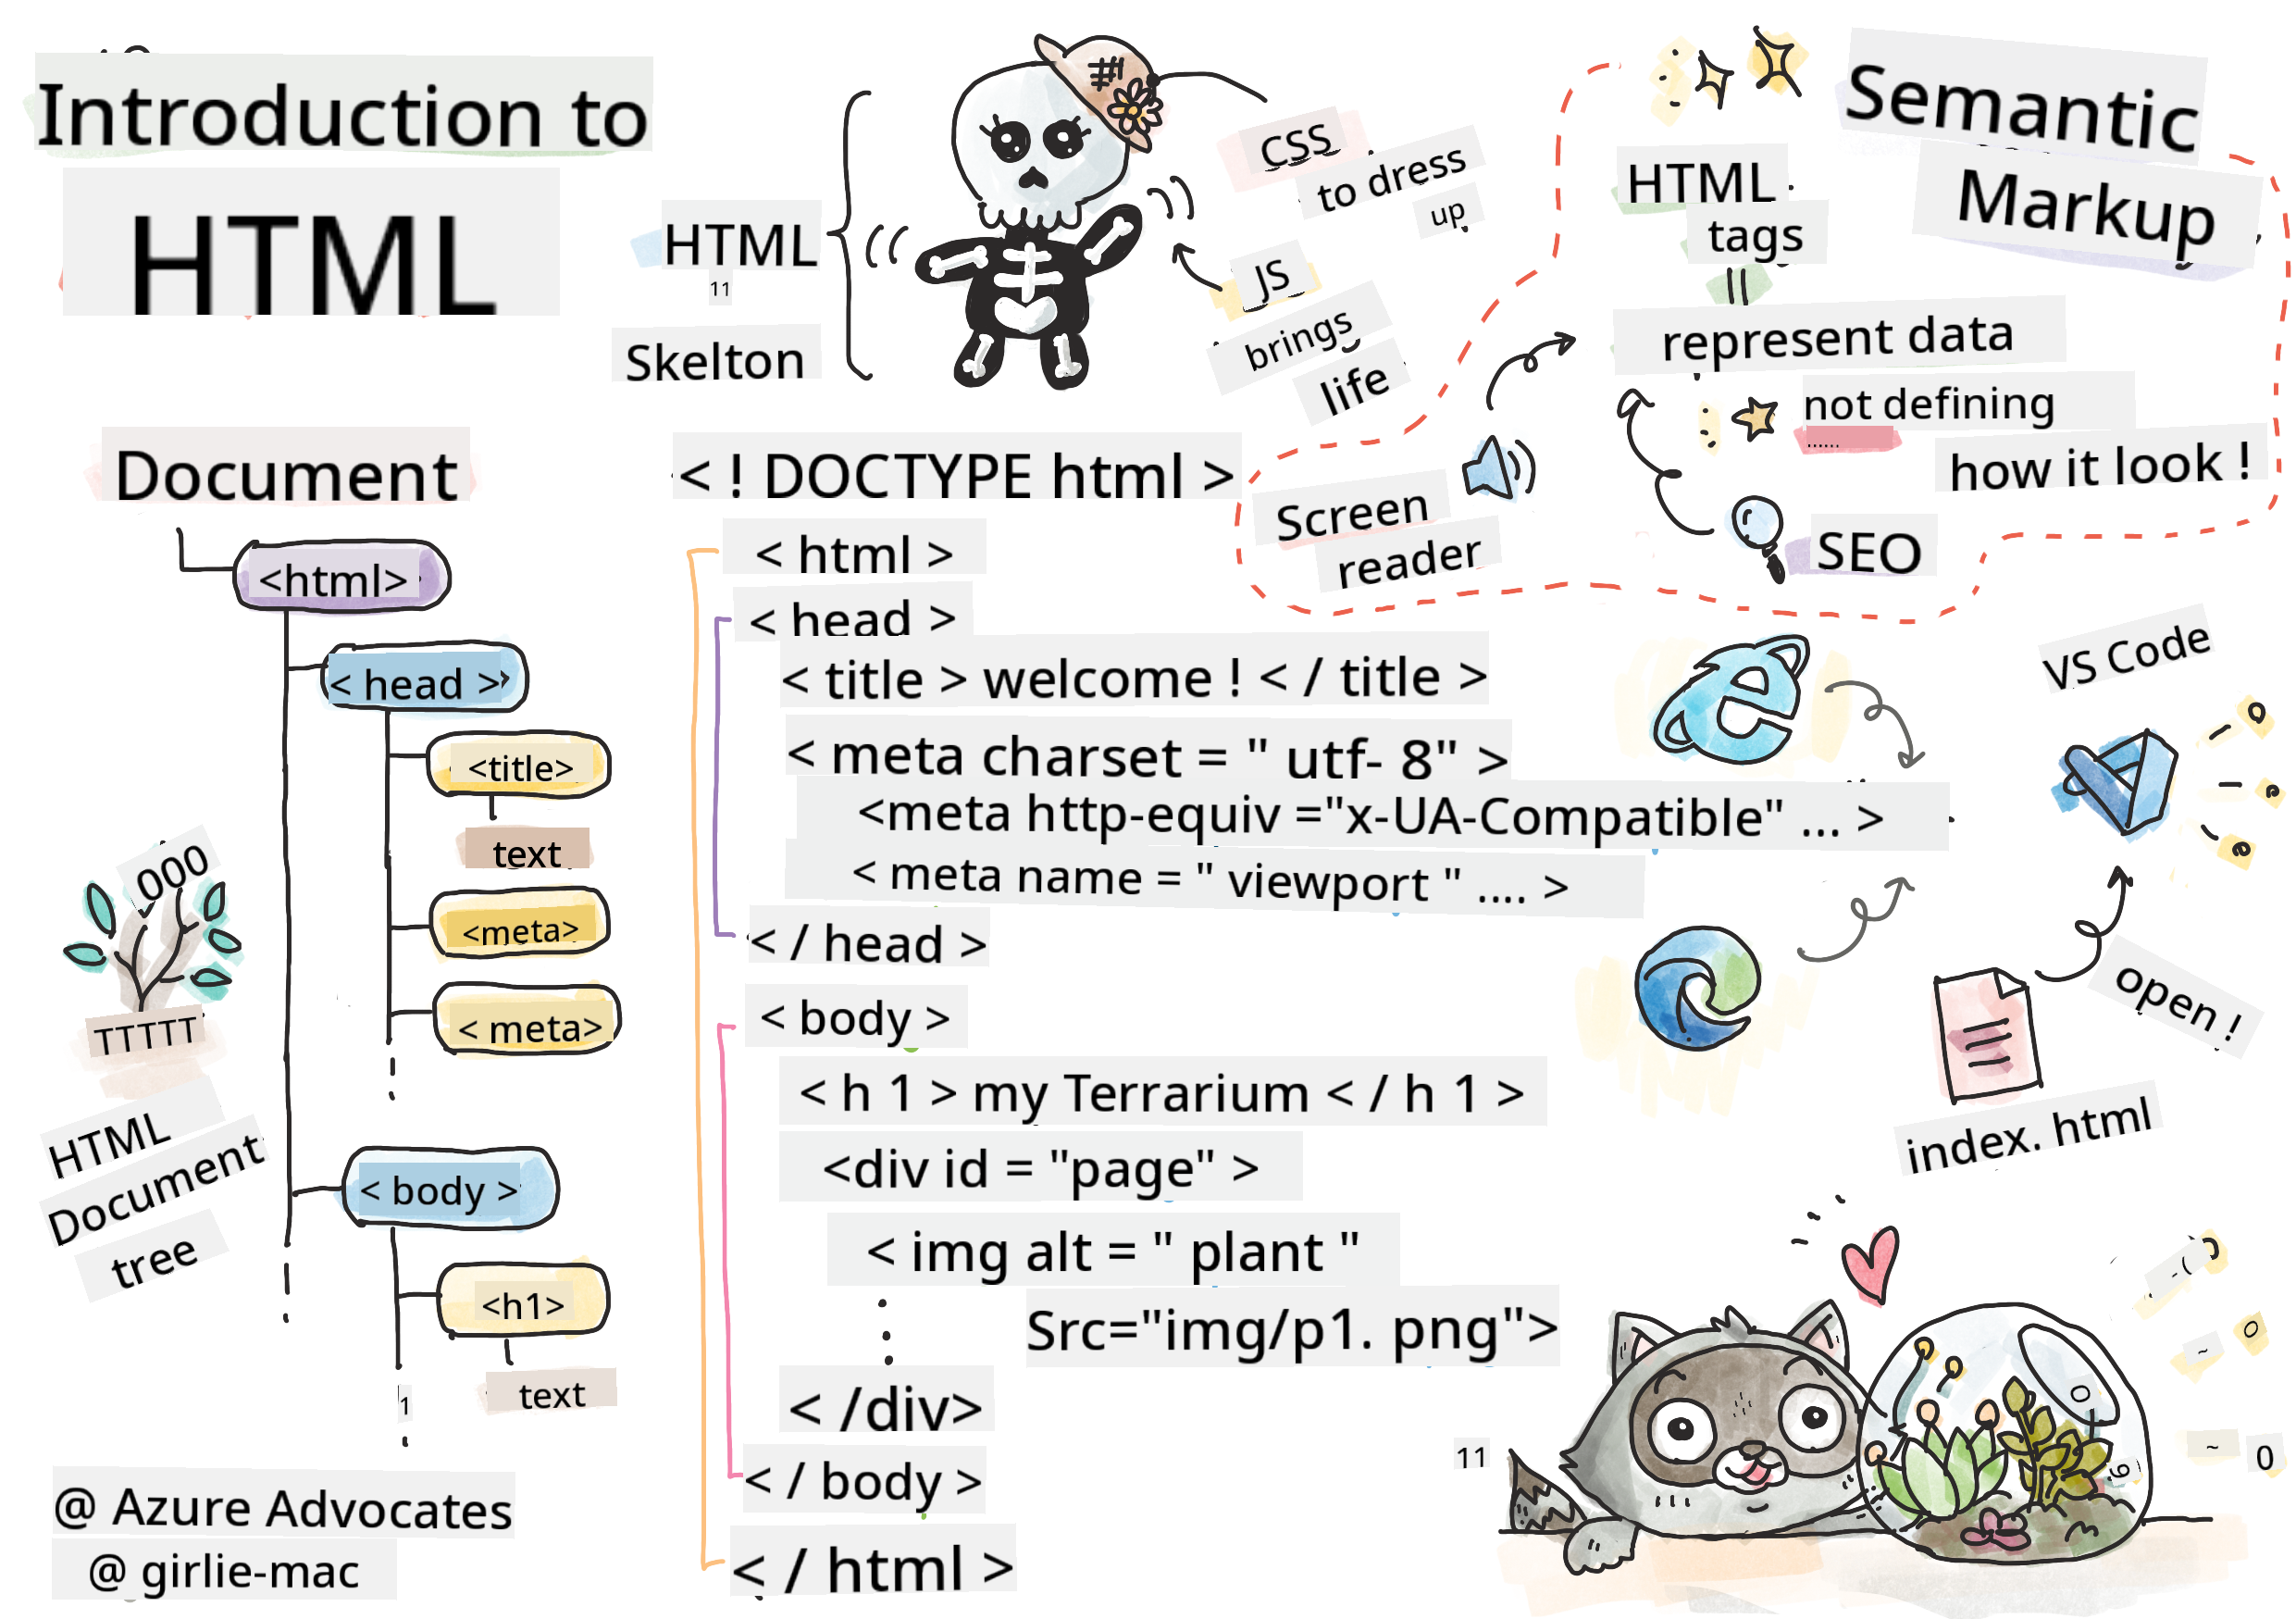
Introduction
HTML, or HyperText Markup Language, is the foundation of the web. If CSS is what styles your HTML and JavaScript adds interactivity, HTML is the structure of your web application. Its syntax even reflects this idea, with tags like "head," "body," and "footer."
In this lesson, you'll use HTML to create the structure of the interface for your virtual terrarium. The interface will include a title and three columns: a left and right column for draggable plants, and a center area that will represent the terrarium itself. By the end of this lesson, you'll see the plants in the columns, but the interface might look a bit odd. Don't worry—CSS styling will be added in the next section to improve its appearance.
Task
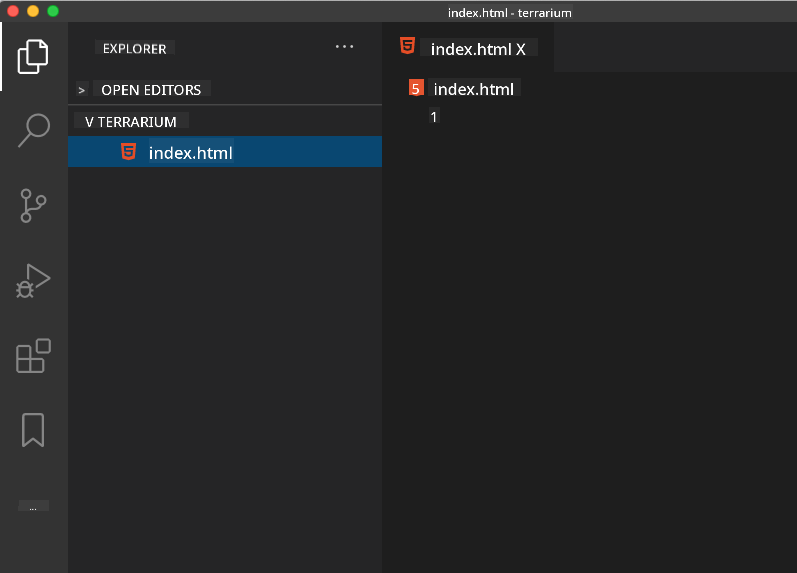
On your computer, create a folder named 'terrarium' and inside it, create a file called 'index.html'. You can do this in Visual Studio Code by opening a new VS Code window, clicking 'open folder,' and navigating to your new folder. Then, click the small 'file' button in the Explorer pane to create the new file:
Alternatively, you can use these commands in Git Bash:
mkdir terrariumcd terrariumtouch index.htmlcode index.htmlornano index.html
The
index.htmlfile is recognized by browsers as the default file in a folder. For example, URLs likehttps://anysite.com/testmight correspond to a folder namedtestcontaining anindex.htmlfile. Theindex.htmlfile doesn't need to appear in the URL.
The DocType and html tags
The first line of an HTML file is the doctype declaration. While it might seem odd to include this line at the very top, it tells older browsers to render the page in standard mode, adhering to the current HTML specification.
Tip: In VS Code, you can hover over a tag to see information about its usage from the MDN Reference guides.
The second line should be the opening <html> tag, followed by its closing tag </html>. These tags serve as the root elements of your interface.
Task
Add these lines at the top of your index.html file:
<!DOCTYPE html>
<html></html>
✅ There are different modes that can be set using the DocType declaration, such as Quirks Mode and Standards Mode. These modes were designed to support very old browsers (like Netscape Navigator 4 and Internet Explorer 5), which are rarely used today. Stick to the standard doctype declaration.
The document's 'head'
The 'head' section of an HTML document contains important information about your web page, known as metadata. In this case, it provides the web server with the following details:
- The page's title
- Metadata, including:
- The character set, specifying the character encoding used in the page
- Browser compatibility information, such as
x-ua-compatibleto indicate support for IE=edge - Instructions for how the viewport should behave when the page loads. Setting the viewport's initial scale to 1 controls the zoom level upon loading.
Task
Add a 'head' section to your document between the opening and closing <html> tags.
<head>
	<title>Welcome to my Virtual Terrarium</title>
	<meta charset="utf-8" />
	<meta http-equiv="X-UA-Compatible" content="IE=edge" />
	<meta name="viewport" content="width=device-width, initial-scale=1" />
</head>
✅ What happens if you set a viewport meta tag like this: <meta name="viewport" content="width=600">? Learn more about the viewport.
The document's body
HTML Tags
In HTML, you use tags in your .html file to create elements for a web page. Most tags have an opening and closing tag, like <p>hello</p> for a paragraph. Create the body of your interface by adding <body> tags inside the <html> tag pair. Your markup will now look like this:
Task
<!DOCTYPE html>
<html>
	<head>
		<title>Welcome to my Virtual Terrarium</title>
		<meta charset="utf-8" />
		<meta http-equiv="X-UA-Compatible" content="IE=edge" />
		<meta name="viewport" content="width=device-width, initial-scale=1" />
	</head>
	<body></body>
</html>
Now, you can start building your page. Typically, <div> tags are used to create separate elements on a page. You'll create a series of <div> elements to hold images.
Images
The <img> tag is one HTML tag that doesn't require a closing tag because its src attribute provides all the necessary information to render the image.
Create a folder named images in your app and add all the images from the source code folder into it. (There are 14 plant images.)
Task
Add these plant images into two columns between the <body></body> tags:
<div id="page">
	<div id="left-container" class="container">
		<div class="plant-holder">
			<img class="plant" alt="plant" id="plant1" src="./images/plant1.png" />
		</div>
		<div class="plant-holder">
			<img class="plant" alt="plant" id="plant2" src="./images/plant2.png" />
		</div>
		<div class="plant-holder">
			<img class="plant" alt="plant" id="plant3" src="./images/plant3.png" />
		</div>
		<div class="plant-holder">
			<img class="plant" alt="plant" id="plant4" src="./images/plant4.png" />
		</div>
		<div class="plant-holder">
			<img class="plant" alt="plant" id="plant5" src="./images/plant5.png" />
		</div>
		<div class="plant-holder">
			<img class="plant" alt="plant" id="plant6" src="./images/plant6.png" />
		</div>
		<div class="plant-holder">
			<img class="plant" alt="plant" id="plant7" src="./images/plant7.png" />
		</div>
	</div>
	<div id="right-container" class="container">
		<div class="plant-holder">
			<img class="plant" alt="plant" id="plant8" src="./images/plant8.png" />
		</div>
		<div class="plant-holder">
			<img class="plant" alt="plant" id="plant9" src="./images/plant9.png" />
		</div>
		<div class="plant-holder">
			<img class="plant" alt="plant" id="plant10" src="./images/plant10.png" />
		</div>
		<div class="plant-holder">
			<img class="plant" alt="plant" id="plant11" src="./images/plant11.png" />
		</div>
		<div class="plant-holder">
			<img class="plant" alt="plant" id="plant12" src="./images/plant12.png" />
		</div>
		<div class="plant-holder">
			<img class="plant" alt="plant" id="plant13" src="./images/plant13.png" />
		</div>
		<div class="plant-holder">
			<img class="plant" alt="plant" id="plant14" src="./images/plant14.png" />
		</div>
	</div>
</div>
Note: Divs vs. Spans. Divs are 'block' elements, while Spans are 'inline' elements. What would happen if you changed these divs to spans?
With this markup, the plants will now appear on the screen. However, the layout will look unpolished because it hasn't been styled with CSS yet. We'll address this in the next lesson.
Each image includes alt text, which appears if the image cannot be displayed. This is an important attribute for accessibility. You'll learn more about accessibility in future lessons, but for now, remember that the alt attribute provides alternative information for an image if a user cannot view it (due to a slow connection, an error in the src attribute, or the use of a screen reader).
✅ Did you notice that each image has the same alt tag? Is this good practice? Why or why not? How could you improve this code?
Semantic markup
Using meaningful 'semantics' in HTML means employing tags that represent the type of data or interaction they were designed for. For example, the main title of a page should use an <h1> tag.
Add the following line right below your opening <body> tag:
<h1>My Terrarium</h1>
Using semantic markup, such as headers with <h1> and unordered lists with <ul>, helps screen readers navigate a page. Buttons should be written as <button>, and lists as <li>. While you can use styled <span> elements with click handlers to mimic buttons, it's better for accessibility to use actual button elements. This allows assistive technologies to identify and interact with buttons more effectively. Always aim to use semantic markup whenever possible.
✅ Watch a screen reader in action and see how it interacts with a web page. Can you understand why non-semantic markup might frustrate users?
The terrarium
The final part of this interface involves adding markup that will later be styled to create a terrarium.
Task:
Add this markup above the last </div> tag:
<div id="terrarium">
	<div class="jar-top"></div>
	<div class="jar-walls">
		<div class="jar-glossy-long"></div>
		<div class="jar-glossy-short"></div>
	</div>
	<div class="dirt"></div>
	<div class="jar-bottom"></div>
</div>
✅ Even though you've added this markup, nothing appears on the screen yet. Why?
🚀Challenge
HTML includes some quirky 'older' tags that are fun to experiment with, even though you shouldn't use deprecated tags like these tags in your code. Can you use the old <marquee> tag to make the <h1> title scroll horizontally? (Remember to remove it afterward!)
Post-Lecture Quiz
Review & Self Study
HTML is a reliable building block system that has shaped the web into what it is today. Explore its history by studying old and new tags. Can you figure out why some tags were deprecated and others introduced? What tags might be added in the future?
Learn more about building websites for the web and mobile devices at Microsoft Learn.
Assignment
Practice your HTML: Build a blog mockup
Disclaimer:
This document has been translated using the AI translation service Co-op Translator. While we strive for accuracy, please note that automated translations may contain errors or inaccuracies. The original document in its native language should be regarded as the authoritative source. For critical information, professional human translation is recommended. We are not responsible for any misunderstandings or misinterpretations resulting from the use of this translation.