
 localizeflow[bot]
9e661e295d
localizeflow[bot]
9e661e295d
|
8 months ago | |
|---|---|---|
| .. | ||
| README.md | 8 months ago | |
| assignment.md | 8 months ago | |
README.md
Build a Space Game Part 2: Draw Hero and Monsters to Canvas
journey
    title Your Canvas Graphics Journey
    section Foundation
      Understand Canvas API: 3: Student
      Learn coordinate system: 4: Student
      Draw basic shapes: 4: Student
    section Image Handling
      Load game assets: 4: Student
      Handle async loading: 5: Student
      Position sprites: 5: Student
    section Game Rendering
      Create game screen: 5: Student
      Build formations: 5: Student
      Optimize performance: 4: Student
Di Canvas API na one of di web development powerfull tin dem wey fit create dynamic, interactive graphics direct for your browser. For dis lesson, we go change dat blank HTML <canvas> element come be game world wey full with heroes and monsters. Think am like your digital art board wey code dey change to visual.
We dey build on top wetin you learn for di last lesson, and now we go enter di visual tins dem. You go learn how to load and show game sprites, put elements for correct position, and create di visual base for your space game. Dis one go join di gap between static web pages and dynamic, interactive experience dem.
By di time we don finish dis lesson, you go get complete game scene wey your hero ship dey positioned well and enemy formations dey ready for battle. You go sabi how modern games dey render graphics for browsers and gain skills to create your own interactive visual experiences. Make we explore canvas graphics and bring your space game come life!
mindmap
  root((Canvas Graphics))
    Canvas Element
      HTML5 Feature
      2D Context
      Coordinate System
      Pixel Control
    Drawing Operations
      Basic Shapes
      Text Rendering
      Image Display
      Path Drawing
    Asset Management
      Image Loading
      Async Operations
      Error Handling
      Performance
    Game Rendering
      Sprite Positioning
      Formation Layout
      Scene Composition
      Frame Updates
    Visual Effects
      Colors & Styles
      Transformations
      Animations
      Layering
Pre-Lecture Quiz
The Canvas
So wetin dis <canvas> element really be? Na HTML5 solution for creating dynamic graphics and animations inside web browsers. E different from regular images or videos wey na static, di canvas dey give you control for every pixel wey show for screen. Dis one perfect for games, data visualizations, and interactive art. Think am as programmable drawing surface wey JavaScript be your paintbrush.
By default, canvas element be like blank, transparent rectangle for your page. But na there di potential dey! E real power dey come out when you use JavaScript draw shapes, load images, create animates, and make tins respond to how user interact. E similar to how early computer graphics pipo for Bell Labs for di 1960s gats program every pixel to create di first digital animations.
✅ Read more about the Canvas API for MDN.
Dis na how e normally dey show for page body:
<canvas id="myCanvas" width="200" height="100"></canvas>
Dis na wetin dis code dey do:
- Sets di
idattribute so you fit reference dis particular canvas element inside JavaScript - Defines di
widthfor pixels to control horizontal size of di canvas - Establishes di
heightfor pixels to determine vertical dimension of di canvas
Drawing Simple Geometry
Now wey you don sabi wetin di canvas element be, mek we explore how to actually draw for am! Di canvas dey use coordinate system wey fit remind you of math class, but one important kink dey wey relate to computer graphics.
Di canvas dey use Cartesian coordinates with x-axis (horizontal) and y-axis (vertical) to place everytin wey you draw. But di main difference be say: no be like math class coordinate system, di origin point (0,0) dey for top-left corner, with x-values dey increase as you dey move right and y-values dey increase as you dey move down. Dis approach come from early computer displays wey electron beams dey scan from top to bottom, so top-left na di natural starting point.
quadrantChart
    title Canvas Coordinate System
    x-axis Left --> Right
    y-axis Top --> Bottom
    quadrant-1 Quadrant 1
    quadrant-2 Quadrant 2
    quadrant-3 Quadrant 3
    quadrant-4 Quadrant 4

    Origin Point: [0.1, 0.1]
    Hero Center: [0.5, 0.8]
    Enemy Formation: [0.3, 0.2]
    Power-up: [0.7, 0.6]
    UI Elements: [0.9, 0.1]
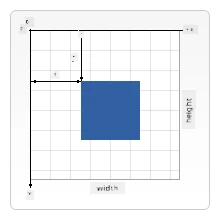
Image from MDN
To draw for di canvas element, you go follow same three-step process wey be foundation for all canvas graphics. Once you do am small times, e go become second nature:
flowchart LR
    A[HTML Canvas Element] --> B[Get Canvas Reference]
    B --> C[Get 2D Context]
    C --> D[Drawing Operations]

    D --> E[Draw Shapes]
    D --> F[Draw Text]
    D --> G[Draw Images]
    D --> H[Apply Styles]

    E --> I[Render to Screen]
    F --> I
    G --> I
    H --> I

    style A fill:#e1f5fe
    style C fill:#e8f5e8
    style I fill:#fff3e0
- Get reference to your Canvas element from di DOM (like any other HTML element)
- Get di 2D rendering context – dis one dey provide all di drawing methods
- Start to draw! Use di context built-in methods to create your graphics
Dis na how e look for code:
// Step 1: Comot di canvas element
const canvas = document.getElementById("myCanvas");

// Step 2: Comot di 2D rendering context
const ctx = canvas.getContext("2d");

// Step 3: Set di fill color an draw one rectangle
ctx.fillStyle = 'red';
ctx.fillRect(0, 0, 200, 200); // x, y, width, height
Make we break dis down step by step:
- We grab our canvas element by im ID and store am for variable
- We get di 2D rendering context – na our toolkit full of drawing methods dis be
- We tell di canvas say we wan fill tins with red with di
fillStyleproperty - We draw rectangle wey dey start for top-left corner (0,0) wey 200 pixels wide and tall be dat
✅ Di Canvas API focus mostly on 2D shapes, but you fit also draw 3D tins for web site; for dis, you fit use di WebGL API.
You fit draw all kain tins with di Canvas API like:
- Geometrical shapes, we don show how to draw rectangle, but many more tins dey wey you fit draw.
- Text, you fit draw text with any font and color wey you want.
- Images, you fit draw image based on image asset like .jpg or .png for example.
✅ Try am! You sabi how to draw rectangle, you fit draw circle for page? Check some interesting Canvas drawings for CodePen. Here na one example wey good well.
🔄 Pedagogical Check-in
Canvas Fundamentals Understanding: Before you move go image loading, make sure you fit:
- ✅ Explain how di canvas coordinate system different from math coordinates
- ✅ Understand di three-step process for canvas drawing operations
- ✅ Identify wetin di 2D rendering context provide
- ✅ Describe how fillStyle and fillRect dey work together
Quick Self-Test: How you go draw blue circle for position (100, 50) with radius 25?
ctx.fillStyle = 'blue';
ctx.beginPath();
ctx.arc(100, 50, 25, 0, 2 * Math.PI);
ctx.fill();
Canvas Drawing Methods We You Don Know:
- fillRect(): Draw filled rectangles
- fillStyle: Set colors and patterns
- beginPath(): Start new drawing paths
- arc(): Create circles and curves
Load and Draw an Image Asset
Drawing simple shapes e good for start, but most games need real images! Sprites, backgrounds, and textures na wetin make games get better visual look. Loading and showing images on canvas different from drawing geometric shapes, but e easy once you sabi the way.
We gats create Image object, load our image file (dis one na asynchronous, e mean say e dey happen "for background"), then draw am for canvas when e ready. Dis approach make sure say your images go show well without blocking your application while dem dey load.
sequenceDiagram
    participant JS as JavaScript
    participant Img as Image Object
    participant Server as File Server
    participant Canvas as Canvas Context

    JS->>Img: new Image()
    JS->>Img: Set src property
    Img->>Server: Request image file
    Server->>Img: Return image data
    Img->>JS: Trigger onload event
    JS->>Canvas: drawImage(img, x, y)
    Canvas->>Canvas: Render to screen

    Note over JS,Canvas: Async loading dey stop UI from gbege
Basic Image Loading
const img = new Image();
img.src = 'path/to/my/image.png';
img.onload = () => {
  // Image don load and e ready to use
  console.log('Image loaded successfully!');
};
Dis na wetin dey happen for dis code:
- We create new Image object to hold our sprite or texture
- We tell am which image file to load by setting source path
- We listen for load event so we go know exact time wey image ready to use
Better Way to Load Images
Here na better way to handle image loading wey professional developers dey usually use. We go wrap di image loading with Promise-based function – dis approach wey JavaScript Promises popular in ES6, go organize your code well and handle errors sharp-sharp:
function loadAsset(path) {
  return new Promise((resolve, reject) => {
    const img = new Image();
    img.src = path;
    img.onload = () => {
      resolve(img);
    };
    img.onerror = () => {
      reject(new Error(`Failed to load image: ${path}`));
    };
  });
}

// Modern way to use am wit async/await
async function initializeGame() {
  try {
    const heroImg = await loadAsset('hero.png');
    const monsterImg = await loadAsset('monster.png');
    // Images dem don ready to use now
  } catch (error) {
    console.error('Failed to load game assets:', error);
  }
}
Wetin we do here:
- Wrap all di image loading logic inside Promise so e go better handle am
- Add error handling wey go really tell us if any tin go wrong
- Use modern async/await syntax because e clear and easy to read
- Include try/catch blocks to handle loading wahala well
Once your images load finish, drawing dem for canvas na easy matter:
async function renderGameScreen() {
  try {
    // Load game things dem
    const heroImg = await loadAsset('hero.png');
    const monsterImg = await loadAsset('monster.png');

    // Find canvas and context
    const canvas = document.getElementById("myCanvas");
    const ctx = canvas.getContext("2d");

    // Draw picture dem for specific place dem
    ctx.drawImage(heroImg, canvas.width / 2, canvas.height / 2);
    ctx.drawImage(monsterImg, 0, 0);
  } catch (error) {
    console.error('Failed to render game screen:', error);
  }
}
Make we run dis step by step:
- We load both our hero and monster images for background using await
- We grab our canvas element and get di 2D rendering context we need
- We position hero image for center using some quick coordinate math
- We put monster image for top-left corner to start our enemy formation
- We catch any errors wey fit happen during loading or rendering
flowchart TD
    A[Load Assets] --> B{All Images Loaded?}
    B -->|No| C[Show Loading]
    B -->|Yes| D[Get Canvas Context]
    C --> B
    D --> E[Clear Screen]
    E --> F[Draw Background]
    F --> G[Draw Enemy Formation]
    G --> H[Draw Hero Ship]
    H --> I[Apply Visual Effects]
    I --> J[Render Frame]

    subgraph "Rendering Pipeline"
        K[Asset Management]
        L[Scene Composition]
        M[Drawing Operations]
        N[Frame Output]
    end

    style A fill:#e1f5fe
    style J fill:#e8f5e8
    style I fill:#fff3e0
Now E Time to Start Building Your Game
Now we go join everytin together to create di visual base for your space game. You get solid understanding of canvas fundamentals and image loading, so dis hands-on section go guide you build complete game screen with proper sprite position.
Wetin To Build
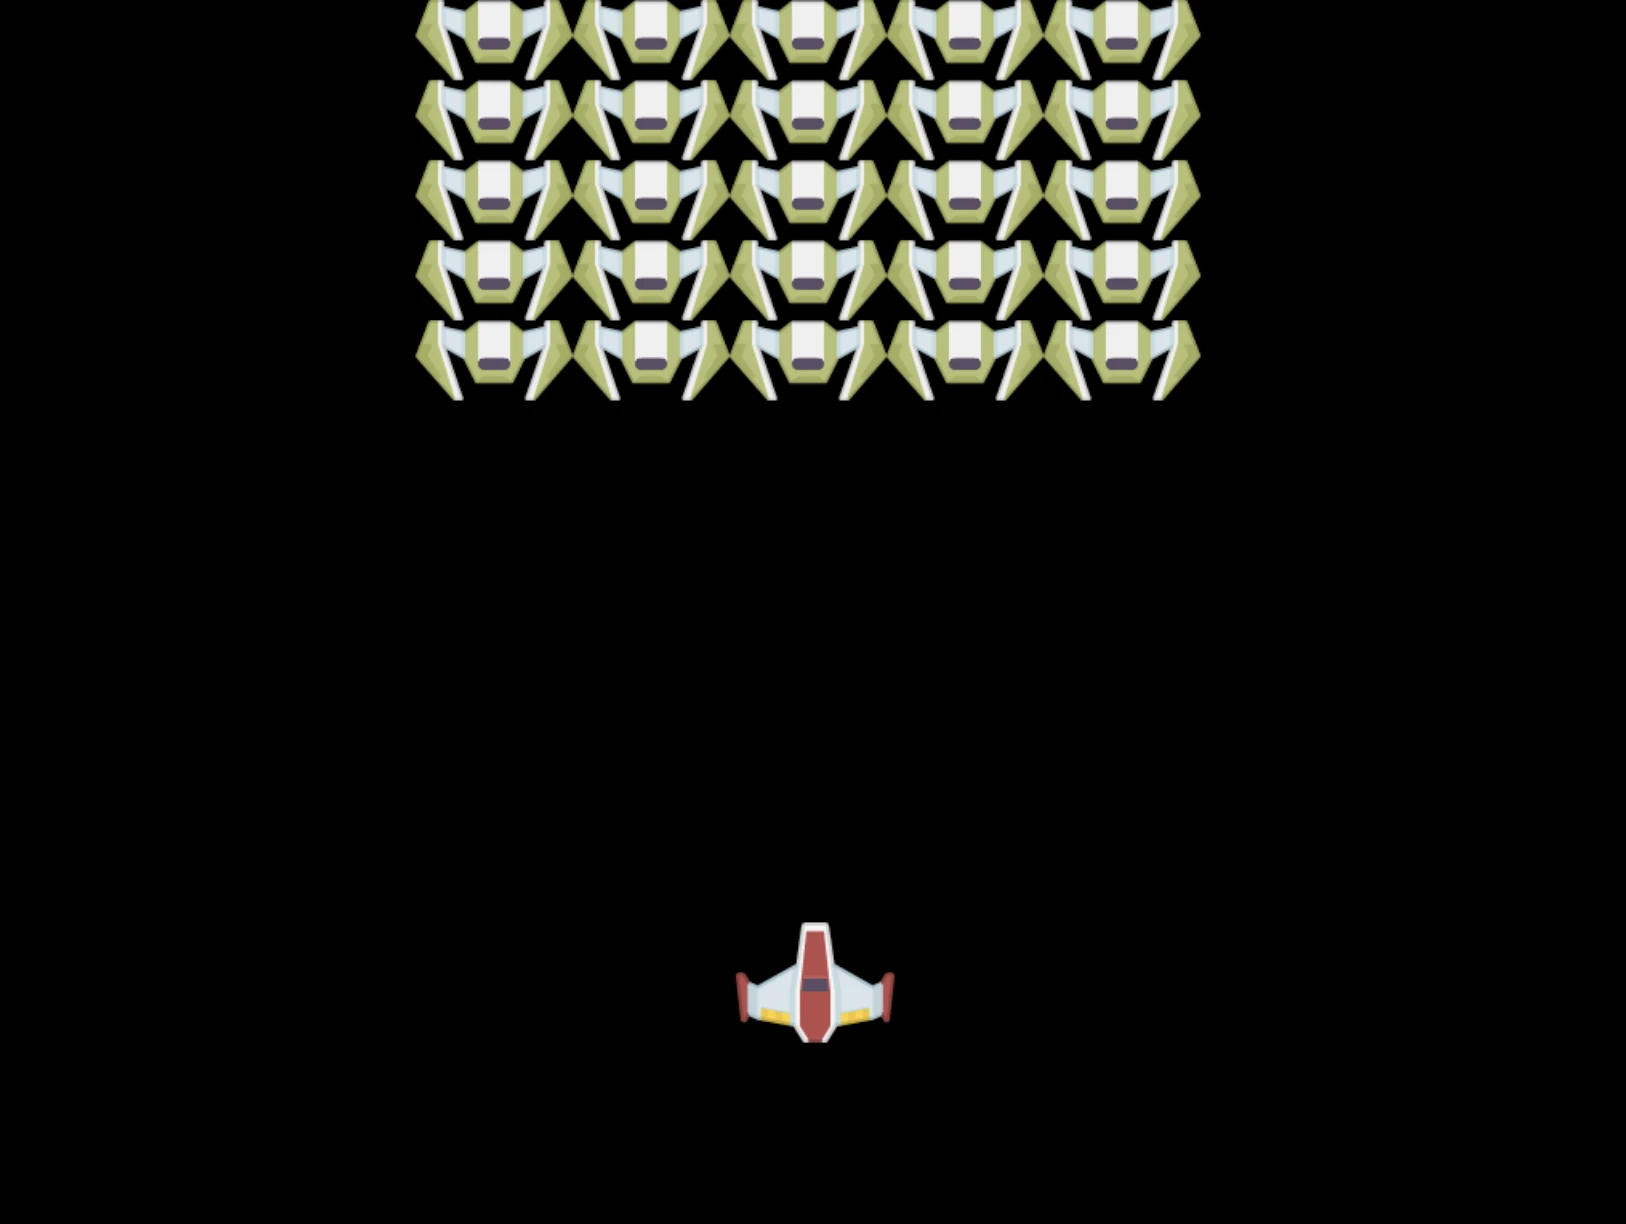
You go build web page wey get Canvas element. E suppose show black screen 1024*768. We don provide you with two images:
-
Hero ship

-
5*5 monster

Recommended steps to start development
Find di starter files wey dem don create for you for your-work sub folder. Your project structure suppose get:
your-work/
├── assets/
│   ├── enemyShip.png
│   └── player.png
├── index.html
├── app.js
└── package.json
Dis na wetin you dey work with:
- Game sprites dey
assets/folder so everything go stay organized - Your main HTML file go setup canvas element and prepare everything
- JavaScript file wey you go write all your game rendering magic
- A package.json wey go setup development server so you fit test locally
Open dis folder for Visual Studio Code to start development. You need local development environment with Visual Studio Code, NPM, and Node.js installed. If you never get npm for your computer, here na how to install am.
Start your development server by entering your-work folder:
cd your-work
npm start
Dis command dey do cool tins:
- Start local server for
http://localhost:5000so you fit test game - Serve all your files correct make your browser fit load am well
- Watch your files for changes so you fit develop smoothly
- Give you professional development environment for testing everything
💡 Note: At first your browser go show blank page – na normal! As you add code, just refresh browser to see your changes. Dis iterative development approach similar to how NASA build Apollo guidance computer – dem dey test each part before dem join am together.
Add code
Add di code wey dem ask for inside your-work/app.js to finish dis tasks:
-
Draw canvas wit black background
💡 How e go be: Find TODO inside
/app.jsand add only two lines. Setctx.fillStyleto black, then usectx.fillRect()start (0,0) with your canvas size. Easy! -
Load game textures
💡 How e go be: Use
await loadAsset()to load your player and enemy images. Store dem for variables so you fit use later. Remember – dem no go show till you draw dem! -
Draw hero ship for center-bottom position
💡 How e go be: Use
ctx.drawImage()to position your hero. For x-coordinate, trycanvas.width / 2 - 45to center am, for y-coordinate usecanvas.height - canvas.height / 4put am for bottom area. -
Draw 5×5 formation of enemy ships
💡 How e go be: Find
createEnemiesfunction and set nested loop. You need do some math for space and position, but no worry – I go show you exactly how!
First, set constants for correct enemy formation layout:
const ENEMY_TOTAL = 5;
const ENEMY_SPACING = 98;
const FORMATION_WIDTH = ENEMY_TOTAL * ENEMY_SPACING;
const START_X = (canvas.width - FORMATION_WIDTH) / 2;
const STOP_X = START_X + FORMATION_WIDTH;
Make we break down weh dis constants dey do:
- We set 5 enemies per row and column (nice 5×5 grid)
- We define how far enemies go dey from each other so dem no go too close
- We calculate di width of our whole formation
- We figure where to start and stop so formation go look centered
flowchart LR
    A["Canvas Width: 1024px"] --> B["Formation Width: 490px"]
    B --> C["Start X: 267px"]
    C --> D["Enemy Spacing: 98px"]

    subgraph "5x5 Enemy Formation"
        E["Row 1: Y=0"]
        F["Row 2: Y=50"]
        G["Row 3: Y=100"]
        H["Row 4: Y=150"]
        I["Row 5: Y=200"]
    end

    subgraph "Column Spacing"
        J["Col 1: X=267"]
        K["Col 2: X=365"]
        L["Col 3: X=463"]
        M["Col 4: X=561"]
        N["Col 5: X=659"]
    end

    style A fill:#e1f5fe
    style B fill:#e8f5e8
    style C fill:#fff3e0
Then, create nested loops to draw enemy formation:
for (let x = START_X; x < STOP_X; x += ENEMY_SPACING) {
  for (let y = 0; y < 50 * 5; y += 50) {
    ctx.drawImage(enemyImg, x, y);
  }
}
Dis na wetin dis nested loop dey do:
- Outer loop go move left to right across formation
- Inner loop go move top to bottom to create nice rows
- We draw each enemy sprite for exact x,y coordinates we calculate
- Everything stay evenly spaced so e go look sharp and organized
🔄 Pedagogical Check-in
Game Rendering Mastery: Make sure you understand whole rendering system:
- ✅ How async image loading dey stop UI from blocking for game start?
- ✅ Why we dey calculate enemy formation position with constants, no hardcode?
- ✅ Wetin 2D rendering context dey do for drawing?
- ✅ How nested loops dey create organized sprite formations?
Performance Considerations: Your game now dey show:
- Efficient asset loading: Promise-based image management
- Organized rendering: Structured drawing operations
- Mathematical positioning: Calculated sprite placement
- Error handling: Graceful failure management
Visual Programming Concepts: You don learn:
- Coordinate systems: Di way we take change math go screen positions
- Sprite management: How to load an show game graphics
- Formation algorithms: Math patterns for organized layouts
- Async operations: Modern JavaScript for better user experience
Result
Di final result suppose be like dis:
Solution
Try solve am by yourself first but if you jam, make you check dis solution
GitHub Copilot Agent Challenge 🚀
Use di Agent mode to complete dis challenge:
Description: Make your space game canvas beta by adding visual effects and interactive tins using di Canvas API way you don learn.
Prompt: Create new file wey dem go call enhanced-canvas.html wey get canvas wey dey show animated stars for background, one pulsing health bar for di hero ship, plus enemy ships wey go dey slowly move down. Add JavaScript code wey go draw twinkling stars using random positions and opacity, put health bar wey dey change color base on health level (green > yellow > red), plus make di enemy ships dey move down di screen with different speeds.
Learn more about agent mode here.
🚀 Challenge
You don sabi how to draw with di 2D Canvas API; try check am for WebGL API, then try draw 3D object.
Post-Lecture Quiz
Review & Self Study
Learn more about di Canvas API by reading about it.
⚡ Wetin You Fit Do For Di Next 5 Minutes
- Open your browser console and create canvas element with
document.createElement('canvas') - Try draw rectangle using
fillRect()for canvas context - Experiment with different colors using
fillStyleproperty - Draw simple circle using
arc()method
🎯 Wetin You Fit Achieve This Hour
- Complete post-lesson quiz and understand canvas basics
- Create canvas drawing app with plenty shapes and colors
- Implement image loading and sprite rendering for your game
- Build simple animation wey dey move objects across di canvas
- Practice canvas transformations like scaling, rotation, and translation
📅 Your Week-Long Canvas Journey
- Complete space game with polished graphics and sprite animations
- Master advanced canvas techniques like gradients, patterns, and compositing
- Create interactive visualizations using canvas for data representation
- Learn canvas optimization techniques for smooth performance
- Build drawing or painting app with different tools
- Explore creative coding patterns and generative art with canvas
🌟 Your Month-Long Graphics Mastery
- Build complex visual apps using Canvas 2D and WebGL
- Learn graphics programming concepts and shader basics
- Contribute to open source graphics libraries and visualization tools
- Master performance optimization for graphics-heavy apps
- Create educational content about canvas programming and computer graphics
- Become graphics programming expert wey fit help others create visual experience
🎯 Your Canvas Graphics Mastery Timeline
timeline
    title Canvas API Learning Progression

    section Canvas Fundamentals (15 minutes)
        Basic Operations: Element reference
                        : 2D context access
                        : Coordinate system
                        : Simple shape drawing

    section Drawing Techniques (20 minutes)
        Graphics Primitives: Rectangles and circles
                           : Colors and styles
                           : Text rendering
                           : Path operations

    section Image Handling (25 minutes)
        Asset Management: Image object creation
                        : Async loading patterns
                        : Error handling
                        : Performance optimization

    section Game Graphics (30 minutes)
        Sprite Rendering: Positioning algorithms
                        : Formation calculations
                        : Scene composition
                        : Frame rendering

    section Advanced Techniques (40 minutes)
        Visual Effects: Transformations
                      : Animations
                      : Layering
                      : State management

    section Performance (35 minutes)
        Optimization: Efficient drawing
                    : Memory management
                    : Frame rate control
                    : Asset caching

    section Professional Skills (1 week)
        Production Graphics: WebGL integration
                           : Canvas libraries
                           : Game engines
                           : Cross-platform considerations

    section Advanced Graphics (1 month)
        Specialized Applications: Data visualization
                                : Interactive art
                                : Real-time effects
                                : 3D graphics
🛠️ Your Canvas Graphics Toolkit Summary
After you finish dis lesson, you get:
- Canvas API Mastery: Full understanding of 2D graphics programming
- Coordinate Mathematics: Correct positioning and layout algorithms
- Asset Management: Professional image loading with error handling
- Rendering Pipeline: Organized way to compose scenes
- Game Graphics: Sprite positioning and formation calculations
- Async Programming: Modern JavaScript patterns for smooth performance
- Visual Programming: How to change math concepts to screen graphics
Real-World Applications: Your Canvas skills fit directly apply to:
- Data Visualization: Charts, graphs, and interactive dashboards
- Game Development: 2D games, simulations, and interactive experience
- Digital Art: Creative coding and generative art projects
- UI/UX Design: Custom graphics and interactive elements
- Educational Software: Visual learning tools and simulations
- Web Applications: Dynamic graphics and real-time visuals
Professional Skills Gained: Now you fit:
- Build custom graphics wey no use outside libraries
- Optimize rendering performance for smooth user experience
- Debug complex visual wahala with browser developer tools
- Design scalable graphics system using math principles
- Integrate Canvas graphics wit modern web application frameworks
Canvas API Methods You Don Master:
- Element Management: getElementById, getContext
- Drawing Operations: fillRect, drawImage, fillStyle
- Asset Loading: Image objects, Promise patterns
- Mathematical Positioning: Coordinate calculations, formation algorithms
Next Level: You fit now add animation, user interaction, collision detection, or try WebGL for 3D graphics!
🌟 Achievement Unlocked: You don build complete game rendering system using basic Canvas API techniques!
Assignment
Disclaimer:
Dis document don translate by AI translation service Co-op Translator. Even though we dey try make am correct, abeg sabi say automated translations fit get some mistake or wahala. The original document wey e dey for im own language na the real correct source. For important information, e good make person wey sabi translate am well do the translation. We no go take responsibility for any misunderstanding or wrong meaning wey fit happen because of dis translation.