8.8 KiB
Capture audio - Raspberry Pi
In this part of the lesson, you will write code to record audio on your Raspberry Pi. The audio recording will be controlled by a button.
Hardware
The Raspberry Pi requires a button to manage the audio recording.
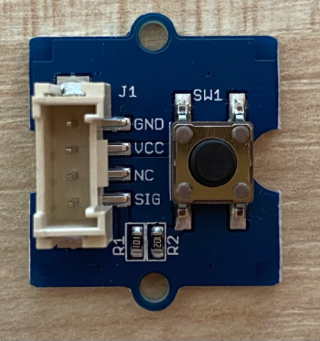
The button you'll use is a Grove button. This is a digital sensor that toggles a signal on or off. These buttons can be configured to send a high signal when pressed and a low signal when not, or vice versa.
If you're using a ReSpeaker 2-Mics Pi HAT as a microphone, you don't need to connect an external button since this hat already has one built in. Skip to the next section.
Connect the button
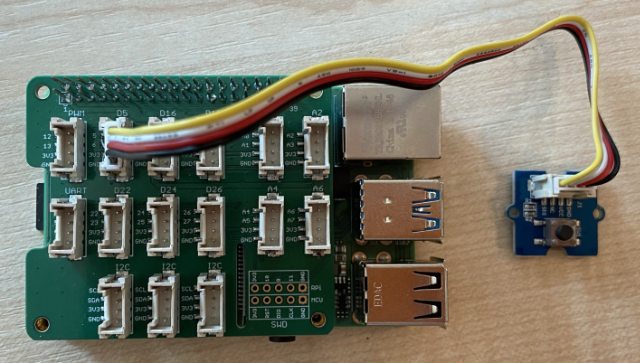
The button can be connected to the Grove base hat.
Task - connect the button
-
Insert one end of a Grove cable into the socket on the button module. It will only fit one way.
-
With the Raspberry Pi powered off, connect the other end of the Grove cable to the digital socket labeled D5 on the Grove Base hat attached to the Pi. This socket is the second from the left in the row of sockets next to the GPIO pins.
Capture audio
You can record audio from the microphone using Python code.
Task - capture audio
-
Power up the Pi and wait for it to boot.
-
Open VS Code, either directly on the Pi or by connecting via the Remote SSH extension.
-
The PyAudio Pip package provides functions to record and play audio. This package depends on some audio libraries that need to be installed first. Run the following commands in the terminal to install them:
sudo apt update sudo apt install libportaudio0 libportaudio2 libportaudiocpp0 portaudio19-dev libasound2-plugins --yes -
Install the PyAudio Pip package.
pip3 install pyaudio -
Create a new folder called
smart-timerand add a file namedapp.pyto this folder. -
Add the following imports at the top of the file:
import io
import pyaudio
import time
import wave

from grove.factory import Factory
This imports the
pyaudiomodule, some standard Python modules for handling wave files, and thegrove.factorymodule to import aFactoryfor creating a button class. -
Below this, add code to create a Grove button.
If you're using the ReSpeaker 2-Mics Pi HAT, use the following code:
# The button on the ReSpeaker 2-Mics Pi HAT
button = Factory.getButton("GPIO-LOW", 17)
This creates a button on port D17, which is the port connected to the button on the ReSpeaker 2-Mics Pi HAT. This button is configured to send a low signal when pressed.
If you're not using the ReSpeaker 2-Mics Pi HAT and are instead using a Grove button connected to the base hat, use this code:
button = Factory.getButton("GPIO-HIGH", 5)This creates a button on port D5, configured to send a high signal when pressed.
-
Below this, create an instance of the PyAudio class to manage audio:
audio = pyaudio.PyAudio() -
Specify the hardware card number for the microphone and speaker. This will be the number you identified earlier in the lesson by running
arecord -landaplay -l.microphone_card_number = <microphone card number> speaker_card_number = <speaker card number>Replace
<microphone card number>with the number of your microphone's card.Replace
<speaker card number>with the number of your speaker's card, which is the same number you set in thealsa.conffile. -
Below this, define the sample rate for audio recording and playback. You may need to adjust this depending on your hardware.
rate = 48000 #48KHzIf you encounter sample rate errors when running the code later, change this value to
44100or16000. Higher values result in better sound quality. -
Below this, create a new function called
capture_audio. This function will handle audio recording from the microphone:def capture_audio(): -
Inside this function, add the following code to record audio:
stream = audio.open(format = pyaudio.paInt16,
                    rate = rate,
                    channels = 1,
                    input_device_index = microphone_card_number,
                    input = True,
                    frames_per_buffer = 4096)

frames = []

while button.is_pressed():
    frames.append(stream.read(4096))

stream.stop_stream()
stream.close()
This code opens an audio input stream using the PyAudio object. The stream captures audio from the microphone at 16KHz, storing it in buffers of 4096 bytes.
The code loops while the Grove button is pressed, reading these 4096-byte buffers into an array each time.
💁 You can learn more about the options passed to the
openmethod in the PyAudio documentation.Once the button is released, the stream is stopped and closed.
-
Add the following code at the end of this function:
wav_buffer = io.BytesIO()
with wave.open(wav_buffer, 'wb') as wavefile:
    wavefile.setnchannels(1)
    wavefile.setsampwidth(audio.get_sample_size(pyaudio.paInt16))
    wavefile.setframerate(rate)
    wavefile.writeframes(b''.join(frames))
    wav_buffer.seek(0)

return wav_buffer
This code creates a binary buffer and writes all the recorded audio to it as a WAV file. WAV is a standard format for storing uncompressed audio. The buffer is then returned.
-
Add the following
play_audiofunction to play back the recorded audio:def play_audio(buffer): stream = audio.open(format = pyaudio.paInt16, rate = rate, channels = 1, output_device_index = speaker_card_number, output = True) with wave.open(buffer, 'rb') as wf: data = wf.readframes(4096) while len(data) > 0: stream.write(data) data = wf.readframes(4096) stream.close()This function opens another audio stream, this time for output, to play the audio. It uses the same settings as the input stream. The buffer is opened as a wave file and written to the output stream in 4096-byte chunks, playing the audio. The stream is then closed.
-
Add the following code below the
capture_audiofunction to loop until the button is pressed. Once the button is pressed, the audio is recorded and then played back.while True: while not button.is_pressed(): time.sleep(.1) buffer = capture_audio() play_audio(buffer) -
Run the code. Press the button and speak into the microphone. Release the button when you're done, and you'll hear the recording.
You may see some ALSA errors when the PyAudio instance is created. These errors are caused by configurations for audio devices that aren't present on the Pi. You can ignore them.
pi@raspberrypi:~/smart-timer $ python3 app.py
ALSA lib pcm.c:2565:(snd_pcm_open_noupdate) Unknown PCM cards.pcm.front
ALSA lib pcm.c:2565:(snd_pcm_open_noupdate) Unknown PCM cards.pcm.rear
ALSA lib pcm.c:2565:(snd_pcm_open_noupdate) Unknown PCM cards.pcm.center_lfe
ALSA lib pcm.c:2565:(snd_pcm_open_noupdate) Unknown PCM cards.pcm.side
If you encounter the following error:
OSError: [Errno -9997] Invalid sample ratechange the
rateto either 44100 or 16000.
💁 You can find this code in the code-record/pi folder.
😀 Your audio recording program is working perfectly!
Disclaimer:
This document has been translated using the AI translation service Co-op Translator. While we aim for accuracy, please note that automated translations may include errors or inaccuracies. The original document in its native language should be regarded as the authoritative source. For critical information, professional human translation is advised. We are not responsible for any misunderstandings or misinterpretations resulting from the use of this translation.