21 KiB
Train a fruit quality detector
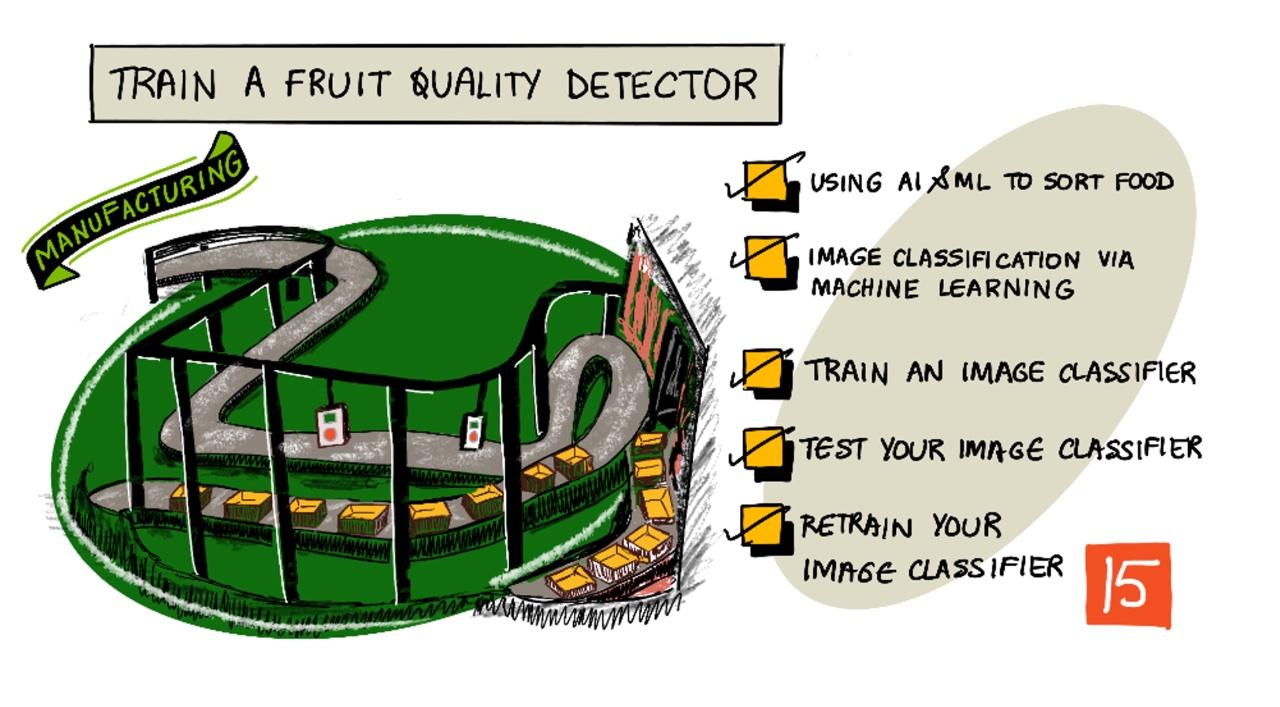
Sketchnote by Nitya Narasimhan. Click the image for a larger version.
This video provides an overview of the Azure Custom Vision service, which will be explored in this lesson.
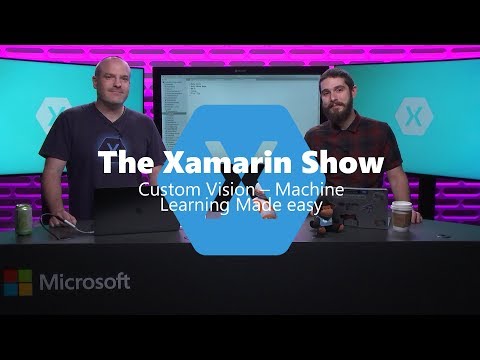
🎥 Click the image above to watch the video
Pre-lecture quiz
Introduction
The recent advancements in Artificial Intelligence (AI) and Machine Learning (ML) are equipping developers with powerful tools. ML models can be trained to identify various objects in images, such as unripe fruit, which can then be used in IoT devices to sort produce during harvesting or processing in factories and warehouses.
In this lesson, you'll learn about image classification—using ML models to differentiate between images of various objects. Specifically, you'll train an image classifier to distinguish between good and bad fruit, such as under-ripe, overripe, bruised, or rotten produce.
This lesson will cover:
- Using AI and ML to sort food
- Image classification via Machine Learning
- Train an image classifier
- Test your image classifier
- Retrain your image classifier
Using AI and ML to sort food
Feeding the global population is a challenging task, especially at a cost that ensures food remains affordable for everyone. One of the biggest expenses is labor, which is why farmers are increasingly adopting automation and IoT tools to reduce these costs. Harvesting by hand is labor-intensive (and often physically demanding), so machinery is replacing manual labor, particularly in wealthier countries. However, while machinery reduces harvesting costs, it comes with a drawback—the inability to sort food during the harvest.
Not all crops ripen uniformly. For instance, tomatoes on the same vine may vary in ripeness, with some still green while others are ready for harvest. Although harvesting unripe produce is wasteful, it is often more cost-effective for farmers to harvest everything at once using machinery and discard the unripe produce later.
✅ Take a look at fruits or vegetables near you—whether in farms, gardens, or stores. Are they all at the same stage of ripeness, or do you notice variations?
The shift to automated harvesting moved the sorting process from the field to the factory. In factories, food travels along conveyor belts, where teams of workers manually remove produce that doesn't meet quality standards. While machinery made harvesting cheaper, manual sorting still incurred significant costs.
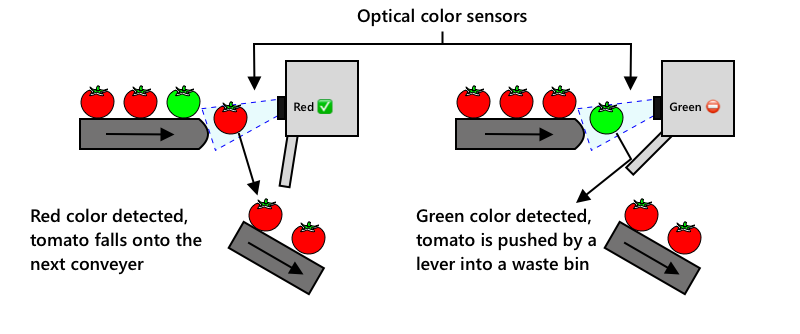
The next step in evolution was the use of machines for sorting, either integrated into harvesters or located in processing plants. Early machines relied on optical sensors to detect colors, using actuators to push green tomatoes into waste bins with levers or air puffs, while allowing red tomatoes to continue along the conveyor belts.
In this video, as tomatoes fall from one conveyor belt to another, green tomatoes are identified and flicked into a bin using levers.
✅ What conditions would be necessary in a factory or field for these optical sensors to function effectively?
The latest advancements in sorting machines leverage AI and ML. These systems use models trained to differentiate good produce from bad, not just based on obvious color differences (e.g., green vs. red tomatoes) but also on subtle visual cues that indicate bruising or disease.
Image classification via Machine Learning
Traditional programming involves taking data, applying an algorithm, and producing an output. For example, in the previous project, you used GPS coordinates and a geofence, applied an algorithm provided by Azure Maps, and determined whether the point was inside or outside the geofence. More data input results in more output.
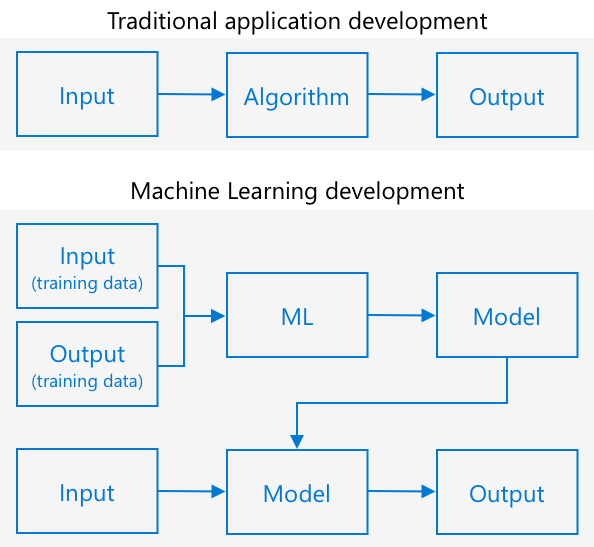
Machine learning flips this process—you start with data and known outputs, and the machine learning algorithm learns from the data. The trained algorithm, called a machine learning model or simply model, can then process new data to generate new outputs.
🎓 The process of a machine learning algorithm learning from data is called training. The inputs and known outputs are referred to as training data.
For example, you could provide a model with millions of images of unripe bananas labeled as unripe and millions of images of ripe bananas labeled as ripe. The ML algorithm would then create a model based on this data. When given a new image of a banana, the model would predict whether it is ripe or unripe.
🎓 The results produced by ML models are called predictions.
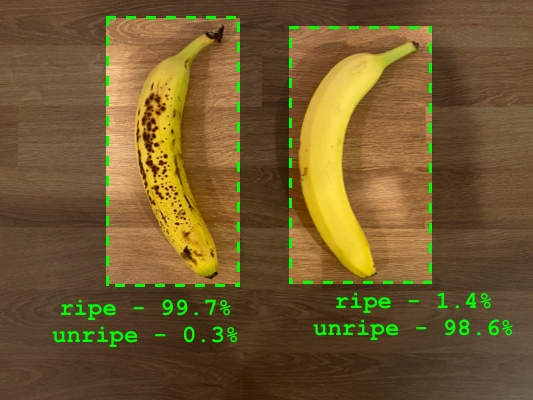
ML models don't provide binary answers; instead, they generate probabilities. For instance, a model might analyze a banana image and predict it is 99.7% ripe and 0.3% unripe. Your code would then select the most likely prediction and classify the banana as ripe.
The ML model used for image recognition is called an image classifier. It is trained with labeled images and then classifies new images based on those labels.
💁 This explanation is simplified. There are other ways to train models, such as unsupervised learning, which doesn't require labeled outputs. If you're interested in learning more about ML, check out ML for beginners, a 24-lesson curriculum on Machine Learning.
Train an image classifier
Training an image classifier typically requires millions of images. However, once an image classifier has been trained on a large dataset, it can be re-trained with a smaller set of images to achieve excellent results. This process is called transfer learning.
🎓 Transfer learning involves transferring knowledge from an existing ML model to a new model using new data.
A pre-trained image classifier is already adept at recognizing shapes, colors, and patterns. Transfer learning allows the model to apply this knowledge to identify new objects.
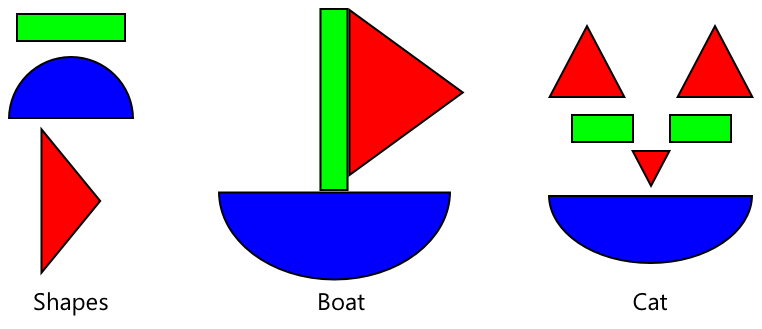
Think of it like children's shape books—once you can identify a semi-circle, rectangle, and triangle, you can recognize a sailboat or a cat based on how the shapes are arranged. Similarly, an image classifier recognizes shapes, and transfer learning teaches it how these shapes combine to form objects like a ripe banana.
There are many tools available to help with this process, including cloud-based services that allow you to train models and use them via web APIs.
💁 Training models requires significant computational power, often provided by Graphics Processing Units (GPUs). The same hardware that enhances gaming experiences on devices like Xbox can also train ML models. Cloud services allow you to rent powerful GPUs for the time you need them.
Custom Vision
Custom Vision is a cloud-based tool for training image classifiers. It enables you to train a classifier with a relatively small number of images. You can upload images via a web portal, API, or SDK, tagging each image with its classification. After training the model, you can test its performance and publish it for use through a web API or SDK.
![]()
💁 You can train a Custom Vision model with as few as 5 images per classification, but more images yield better results. Aim for at least 30 images for improved accuracy.
Custom Vision is part of Microsoft's Cognitive Services, a suite of AI tools that require little or no training. These services include speech recognition, language understanding, and image analysis, and they are available with a free tier in Azure.
💁 The free tier is sufficient for creating, training, and using a model during development. Learn more about the free tier's limits on the Custom Vision Limits and Quotas page.
Task - create a cognitive services resource
To use Custom Vision, you'll first need to create two cognitive services resources in Azure using the Azure CLI: one for training and one for prediction.
-
Create a Resource Group for this project called
fruit-quality-detector. -
Use the following command to create a free Custom Vision training resource:
az cognitiveservices account create --name fruit-quality-detector-training \
                                    --resource-group fruit-quality-detector \
                                    --kind CustomVision.Training \
                                    --sku F0 \
                                    --yes \
                                    --location <location>
Replace
<location>with the location you used when creating the Resource Group.This will create a Custom Vision training resource in your Resource Group. It will be called
fruit-quality-detector-trainingand use theF0SKU, which is the free tier. The--yesoption indicates your agreement to the cognitive services terms and conditions.
💁 Use the
S0SKU if you already have a free account for any Cognitive Services.
-
Use the following command to create a free Custom Vision prediction resource:
az cognitiveservices account create --name fruit-quality-detector-prediction \
                                    --resource-group fruit-quality-detector \
                                    --kind CustomVision.Prediction \
                                    --sku F0 \
                                    --yes \
                                    --location <location>
Replace
<location>with the location you used when creating the Resource Group.This will create a Custom Vision prediction resource in your Resource Group. It will be called
fruit-quality-detector-predictionand use theF0SKU, which is the free tier. The--yesoption indicates your agreement to the cognitive services terms and conditions.
Task - create an image classifier project
-
Open the Custom Vision portal at CustomVision.ai and sign in with the Microsoft account linked to your Azure account.
-
Follow the Create a new Project section of the Build a Classifier Quickstart to create a new Custom Vision project. The UI may change, so refer to the documentation for the most up-to-date instructions.
Name your project
fruit-quality-detector.When creating your project, select the
fruit-quality-detector-trainingresource you created earlier. Choose a Classification project type, a Multiclass classification type, and the Food domain.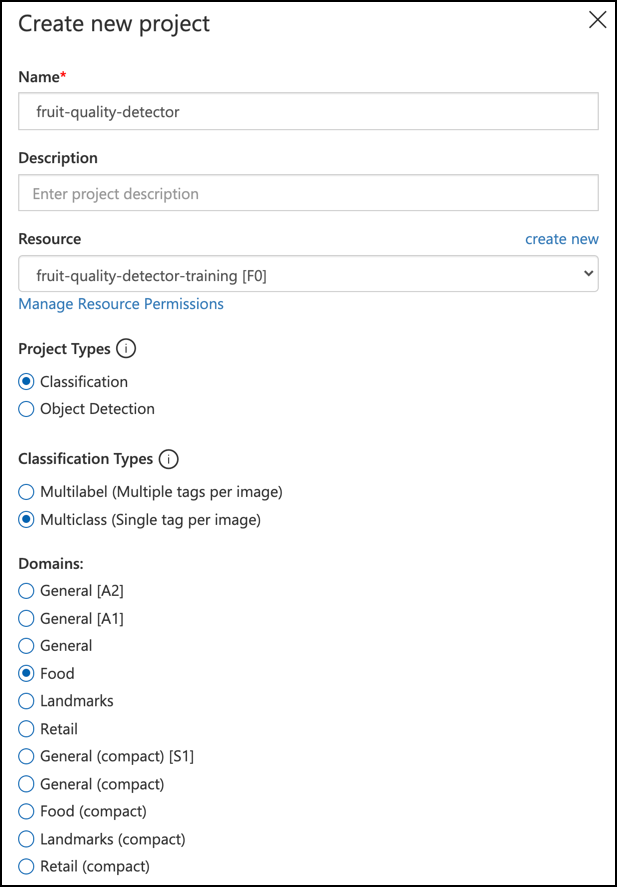
✅ Take some time to explore the Custom Vision UI for your image classifier.
Task - train your image classifier project
To train an image classifier, you'll need multiple images of fruit, both good and bad quality, to tag as good or bad—for example, ripe and overripe bananas. 💁 These classifiers can categorize images of anything, so if you don't have fruits of varying quality available, you can use two different types of fruit, or even cats and dogs! Ideally, each picture should only show the fruit, either with a consistent background or a variety of backgrounds. Make sure there’s nothing in the background that indicates whether the fruit is ripe or unripe.
💁 It’s crucial to avoid specific backgrounds or unrelated items in the images for each tag. Otherwise, the classifier might focus on the background instead of the object being classified. For example, there was a skin cancer classifier trained on images of moles, both normal and cancerous. The cancerous moles were often photographed with rulers to measure their size. The classifier ended up being almost 100% accurate at identifying rulers in pictures, not cancerous moles.
Image classifiers operate at very low resolutions. For instance, Custom Vision can handle training and prediction images up to 10240x10240, but the model itself trains and runs on images at 227x227. Larger images are resized to this smaller resolution, so make sure the object you’re classifying occupies a significant portion of the image. Otherwise, it might be too small in the resized version used by the classifier.
-
Collect images for your classifier. You’ll need at least 5 images per label to train the classifier, but the more, the better. Additionally, you’ll need a few extra images to test the classifier. These images should all depict the same object but from different perspectives. For example:
-
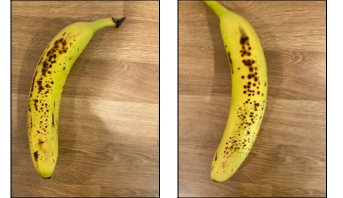
Using 2 ripe bananas, take several pictures of each one from different angles, capturing at least 7 images (5 for training, 2 for testing), but ideally more.
-
Repeat the same process with 2 unripe bananas.
You should end up with at least 10 training images—5 ripe and 5 unripe—and 4 testing images, 2 ripe and 2 unripe. The images should be in PNG or JPEG format and smaller than 6MB. If you use an iPhone, for example, the images might be high-resolution HEIC files, which will need to be converted and possibly resized. The more images you have, the better, and you should aim for a balanced number of ripe and unripe images.
If you don’t have both ripe and unripe fruit, you can use different fruits or any two objects you have available. Alternatively, you can find example images of ripe and unripe bananas in the images folder.
-
-
Follow the upload and tag images section of the build a classifier quickstart on the Microsoft docs to upload your training images. Tag the ripe fruit as
ripeand the unripe fruit asunripe.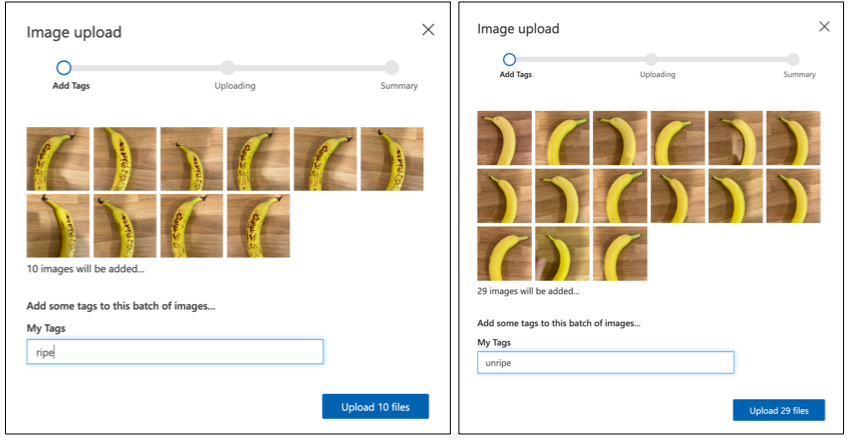
-
Follow the train the classifier section of the build a classifier quickstart on the Microsoft docs to train the image classifier using your uploaded images.
You’ll be given a choice of training type. Select Quick Training.
The classifier will then begin training. It will take a few minutes to complete.
🍌 If you decide to eat your fruit while the classifier is training, make sure you’ve already taken enough images for testing!
Test your image classifier
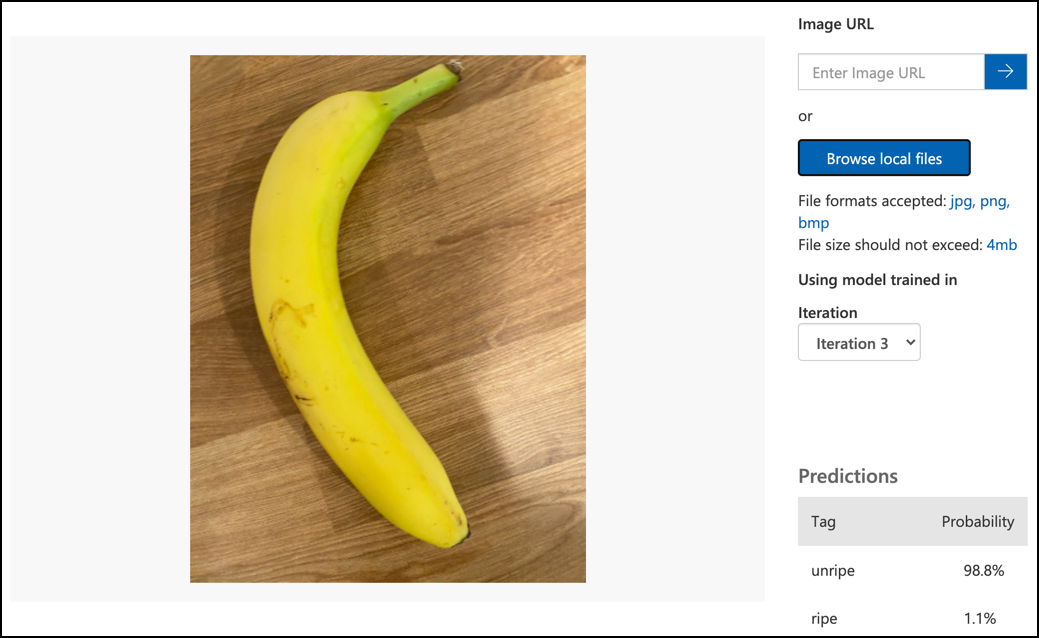
Once your classifier is trained, you can test it by providing a new image for classification.
Task - Test your image classifier
-
Follow the test your model documentation on the Microsoft docs to test your image classifier. Use the testing images you created earlier, not the ones used for training.
-
Test all the images you have for testing and observe the probabilities.
Retrain your image classifier
When testing your classifier, it might not produce the results you expect. Image classifiers use machine learning to predict what’s in an image based on probabilities that certain features match a specific label. They don’t actually understand the content of the image—they don’t know what a banana is or what makes a banana different from a boat. You can improve your classifier by retraining it with images it misclassifies.
Every time you make a prediction using the quick test option, the image and its results are stored. You can use these images to retrain your model.
Task - Retrain your image classifier
-
Follow the use the predicted image for training documentation on the Microsoft docs to retrain your model, assigning the correct tag to each image.
-
Once your model has been retrained, test it with new images.
🚀 Challenge
What do you think would happen if you used a picture of a strawberry with a model trained on bananas, or a picture of an inflatable banana, or a person in a banana suit, or even a yellow cartoon character like someone from the Simpsons?
Try it out and see what the predictions are. You can find images to experiment with using Bing Image search.
Post-lecture quiz
Review & Self Study
- When you trained your classifier, you would have seen values for Precision, Recall, and AP that evaluate the model. Learn more about these metrics by reading the evaluate the classifier section of the build a classifier quickstart on the Microsoft docs.
- Explore ways to improve your classifier by reading how to improve your Custom Vision model on the Microsoft docs.
Assignment
Train your classifier for multiple fruits and vegetables
Disclaimer:
This document has been translated using the AI translation service Co-op Translator. While we strive for accuracy, please note that automated translations may contain errors or inaccuracies. The original document in its native language should be regarded as the authoritative source. For critical information, professional human translation is recommended. We are not responsible for any misunderstandings or misinterpretations resulting from the use of this translation.