
6.9 KiB
Configure your microphone and speakers - Raspberry Pi
In this part of the lesson, you will set up a microphone and speakers for your Raspberry Pi.
Hardware
The Raspberry Pi requires a microphone.
Since the Pi doesn't have a built-in microphone, you'll need to connect an external one. There are several options for this:
- USB microphone
- USB headset
- USB all-in-one speakerphone
- USB audio adapter with a microphone that uses a 3.5mm jack
- ReSpeaker 2-Mics Pi HAT
💁 Bluetooth microphones are not fully supported on the Raspberry Pi. If you have a Bluetooth microphone or headset, you may encounter issues with pairing or recording audio.
Raspberry Pis come with a 3.5mm headphone jack, which can be used to connect headphones, a headset, or a speaker. Alternatively, you can add speakers using:
- HDMI audio through a monitor or TV
- USB speakers
- USB headset
- USB all-in-one speakerphone
- ReSpeaker 2-Mics Pi HAT with a speaker connected either to the 3.5mm jack or the JST port
Connect and configure the microphone and speakers
You'll need to connect and configure both the microphone and speakers.
Task - Connect and configure the microphone
-
Connect the microphone using the appropriate method, such as plugging it into one of the USB ports.
-
If you're using the ReSpeaker 2-Mics Pi HAT, remove the Grove base hat and attach the ReSpeaker hat in its place.
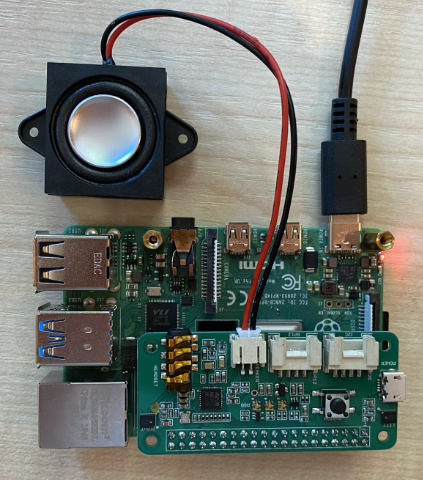
You'll need a Grove button later in this lesson, but since the ReSpeaker hat has a built-in Grove button, the Grove base hat is unnecessary.
After attaching the hat, you'll need to install some drivers. Follow the Seeed getting started instructions for driver installation.
⚠️ The instructions use
gitto clone a repository. Ifgitisn't installed on your Pi, you can install it by running the following command:sudo apt install git --yes -
Run the following command in your Terminal (either directly on the Pi or via VS Code with a remote SSH session) to view information about the connected microphone:
arecord -lThis will display a list of connected microphones, similar to the following:
pi@raspberrypi:~ $ arecord -l
**** List of CAPTURE Hardware Devices ****
card 1: M0 [eMeet M0], device 0: USB Audio [USB Audio]
  Subdevices: 1/1
  Subdevice #0: subdevice #0
If you only have one microphone connected, you should see just one entry. Configuring microphones on Linux can be challenging, so it's best to use only one microphone and disconnect any others.
Note down the card number, as you'll need it later. In the example above, the card number is 1.
Task - Connect and configure the speaker
-
Connect the speakers using the appropriate method.
-
Run the following command in your Terminal (either directly on the Pi or via VS Code with a remote SSH session) to view information about the connected speakers:
aplay -lThis will display a list of connected speakers, similar to the following:
pi@raspberrypi:~ $ aplay -l
**** List of PLAYBACK Hardware Devices ****
card 0: Headphones [bcm2835 Headphones], device 0: bcm2835 Headphones [bcm2835 Headphones]
  Subdevices: 8/8
  Subdevice #0: subdevice #0
  Subdevice #1: subdevice #1
  Subdevice #2: subdevice #2
  Subdevice #3: subdevice #3
  Subdevice #4: subdevice #4
  Subdevice #5: subdevice #5
  Subdevice #6: subdevice #6
  Subdevice #7: subdevice #7
card 1: M0 [eMeet M0], device 0: USB Audio [USB Audio]
  Subdevices: 1/1
  Subdevice #0: subdevice #0
You'll always see
card 0: Headphones, which corresponds to the built-in headphone jack. If you've added additional speakers, such as a USB speaker, they will also appear in the list. -
If you're using an external speaker (not connected to the built-in headphone jack), you'll need to set it as the default. To do this, run the following command:
sudo nano /usr/share/alsa/alsa.confThis will open a configuration file in
nano, a terminal-based text editor. Use the arrow keys on your keyboard to scroll down until you find the following line:defaults.pcm.card 0Change the value from
0to the card number of the speaker you want to use, as shown in the output from theaplay -lcommand. For example, in the output above, there's a second sound card labeledcard 1: M0 [eMeet M0], device 0: USB Audio [USB Audio]. To use this card, update the line to:defaults.pcm.card 1Replace the value with the appropriate card number. Use the arrow keys to navigate, then delete and type the new number as you would in any text editor.
-
Save the changes and close the file by pressing
Ctrl+x. Pressyto confirm saving, thenreturnto finalize the file name.
Task - Test the microphone and speaker
-
Run the following command to record 5 seconds of audio using the microphone:
arecord --format=S16_LE --duration=5 --rate=16000 --file-type=wav out.wavWhile the command is running, make noise into the microphone—speak, sing, beatbox, play an instrument, or anything else you'd like.
-
After 5 seconds, the recording will stop. Run the following command to play back the audio:
aplay --format=S16_LE --rate=16000 out.wavYou should hear the audio played back through the speakers. Adjust the speaker's volume as needed.
-
If you need to adjust the volume of the built-in microphone port or the microphone's gain, you can use the
alsamixerutility. Learn more about this tool on the Linux alsamixer man page. -
If you encounter errors during playback, double-check the card number you set as
defaults.pcm.cardin thealsa.conffile.
Disclaimer:
This document has been translated using the AI translation service Co-op Translator. While we aim for accuracy, please note that automated translations may include errors or inaccuracies. The original document in its native language should be regarded as the authoritative source. For critical information, professional human translation is advised. We are not responsible for any misunderstandings or misinterpretations resulting from the use of this translation.