# Enable Kubernetes on Docker Desktop for Mac/Windows in China
[中文](README.md) | English
NOTE:
* The master branch is tested with Docker Desktop for Mac/Windows version 2.1.5.0 Edge (with Docker CE 19.03.4 and Kubernetes 1.15.5).
* If you want to use with other version, pls check version of Kubernetes,Docker -> About Docker Desktop

* For Kubernetes v1.15.4, please use the v1.15.4 branch ```git checkout v1.15.4```
* For Kubernetes v1.14.8, please use the v1.14.8 branch ```git checkout v1.14.8```
* For Kubernetes v1.14.7, please use the v1.14.7 branch ```git checkout v1.14.7```
* For Kubernetes v1.14.6, please use the v1.14.6 branch ```git checkout v1.14.6```
* For Kubernetes v1.14.3, please use the v1.14.3 branch ```git checkout v1.14.3```
* For Kubernetes v1.14.1, please use the v1.14.1 branch ```git checkout v1.14.1```
* For Kubernetes v1.13.0, please use the v1.13.0 branch ```git checkout v1.13.0```
* For Kubernetes v1.10.11, please use the v1.10.11 branch ```git checkout v1.10.11```
### Enable Kubernetes on Docker Desktop
Config registry mirror for Docker daemon with ```https://docker.mirrors.ustc.edu.cn``` only if in China

Optional: config the CPU and memory for Kubernetes, 4GB RAM or more is suggested.

Preload Kubernetes images form Alibaba Cloud Registry Service, NOTE: you can modify the ```images.properties``` for your own images
On Mac, execute the following scripts
```bash
./load_images.sh
```
Or on Windows, execute the following scripts in PowerShell
```powershell
.\load_images.ps1
```
NOTE: if you failed to start PowerShell scripts for security policy, please execute ```Set-ExecutionPolicy RemoteSigned``` command in PowerShell with "Run as administrator" option.
Enable Kubernetes, and wait a while for Kubernetes is running

### Config Kubernetes
Optional: switch the context to `docker-desktop` (In the former version, the context is `docker-for-desktop`)
```shell
kubectl config use-context docker-desktop
```
Verify Kubernetes installation
```shell
kubectl cluster-info
kubectl get nodes
```
### Deploy Kubernetes dashboard
#### Install Kubernetes dashboard
```shell
kubectl apply -f https://raw.githubusercontent.com/kubernetes/dashboard/v1.10.1/src/deploy/recommended/kubernetes-dashboard.yaml
```
or
```shell
kubectl create -f kubernetes-dashboard.yaml
```
Start proxy for API server
```shell
kubectl proxy
```
#### Access Kubernetes dashboard
http://localhost:8001/api/v1/namespaces/kube-system/services/https:kubernetes-dashboard:/proxy/#!/overview?namespace=default
#### Config Token for dashboard
For Mac
```bash
TOKEN=$(kubectl -n kube-system describe secret default| awk '$1=="token:"{print $2}')
kubectl config set-credentials docker-for-desktop --token="${TOKEN}"
echo $TOKEN
```
For Windows
```cmd
$TOKEN=((kubectl -n kube-system describe secret default | Select-String "token:") -split " +")[1]
kubectl config set-credentials docker-for-desktop --token="${TOKEN}"
echo $TOKEN
```
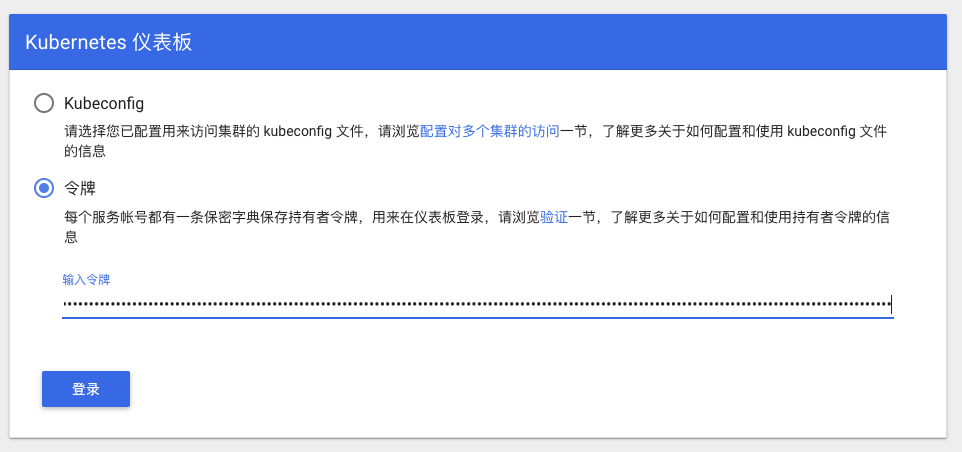
#### Login dashboard

Choose **Token**, and input the output from above result
Or, choose **Kubeconfig**, select file from below path:
```
Win: %UserProfile%\.kube\config
Mac: $HOME/.kube/config
```
Click login, go to Kubernetes Dashboard
### Install Helm
Install helm following the instruction on https://helm.sh/docs/intro/install/
#### For Mac OS
```shell
# Use homebrew on Mac
brew install helm
# add helm repo
helm repo add stable http://mirror.azure.cn/kubernetes/charts/
# update charts repo
helm repo update
```
#### For Windows
```shell
# Use Chocolatey on Windows
# NOTE: please ensure you can access googleapis
choco install kubernetes-helm
# add helm repo
helm repo add stable http://mirror.azure.cn/kubernetes/charts/
# update charts repo
helm repo update
```
### Setup Istio
More details can be found in https://istio.io/docs/setup/getting-started/
#### Download Istio 1.4.0 and install CLI
```shell
curl -L https://git.io/getLatestIstio | ISTIO_VERSION=1.4.0 sh -
cd istio-1.4.0/
export PATH=$PWD/bin:$PATH
```
In Windows, you can download the Istio manually, or copy ```getLatestIstio.ps1``` to your Istio directory, and execute the script.
NOTE: It refer the [scripts](https://gist.github.com/kameshsampath/796060a806da15b39aa9569c8f8e6bcf) from community.
```powershell
.\getLatestIstio.ps1
```
#### Install Istio
```shell
istioctl manifest apply --set profile=demo
```
Check status of istio release
```shell
kubectl get pods -n istio-system
```
#### Enable automatic sidecar injection for ```default``` namespace
```shell
kubectl label namespace default istio-injection=enabled
kubectl get namespace -L istio-injection
```
#### Install Book Info sample
Please refer https://istio.io/docs/examples/bookinfo/
```shell
kubectl apply -f samples/bookinfo/platform/kube/bookinfo.yaml
```
Check the resources of sample application
```shell
kubectl get svc,pod
```
Confirm the application is running
```shell
kubectl exec -it $(kubectl get pod -l app=ratings -o jsonpath='{.items[0].metadata.name}') -c ratings -- curl productpage:9080/productpage | grep -o ".*"
```
Create Ingress Gateway
```shell
kubectl apply -f samples/bookinfo/networking/bookinfo-gateway.yaml
```
Check Gateway status
```shell
kubectl get gateway
```
Confirm the application is accessible
```shell
export GATEWAY_URL=localhost:80
curl -s http://${GATEWAY_URL}/productpage | grep -o ".*"
```
Open with browser http://localhost/productpage
#### Confirm application is running
```shell
export GATEWAY_URL=localhost:80
curl -o /dev/null -s -w "%{http_code}\n" http://${GATEWAY_URL}/productpage
```
#### Cleanup sample application
```shell
samples/bookinfo/platform/kube/cleanup.sh
```
#### Delete Istio
```shell
istioctl manifest generate --set profile=demo | kubectl delete -f -
```