# Deploying
The following guides are based on some shared assumptions:
- You are placing your docs inside the `docs` directory of your project;
- You are using the default build output location (`.vitepress/dist`);
- VitePress is installed as a local dependency in your project, and you have setup the following npm scripts:
```json
{
"scripts": {
"docs:build": "vitepress build docs",
"docs:serve": "vitepress serve docs"
}
}
```
## Build and test locally
You may run `yarn docs:build` command to build the docs.
```bash
$ yarn docs:build
```
By default, the build output will be placed at `.vitepress/dist`. You may deploy this `dist` folder to any of your preferred platforms.
Once you've built the docs, you may test them locally by running `yarn docs:serve` command.
```bash
$ yarn docs:build
$ yarn docs:serve
```
The `serve` command will boot up local static web server that serves the files from `.vitepress/dist` at `http://localhost:5000`. It's an easy way to check if the production build looks OK in your local environment.
You may configure the port of the server by passing `--port` flag as an argument.
```json
{
"scripts": {
"docs:serve": "vitepress serve docs --port 8080"
}
}
```
Now the `docs:serve` method will launch the server at `http://localhost:8080`.
## GitHub Pages
1. Set the correct `base` in `docs/.vitepress/config.js`.
If you are deploying to `https://<USERNAME>.github.io/`, you can omit `base` as it defaults to `'/'`.
If you are deploying to `https://<USERNAME>.github.io/<REPO>/`, for example your repository is at `https://github.com/<USERNAME>/<REPO>`, then set `base` to `'/<REPO>/'`.
2. Inside your project, create `deploy.sh` with the following content (with highlighted lines uncommented appropriately), and run it to deploy:
```bash{13,20,23}
#!/usr/bin/env sh
# abort on errors
set -e
# build
npm run docs:build
# navigate into the build output directory
cd docs/.vitepress/dist
# if you are deploying to a custom domain
# echo 'www.example.com' > CNAME
git init
git add -A
git commit -m 'deploy'
# if you are deploying to https://<USERNAME>.github.io
# git push -f git@github.com:<USERNAME>/<USERNAME>.github.io.git main
# if you are deploying to https://<USERNAME>.github.io/<REPO>
# git push -f git@github.com:<USERNAME>/<REPO>.git main:gh-pages
cd -
```
::: tip
You can also run the above script in your CI setup to enable automatic deployment on each push.
:::
## GitHub Pages and Travis CI
1. Set the correct `base` in `docs/.vitepress/config.js`.
If you are deploying to `https://<USERNAME or GROUP>.github.io/`, you can omit `base` as it defaults to `'/'`.
If you are deploying to `https://<USERNAME or GROUP>.github.io/<REPO>/`, for example your repository is at `https://github.com/<USERNAME>/<REPO>`, then set `base` to `'/<REPO>/'`.
2. Create a file named `.travis.yml` in the root of your project.
3. Run `yarn` or `npm install` locally and commit the generated lockfile (that is `yarn.lock` or `package-lock.json`).
4. Use the GitHub Pages deploy provider template, and follow the [Travis CI documentation](https://docs.travis-ci.com/user/deployment/pages).
```yaml
language: node_js
node_js:
- lts/*
install:
- yarn install # npm ci
script:
- yarn docs:build # npm run docs:build
deploy:
provider: pages
skip_cleanup: true
local_dir: docs/.vitepress/dist
# A token generated on GitHub allowing Travis to push code on you repository.
# Set in the Travis settings page of your repository, as a secure variable.
github_token: $GITHUB_TOKEN
keep_history: true
on:
branch: main
```
## GitLab Pages and GitLab CI
1. Set the correct `base` in `docs/.vitepress/config.js`.
If you are deploying to `https://<USERNAME or GROUP>.gitlab.io/`, you can omit `base` as it defaults to `'/'`.
If you are deploying to `https://<USERNAME or GROUP>.gitlab.io/<REPO>/`, for example your repository is at `https://gitlab.com/<USERNAME>/<REPO>`, then set `base` to `'/<REPO>/'`.
2. Set `outDir` in `.vitepress/config.js` to `../public`.
3. Create a file called `.gitlab-ci.yml` in the root of your project with the content below. This will build and deploy your site whenever you make changes to your content:
```yaml
image: node:16
pages:
cache:
paths:
- node_modules/
script:
- yarn install # npm install
- yarn docs:build # npm run docs:build
artifacts:
paths:
- public
only:
- main
```
## Netlify
1. On [Netlify](https://www.netlify.com/), setup up a new project from GitHub with the following settings:
- **Build Command:** `vitepress build docs` or `yarn docs:build` or `npm run docs:build`
- **Publish directory:** `docs/.vitepress/dist`
2. Hit the deploy button.
## Google Firebase
1. Make sure you have [firebase-tools](https://www.npmjs.com/package/firebase-tools) installed.
2. Create `firebase.json` and `.firebaserc` at the root of your project with the following content:
`firebase.json`:
```json
{
"hosting": {
"public": "./docs/.vitepress/dist",
"ignore": []
}
}
```
`.firebaserc`:
```js
{
"projects": {
"default": "<YOUR_FIREBASE_ID>"
}
}
```
3. After running `yarn docs:build` or `npm run docs:build`, deploy using the command `firebase deploy`.
## Surge
1. First install [surge](https://www.npmjs.com/package/surge), if you haven’t already.
2. Run `yarn docs:build` or `npm run docs:build`.
3. Deploy to surge by typing `surge docs/.vitepress/dist`.
You can also deploy to a [custom domain](https://surge.sh/help/adding-a-custom-domain) by adding `surge docs/.vitepress/dist yourdomain.com`.
## Heroku
1. Install [Heroku CLI](https://devcenter.heroku.com/articles/heroku-cli).
2. Create a Heroku account by [signing up](https://signup.heroku.com).
3. Run `heroku login` and fill in your Heroku credentials:
```bash
$ heroku login
```
4. Create a file called `static.json` in the root of your project with the below content:
`static.json`:
```json
{
"root": "./docs/.vitepress/dist"
}
```
This is the configuration of your site; read more at [heroku-buildpack-static](https://github.com/heroku/heroku-buildpack-static).
5. Set up your Heroku git remote:
```bash
# version change
$ git init
$ git add .
$ git commit -m "My site ready for deployment."
# creates a new app with a specified name
$ heroku apps:create example
# set buildpack for static sites
$ heroku buildpacks:set https://github.com/heroku/heroku-buildpack-static.git
```
6. Deploy your site:
```bash
# publish site
$ git push heroku main
# opens a browser to view the Dashboard version of Heroku CI
$ heroku open
```
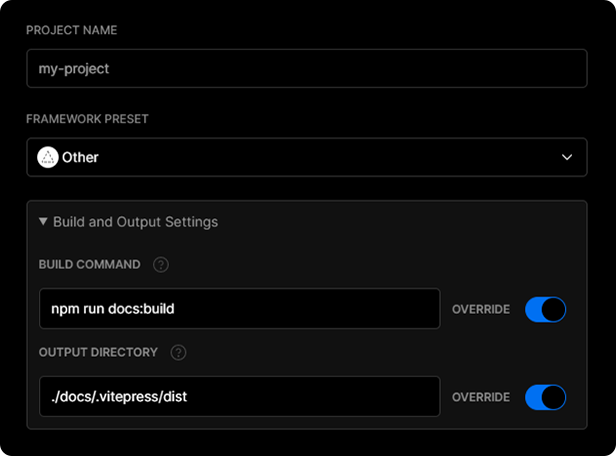
## Vercel
To deploy your VitePress app with a [Vercel for Git](https://vercel.com/docs/concepts/git), make sure it has been pushed to a Git repository.
Go to https://vercel.com/new and import the project into Vercel using your Git of choice (GitHub, GitLab or BitBucket). Follow the wizard to select the project root with the project's `package.json` and override the build step using `yarn docs:build` or `npm run docs:build` and the output dir to be `./docs/.vitepress/dist`
After your project has been imported, all subsequent pushes to branches will generate Preview Deployments, and all changes made to the Production Branch (commonly "main") will result in a Production Deployment.
Once deployed, you will get a URL to see your app live, such as the following: https://vitepress.vercel.app