|
|
4 years ago | |
|---|---|---|
| .. | ||
| README.es.md | 4 years ago | |
| README.it.md | 4 years ago | |
| README.ja.md | ||
| README.ko.md | 4 years ago | |
| README.ms.md | 4 years ago | |
| README.zh-tw.md | 4 years ago | |
| assignment.es.md | ||
| assignment.hi.md | ||
| assignment.it.md | ||
| assignment.ja.md | ||
| assignment.ko.md | ||
| assignment.ms.md | ||
| assignment.nl.md | 4 years ago | |
| assignment.zh-tw.md | ||
README.zh-tw.md
瀏覽器擴充功能專案 Part 1:呼叫 API,使用 Local Storage
課前測驗
大綱
在這堂課中,藉由傳遞你的擴充功能表單並顯示結果來呼叫 API。此外,你會了解如何儲存資料到瀏覽器的 Local Storage 中給未來使用。
✅ 請參考下列程式碼段,加入程式碼到檔案適當的位置
設定控制擴充功能的元素:
現在你有已建好的 HTML 表單與結果區 <div>。接下來,你需要在 /src/index.js 做一些處理,一點一點地構築出你的擴充功能。參考前一堂課程來設置你的專案與了解建制過程。
處理 index.js 檔案,建立一些 const 變數來儲存不同用途的數值:
// 表單區域
const form = document.querySelector('.form-data');
const region = document.querySelector('.region-name');
const apiKey = document.querySelector('.api-key');

// 結果區域
const errors = document.querySelector('.errors');
const loading = document.querySelector('.loading');
const results = document.querySelector('.result-container');
const usage = document.querySelector('.carbon-usage');
const fossilfuel = document.querySelector('.fossil-fuel');
const myregion = document.querySelector('.my-region');
const clearBtn = document.querySelector('.clear-btn');
這些區域會被 CSS class 給參考,它們在前一堂課中已經被你設定好了。
新增監聽者
接下來,新增提交與重置表單的事件監聽者與按鈕,讓使用者能提交表單或是點擊重置鈕時,事件會發生。新增初始化呼叫處理到應用中,在檔案的最下方新增:
form.addEventListener('submit', (e) => handleSubmit(e));
clearBtn.addEventListener('click', (e) => reset(e));
init();
✅ 注意提交事件與點擊事件的寫法,事件是如何被傳入到 handleSubmit 或是 reset 函式中的。你能在不改變功能的情況下,改寫成較長的格式嗎?你比較喜歡哪一種寫法?
建立 init() 函式與 reset() 函式:
現在你需要建立函式 init(),處理應用程式的初始化部分:
function init() {
	//如果任何東西存在 localStorage 中,取出來
	const storedApiKey = localStorage.getItem('apiKey');
	const storedRegion = localStorage.getItem('regionName');

	//設定 icon 為通用綠色
	//todo

	if (storedApiKey === null || storedRegion === null) {
		//如果沒有 keys,顯示表單
		form.style.display = 'block';
		results.style.display = 'none';
		loading.style.display = 'none';
		clearBtn.style.display = 'none';
		errors.textContent = '';
	} else {
        //localStorage 有 saved keys/regions,顯示結果
        displayCarbonUsage(storedApiKey, storedRegion);
		results.style.display = 'none';
		form.style.display = 'none';
		clearBtn.style.display = 'block';
	}
};

function reset(e) {
	e.preventDefault();
	//只清除 local storage 國家區域代碼
	localStorage.removeItem('regionName');
	init();
}
在函式中,有一些有趣的邏輯。閱讀它們,你看出發生什麼事嗎?
- 兩個
const被設定為檢查用戶是否有儲存 APIKey 與國家區域代碼在 local storage 中。 - 若兩者皆為 null,將造型設為 'block' 來顯示表單
- 隱藏 results、loading 與 clearBtn,設定 error 文字為空字串
- 若存在 key 與代碼,開始新的流程:
- 呼叫 API 取得碳排放資訊
- 隱藏結果區域
- 隱藏表單
- 顯示重置按鈕
在下一步之前,你可以學習一些瀏覽器的重要成員:LocalStorage。 LocalStorage 是瀏覽器儲存字串的有效方法,以 key-value 配對兩兩一組。這種儲存型態可以被 JavaScript 管理並控制瀏覽器的資料。LocalStorage 沒有期限,而另一款網頁儲存 SessionStorage 會在瀏覽器關閉時清除內容。不同的儲存方式有各自的優缺點。
注意 ── 你的瀏覽器擴充套件有自己的 local storage。主瀏覽器視窗是不同的個體,兩者會做各自的行為。
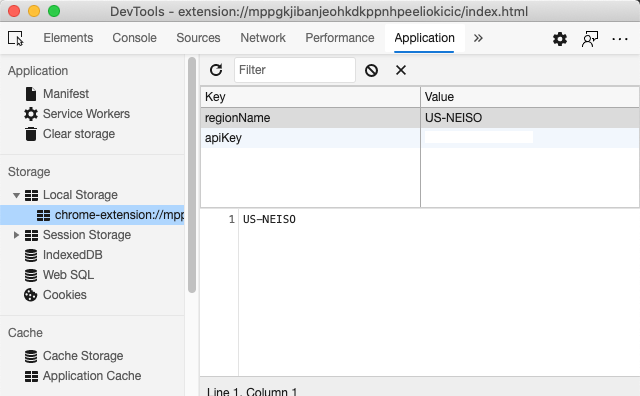
你設定 APIKey 紀錄字串數值。你可以在 Edge 瀏覽器上「檢查」一個網頁 (右鍵瀏覽器來檢查),在 Applications 標籤中觀察儲存區的使用情況。
✅ 想想那些情況你不需要儲存資料到 LocalStorage 中。總體而言,將 API Keys 放在 LocalStorage 是個很糟糕的想法!你知道為什麼嗎?在我們的例子中,我們的應用程式是以教學為目的,並不會發布在應用程式商店中,所以我們選擇此中處理方式。
你可以發現網頁 API 能處理 LocalStorage,使用 getItem()、setItem() 或是 removeItem()。它們廣泛地支援不同的瀏覽器。
在建立函式 init() 中的函式 displayCarbonUsage() 之前,我們先建立表單提交初始化的功能。
處理表單提交
建立函式 handleSubmit,接收事件參數 (e)。終止網頁移轉的事件(在本例子中,我們終止瀏覽器刷新的處理)並呼叫新的函式 setUpUser,傳送參數 apiKey.value 與 region.value。藉由這個方式,你能將兩個初始表單的數值正確地移轉到適合的位置。
function handleSubmit(e) {
	e.preventDefault();
	setUpUser(apiKey.value, region.value);
}
✅ 刷新你的記憶 ── 上堂課中的 HTML 檔案開頭有兩個輸入區域,它們的 values 被存到 const 中,並且被定為 required,表示瀏覽器禁止使用者輸入空值。
設定使用者
來到函式 setUpUser,這裡你能找到 apiKey 與 regionName 被存到 Local Storage 中。新增函式:
function setUpUser(apiKey, regionName) {
	localStorage.setItem('apiKey', apiKey);
	localStorage.setItem('regionName', regionName);
	loading.style.display = 'block';
	errors.textContent = '';
	clearBtn.style.display = 'block';
	//建立初始化呼叫
	displayCarbonUsage(apiKey, regionName);
}
這個函式設定當 API 被呼叫時,顯示讀取訊息。到這裡,你即將建立這個擴充功能專案最重要的函式!
顯示碳排放量
最後,是時候查詢 API 了!
在前往下一步前,我們先來討論何謂 API。API,Application Programming Interfaces,是網頁開發者工具箱內最重要的成員。它們提供程式標準的互動模式與溝通介面,舉例來說,如果你建立一個需要存取資料庫的網頁,資料庫方可能就有人建立了 API 供你使用。API 有各式各樣的種類,最普遍使用的為REST API。
✅ 'REST' 全名為 'Representational State Transfer',提供各式各樣 URL 形式來抓取資料。對網路開發者的 API 種類做一點研究,什麼形式的 API 最吸引你?
這條函式中有一個重要到值得紀錄的事情。第一點為關鍵字 async。讓你的函式非同步地執行,在行為完成前做等待,譬如資料被回傳。
這裡有一個簡短的影片介紹 async:
點擊上方圖片以觀賞關於 async/await 的影片。
建立新的函式來詢問 C02Signal 的 API:
import axios from '../node_modules/axios';

async function displayCarbonUsage(apiKey, region) {
	try {
		await axios
			.get('https://api.co2signal.com/v1/latest', {
				params: {
					countryCode: region,
				},
				headers: {
					'auth-token': apiKey,
				},
			})
			.then((response) => {
				let CO2 = Math.floor(response.data.data.carbonIntensity);

				//calculateColor(CO2);

				loading.style.display = 'none';
				form.style.display = 'none';
				myregion.textContent = region;
				usage.textContent =
					Math.round(response.data.data.carbonIntensity) + ' grams (grams C02 emitted per kilowatt hour)';
				fossilfuel.textContent =
					response.data.data.fossilFuelPercentage.toFixed(2) +
					'% (percentage of fossil fuels used to generate electricity)';
				results.style.display = 'block';
			});
	} catch (error) {
		console.log(error);
		loading.style.display = 'none';
		results.style.display = 'none';
		errors.textContent = 'Sorry, we have no data for the region you have requested.';
	}
}
這是一個挺大的函式,發生了什麼事?
- 遵循程式實踐過程,你使用關鍵字
async讓函式非同步地作行為。函式內的try/catch區塊會在 API 回傳資料時回傳 promise 物件。因為我們無法控制 API 會多快地回應訊息(甚至無法回應訊息!),你需要處理這種不確定性的時序關係。 - 藉由提供 API Key 訪問 co2signal API 以取得你的地區資料。要使用這把鑰匙,你必須在網頁標頭中新增認證參數。
- 當 API 回應時,你將各種物件填入回傳的數值,並輸出到畫面上中。
- 如果發生錯誤,或沒有結果產生,輸出錯誤訊息。
✅ 非同步程式設計是一種實用的工具。閱讀更多使用方法設定非同步程式的程式碼。
恭喜你!當你建制你的專案(npm run build)並在瀏覽器上刷新功能,你有個可以運作的應用套件了!現在只差圖示無法正常顯示,我們會在下一堂課中修正它。
🚀 挑戰
我們在課程中討論了不同種類的 API。選擇一樣網頁 API 並做更深度的研究。舉例來說,看看瀏覽器內支援的 API 如 HTML Drag and Drop API。依你看,什麼決定了 API 的優劣?
課後測驗
複習與自學
這堂課你學會關於 LocalStorage 與 API,它們對資深網頁開發者提供很大的幫助。你能想想這兩樣東西如何彼此相互合作呢?想想你會如何建構你的網頁,讓 API 得以使用你所儲存的資料。

