|
|
1 month ago | |
|---|---|---|
| .. | ||
| images | 5 years ago | |
| translations | 3 months ago | |
| README.md | 1 month ago | |
| assignment.md | 2 months ago | |
README.md
Terrarium Project Part 3: DOM Manipulation and JavaScript Closures
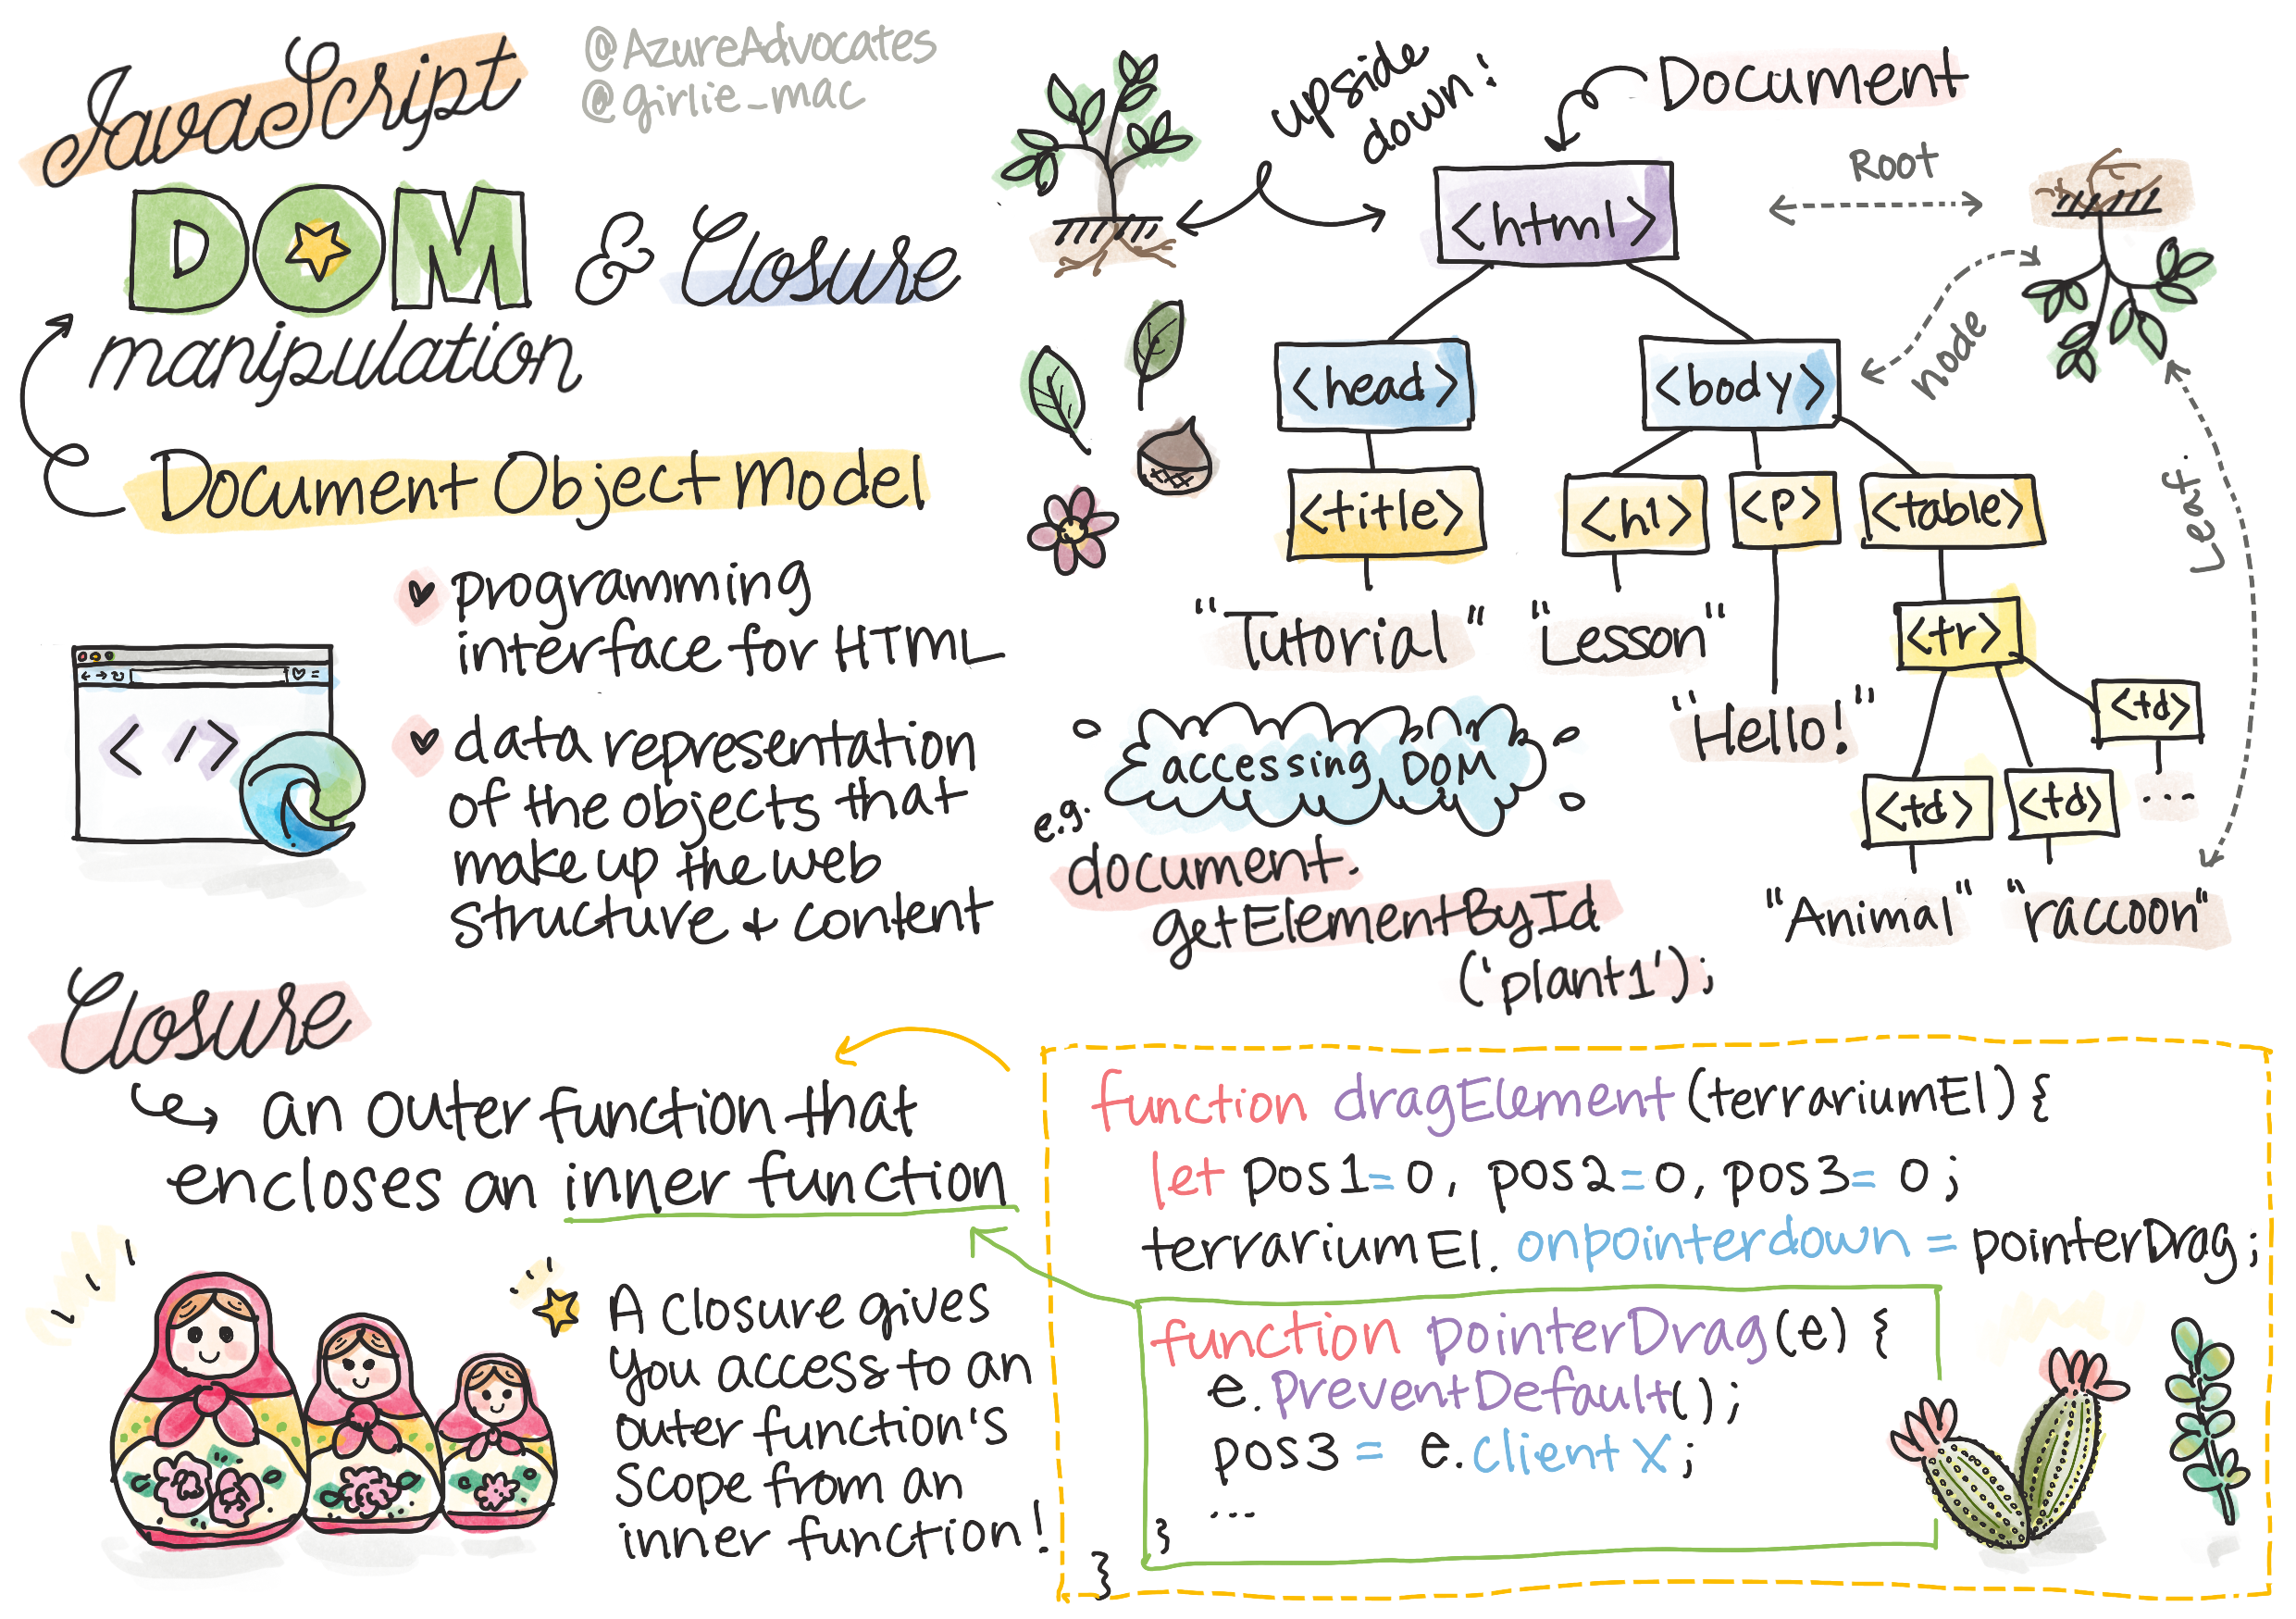
Sketchnote by Tomomi Imura
Welcome to one of the most engaging aspects of web development - making things interactive! The Document Object Model (DOM) is like a bridge between your HTML and JavaScript, and today we'll use it to bring your terrarium to life. When Tim Berners-Lee created the first web browser, he envisioned a web where documents could be dynamic and interactive - the DOM makes that vision possible.
We'll also explore JavaScript closures, which might sound intimidating initially. Think of closures as creating "memory pockets" where your functions can remember important information. It's like each plant in your terrarium having its own data record to track its position. By the end of this lesson, you'll understand how natural and useful they are.
Here's what we're building: a terrarium where users can drag and drop plants anywhere they want. You'll learn the DOM manipulation techniques that power everything from drag-and-drop file uploads to interactive games. Let's make your terrarium come alive.
Pre-Lecture Quiz
Understanding the DOM: Your Gateway to Interactive Web Pages
The Document Object Model (DOM) is how JavaScript communicates with your HTML elements. When your browser loads an HTML page, it creates a structured representation of that page in memory - that's the DOM. Think of it as a family tree where every HTML element is a family member that JavaScript can access, modify, or rearrange.
DOM manipulation transforms static pages into interactive websites. Every time you see a button change color on hover, content update without page refresh, or elements you can drag around, that's DOM manipulation at work.

A representation of the DOM and the HTML markup that references it. From Olfa Nasraoui
Here's what makes the DOM powerful:
- Provides a structured way to access any element on your page
- Enables dynamic content updates without page refreshes
- Allows real-time response to user interactions like clicks and drags
- Creates the foundation for modern interactive web applications
JavaScript Closures: Creating Organized, Powerful Code
A JavaScript closure is like giving a function its own private workspace with persistent memory. Consider how Darwin's finches on the Galápagos Islands each developed specialized beaks based on their specific environment - closures work similarly, creating specialized functions that "remember" their specific context even after their parent function has finished.
In our terrarium, closures help each plant remember its own position independently. This pattern appears throughout professional JavaScript development, making it a valuable concept to understand.
💡 Understanding Closures: Closures are a significant topic in JavaScript, and many developers use them for years before fully grasping all the theoretical aspects. Today, we're focusing on practical application - you'll see closures naturally emerge as we build our interactive features. Understanding will develop as you see how they solve real problems.
A representation of the DOM and the HTML markup that references it. From Olfa Nasraoui
In this lesson, we will complete our interactive terrarium project by creating the JavaScript that will allow a user to manipulate the plants on the page.
Before We Begin: Setting Up for Success
You'll need your HTML and CSS files from the previous terrarium lessons - we're about to make that static design interactive. If you're joining for the first time, completing those lessons first will provide important context.
Here's what we'll build:
- Smooth drag-and-drop for all terrarium plants
- Coordinate tracking so plants remember their positions
- A complete interactive interface using vanilla JavaScript
- Clean, organized code using closure patterns
Setting Up Your JavaScript File
Let's create the JavaScript file that will make your terrarium interactive.
Step 1: Create your script file
In your terrarium folder, create a new file called script.js.
Step 2: Link the JavaScript to your HTML
Add this script tag to the <head> section of your index.html file:
<script src="./script.js" defer></script>
Why the defer attribute is important:
- Ensures your JavaScript waits until all HTML is loaded
- Prevents errors where JavaScript looks for elements that aren't ready yet
- Guarantees all your plant elements are available for interaction
- Provides better performance than placing scripts at the page bottom
⚠️ Important Note: The
deferattribute prevents common timing issues. Without it, JavaScript may try to access HTML elements before they're loaded, causing errors.
Connecting JavaScript to Your HTML Elements
Before we can make elements draggable, JavaScript needs to locate them in the DOM. Think of this like a library cataloging system - once you have the catalog number, you can find exactly the book you need and access all its contents.
We'll use the document.getElementById() method to make these connections. It's like having a precise filing system - you provide an ID, and it locates exactly the element you need in your HTML.
Enabling Drag Functionality for All Plants
Add this code to your script.js file:
// Enable drag functionality for all 14 plants
dragElement(document.getElementById('plant1'));
dragElement(document.getElementById('plant2'));
dragElement(document.getElementById('plant3'));
dragElement(document.getElementById('plant4'));
dragElement(document.getElementById('plant5'));
dragElement(document.getElementById('plant6'));
dragElement(document.getElementById('plant7'));
dragElement(document.getElementById('plant8'));
dragElement(document.getElementById('plant9'));
dragElement(document.getElementById('plant10'));
dragElement(document.getElementById('plant11'));
dragElement(document.getElementById('plant12'));
dragElement(document.getElementById('plant13'));
dragElement(document.getElementById('plant14'));
Here's what this code accomplishes:
- Locates each plant element in the DOM using its unique ID
- Retrieves a JavaScript reference to each HTML element
- Passes each element to a
dragElementfunction (which we'll create next) - Prepares every plant for drag-and-drop interaction
- Connects your HTML structure to JavaScript functionality
🎯 Why Use IDs Instead of Classes? IDs provide unique identifiers for specific elements, while CSS classes are designed for styling groups of elements. When JavaScript needs to manipulate individual elements, IDs offer the precision and performance we need.
💡 Pro Tip: Notice how we're calling
dragElement()for each plant individually. This approach ensures that each plant gets its own independent dragging behavior, which is essential for smooth user interaction.
Building the Drag Element Closure
Now we'll create the heart of our dragging functionality: a closure that manages the dragging behavior for each plant. This closure will contain multiple inner functions that work together to track mouse movements and update element positions.
Closures are perfect for this task because they allow us to create "private" variables that persist between function calls, giving each plant its own independent coordinate tracking system.
Understanding Closures with a Simple Example
Let me demonstrate closures with a simple example that illustrates the concept:
function createCounter() {
    let count = 0; // This is like a private variable

    function increment() {
        count++; // The inner function remembers the outer variable
        return count;
    }

    return increment; // We're giving back the inner function
}

const myCounter = createCounter();
console.log(myCounter()); // 1
console.log(myCounter()); // 2
Here's what's happening in this closure pattern:
- Creates a private
countvariable that only exists within this closure - The inner function can access and modify that outer variable (the closure mechanism)
- When we return the inner function, it maintains its connection to that private data
- Even after
createCounter()finishes execution,countpersists and remembers its value
Why Closures Are Perfect for Drag Functionality
For our terrarium, each plant needs to remember its current position coordinates. Closures provide the perfect solution:
Key benefits for our project:
- Maintains private position variables for each plant independently
- Preserves coordinate data between drag events
- Prevents variable conflicts between different draggable elements
- Creates clean, organized code structure
🎯 Learning Goal: You don't need to master every aspect of closures right now. Focus on seeing how they help us organize code and maintain state for our dragging functionality.
Creating the dragElement Function
Now let's build the main function that will handle all the dragging logic. Add this function below your plant element declarations:
function dragElement(terrariumElement) {
    // Initialize position tracking variables
    let pos1 = 0,  // Previous mouse X position
        pos2 = 0,  // Previous mouse Y position
        pos3 = 0,  // Current mouse X position
        pos4 = 0;  // Current mouse Y position

    // Set up the initial drag event listener
    terrariumElement.onpointerdown = pointerDrag;
}
Understanding the position tracking system:
pos1andpos2: Store the difference between old and new mouse positionspos3andpos4: Track the current mouse coordinatesterrariumElement: The specific plant element we're making draggableonpointerdown: The event that triggers when the user starts dragging
Here's how the closure pattern works:
- Creates private position variables for each plant element
- Maintains these variables throughout the dragging lifecycle
- Ensures each plant tracks its own coordinates independently
- Provides a clean interface through the
dragElementfunction
Why Use Pointer Events?
You might wonder why we use onpointerdown instead of the more familiar onclick. Here's the reasoning:
| Event Type | Best For | The Catch |
|---|---|---|
onclick |
Simple button clicks | Can't handle dragging (just clicks and releases) |
onpointerdown |
Both mouse and touch | Newer, but well-supported these days |
onmousedown |
Desktop mouse only | Leaves mobile users out in the cold |
Why pointer events are perfect for what we're building:
- Works great whether someone's using a mouse, finger, or even a stylus
- Feels the same on a laptop, tablet, or phone
- Handles the actual dragging motion (not just click-and-done)
- Creates a smooth experience that users expect from modern web apps
💡 Future-Proofing: Pointer events are the modern way to handle user interactions. Instead of writing separate code for mouse and touch, you get both for free. Pretty neat, right?
The pointerDrag Function: Capturing the Start of a Drag
When a user presses down on a plant (whether with a mouse click or finger touch), the pointerDrag function springs into action. This function captures the initial coordinates and sets up the dragging system.
Add this function inside your dragElement closure, right after the line terrariumElement.onpointerdown = pointerDrag;:
function pointerDrag(e) {
    // Prevent default browser behavior (like text selection)
    e.preventDefault();

    // Capture the initial mouse/touch position
    pos3 = e.clientX;  // X coordinate where drag started
    pos4 = e.clientY;  // Y coordinate where drag started

    // Set up event listeners for the dragging process
    document.onpointermove = elementDrag;
    document.onpointerup = stopElementDrag;
}
Step by step, here's what's happening:
- Prevents default browser behaviors that could interfere with dragging
- Records the exact coordinates where the user started the drag gesture
- Establishes event listeners for the ongoing drag movement
- Prepares the system to track mouse/finger movement across the entire document
Understanding Event Prevention
The e.preventDefault() line is crucial for smooth dragging:
Without prevention, browsers might:
- Select text when dragging across the page
- Trigger context menus on right-click drag
- Interfere with our custom dragging behavior
- Create visual artifacts during the drag operation
🔍 Experiment: After completing this lesson, try removing
e.preventDefault()and see how it affects the dragging experience. You'll quickly understand why this line is essential!
Coordinate Tracking System
The e.clientX and e.clientY properties give us precise mouse/touch coordinates:
| Property | What It Measures | Use Case |
|---|---|---|
clientX |
Horizontal position relative to the viewport | Tracking left-right movement |
clientY |
Vertical position relative to the viewport | Tracking up-down movement |
Understanding these coordinates:
- Provides pixel-perfect positioning information
- Updates in real-time as the user moves their pointer
- Remains consistent across different screen sizes and zoom levels
- Enables smooth, responsive drag interactions
Setting Up Document-Level Event Listeners
Notice how we attach the move and stop events to the entire document, not just the plant element:
document.onpointermove = elementDrag;
document.onpointerup = stopElementDrag;
Why attach to the document:
- Continues tracking even when the mouse leaves the plant element
- Prevents drag interruption if the user moves quickly
- Provides smooth dragging across the entire screen
- Handles edge cases where the cursor moves outside the browser window
⚡ Performance Note: We'll clean up these document-level listeners when dragging stops to avoid memory leaks and performance issues.
Completing the Drag System: Movement and Cleanup
Now we'll add the two remaining functions that handle the actual dragging movement and the cleanup when dragging stops. These functions work together to create smooth, responsive plant movement across your terrarium.
The elementDrag Function: Tracking Movement
Add the elementDrag function right after the closing curly bracket of pointerDrag:
function elementDrag(e) {
    // Calculate the distance moved since the last event
    pos1 = pos3 - e.clientX;  // Horizontal distance moved
    pos2 = pos4 - e.clientY;  // Vertical distance moved

    // Update the current position tracking
    pos3 = e.clientX;  // New current X position
    pos4 = e.clientY;  // New current Y position

    // Apply the movement to the element's position
    terrariumElement.style.top = (terrariumElement.offsetTop - pos2) + 'px';
    terrariumElement.style.left = (terrariumElement.offsetLeft - pos1) + 'px';
}
Understanding the coordinate mathematics:
pos1andpos2: Calculate how far the mouse has moved since the last updatepos3andpos4: Store the current mouse position for the next calculationoffsetTopandoffsetLeft: Get the element's current position on the page- Subtraction logic: Moves the element by the same amount the mouse moved
Here's the movement calculation breakdown:
- Measures the difference between old and new mouse positions
- Calculates how much to move the element based on mouse movement
- Updates the element's CSS position properties in real-time
- Stores the new position as the baseline for the next movement calculation
Visual Representation of the Math
sequenceDiagram
    participant Mouse
    participant JavaScript
    participant Plant

    Mouse->>JavaScript: Move from (100,50) to (110,60)
    JavaScript->>JavaScript: Calculate: moved 10px right, 10px down
    JavaScript->>Plant: Update position by +10px right, +10px down
    Plant->>Plant: Render at new position
The stopElementDrag Function: Cleaning Up
Add the cleanup function after the closing curly bracket of elementDrag:
function stopElementDrag() {
    // Remove the document-level event listeners
    document.onpointerup = null;
    document.onpointermove = null;
}
Why cleanup is essential:
- Prevents memory leaks from lingering event listeners
- Stops the dragging behavior when the user releases the plant
- Allows other elements to be dragged independently
- Resets the system for the next drag operation
What happens without cleanup:
- Event listeners continue running even after dragging stops
- Performance degrades as unused listeners accumulate
- Unexpected behavior when interacting with other elements
- Browser resources are wasted on unnecessary event handling
Understanding CSS Position Properties
Our dragging system manipulates two key CSS properties:
| Property | What It Controls | How We Use It |
|---|---|---|
top |
Distance from the top edge | Vertical positioning during drag |
left |
Distance from the left edge | Horizontal positioning during drag |
Key insights about offset properties:
offsetTop: Current distance from the top of the positioned parent elementoffsetLeft: Current distance from the left of the positioned parent element- Positioning context: These values are relative to the nearest positioned ancestor
- Real-time updates: Changes immediately when we modify the CSS properties
🎯 Design Philosophy: This drag system is intentionally flexible – there are no "drop zones" or restrictions. Users can place plants anywhere, giving them complete creative control over their terrarium design.
Bringing It All Together: Your Complete Drag System
Congratulations! You've just built a sophisticated drag-and-drop system using vanilla JavaScript. Your complete dragElement function now contains a powerful closure that manages:
What your closure accomplishes:
- Maintains private position variables for each plant independently
- Handles the complete drag lifecycle from start to finish
- Provides smooth, responsive movement across the entire screen
- Cleans up resources properly to prevent memory leaks
- Creates an intuitive, creative interface for terrarium design
Testing Your Interactive Terrarium
Now test your interactive terrarium! Open your index.html file in a web browser and try the functionality:
- Click and hold any plant to start dragging
- Move your mouse or finger and watch the plant follow smoothly
- Release to drop the plant in its new position
- Experiment with different arrangements to explore the interface
🥇 Achievement: You've created a fully interactive web application using core concepts that professional developers use daily. That drag-and-drop functionality uses the same principles behind file uploads, kanban boards, and many other interactive interfaces.

GitHub Copilot Agent Challenge 🚀
Use the Agent mode to complete the following challenge:
Description: Enhance the terrarium project by adding a reset functionality that returns all plants to their original positions with smooth animations.
Prompt: Create a reset button that, when clicked, animates all plants back to their original sidebar positions using CSS transitions. The function should store the original positions when the page loads and smoothly transition plants back to those positions over 1 second when the reset button is pressed.
Learn more about agent mode here.
🚀 Additional Challenge: Expand Your Skills
Ready to take your terrarium to the next level? Try implementing these enhancements:
Creative Extensions:
- Double-click a plant to bring it to the front (z-index manipulation)
- Add visual feedback like a subtle glow when hovering over plants
- Implement boundaries to prevent plants from being dragged outside the terrarium
- Create a save function that remembers plant positions using localStorage
- Add sound effects for picking up and placing plants
💡 Learning Opportunity: Each of these challenges will teach you new aspects of DOM manipulation, event handling, and user experience design.
Post-Lecture Quiz
Review & Self Study: Deepening Your Understanding
You've mastered the fundamentals of DOM manipulation and closures, but there's always more to explore! Here are some pathways to expand your knowledge and skills.
Alternative Drag and Drop Approaches
We used pointer events for maximum flexibility, but web development offers multiple approaches:
| Approach | Best For | Learning Value |
|---|---|---|
| HTML Drag and Drop API | File uploads, formal drag zones | Understanding native browser capabilities |
| Touch Events | Mobile-specific interactions | Mobile-first development patterns |
CSS transform properties |
Smooth animations | Performance optimization techniques |
Advanced DOM Manipulation Topics
Next steps in your learning journey:
- Event delegation: Handling events efficiently for multiple elements
- Intersection Observer: Detecting when elements enter/leave the viewport
- Mutation Observer: Watching for changes in the DOM structure
- Web Components: Creating reusable, encapsulated UI elements
- Virtual DOM concepts: Understanding how frameworks optimize DOM updates
Essential Resources for Continued Learning
Technical Documentation:
- MDN Pointer Events Guide - Comprehensive pointer event reference
- W3C Pointer Events Specification - Official standards documentation
- JavaScript Closures Deep Dive - Advanced closure patterns
Browser Compatibility:
- CanIUse.com - Check feature support across browsers
- MDN Browser Compatibility Data - Detailed compatibility information
Practice Opportunities:
- Build a puzzle game using similar drag mechanics
- Create a kanban board with drag-and-drop task management
- Design an image gallery with draggable photo arrangements
- Experiment with touch gestures for mobile interfaces
🎯 Learning Strategy: The best way to solidify these concepts is through practice. Try building variations of draggable interfaces – each project will teach you something new about user interaction and DOM manipulation.