26 KiB
JavaScript 基礎:陣列與迴圈
Sketchnote 作者:Tomomi Imura
journey
    title Your Arrays & Loops Adventure
    section Array Fundamentals
      Creating Arrays: 5: You
      Accessing Elements: 4: You
      Array Methods: 5: You
    section Loop Mastery
      For Loops: 4: You
      While Loops: 5: You
      Modern Syntax: 4: You
    section Data Processing
      Array + Loops: 5: You
      Real-world Applications: 4: You
      Performance Optimization: 5: You
課前測驗
你是否曾經好奇網站如何追蹤購物車中的商品或顯示好友列表?這就是陣列和迴圈的用途。陣列就像數位容器,可以存放多個資訊,而迴圈則能有效地處理這些數據,避免重複的程式碼。
這兩個概念結合起來,形成了程式中處理資訊的基礎。你將學會如何從手動逐步撰寫每個步驟,轉變為創建能快速處理數百甚至數千項目資料的智能高效程式碼。
在本課程結束時,你將了解如何僅用幾行程式碼完成複雜的數據任務。讓我們一起探索這些重要的程式設計概念吧。


🎥 點擊上方圖片觀看有關陣列和迴圈的影片。
你可以在 Microsoft Learn 上學習本課程!
mindmap
  root((Data Processing))
    Arrays
      Structure
        Square brackets syntax
        Zero-based indexing
        Dynamic sizing
      Operations
        push/pop
        shift/unshift
        indexOf/includes
      Types
        Numbers array
        Strings array
        Mixed types
    Loops
      For Loops
        Counting iterations
        Array processing
        Predictable flow
      While Loops
        Condition-based
        Unknown iterations
        User input
      Modern Syntax
        for...of
        forEach
        Functional methods
    Applications
      Data Analysis
        Statistics
        Filtering
        Transformations
      User Interfaces
        Lists
        Menus
        Galleries
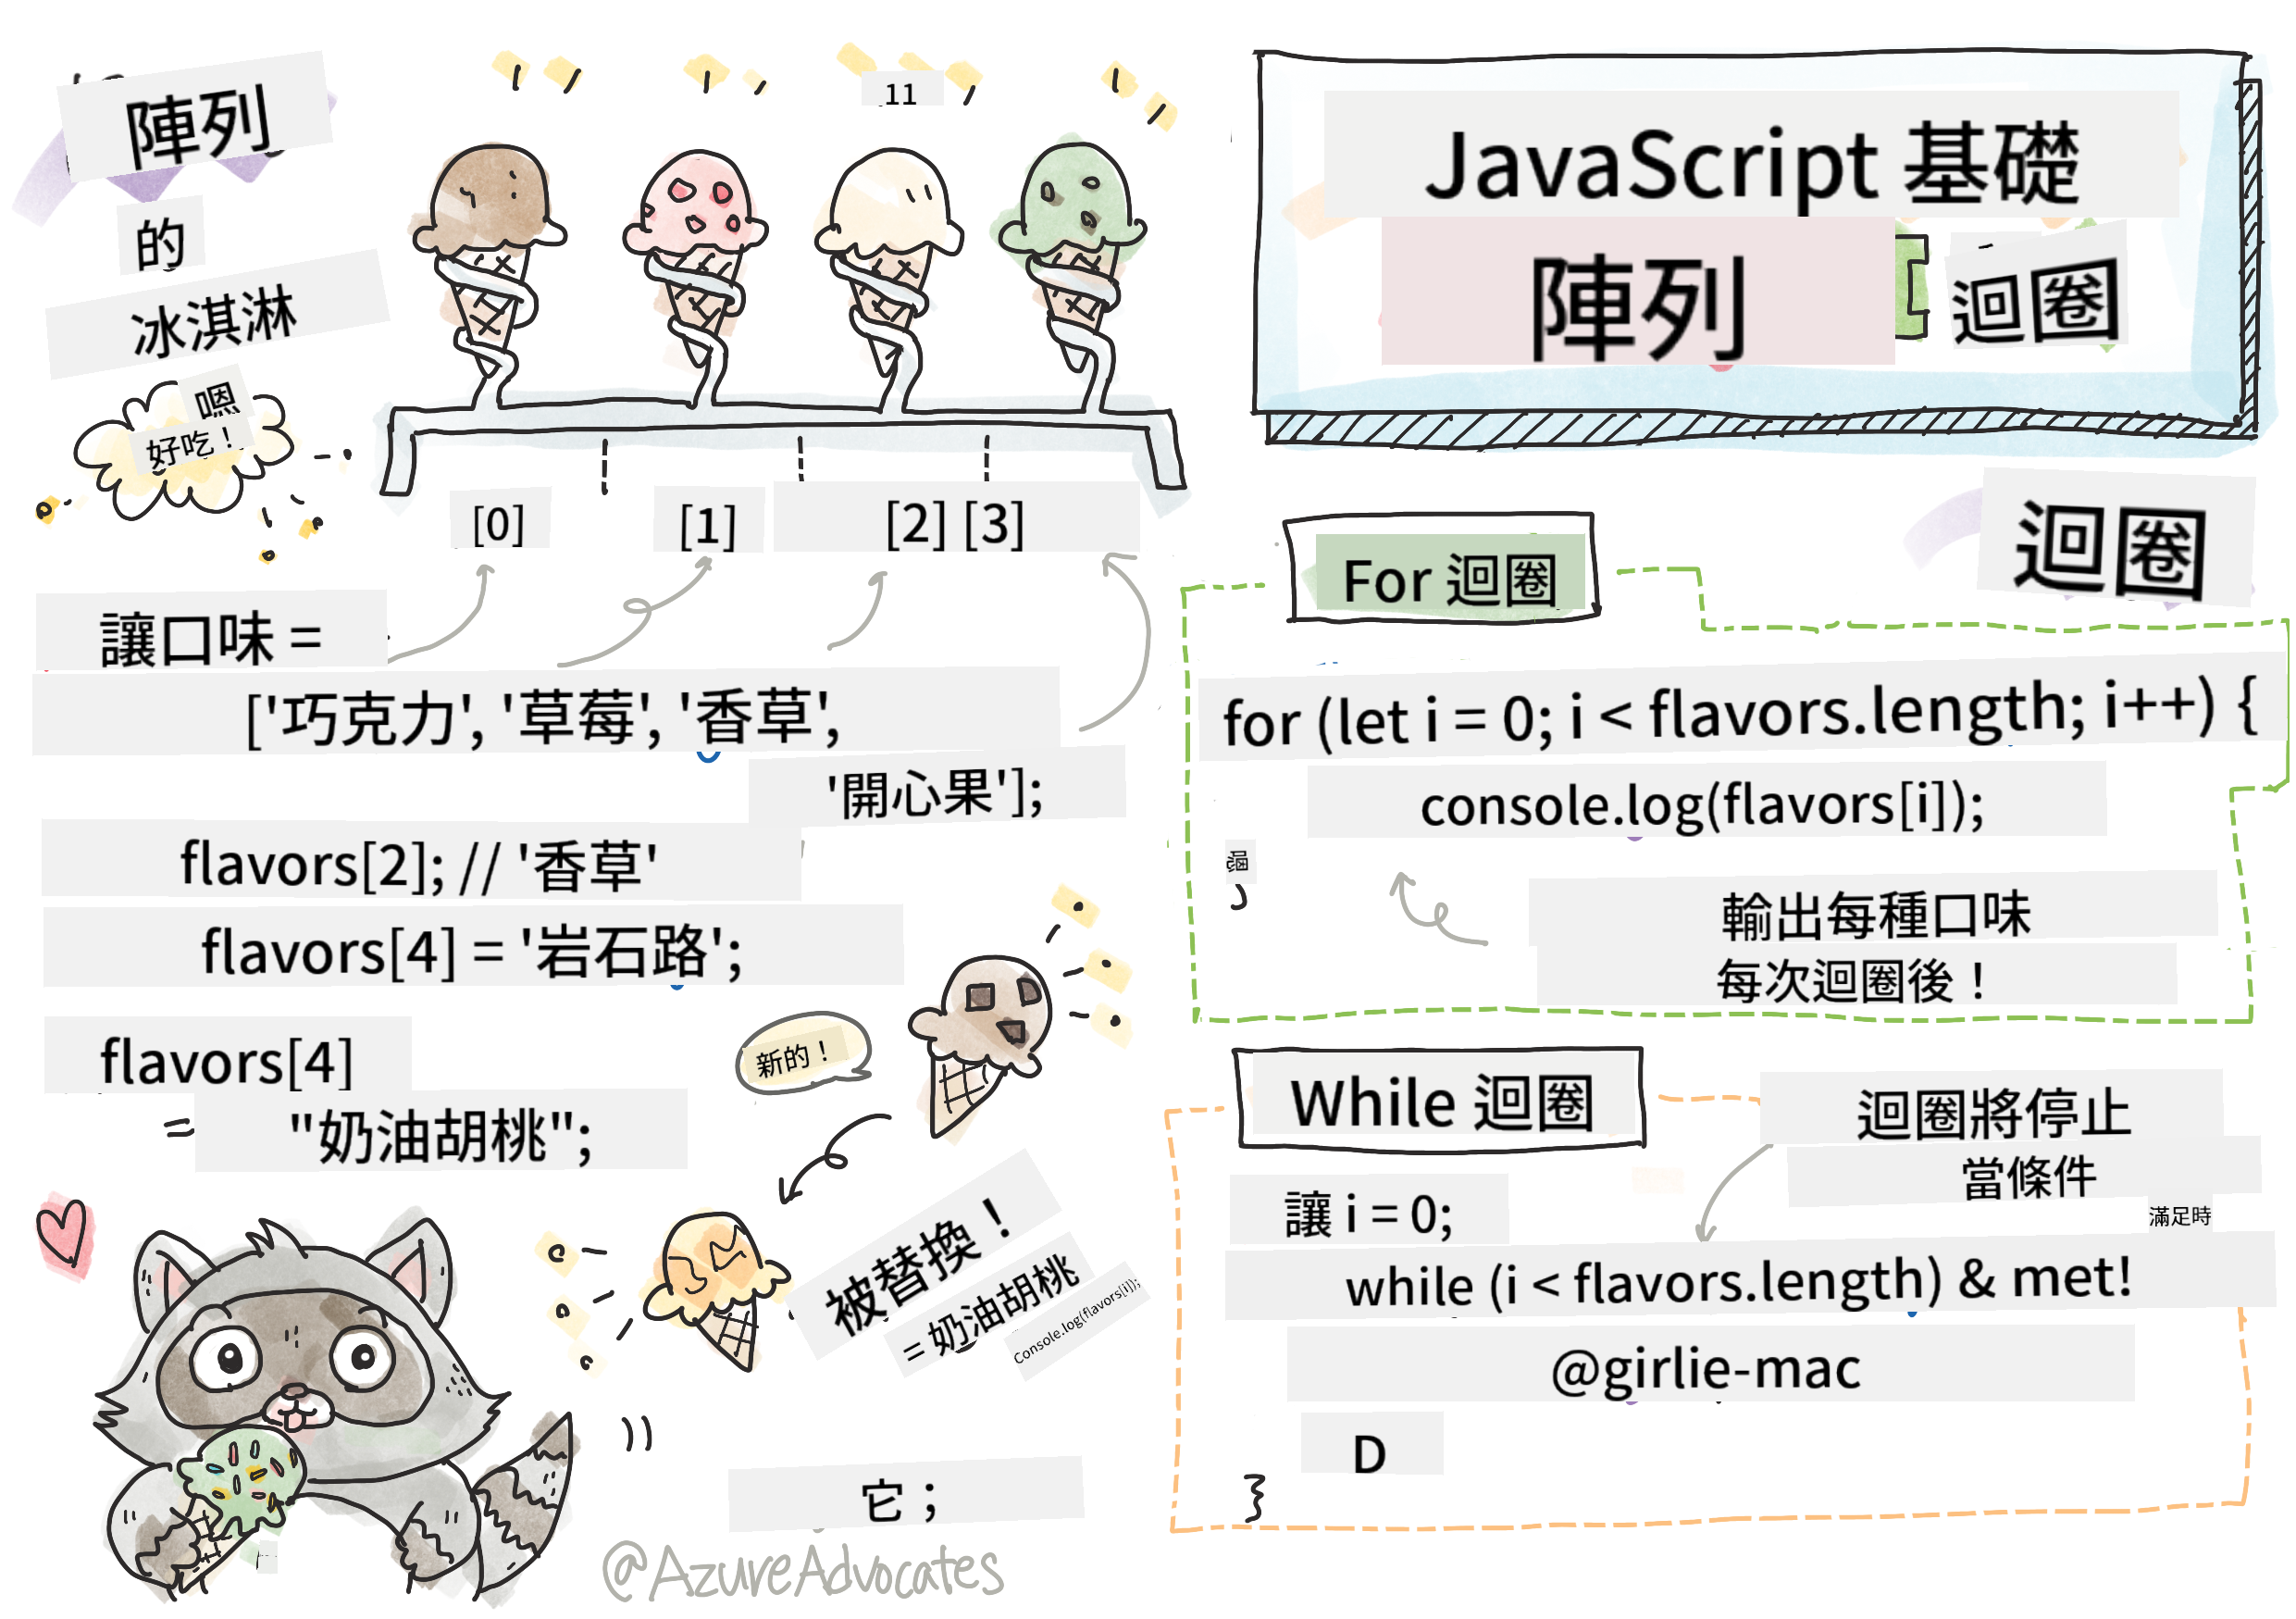
陣列
把陣列想像成數位檔案櫃——與其每個抽屜只存放一份文件,你可以在一個結構化的容器中組織多個相關項目。在程式設計中,陣列讓你能夠在一個有組織的包裝中存放多個資訊。
無論你是在建立相片庫、管理待辦事項清單,還是追蹤遊戲中的高分,陣列都是數據組織的基礎。讓我們來看看它是如何運作的。
✅ 陣列無處不在!你能想到一個現實生活中的陣列例子嗎,例如太陽能板陣列?
建立陣列
建立陣列非常簡單——只需使用方括號!
// Empty array - like an empty shopping cart waiting for items
const myArray = [];
這裡發生了什麼?
你剛剛使用方括號 [] 創建了一個空的容器。把它想像成一個空的圖書館書架——它已準備好存放你想要組織的書籍。
你也可以從一開始就為你的陣列填入初始值:
// Your ice cream shop's flavor menu
const iceCreamFlavors = ["Chocolate", "Strawberry", "Vanilla", "Pistachio", "Rocky Road"];

// A user's profile info (mixing different types of data)
const userData = ["John", 25, true, "developer"];

// Test scores for your favorite class
const scores = [95, 87, 92, 78, 85];
值得注意的酷事:
- 你可以在同一個陣列中存放文字、數字,甚至是 true/false 值
- 只需用逗號分隔每個項目——簡單!
- 陣列非常適合將相關資訊組織在一起
flowchart LR
    A["📦 Arrays"] --> B["Create [ ]"]
    A --> C["Store Multiple Items"]
    A --> D["Access by Index"]

    B --> B1["const arr = []"]
    B --> B2["const arr = [1,2,3]"]

    C --> C1["Numbers"]
    C --> C2["Strings"]
    C --> C3["Booleans"]
    C --> C4["Mixed Types"]

    D --> D1["arr[0] = first"]
    D --> D2["arr[1] = second"]
    D --> D3["arr[2] = third"]

    E["📊 Array Index"] --> E1["Index 0: First"]
    E --> E2["Index 1: Second"]
    E --> E3["Index 2: Third"]
    E --> E4["Index n-1: Last"]

    style A fill:#e3f2fd
    style B fill:#e8f5e8
    style C fill:#fff3e0
    style D fill:#f3e5f5
    style E fill:#e0f2f1
陣列索引
有件事可能一開始會讓人感到不習慣:陣列的項目編號是從 0 開始,而不是 1。這種基於零的索引源於電腦記憶體的運作方式——自從像 C 這樣的早期程式語言開始,這就成為了一種程式設計慣例。陣列中的每個位置都有自己的地址編號,稱為 索引。
| 索引 | 值 | 描述 |
|---|---|---|
| 0 | "巧克力" | 第一個元素 |
| 1 | "草莓" | 第二個元素 |
| 2 | "香草" | 第三個元素 |
| 3 | "開心果" | 第四個元素 |
| 4 | "洛基路" | 第五個元素 |
✅ 陣列從零索引開始是否讓你感到驚訝?在某些程式語言中,索引是從 1 開始的。這背後有一段有趣的歷史,你可以在 維基百科 上閱讀。
存取陣列元素:
const iceCreamFlavors = ["Chocolate", "Strawberry", "Vanilla", "Pistachio", "Rocky Road"];

// Access individual elements using bracket notation
console.log(iceCreamFlavors[0]); // "Chocolate" - first element
console.log(iceCreamFlavors[2]); // "Vanilla" - third element
console.log(iceCreamFlavors[4]); // "Rocky Road" - last element
這裡發生了什麼?
- 使用 方括號表示法和索引號來存取元素
- 返回 陣列中該特定位置存放的值
- 從 0 開始計數,第一個元素的索引為 0
修改陣列元素:
// Change an existing value
iceCreamFlavors[4] = "Butter Pecan";
console.log(iceCreamFlavors[4]); // "Butter Pecan"

// Add a new element at the end
iceCreamFlavors[5] = "Cookie Dough";
console.log(iceCreamFlavors[5]); // "Cookie Dough"
在上面的例子中,我們:
- 修改 索引 4 的元素,從 "洛基路" 改為 "奶油胡桃"
- 新增 一個新元素 "餅乾麵團" 到索引 5
- 自動擴展 陣列長度,當新增超出目前範圍的元素時
陣列長度與常用方法
陣列附帶內建的屬性和方法,使得處理數據更加簡單。
尋找陣列長度:
const iceCreamFlavors = ["Chocolate", "Strawberry", "Vanilla", "Pistachio", "Rocky Road"];
console.log(iceCreamFlavors.length); // 5

// Length updates automatically as array changes
iceCreamFlavors.push("Mint Chip");
console.log(iceCreamFlavors.length); // 6
需要記住的重點:
- 返回 陣列中的元素總數
- 自動更新 當元素被新增或移除時
- 提供 用於迴圈和驗證的動態計數
重要的陣列方法:
const fruits = ["apple", "banana", "orange"];

// Add elements
fruits.push("grape");           // Adds to end: ["apple", "banana", "orange", "grape"]
fruits.unshift("strawberry");   // Adds to beginning: ["strawberry", "apple", "banana", "orange", "grape"]

// Remove elements
const lastFruit = fruits.pop();        // Removes and returns "grape"
const firstFruit = fruits.shift();     // Removes and returns "strawberry"

// Find elements
const index = fruits.indexOf("banana"); // Returns 1 (position of "banana")
const hasApple = fruits.includes("apple"); // Returns true
理解這些方法:
- 使用
push()(尾部)和unshift()(開頭)新增元素 - 使用
pop()(尾部)和shift()(開頭)移除元素 - 使用
indexOf()定位元素並用includes()檢查是否存在 - 返回 有用的值,例如移除的元素或位置索引
✅ 自己試試看!使用瀏覽器的控制台創建並操作一個你自己的陣列。
🧠 陣列基礎檢查:組織你的數據
測試你的陣列理解:
- 你認為為什麼陣列從 0 開始計數而不是 1?
- 如果你嘗試存取不存在的索引(例如在 5 個元素的陣列中使用
arr[100]),會發生什麼? - 你能想到三個現實生活中使用陣列的場景嗎?
stateDiagram-v2
    [*] --> EmptyArray: const arr = []
    EmptyArray --> WithItems: Add elements
    WithItems --> Accessing: Use indexes
    Accessing --> Modifying: Change values
    Modifying --> Processing: Use methods

    WithItems --> WithItems: push(), unshift()
    Processing --> Processing: pop(), shift()

    note right of Accessing
        Zero-based indexing
        arr[0] = first element
    end note

    note right of Processing
        Built-in methods
        Dynamic operations
    end note
現實洞察:陣列在程式設計中無處不在!社交媒體動態、購物車、相片庫、播放清單歌曲——它們背後都是陣列!
迴圈
想像一下查爾斯·狄更斯小說中學生被懲罰時,必須在石板上重複寫句子。如果你能簡單地指示某人「把這句話寫 100 次」,並讓它自動完成,那就是迴圈對程式碼的作用。
迴圈就像擁有一個不知疲倦的助手,可以無誤地重複執行任務。無論你需要檢查購物車中的每個商品,還是顯示相簿中的所有照片,迴圈都能高效地處理重複的工作。
JavaScript 提供了幾種迴圈類型供你選擇。讓我們來看看每一種迴圈,並了解它們的使用時機。
flowchart TD
    A["🔄 Loop Types"] --> B["For Loop"]
    A --> C["While Loop"]
    A --> D["For...of Loop"]
    A --> E["forEach Method"]

    B --> B1["Known iterations"]
    B --> B2["Counter-based"]
    B --> B3["for(init; condition; increment)"]

    C --> C1["Unknown iterations"]
    C --> C2["Condition-based"]
    C --> C3["while(condition)"]

    D --> D1["Modern ES6+"]
    D --> D2["Array iteration"]
    D --> D3["for(item of array)"]

    E --> E1["Functional style"]
    E --> E2["Array method"]
    E --> E3["array.forEach(callback)"]

    F["⏰ When to Use"] --> F1["For: Counting, indexes"]
    F --> F2["While: User input, searching"]
    F --> F3["For...of: Simple iteration"]
    F --> F4["forEach: Functional programming"]

    style A fill:#e3f2fd
    style B fill:#e8f5e8
    style C fill:#fff3e0
    style D fill:#f3e5f5
    style E fill:#e0f2f1
    style F fill:#fce4ec
For 迴圈
for 迴圈就像設置一個計時器——你清楚地知道自己希望某件事發生的次數。它非常有條理且可預測,這使得它在處理陣列或需要計數時非常合適。
For 迴圈結構:
| 組成部分 | 目的 | 範例 |
|---|---|---|
| 初始化 | 設定起始點 | let i = 0 |
| 條件 | 何時繼續 | i < 10 |
| 遞增 | 如何更新 | i++ |
// Counting from 0 to 9
for (let i = 0; i < 10; i++) {
  console.log(`Count: ${i}`);
}

// More practical example: processing scores
const testScores = [85, 92, 78, 96, 88];
for (let i = 0; i < testScores.length; i++) {
  console.log(`Student ${i + 1}: ${testScores[i]}%`);
}
逐步解析發生了什麼:
- 初始化 計數器變數
i,初始值為 0 - 檢查 條件
i < 10,在每次迴圈執行前 - 執行 條件為真時的程式碼區塊
- 遞增 每次迴圈後將
i加 1 - 停止 當條件變為假(當
i達到 10 時)
✅ 在瀏覽器控制台中執行此程式碼。當你對計數器、條件或迴圈表達式進行小改動時會發生什麼?你能讓它倒著運行,創建倒數嗎?
🗓️ For 迴圈掌握檢查:受控重複
評估你的 for 迴圈理解:
- For 迴圈的三個部分是什麼?每個部分的作用是什麼?
- 你如何反向迴圈遍歷一個陣列?
- 如果你忘記了遞增部分(
i++),會發生什麼?
flowchart TD
    A["🚀 Start For Loop"] --> B["Initialize: let i = 0"]
    B --> C{"Condition: i < array.length?"}
    C -->|true| D["Execute code block"]
    D --> E["Increment: i++"]
    E --> C
    C -->|false| F["✅ Exit loop"]

    G["📋 Common Patterns"] --> G1["for(let i=0; i<n; i++)"]
    G --> G2["for(let i=n-1; i>=0; i--)"]
    G --> G3["for(let i=0; i<arr.length; i+=2)"]

    style A fill:#e3f2fd
    style F fill:#e8f5e8
    style G fill:#fff3e0
迴圈智慧:當你清楚知道需要重複的次數時,for 迴圈是最完美的選擇。它是處理陣列的最常見選擇!
While 迴圈
while 迴圈就像在說「一直做這件事直到...」——你可能不知道它會執行多少次,但你知道什麼時候停止。它非常適合用於像是要求使用者輸入直到他們給出正確答案,或者在數據中搜尋直到找到所需內容。
While 迴圈特性:
- 持續執行 只要條件為真
- 需要 手動管理任何計數器變數
- 在每次迴圈前檢查 條件
- 可能有風險 如果條件永遠不為假,可能導致無限迴圈
// Basic counting example
let i = 0;
while (i < 10) {
  console.log(`While count: ${i}`);
  i++; // Don't forget to increment!
}

// More practical example: processing user input
let userInput = "";
let attempts = 0;
const maxAttempts = 3;

while (userInput !== "quit" && attempts < maxAttempts) {
  userInput = prompt(`Enter 'quit' to exit (attempt ${attempts + 1}):`);
  attempts++;
}

if (attempts >= maxAttempts) {
  console.log("Maximum attempts reached!");
}
理解這些範例:
- 手動管理 迴圈內的計數器變數
i - 遞增 計數器以防止無限迴圈
- 展示 實際應用場景,例如用戶輸入和嘗試次數限制
- 包含 防止無限執行的安全機制
♾️ While 迴圈智慧檢查:基於條件的重複
測試你的 while 迴圈理解:
- 使用 while 迴圈的主要風險是什麼?
- 什麼情況下你會選擇使用 while 迴圈而不是 for 迴圈?
- 你如何防止無限迴圈?
flowchart LR
    A["🔄 While vs For"] --> B["While Loop"]
    A --> C["For Loop"]

    B --> B1["Unknown iterations"]
    B --> B2["Condition-driven"]
    B --> B3["User input, searching"]
    B --> B4["⚠️ Risk: infinite loops"]

    C --> C1["Known iterations"]
    C --> C2["Counter-driven"]
    C --> C3["Array processing"]
    C --> C4["✅ Safe: predictable end"]

    D["🛡️ Safety Tips"] --> D1["Always modify condition variable"]
    D --> D2["Include escape conditions"]
    D --> D3["Set maximum iteration limits"]

    style A fill:#e3f2fd
    style B fill:#fff3e0
    style C fill:#e8f5e8
    style D fill:#ffebee
安全第一:While 迴圈功能強大,但需要謹慎管理條件。務必確保你的迴圈條件最終會變為假!
現代迴圈替代方案
JavaScript 提供了現代迴圈語法,使你的程式碼更易讀且更少出錯。
For...of 迴圈(ES6+):
const colors = ["red", "green", "blue", "yellow"];

// Modern approach - cleaner and safer
for (const color of colors) {
  console.log(`Color: ${color}`);
}

// Compare with traditional for loop
for (let i = 0; i < colors.length; i++) {
  console.log(`Color: ${colors[i]}`);
}
For...of 的主要優勢:
- 消除 索引管理和潛在的越界錯誤
- 直接提供 陣列元素的存取
- 提升 程式碼可讀性並減少語法複雜性
forEach 方法:
const prices = [9.99, 15.50, 22.75, 8.25];

// Using forEach for functional programming style
prices.forEach((price, index) => {
  console.log(`Item ${index + 1}: $${price.toFixed(2)}`);
});

// forEach with arrow functions for simple operations
prices.forEach(price => console.log(`Price: $${price}`));
關於 forEach 的重點:
- 執行 每個陣列元素的函數
- 提供 元素值和索引作為參數
- 無法 提前停止(與傳統迴圈不同)
- 返回 undefined(不會創建新陣列)
✅ 為什麼你會選擇 for 迴圈而不是 while 迴圈?17K 名觀眾在 StackOverflow 上有相同的問題,一些意見可能 對你有幫助。
🎨 現代迴圈語法檢查:擁抱 ES6+
評估你的現代 JavaScript 理解:
for...of相較於傳統 for 迴圈的優勢是什麼?- 什麼情況下你仍然會偏好使用傳統 for 迴圈?
forEach和map有什麼不同?
quadrantChart
    title Loop Selection Guide
    x-axis Traditional --> Modern
    y-axis Simple --> Complex
    quadrant-1 Modern Complex
    quadrant-2 Traditional Complex
    quadrant-3 Traditional Simple
    quadrant-4 Modern Simple

    Traditional For: [0.2, 0.7]
    While Loop: [0.3, 0.6]
    For...of: [0.8, 0.3]
    forEach: [0.9, 0.4]
    Array Methods: [0.8, 0.8]
現代趨勢:像
for...of和forEach的 ES6+ 語法正成為陣列迴圈的首選,因為它更簡潔且更少出錯!
迴圈與陣列
將陣列與迴圈結合使用可以創造強大的數據處理能力。這種組合是許多程式任務的基礎,從顯示列表到計算統計數據。
傳統陣列處理:
const iceCreamFlavors = ["Chocolate", "Strawberry", "Vanilla", "Pistachio", "Rocky Road"];

// Classic for loop approach
for (let i = 0; i < iceCreamFlavors.length; i++) {
  console.log(`Flavor ${i + 1}: ${iceCreamFlavors[i]}`);
}

// Modern for...of approach
for (const flavor of iceCreamFlavors) {
  console.log(`Available flavor: ${flavor}`);
}
讓我們理解每種方法:
- 使用 陣列長度屬性來確定迴圈邊界
- 透過索引存取 傳統 for 迴圈中的元素
- 直接存取 for...of 迴圈中的元素
- 精確處理 每個陣列元素一次
實際數據處理範例:
const studentGrades = [85, 92, 78, 96, 88, 73, 89];
let total = 0;
let highestGrade = studentGrades[0];
let lowestGrade = studentGrades[0];

// Process all grades with a single loop
for (let i = 0; i < studentGrades.length; i++) {
  const grade = studentGrades[i];
  total += grade;

  if (grade > highestGrade) {
    highestGrade = grade;
  }

  if (grade < lowestGrade) {
    lowestGrade = grade;
  }
}

const average = total / studentGrades.length;
console.log(`Average: ${average.toFixed(1)}`);
console.log(`Highest: ${highestGrade}`);
console.log(`Lowest: ${lowestGrade}`);
這段程式碼的運作方式:
- 初始化 用於追蹤的變數,例如總和和極值
- 使用 單一高效迴圈處理每個分數
- 累積 總分以計算平均值
- 追蹤 迴圈期間的最高和最低值
- 在迴圈完成後計算 最終統計數據
✅ 在瀏覽器的控制台中嘗試迴圈遍歷你自己創建的陣列。
flowchart TD
    A["📦 Array Data"] --> B["🔄 Loop Processing"]
    B --> C["📈 Results"]

    A1["[85, 92, 78, 96, 88]"] --> A

    B --> B1["Calculate total"]
    B --> B2["Find min/max"]
    B --> B3["Count conditions"]
    B --> B4["Transform data"]

    C --> C1["Average: 87.8"]
    C --> C2["Highest: 96"]
    C --> C3["Passing: 5/5"]
    C --> C4["Letter grades"]

    D["⚡ Processing Patterns"] --> D1["Accumulation (sum)"]
    D --> D2["Comparison (min/max)"]
    D --> D3["Filtering (conditions)"]
    D --> D4["Mapping (transformation)"]

    style A fill:#e3f2fd
    style B fill:#fff3e0
    style C fill:#e8f5e8
    style D fill:#f3e5f5
GitHub Copilot Agent 挑戰 🚀
使用 Agent 模式完成以下挑戰:
描述: 建立一個綜合數據處理函數,結合陣列和迴圈分析數據集並生成有意義的洞察。
提示: 創建一個名為 analyzeGrades 的函數,該函數接收一個包含學生成績物件的陣列(每個物件包含 name 和 score 屬性),並返回一個包含統計數據的物件,包括最高分、最低分、平均分、通過人數(分數 >= 70),以及一個分數高於平均分的學生姓名陣列。在解決方案中至少使用兩種不同的迴圈類型。
了解更多有關 agent 模式 的資訊。
🚀 挑戰
JavaScript 提供了幾個現代化的陣列方法,可以用來取代傳統的迴圈來完成特定任務。探索 forEach、for-of、map、filter 和 reduce。
你的挑戰: 使用至少三種不同的陣列方法重構學生成績的範例。注意,使用現代 JavaScript 語法後,程式碼會變得更簡潔、更易讀。
課後測驗
回顧與自學
JavaScript 中的陣列附帶許多非常有用的操作方法,適合用來進行資料處理。深入了解這些方法,並嘗試在你自己建立的陣列上使用一些方法(例如 push、pop、slice 和 splice)。
作業
📊 你的陣列與迴圈工具包摘要
graph TD
    A["🎯 Arrays & Loops Mastery"] --> B["📦 Array Fundamentals"]
    A --> C["🔄 Loop Types"]
    A --> D["🔗 Data Processing"]
    A --> E["🎨 Modern Techniques"]

    B --> B1["Creation: [ ]"]
    B --> B2["Indexing: arr[0]"]
    B --> B3["Methods: push, pop"]
    B --> B4["Properties: length"]

    C --> C1["For: Known iterations"]
    C --> C2["While: Condition-based"]
    C --> C3["For...of: Direct access"]
    C --> C4["forEach: Functional"]

    D --> D1["Statistics calculation"]
    D --> D2["Data transformation"]
    D --> D3["Filtering & searching"]
    D --> D4["Real-time processing"]

    E --> E1["Arrow functions"]
    E --> E2["Method chaining"]
    E --> E3["Destructuring"]
    E --> E4["Template literals"]

    F["💡 Key Benefits"] --> F1["Efficient data handling"]
    F --> F2["Reduced code repetition"]
    F --> F3["Scalable solutions"]
    F --> F4["Cleaner syntax"]

    style A fill:#e3f2fd
    style B fill:#e8f5e8
    style C fill:#fff3e0
    style D fill:#f3e5f5
    style E fill:#e0f2f1
    style F fill:#fce4ec
🚀 你的陣列與迴圈精通時間表
⚡ 接下來 5 分鐘內可以完成的事
- 建立一個包含你最喜愛電影的陣列並存取特定元素
- 撰寫一個從 1 數到 10 的 for 迴圈
- 嘗試課程中的現代陣列方法挑戰
- 在瀏覽器主控台練習陣列索引
🎯 接下來 1 小時內可以完成的事
- 完成課後測驗並回顧任何有挑戰性的概念
- 完成 GitHub Copilot 挑戰中的綜合成績分析器
- 建立一個簡單的購物車功能,能新增和移除商品
- 練習不同迴圈類型的轉換
- 嘗試使用陣列方法,例如
push、pop、slice和splice
📅 一週的資料處理旅程
- 完成「迴圈處理陣列」作業並進行創意改進
- 使用陣列和迴圈建立一個待辦事項應用程式
- 建立一個簡單的數據統計計算器
- 練習使用 MDN 陣列方法
- 建立一個相片集或音樂播放清單介面
- 探索使用
map、filter和reduce進行函數式程式設計
🌟 一個月的轉變
- 精通進階陣列操作與效能優化
- 建立完整的數據視覺化儀表板
- 參與涉及資料處理的開源專案
- 用實際範例教導他人陣列與迴圈的使用
- 建立個人可重複使用的資料處理函數庫
- 探索基於陣列的演算法與資料結構
🏆 最終資料處理冠軍檢查
慶祝你對陣列與迴圈的精通:
- 你學到的最有用的陣列操作是什麼?它如何應用於現實世界?
- 哪種類型的迴圈對你來說最自然?為什麼?
- 理解陣列與迴圈如何改變你組織資料的方式?
- 你接下來想挑戰什麼複雜的資料處理任務?
journey
    title Your Data Processing Evolution
    section Today
      Array Confusion: 3: You
      Loop Basics: 4: You
      Index Understanding: 5: You
    section This Week
      Method Mastery: 4: You
      Efficient Processing: 5: You
      Modern Syntax: 5: You
    section Next Month
      Complex Algorithms: 5: You
      Performance Optimization: 5: You
      Teaching Others: 5: You
📦 你已解鎖資料組織與處理的力量! 陣列與迴圈是幾乎所有應用程式的基礎。從簡單的清單到複雜的數據分析,現在你擁有高效且優雅地處理資訊的工具。每個動態網站、行動應用程式和數據驅動的應用程式都依賴這些基本概念。歡迎進入可擴展資料處理的世界! 🎉
免責聲明:
此文件已使用 AI 翻譯服務 Co-op Translator 進行翻譯。儘管我們努力確保準確性,但請注意,自動翻譯可能包含錯誤或不準確之處。原始文件的母語版本應被視為權威來源。對於關鍵信息,建議使用專業人工翻譯。我們對因使用此翻譯而產生的任何誤解或誤釋不承擔責任。