|
|
3 weeks ago | |
|---|---|---|
| .. | ||
| solution | 3 weeks ago | |
| README.md | 3 weeks ago | |
README.md
聊天專案
這個聊天專案展示了如何使用 GitHub Models 建立一個聊天助手。
以下是完成的專案樣貌:

一些背景資訊,使用生成式 AI 建立聊天助手是一個很好的方式來開始學習 AI。在這堂課中,你將學習如何將生成式 AI整合到網頁應用程式中,讓我們開始吧。
連接生成式 AI
在後端部分,我們使用 GitHub Models。這是一個很棒的服務,讓你可以免費使用 AI。前往它的 Playground,並取得與你選擇的後端語言相對應的程式碼。以下是 GitHub Models Playground 的樣子:

如前所述,選擇 "Code" 標籤和你選擇的執行環境。

在這個例子中,我們選擇 Python,這意味著我們會選擇以下程式碼:
"""Run this model in Python

> pip install openai
"""
import os
from openai import OpenAI

# To authenticate with the model you will need to generate a personal access token (PAT) in your GitHub settings.
# Create your PAT token by following instructions here: https://docs.github.com/en/authentication/keeping-your-account-and-data-secure/managing-your-personal-access-tokens
client = OpenAI(
    base_url="https://models.github.ai/inference",
    api_key=os.environ["GITHUB_TOKEN"],
)

response = client.chat.completions.create(
    messages=[
        {
            "role": "system",
            "content": "",
        },
        {
            "role": "user",
            "content": "What is the capital of France?",
        }
    ],
    model="openai/gpt-4o-mini",
    temperature=1,
    max_tokens=4096,
    top_p=1
)

print(response.choices[0].message.content)
讓我們稍微整理一下這段程式碼,使其可重複使用:
def call_llm(prompt: str, system_message: str):
    response = client.chat.completions.create(
        messages=[
            {
                "role": "system",
                "content": system_message,
            },
            {
                "role": "user",
                "content": prompt,
            }
        ],
        model="openai/gpt-4o-mini",
        temperature=1,
        max_tokens=4096,
        top_p=1
    )

    return response.choices[0].message.content
有了這個函數 call_llm,我們現在可以傳入提示和系統提示,函數最終會返回結果。
自訂 AI 助手
如果你想自訂 AI 助手的行為,可以像下面這樣填入系統提示:
call_llm("Tell me about you", "You're Albert Einstein, you only know of things in the time you were alive")
通過 Web API 暴露功能
很好,我們已完成 AI 部分,接下來看看如何將其整合到 Web API 中。對於 Web API,我們選擇使用 Flask,但任何網頁框架都可以。以下是程式碼:
# api.py
from flask import Flask, request, jsonify
from llm import call_llm
from flask_cors import CORS

app = Flask(__name__)
CORS(app)   # *   example.com

@app.route("/", methods=["GET"])
def index():
    return "Welcome to this API. Call POST /hello with 'message': 'my message' as JSON payload"


@app.route("/hello", methods=["POST"])
def hello():
    # get message from request body  { "message": "do this taks for me" }
    data = request.get_json()
    message = data.get("message", "")

    response = call_llm(message, "You are a helpful assistant.")
    return jsonify({
        "response": response
    })

if __name__ == "__main__":
    app.run(host="0.0.0.0", port=5000)
在這裡,我們建立了一個 Flask API,並定義了預設路徑 "/" 和 "/chat"。後者是供前端用來傳遞問題的。
要整合 llm.py,我們需要做以下幾件事:
-
匯入
call_llm函數:from llm import call_llm from flask import Flask, request -
從 "/chat" 路徑呼叫它:
@app.route("/hello", methods=["POST"])
def hello():
   # get message from request body  { "message": "do this taks for me" }
   data = request.get_json()
   message = data.get("message", "")

   response = call_llm(message, "You are a helpful assistant.")
   return jsonify({
      "response": response
   })
在這裡,我們解析傳入的請求,從 JSON 主體中檢索
message屬性。接著,我們使用以下呼叫來調用 LLM:response = call_llm(message, "You are a helpful assistant") # return the response as JSON return jsonify({ "response": response })
很好,現在我們已完成所需的部分。
配置 Cors
我們需要提到的是,我們設置了類似 CORS(跨來源資源共享)的功能。這意味著,由於後端和前端將在不同的埠上運行,我們需要允許前端呼叫後端。在 api.py 中有一段程式碼設置了這個功能:
from flask_cors import CORS

app = Flask(__name__)
CORS(app)   # *   example.com
目前它被設置為允許 "*",即所有來源,這有點不安全,應該在進入生產環境時進行限制。
運行你的專案
好了,我們有 llm.py 和 api.py,如何讓它與後端一起運行呢?有兩件事需要做:
-
安裝依賴項:
cd backend python -m venv venv source ./venv/bin/activate pip install openai flask flask-cors openai -
啟動 API:
python api.py如果你在 Codespaces 中,需要前往編輯器底部的 Ports,右鍵點擊並選擇 "Port Visibility",然後選擇 "Public"。
開發前端
現在我們的 API 已經啟動並運行,讓我們為此建立一個前端。這是一個最低限度的前端,我們將逐步改進。在 frontend 資料夾中,建立以下內容:
backend/
frontend/
index.html
app.js
styles.css
首先是 index.html:
<html>
    <head>
        <link rel="stylesheet" href="styles.css">
    </head>
    <body>
      <form>
        <textarea id="messages"></textarea>
        <input id="input" type="text" />
        <button type="submit" id="sendBtn">Send</button>
      </form>
      <script src="app.js" />
    </body>
</html>
以上是支持聊天窗口所需的最低限度內容,包括一個用於顯示訊息的文字區域、一個輸入框用於輸入訊息,以及一個按鈕用於將訊息發送到後端。接下來看看 app.js 中的 JavaScript。
app.js
// app.js

(function(){
  // 1. set up elements
  const messages = document.getElementById("messages");
  const form = document.getElementById("form");
  const input = document.getElementById("input");

  const BASE_URL = "change this";
  const API_ENDPOINT = `${BASE_URL}/hello`;

  // 2. create a function that talks to our backend
  async function callApi(text) {
    const response = await fetch(API_ENDPOINT, {
      method: "POST",
      headers: { "Content-Type": "application/json" },
      body: JSON.stringify({ message: text })
    });
    let json = await response.json();
    return json.response;
  }

  // 3. add response to our textarea
  function appendMessage(text, role) {
    const el = document.createElement("div");
    el.className = `message ${role}`;
    el.innerHTML = text;
    messages.appendChild(el);
  }

  // 4. listen to submit events
  form.addEventListener("submit", async(e) => {
    e.preventDefault();
   // someone clicked the button in the form

   // get input
   const text = input.value.trim();

   appendMessage(text, "user")

   // reset it
   input.value = '';

   const reply = await callApi(text);

   // add to messages
   appendMessage(reply, "assistant");

  })
})();
讓我們逐段解析程式碼:
-
- 在這裡,我們獲取所有稍後會引用的元素的參考。
-
- 在這部分,我們建立了一個函數,使用內建的
fetch方法呼叫後端。
- 在這部分,我們建立了一個函數,使用內建的
-
appendMessage幫助添加回應以及使用者輸入的訊息。
-
- 在這裡,我們監聽提交事件,讀取輸入欄位,將使用者的訊息放入文字區域,呼叫 API,並將回應渲染到文字區域。
接下來看看樣式,這是你可以自由發揮的地方,但以下是一些建議:
styles.css
.message {
    background: #222;
    box-shadow: 0 0 0 10px orange;
    padding: 10px:
    margin: 5px;
}

.message.user {
    background: blue;
}

.message.assistant {
    background: grey;
}
有了這三個類別,你可以根據訊息的來源(助手或使用者)來區分樣式。如果需要靈感,可以查看 solution/frontend/styles.css 資料夾。
更改 Base Url
有一件事我們還沒設置,那就是 BASE_URL,這在後端啟動之前是未知的。設置方式如下:
- 如果你在本地運行 API,應設置為類似
http://localhost:5000。 - 如果在 Codespaces 中運行,應設置為類似 "[name]app.github.dev"。
作業
建立自己的資料夾 project,內容如下:
project/
  frontend/
    index.html
    app.js
    styles.css
  backend/
    api.py
    llm.py
複製上述指示的內容,但可以根據自己的喜好進行自訂。
解決方案
額外挑戰
嘗試更改 AI 助手的個性。在 api.py 中呼叫 call_llm 時,可以將第二個參數更改為你想要的內容,例如:
call_llm(message, "You are Captain Picard")
同時更改 CSS 和文字,使其符合你的喜好,因此需要修改 index.html 和 styles.css。
總結
很好,你已經從零開始學習如何使用 AI 建立個人助手。我們使用了 GitHub Models、Python 後端以及 HTML、CSS 和 JavaScript 前端完成了這項工作。
使用 Codespaces 設置
-
從模板建立(確保你已登入 GitHub),在右上角:
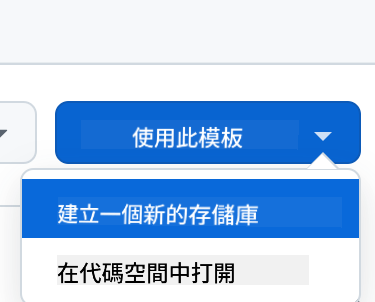
-
一旦進入你的 repo,建立一個 Codespace:
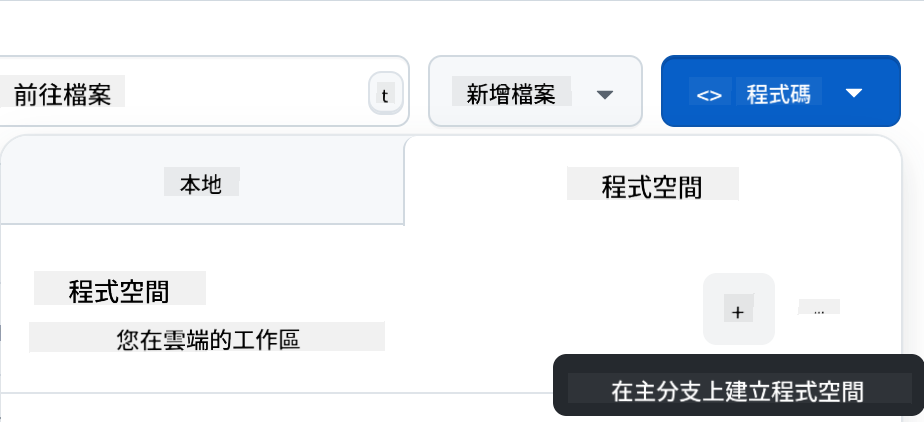
這將啟動一個你可以開始工作的環境。
免責聲明:
本文件已使用 AI 翻譯服務 Co-op Translator 進行翻譯。我們致力於提供準確的翻譯,但請注意,自動翻譯可能包含錯誤或不準確之處。應以原始語言的文件作為權威來源。對於關鍵資訊,建議尋求專業人工翻譯。我們對因使用此翻譯而引起的任何誤解或錯誤解讀概不負責。