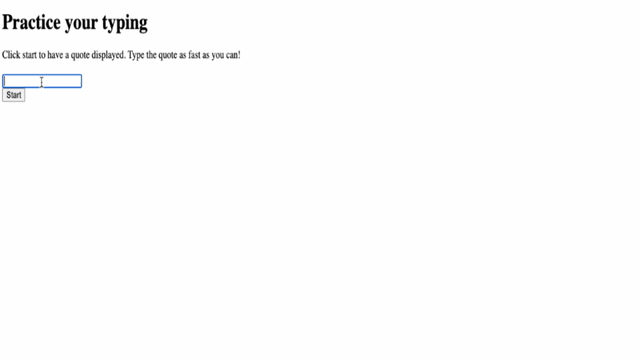
Practice your typing skills with a quote from Sherlock Holmes. Click **start** to begin!
```
### アプリケーションの起動
開発中は、見た目を確認するために反復的に作業するのが最善です。アプリケーションを起動してみましょう。Visual Studio Codeには、[Live Server](https://marketplace.visualstudio.com/items?itemName=ritwickdey.LiveServer&WT.mc_id=academic-77807-sagibbon)という素晴らしい拡張機能があります。この拡張機能は、アプリケーションをローカルでホストし、保存するたびにブラウザを更新してくれます。
- [Live Server](https://marketplace.visualstudio.com/items?itemName=ritwickdey.LiveServer&WT.mc_id=academic-77807-sagibbon)をインストールします。リンクをクリックして**Install**を選択してください。
- ブラウザからVisual Studio Codeを開くように求められ、その後Visual Studio Codeからインストールを実行するように求められます。
- 必要に応じてVisual Studio Codeを再起動してください。
- インストール後、Visual Studio CodeでCtrl-Shift-P(またはCmd-Shift-P)を押してコマンドパレットを開きます。
- **Live Server: Open with Live Server**と入力します。
- Live Serverがアプリケーションをホストします。
- ブラウザを開き、**https://localhost:5500**に移動します。
- 作成したページが表示されるはずです!
次に、機能を追加していきましょう。
## CSSの追加
HTMLが作成できたので、コアスタイリングのためのCSSを追加します。プレイヤーが入力すべき単語をハイライトし、入力が間違っている場合にテキストボックスを色付けします。これを2つのクラスで実現します。
**style.css**という名前の新しいファイルを作成し、以下の構文を追加します。
```css
/* inside style.css */
.highlight {
background-color: yellow;
}
.error {
background-color: lightcoral;
border: red;
}
```
✅ CSSに関しては、ページを好きなようにレイアウトできます。少し時間をかけてページをより魅力的にしてみてください:
- 別のフォントを選ぶ
- ヘッダーに色を付ける
- アイテムのサイズを変更する
## JavaScript
UIが作成できたので、次はロジックを提供するJavaScriptに注目します。これをいくつかのステップに分けて進めます:
- [定数の作成](../../../../4-typing-game/typing-game)
- [ゲーム開始のイベントリスナー](../../../../4-typing-game/typing-game)
- [タイピングのイベントリスナー](../../../../4-typing-game/typing-game)
まず、**script.js**という名前の新しいファイルを作成します。
### 定数の追加
プログラミングを簡単にするために、いくつかのアイテムが必要です。これもレシピのようなもので、以下が必要です:
- すべての引用文を含む配列
- 現在の引用文のすべての単語を格納する空の配列
- プレイヤーが現在入力している単語のインデックスを格納するスペース
- プレイヤーがスタートをクリックした時間
また、UI要素への参照も必要です:
- テキストボックス(**typed-value**)
- 引用文の表示(**quote**)
- メッセージ(**message**)
```javascript
// inside script.js
// all of our quotes
const quotes = [
'When you have eliminated the impossible, whatever remains, however improbable, must be the truth.',
'There is nothing more deceptive than an obvious fact.',
'I ought to know by this time that when a fact appears to be opposed to a long train of deductions it invariably proves to be capable of bearing some other interpretation.',
'I never make exceptions. An exception disproves the rule.',
'What one man can invent another can discover.',
'Nothing clears up a case so much as stating it to another person.',
'Education never ends, Watson. It is a series of lessons, with the greatest for the last.',
];
// store the list of words and the index of the word the player is currently typing
let words = [];
let wordIndex = 0;
// the starting time
let startTime = Date.now();
// page elements
const quoteElement = document.getElementById('quote');
const messageElement = document.getElementById('message');
const typedValueElement = document.getElementById('typed-value');
```
✅ ゲームにもっと引用文を追加してみましょう
> **NOTE:** `document.getElementById`を使用して、コード内でいつでも要素を取得できます。これらの要素を定期的に参照するため、文字列リテラルのタイプミスを避けるために定数を使用します。[Vue.js](https://vuejs.org/)や[React](https://reactjs.org/)のようなフレームワークは、コードの集中管理をより効率的に行うのに役立ちます。
`const`、`let`、`var`の使用方法についてのビデオを見てみましょう。
[](https://youtube.com/watch?v=JNIXfGiDWM8 "変数の種類")
> 🎥 上の画像をクリックすると、変数についてのビデオが再生されます。
### ゲーム開始ロジックの追加
ゲームを開始するには、プレイヤーがスタートをクリックします。当然ながら、プレイヤーがいつスタートをクリックするのかは分かりません。ここで[イベントリスナー](https://developer.mozilla.org/docs/Web/API/EventTarget/addEventListener)が役立ちます。イベントリスナーは、何かが発生するのを待ち、それに応じてコードを実行します。この場合、ユーザーがスタートをクリックしたときにコードを実行したいのです。
ユーザーが**スタート**をクリックしたとき、引用文を選択し、ユーザーインターフェースを設定し、現在の単語とタイミングの追跡を設定する必要があります。以下は追加する必要のあるJavaScriptです。スクリプトブロックの後に説明します。
```javascript
// at the end of script.js
document.getElementById('start').addEventListener('click', () => {
// get a quote
const quoteIndex = Math.floor(Math.random() * quotes.length);
const quote = quotes[quoteIndex];
// Put the quote into an array of words
words = quote.split(' ');
// reset the word index for tracking
wordIndex = 0;
// UI updates
// Create an array of span elements so we can set a class
const spanWords = words.map(function(word) { return `${word} `});
// Convert into string and set as innerHTML on quote display
quoteElement.innerHTML = spanWords.join('');
// Highlight the first word
quoteElement.childNodes[0].className = 'highlight';
// Clear any prior messages
messageElement.innerText = '';
// Setup the textbox
// Clear the textbox
typedValueElement.value = '';
// set focus
typedValueElement.focus();
// set the event handler
// Start the timer
startTime = new Date().getTime();
});
```
コードを分解してみましょう!
- 単語の追跡を設定
- [Math.floor](https://developer.mozilla.org/docs/Web/JavaScript/Reference/Global_Objects/Math/floor)と[Math.random](https://developer.mozilla.org/docs/Web/JavaScript/Reference/Global_Objects/Math/random)を使用して、`quotes`配列からランダムに引用文を選択します
- `quote`を`words`配列に変換して、プレイヤーが現在入力している単語を追跡します
- プレイヤーが最初の単語から始めるため、`wordIndex`を0に設定します
- UIを設定
- 各単語を`span`要素内に含む`spanWords`配列を作成します
- これにより、表示される単語をハイライトできます
- 配列を`join`して、`quoteElement`の`innerHTML`を更新するための文字列を作成します
- これにより、引用文がプレイヤーに表示されます
- 最初の`span`要素の`className`を`highlight`に設定して、黄色でハイライトします
- `messageElement`の`innerText`を`''`に設定してクリアします
- テキストボックスを設定
- 現在の`typedValueElement`の`value`をクリアします
- `typedValueElement`に`focus`を設定します
- タイマーを`getTime`で開始します
### タイピングロジックの追加
プレイヤーが入力すると、`input`イベントが発生します。このイベントリスナーは、プレイヤーが単語を正しく入力しているかを確認し、ゲームの現在の状態を処理します。**script.js**に戻り、以下のコードを末尾に追加します。その後、詳細を説明します。
```javascript
// at the end of script.js
typedValueElement.addEventListener('input', () => {
// Get the current word
const currentWord = words[wordIndex];
// get the current value
const typedValue = typedValueElement.value;
if (typedValue === currentWord && wordIndex === words.length - 1) {
// end of sentence
// Display success
const elapsedTime = new Date().getTime() - startTime;
const message = `CONGRATULATIONS! You finished in ${elapsedTime / 1000} seconds.`;
messageElement.innerText = message;
} else if (typedValue.endsWith(' ') && typedValue.trim() === currentWord) {
// end of word
// clear the typedValueElement for the new word
typedValueElement.value = '';
// move to the next word
wordIndex++;
// reset the class name for all elements in quote
for (const wordElement of quoteElement.childNodes) {
wordElement.className = '';
}
// highlight the new word
quoteElement.childNodes[wordIndex].className = 'highlight';
} else if (currentWord.startsWith(typedValue)) {
// currently correct
// highlight the next word
typedValueElement.className = '';
} else {
// error state
typedValueElement.className = 'error';
}
});
```
コードを分解してみましょう!まず、現在の単語とプレイヤーがこれまでに入力した値を取得します。その後、ウォーターフォールロジックを使用して、引用文が完了したか、単語が完了したか、単語が正しいか、またはエラーがあるかを確認します。
- 引用文が完了した場合(`typedValue`が`currentWord`と等しく、`wordIndex`が`words`の`length`より1少ない場合)
- 現在の時間から`startTime`を引いて`elapsedTime`を計算します
- `elapsedTime`を1,000で割ってミリ秒を秒に変換します
- 成功メッセージを表示します
- 単語が完了した場合(`typedValue`がスペースで終わり、`typedValue`が`currentWord`と等しい場合)
- 次の単語を入力できるように`typedElement`の`value`を`''`に設定します
- `wordIndex`をインクリメントして次の単語に移動します
- `quoteElement`のすべての`childNodes`をループして`className`を`''`に設定し、デフォルト表示に戻します
- 現在の単語の`className`を`highlight`に設定して、次に入力すべき単語としてフラグを立てます
- 現在の単語が正しく入力されている場合(ただし完了していない場合)、`currentWord`が`typedValue`で始まる
- `typedValueElement`をデフォルト表示にするために`className`をクリアします
- ここまで到達した場合、エラーがある
- `typedValueElement`の`className`を`error`に設定します
## アプリケーションのテスト
ここまで来ました!最後のステップは、アプリケーションが動作することを確認することです。試してみてください!エラーがあっても心配しないでください。**すべての開発者**がエラーを経験します。メッセージを確認し、必要に応じてデバッグしてください。
**スタート**をクリックして、タイピングを始めてみましょう!以下のアニメーションのように動作するはずです。
---
## 🚀 チャレンジ
さらに機能を追加してみましょう:
- 完了時に`input`イベントリスナーを無効化し、ボタンがクリックされたときに再有効化する
- プレイヤーが引用文を完了したときにテキストボックスを無効化する
- 成功メッセージを表示するモーダルダイアログボックスを追加する
- [localStorage](https://developer.mozilla.org/docs/Web/API/Window/localStorage) を使用してハイスコアを保存する
## 講義後のクイズ
[講義後のクイズ](https://ff-quizzes.netlify.app/web/quiz/22)
## 復習と自己学習
ウェブブラウザを通じて開発者が利用できる[すべてのイベント](https://developer.mozilla.org/docs/Web/Events)について調べ、それぞれのイベントをどのようなシナリオで使用するかを考えてみてください。
## 課題
[新しいキーボードゲームを作成する](assignment.md)
**免責事項**:
この文書は、AI翻訳サービス [Co-op Translator](https://github.com/Azure/co-op-translator) を使用して翻訳されています。正確性を追求しておりますが、自動翻訳には誤りや不正確な表現が含まれる可能性があります。元の言語で記載された原文が公式な情報源とみなされるべきです。重要な情報については、専門の人間による翻訳を推奨します。この翻訳の使用に起因する誤解や誤認について、当方は一切の責任を負いません。