|
|
2 weeks ago | |
|---|---|---|
| .. | ||
| solution | 3 weeks ago | |
| README.md | 2 weeks ago | |
| assignment.md | 3 weeks ago | |
| notebook.ipynb | 3 weeks ago | |
README.md
建立一個美食推薦網頁應用程式
在這節課中,你將使用之前課程中學到的一些技術,並利用這個系列中使用的美味美食數據集,來建立一個分類模型。此外,你還將建立一個小型網頁應用程式,使用已保存的模型,並利用 Onnx 的網頁運行時環境。
機器學習最實用的應用之一就是建立推薦系統,而今天你可以邁出這個方向的第一步!
🎥 點擊上方圖片觀看影片:Jen Looper 使用分類的美食數據建立了一個網頁應用程式
課前測驗
在這節課中,你將學到:
- 如何建立模型並將其保存為 Onnx 模型
- 如何使用 Netron 檢查模型
- 如何在網頁應用程式中使用你的模型進行推理
建立你的模型
建立應用型機器學習系統是將這些技術應用於業務系統的重要部分。你可以通過使用 Onnx,將模型嵌入到你的網頁應用程式中(因此在需要時也可以在離線環境中使用)。
在之前的課程中,你建立了一個關於 UFO 目擊事件的回歸模型,將其“pickle”保存,並在 Flask 應用程式中使用。雖然這種架構非常實用,但它是一個全棧的 Python 應用程式,而你的需求可能包括使用 JavaScript 應用程式。
在這節課中,你可以建立一個基於 JavaScript 的基本推理系統。不過,首先你需要訓練一個模型並將其轉換為 Onnx 格式。
練習 - 訓練分類模型
首先,使用我們之前清理過的美食數據集來訓練一個分類模型。
-
開始時導入一些有用的庫:
!pip install skl2onnx
import pandas as pd
你需要使用 'skl2onnx' 來幫助將 Scikit-learn 模型轉換為 Onnx 格式。
-
然後,像之前課程中一樣,使用
read_csv()讀取 CSV 文件來處理數據:data = pd.read_csv('../data/cleaned_cuisines.csv') data.head() -
刪除前兩列不必要的數據,並將剩餘數據保存為 'X':
X = data.iloc[:,2:] X.head() -
將標籤保存為 'y':
y = data[['cuisine']]
y.head()
開始訓練流程
我們將使用具有良好準確性的 'SVC' 庫。
-
從 Scikit-learn 導入相關庫:
from sklearn.model_selection import train_test_split from sklearn.svm import SVC from sklearn.model_selection import cross_val_score from sklearn.metrics import accuracy_score,precision_score,confusion_matrix,classification_report -
分離訓練集和測試集:
X_train, X_test, y_train, y_test = train_test_split(X,y,test_size=0.3) -
像之前課程中一樣,建立一個 SVC 分類模型:
model = SVC(kernel='linear', C=10, probability=True,random_state=0) model.fit(X_train,y_train.values.ravel()) -
現在,測試你的模型,調用
predict():y_pred = model.predict(X_test) -
輸出分類報告以檢查模型質量:
print(classification_report(y_test,y_pred))如我們之前所見,準確性是很好的:
                precision    recall  f1-score   support

     chinese       0.72      0.69      0.70       257
      indian       0.91      0.87      0.89       243
    japanese       0.79      0.77      0.78       239
      korean       0.83      0.79      0.81       236
        thai       0.72      0.84      0.78       224

    accuracy                           0.79      1199
   macro avg       0.79      0.79      0.79      1199
weighted avg       0.79      0.79      0.79      1199
將模型轉換為 Onnx 格式
確保使用正確的張量數進行轉換。這個數據集列出了 380 種食材,因此你需要在 FloatTensorType 中標註這個數字:
-
使用 380 的張量數進行轉換。
from skl2onnx import convert_sklearn from skl2onnx.common.data_types import FloatTensorType initial_type = [('float_input', FloatTensorType([None, 380]))] options = {id(model): {'nocl': True, 'zipmap': False}} -
創建 onx 並保存為文件 model.onnx:
onx = convert_sklearn(model, initial_types=initial_type, options=options) with open("./model.onnx", "wb") as f: f.write(onx.SerializeToString())注意,你可以在轉換腳本中傳入選項。在這個例子中,我們將 'nocl' 設為 True,'zipmap' 設為 False。由於這是一個分類模型,你可以選擇移除 ZipMap,它會生成一個字典列表(非必要)。
nocl表示是否在模型中包含類別信息。通過將nocl設為 'True',可以減小模型的大小。
運行整個筆記本後,將生成一個 Onnx 模型並保存到這個文件夾中。
查看你的模型
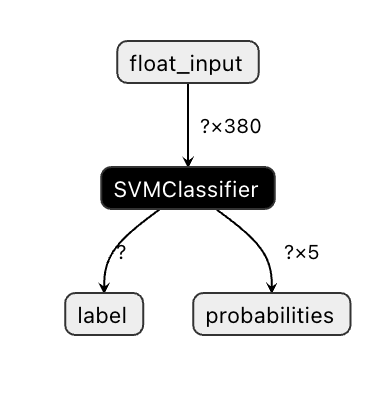
Onnx 模型在 Visual Studio Code 中不太容易查看,但有一個非常好的免費軟體,許多研究人員用來可視化模型,以確保其正確構建。下載 Netron 並打開你的 model.onnx 文件。你可以看到你的簡單模型被可視化,顯示其 380 個輸入和分類器:
Netron 是一個查看模型的有用工具。
現在你已經準備好在網頁應用程式中使用這個簡單的模型了。讓我們建立一個應用程式,當你查看冰箱並試圖找出哪些剩餘食材可以用來烹飪某種美食時,這個應用程式會派上用場。
建立推薦網頁應用程式
你可以直接在網頁應用程式中使用你的模型。這種架構還允許你在本地甚至離線運行它。首先,在存儲 model.onnx 文件的同一文件夾中創建一個 index.html 文件。
-
在這個文件 index.html 中,添加以下標記:
<!DOCTYPE html> <html> <header> <title>Cuisine Matcher</title> </header> <body> ... </body> </html> -
現在,在
body標籤內添加一些標記,顯示一些反映食材的複選框列表:<h1>Check your refrigerator. What can you create?</h1> <div id="wrapper"> <div class="boxCont"> <input type="checkbox" value="4" class="checkbox"> <label>apple</label> </div> <div class="boxCont"> <input type="checkbox" value="247" class="checkbox"> <label>pear</label> </div> <div class="boxCont"> <input type="checkbox" value="77" class="checkbox"> <label>cherry</label> </div> <div class="boxCont"> <input type="checkbox" value="126" class="checkbox"> <label>fenugreek</label> </div> <div class="boxCont"> <input type="checkbox" value="302" class="checkbox"> <label>sake</label> </div> <div class="boxCont"> <input type="checkbox" value="327" class="checkbox"> <label>soy sauce</label> </div> <div class="boxCont"> <input type="checkbox" value="112" class="checkbox"> <label>cumin</label> </div> </div> <div style="padding-top:10px"> <button onClick="startInference()">What kind of cuisine can you make?</button> </div>注意,每個複選框都有一個值。這反映了數據集中食材所在的索引。例如,蘋果在這個按字母順序排列的列表中位於第五列,因此其值為 '4'(因為我們從 0 開始計數)。你可以查閱 ingredients spreadsheet 來找到某個食材的索引。
繼續在 index.html 文件中工作,在最後一個閉合的
</div>後添加一個腳本塊,調用模型。 -
首先,導入 Onnx Runtime:
<script src="https://cdn.jsdelivr.net/npm/onnxruntime-web@1.9.0/dist/ort.min.js"></script>Onnx Runtime 用於在廣泛的硬體平台上運行你的 Onnx 模型,包括優化和使用的 API。
-
一旦運行時環境就緒,你可以調用它:
<script>
    const ingredients = Array(380).fill(0);

    const checks = [...document.querySelectorAll('.checkbox')];

    checks.forEach(check => {
        check.addEventListener('change', function() {
            // toggle the state of the ingredient
            // based on the checkbox's value (1 or 0)
            ingredients[check.value] = check.checked ? 1 : 0;
        });
    });

    function testCheckboxes() {
        // validate if at least one checkbox is checked
        return checks.some(check => check.checked);
    }

    async function startInference() {

        let atLeastOneChecked = testCheckboxes()

        if (!atLeastOneChecked) {
            alert('Please select at least one ingredient.');
            return;
        }
        try {
            // create a new session and load the model.

            const session = await ort.InferenceSession.create('./model.onnx');

            const input = new ort.Tensor(new Float32Array(ingredients), [1, 380]);
            const feeds = { float_input: input };

            // feed inputs and run
            const results = await session.run(feeds);

            // read from results
            alert('You can enjoy ' + results.label.data[0] + ' cuisine today!')

        } catch (e) {
            console.log(`failed to inference ONNX model`);
            console.error(e);
        }
    }

</script>
在這段代碼中,發生了以下幾件事:
- 你創建了一個包含 380 個可能值(1 或 0)的數組,根據是否選中某個食材複選框來設置並發送到模型進行推理。
- 你創建了一個複選框數組,以及一個在應用程式啟動時調用的
init函數,用於確定複選框是否被選中。當複選框被選中時,ingredients數組會被修改以反映所選食材。 - 你創建了一個
testCheckboxes函數,用於檢查是否有任何複選框被選中。 - 當按下按鈕時,你使用
startInference函數,如果有任何複選框被選中,就開始推理。 - 推理過程包括:
- 設置模型的異步加載
- 創建一個張量結構,發送到模型
- 創建反映你在訓練模型時創建的
float_input輸入的 'feeds'(你可以使用 Netron 驗證該名稱) - 將這些 'feeds' 發送到模型並等待響應
測試你的應用程式
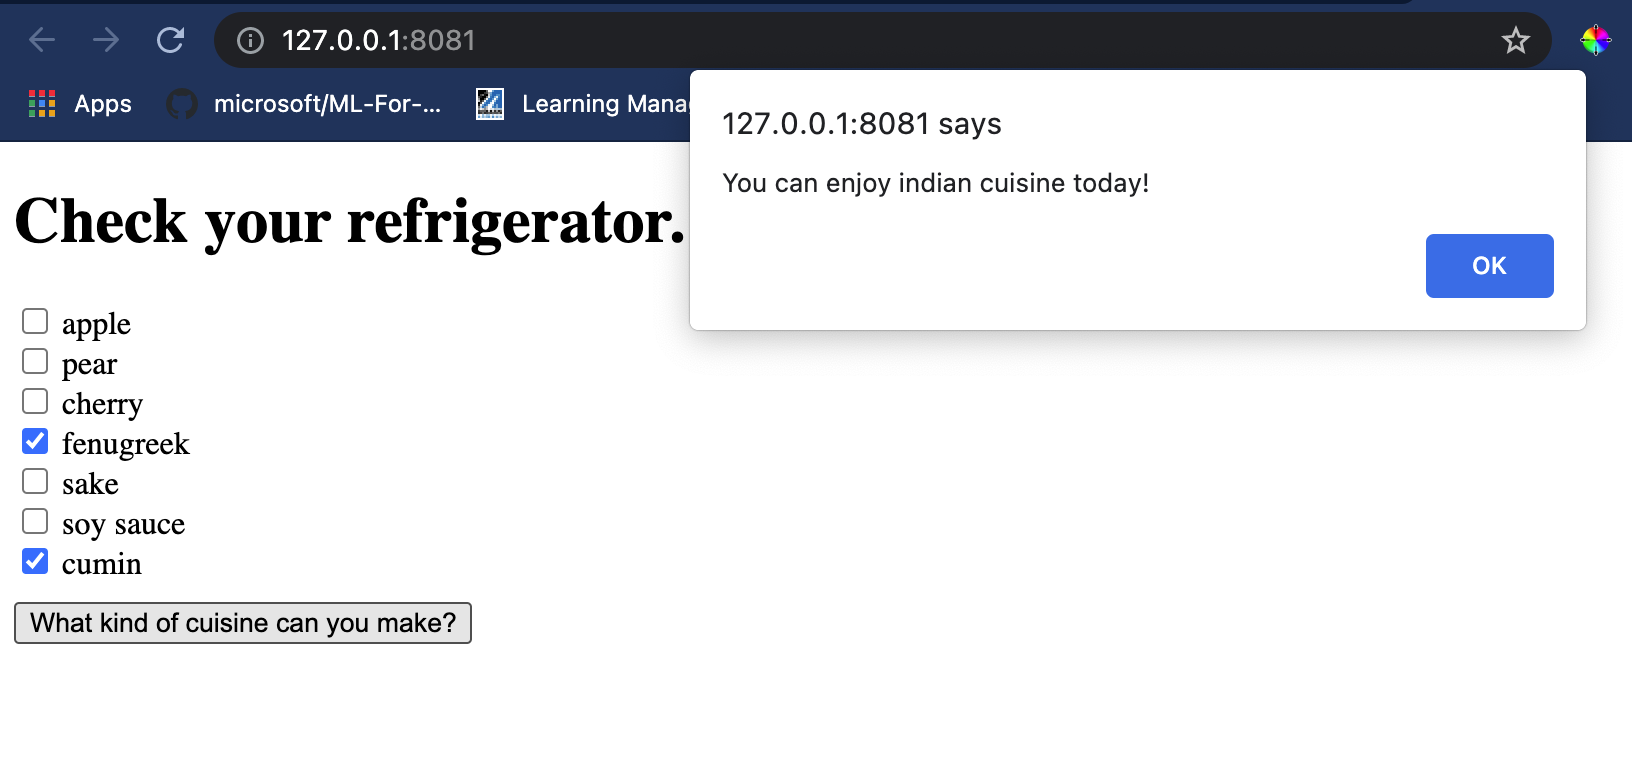
在 Visual Studio Code 中打開一個終端會話,進入存放 index.html 文件的文件夾。確保你已全局安裝 http-server,然後在提示符下輸入 http-server。一個本地主機應該會打開,你可以查看你的網頁應用程式。檢查基於不同食材推薦的美食:
恭喜你,你已經建立了一個帶有幾個字段的“推薦”網頁應用程式。花點時間擴展這個系統吧!
🚀挑戰
你的網頁應用程式非常簡單,因此繼續使用 ingredient_indexes 數據中的食材及其索引來擴展它。哪些味道組合可以用來創造某個國家的菜餚?
課後測驗
回顧與自學
雖然這節課只是簡單介紹了如何為食材創建推薦系統,但這個機器學習應用領域有非常豐富的例子。閱讀更多關於這些系統如何構建的內容:
- https://www.sciencedirect.com/topics/computer-science/recommendation-engine
- https://www.technologyreview.com/2014/08/25/171547/the-ultimate-challenge-for-recommendation-engines/
- https://www.technologyreview.com/2015/03/23/168831/everything-is-a-recommendation/
作業
免責聲明:
本文件使用 AI 翻譯服務 Co-op Translator 進行翻譯。我們致力於提供準確的翻譯,但請注意,自動翻譯可能包含錯誤或不準確之處。應以原始語言的文件作為權威來源。對於關鍵資訊,建議尋求專業人工翻譯。我們對於因使用此翻譯而產生的任何誤解或錯誤解讀概不負責。


