|
|
3 weeks ago | |
|---|---|---|
| .. | ||
| README.md | 3 weeks ago | |
| assignment.md | 3 weeks ago | |
README.md
Geofences
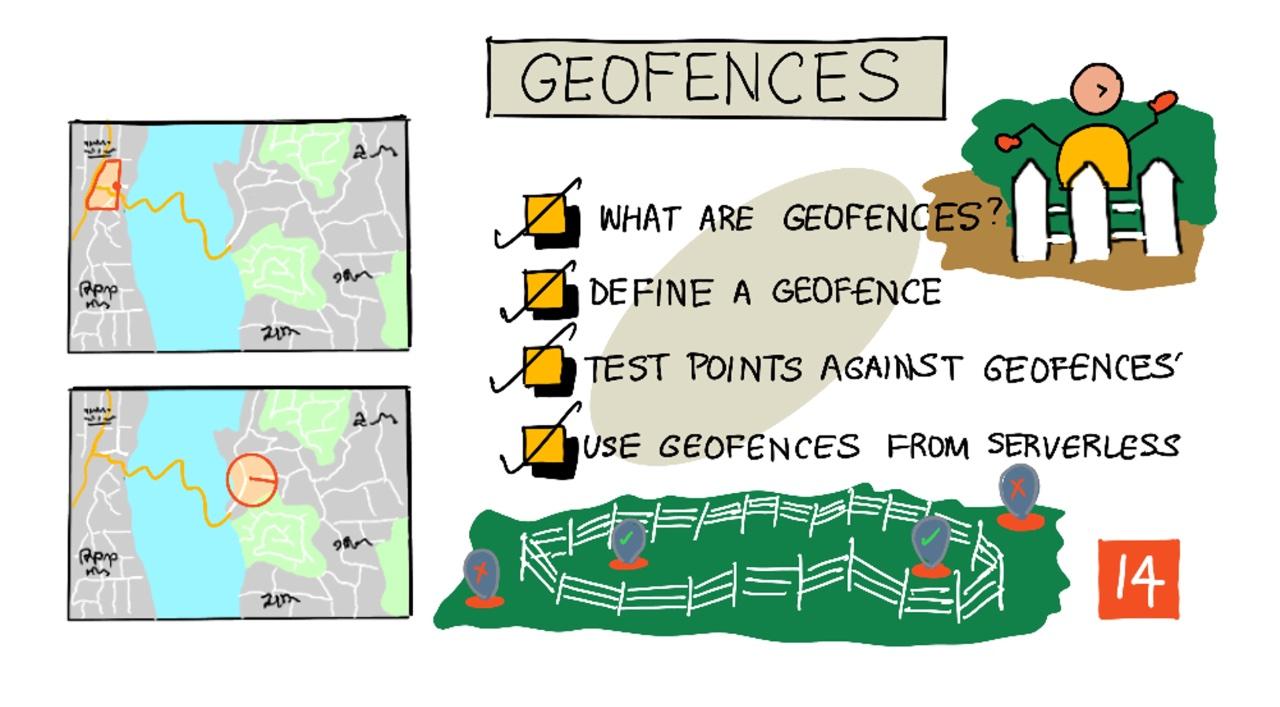
Sketchnote by Nitya Narasimhan. Click the image for a larger version.
This video provides an introduction to geofences and their application in Azure Maps, which will be explored in this lesson:
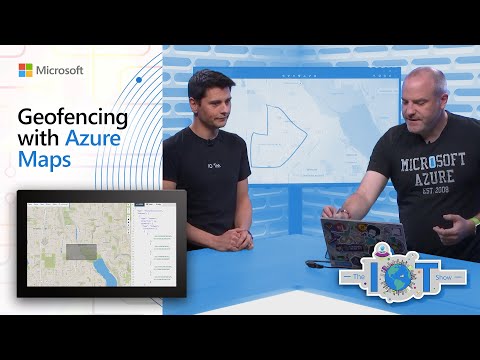
🎥 Click the image above to watch the video
Pre-lecture quiz
Introduction
In the last three lessons, you used IoT to track the trucks transporting your farm produce to a processing hub. You collected GPS data, sent it to the cloud for storage, and displayed it on a map. The next step in optimizing your supply chain is to receive an alert when a truck is nearing the processing hub. This allows the unloading crew to be ready with forklifts and other equipment as soon as the truck arrives, minimizing waiting time and costs.
In this lesson, you'll learn about geofences—defined geospatial areas, such as a region within a 2km drive of a processing hub—and how to determine whether GPS coordinates are inside or outside a geofence. This will help you track whether your GPS sensor has entered or exited a specific area.
This lesson will cover:
- What are geofences
- Define a geofence
- Test points against a geofence
- Use geofences from serverless code
🗑 This is the final lesson in this project. After completing this lesson and the assignment, remember to clean up your cloud services. You'll need these services to finish the assignment, so ensure you complete it first.
Refer to the clean up your project guide if needed for instructions.
What are Geofences
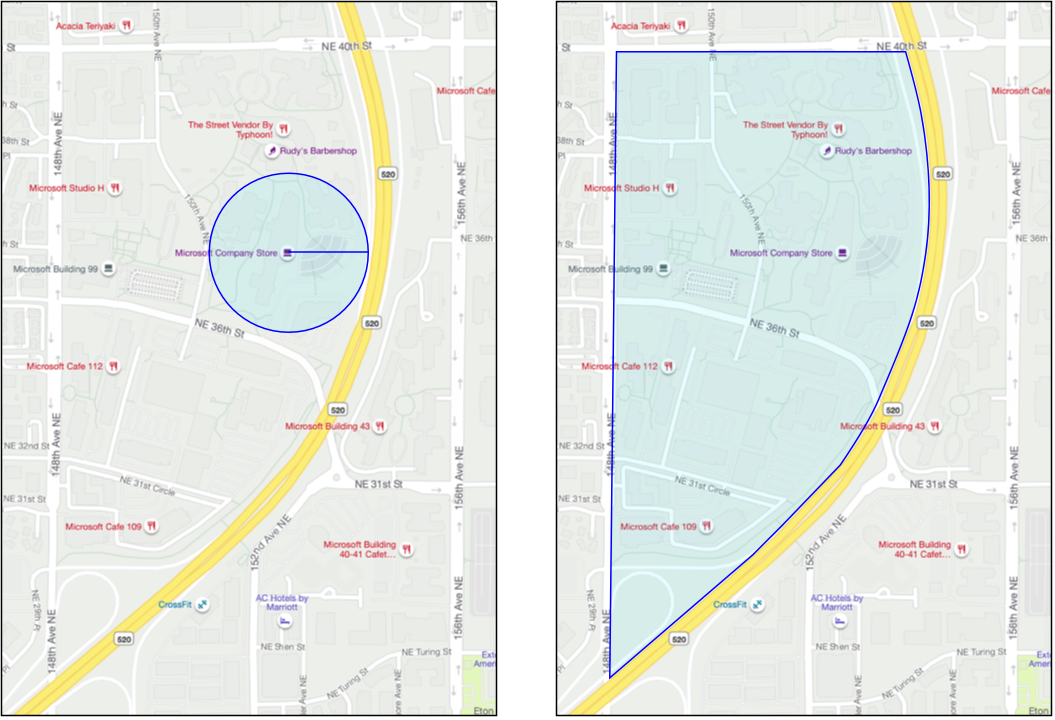
A geofence is a virtual boundary for a real-world geographic area. Geofences can be circular, defined by a center point and radius (e.g., a 100m circle around a building), or polygonal, covering areas like school zones, city limits, or university campuses.
💁 You might have used geofences without realizing it. If you've set a location-based reminder using the iOS Reminders app or Google Keep, you've interacted with geofences. These apps create geofences based on the location you provide and notify you when your phone enters the geofence.
There are many reasons to track whether a vehicle is inside or outside a geofence:
- Unloading preparation: Receiving a notification when a vehicle arrives on-site allows the crew to prepare for unloading, reducing waiting time. This enables drivers to complete more deliveries in a day.
- Tax compliance: In some countries, like New Zealand, road taxes for diesel vehicles are calculated based on mileage driven on public roads. Geofences can help differentiate between public and private roads, such as those on farms or logging sites.
- Theft monitoring: If a vehicle is supposed to stay within a specific area, like a farm, leaving the geofence could indicate theft.
- Location compliance: Certain areas of a worksite, farm, or factory may be restricted for specific vehicles. For example, vehicles carrying artificial fertilizers and pesticides might need to avoid fields growing organic produce. Entering a geofence could signal non-compliance, prompting a notification to the driver.
✅ Can you think of other applications for geofences?
Azure Maps, the service used in the previous lesson to visualize GPS data, allows you to define geofences and test whether a point is inside or outside them.
Define a geofence
Geofences are defined using GeoJSON, similar to the points added to the map in the previous lesson. Instead of a FeatureCollection of Point values, geofences use a FeatureCollection containing a Polygon.
{
   "type": "FeatureCollection",
   "features": [
     {
       "type": "Feature",
       "geometry": {
         "type": "Polygon",
         "coordinates": [
           [
             [
               -122.13393688201903,
               47.63829579223815
             ],
             [
               -122.13389128446579,
               47.63782047131512
             ],
             [
               -122.13240802288054,
               47.63783312249837
             ],
             [
               -122.13238388299942,
               47.63829037035086
             ],
             [
               -122.13393688201903,
               47.63829579223815
             ]
           ]
         ]
       },
       "properties": {
         "geometryId": "1"
       }
     }
   ]
}
Each point in the polygon is represented as a longitude-latitude pair in an array, and these points are grouped into an array set as the coordinates. In the previous lesson, a Point had coordinates as an array with two values (latitude and longitude). For a Polygon, coordinates is an array of arrays, each containing two values (longitude and latitude).
💁 Remember, GeoJSON uses
longitude, latitudefor points, notlatitude, longitude.
The polygon's coordinates array always includes one extra entry to close the shape, with the last point being the same as the first. For example, a rectangle would have five points.
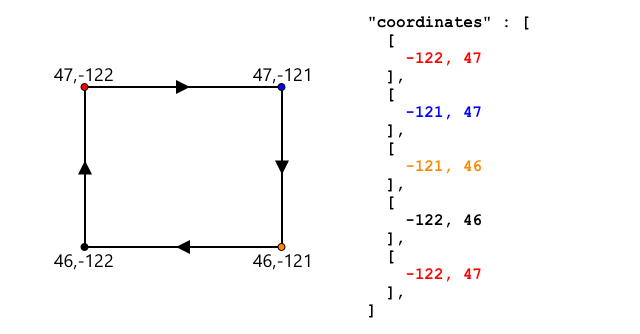
In the image above, the rectangle's polygon coordinates start at the top-left corner (47,-122), move to the top-right (47,-121), then to the bottom-right (46,-121), bottom-left (46,-122), and finally back to the top-left (47,-122) to close the shape. This results in five points.
✅ Try creating a GeoJSON polygon around your home or school using a tool like GeoJSON.io.
Task - define a geofence
To use a geofence in Azure Maps, you first need to upload it to your Azure Maps account. Once uploaded, you'll receive a unique ID to test points against the geofence. Uploading geofences to Azure Maps requires using the maps web API, which can be accessed with a tool like curl.
🎓 Curl is a command-line tool for making requests to web endpoints.
-
If you're using Linux, macOS, or a recent version of Windows 10, curl is likely already installed. Run the following command in your terminal or command line to check:
curl --versionIf curl isn't installed, download it from the curl downloads page.
💁 If you're familiar with Postman, you can use it instead.
-
Create a GeoJSON file containing a polygon around your current location. You can manually edit the GeoJSON example above or use a tool like GeoJSON.io.
The GeoJSON must include a
FeatureCollectioncontaining aFeaturewith ageometryof typePolygon.Additionally, you MUST add a
propertieselement at the same level as thegeometryelement, containing ageometryId:"properties": { "geometryId": "1" }If you use GeoJSON.io, you'll need to manually add this item to the empty
propertieselement, either after downloading the JSON file or in the app's JSON editor.The
geometryIdmust be unique within the file. You can upload multiple geofences as separateFeaturesin the sameFeatureCollection, as long as each has a distinctgeometryId. Polygons can share the samegeometryIdif uploaded from different files at different times. -
Save the file as
geofence.jsonand navigate to its location in your terminal or console. -
Run the following curl command to upload the geofence:
curl --request POST 'https://atlas.microsoft.com/mapData/upload?api-version=1.0&dataFormat=geojson&subscription-key=<subscription_key>' \
     --header 'Content-Type: application/json' \
     --include \
     --data @geofence.json
Replace
<subscription_key>in the URL with your Azure Maps account's API key.The URL uploads map data via the
https://atlas.microsoft.com/mapData/uploadAPI. The call includes anapi-versionparameter to specify the Azure Maps API version, ensuring backward compatibility. The uploaded data format is set togeojson.This POST request returns response headers, including a
locationheader:content-type: application/json location: https://us.atlas.microsoft.com/mapData/operations/1560ced6-3a80-46f2-84b2-5b1531820eab?api-version=1.0 x-ms-azuremaps-region: West US 2 x-content-type-options: nosniff strict-transport-security: max-age=31536000; includeSubDomains x-cache: CONFIG_NOCACHE date: Sat, 22 May 2021 21:34:57 GMT content-length: 0🎓 Web endpoint calls can include parameters by appending
?followed by key-value pairs (key=value), separated by&. -
Azure Maps processes the upload asynchronously. Check the upload status using the URL in the
locationheader. Add your subscription key to the end of thelocationURL by appending&subscription-key=<subscription_key>, replacing<subscription_key>with your Azure Maps account's API key. Run the following command:curl --request GET '<location>&subscription-key=<subscription_key>'Replace
<location>with thelocationheader value and<subscription_key>with your API key. -
Check the
statusvalue in the response. If it's notSucceeded, wait a minute and try again. -
Once the status is
Succeeded, check theresourceLocationin the response. This contains the unique ID (UDID) for the GeoJSON object. The UDID is the value aftermetadata/, excluding theapi-version. For example, if theresourceLocationis:{ "resourceLocation": "https://us.atlas.microsoft.com/mapData/metadata/7c3776eb-da87-4c52-ae83-caadf980323a?api-version=1.0" }The UDID would be
7c3776eb-da87-4c52-ae83-caadf980323a.Save this UDID for testing the geofence.
Test points against a geofence
After uploading the polygon to Azure Maps, you can test whether a point is inside or outside the geofence. This requires making a web API request with the geofence's UDID and the point's latitude and longitude.
You can also specify a searchBuffer value, which determines the accuracy of the results. GPS isn't perfectly precise, and locations can be off by several meters. The default search buffer is 50m, but you can set it between 0m and 500m.
The API response includes a distance value indicating the proximity to the geofence's edge. Positive values mean the point is outside the geofence, while negative values mean it's inside. If the distance is less than the search buffer, the actual distance (in meters) is returned. Otherwise, the value is 999 (outside) or -999 (inside).

In the image above, the geofence has a 50m search buffer:
- A point well inside the geofence and buffer has a distance of -999.
- A point far outside the buffer has a distance of 999.
- A point inside the geofence but near the edge has a distance of 6m.
- A point outside the geofence but within the buffer has a distance of 39m.
Knowing the distance to the geofence's edge, combined with other data like GPS readings, speed, and road information, helps make informed decisions about a vehicle's location.
For example, imagine GPS readings showing a vehicle driving along a road near a geofence. If one GPS reading inaccurately places the vehicle inside the geofence, despite no access, it can be disregarded.
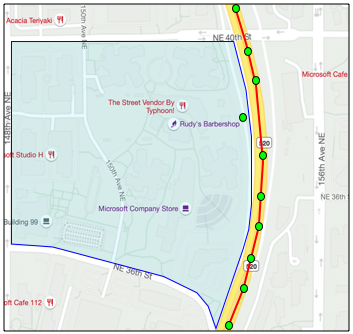 In the above image, there is a geofence covering part of the Microsoft campus. The red line represents a truck driving along Highway 520, with circles indicating the GPS readings. Most of these readings are accurate and align with the highway, but one inaccurate reading appears inside the geofence. This reading cannot be correct—there are no roads that would allow the truck to suddenly divert from the highway onto the campus and then back onto the highway. The code that evaluates this geofence will need to consider previous readings before acting on the results of the geofence test.
✅ What additional data would you need to verify whether a GPS reading is accurate?
Task - Test points against a geofence
-
Start by constructing the URL for the web API query. The format is:
https://atlas.microsoft.com/spatial/geofence/json?api-version=1.0&deviceId=gps-sensor&subscription-key=<subscription-key>&udid=<UDID>&lat=<lat>&lon=<lon>Replace
<subscription_key>with the API key for your Azure Maps account.Replace
<UDID>with the UDID of the geofence from the previous task.Replace
<lat>and<lon>with the latitude and longitude you want to test.This URL uses the
https://atlas.microsoft.com/spatial/geofence/jsonAPI to query a geofence defined using GeoJSON. It targets the1.0API version. ThedeviceIdparameter is required and should be the name of the device from which the latitude and longitude are derived.The default search buffer is 50 meters, but you can modify this by adding the parameter
searchBuffer=<distance>, where<distance>is the search buffer distance in meters, ranging from 0 to 500. -
Use curl to make a GET request to this URL:
curl --request GET '<URL>'💁 If you receive a
BadRequestresponse code with the following error:Invalid GeoJSON: All feature properties should contain a geometryId, which is used for identifying the geofence.it means your GeoJSON is missing the
propertiessection with thegeometryId. You will need to fix your GeoJSON, then repeat the steps above to re-upload it and obtain a new UDID. -
The response will include a list of
geometries, one for each polygon defined in the GeoJSON used to create the geofence. Each geometry contains three fields of interest:distance,nearestLat, andnearestLon.{ "geometries": [ { "deviceId": "gps-sensor", "udId": "7c3776eb-da87-4c52-ae83-caadf980323a", "geometryId": "1", "distance": 999.0, "nearestLat": 47.645875, "nearestLon": -122.142713 } ], "expiredGeofenceGeometryId": [], "invalidPeriodGeofenceGeometryId": [] }-
nearestLatandnearestLonrepresent the latitude and longitude of the point on the edge of the geofence that is closest to the location being tested. -
distanceindicates the distance from the tested location to the nearest point on the edge of the geofence. Negative values mean the location is inside the geofence, while positive values mean it is outside. This value will be less than 50 (the default search buffer) or 999.
-
-
Repeat this process multiple times with locations both inside and outside the geofence.
Use geofences from serverless code
You can now add a new trigger to your Functions app to test IoT Hub GPS event data against the geofence.
Consumer groups
As you may recall from earlier lessons, IoT Hub allows you to replay events that have been received but not yet processed. But what happens if multiple triggers are connected? How does it know which trigger has processed which events?
The answer is that it doesn’t! Instead, you can define multiple separate connections to read events, with each connection managing the replay of unread messages. These are called consumer groups. When connecting to the endpoint, you specify which consumer group to use. Each component of your application connects to a different consumer group.
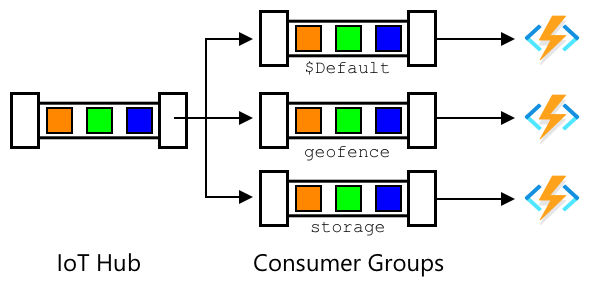
In theory, up to five applications can connect to each consumer group, and all will receive messages as they arrive. However, it’s best practice to have only one application access each consumer group to avoid duplicate message processing and ensure that all queued messages are processed correctly when restarting. For example, if you run your Functions app locally while it’s also running in the cloud, both instances would process messages, leading to duplicate blobs in the storage account.
If you review the function.json file for the IoT Hub trigger you created earlier, you’ll see the consumer group in the event hub trigger binding section:
"consumerGroup": "$Default"
When you create an IoT Hub, the $Default consumer group is created by default. If you want to add another trigger, you can do so using a new consumer group.
💁 In this lesson, you’ll use a different function to test the geofence than the one used to store GPS data. This demonstrates how to use consumer groups and separate code for better readability and understanding. In a production application, there are many ways to architect this—combining both in one function, using a trigger on the storage account to run a function to check the geofence, or using multiple functions. There’s no single "right way"; it depends on your application and its requirements.
Task - Create a new consumer group
-
Run the following command to create a new consumer group called
geofencefor your IoT Hub:az iot hub consumer-group create --name geofence \ --hub-name <hub_name>Replace
<hub_name>with the name of your IoT Hub. -
To view all consumer groups for an IoT Hub, run the following command:
az iot hub consumer-group list --output table \
                               --hub-name <hub_name>
Replace
<hub_name>with the name of your IoT Hub. This will list all consumer groups.Name ResourceGroup -------- --------------- $Default gps-sensor geofence gps-sensor
💁 In an earlier lesson, the IoT Hub event monitor connected to the
$Defaultconsumer group. This is why you couldn’t run the event monitor and an event trigger simultaneously. To run both, use other consumer groups for all your function apps and reserve$Defaultfor the event monitor.
Task - Create a new IoT Hub trigger
-
Add a new IoT Hub event trigger to your
gps-triggerfunction app from an earlier lesson. Name this functiongeofence-trigger.⚠️ Refer to the instructions for creating an IoT Hub event trigger from project 2, lesson 5 if needed.
-
Configure the IoT Hub connection string in the
function.jsonfile. Thelocal.settings.jsonfile is shared among all triggers in the Function App. -
Update the
consumerGroupvalue in thefunction.jsonfile to reference the newgeofenceconsumer group:"consumerGroup": "geofence" -
Add the subscription key for your Azure Maps account to the
local.settings.jsonfile as a new entry calledMAPS_KEY. -
Run the Functions App to ensure it connects and processes messages. The
iot-hub-triggerfrom the earlier lesson will also run and upload blobs to storage.To avoid duplicate GPS readings in blob storage, stop the Functions App running in the cloud. Use the following command:
az functionapp stop --resource-group gps-sensor \
                    --name <functions_app_name>
Replace
<functions_app_name>with the name of your Functions App.Restart it later with the following command:
az functionapp start --resource-group gps-sensor \
                    --name <functions_app_name>
Replace
<functions_app_name>with the name of your Functions App.
Task - Test the geofence from the trigger
Earlier, you used curl to query a geofence to determine if a point was inside or outside. You can make a similar web request from within your trigger.
-
To query the geofence, you need its UDID. Add a new entry to the
local.settings.jsonfile calledGEOFENCE_UDIDwith this value. -
Open the
__init__.pyfile from the newgeofence-triggertrigger. -
Add the following import at the top of the file:
import json
import os
import requests
The
requestspackage allows you to make web API calls. Since Azure Maps doesn’t have a Python SDK, you’ll need to use web API calls in your Python code. -
Add the following two lines at the start of the
mainmethod to retrieve the Maps subscription key:maps_key = os.environ['MAPS_KEY'] geofence_udid = os.environ['GEOFENCE_UDID'] -
Inside the
for event in eventsloop, add the following code to extract the latitude and longitude from each event:event_body = json.loads(event.get_body().decode('utf-8')) lat = event_body['gps']['lat'] lon = event_body['gps']['lon']This code converts the JSON from the event body into a dictionary and extracts the
latandlonfrom thegpsfield. -
Instead of building a long URL as you did with curl, use the URL and pass the parameters as a dictionary. Add the following code to define the URL and configure the parameters:
url = 'https://atlas.microsoft.com/spatial/geofence/json'

params = {
    'api-version': 1.0,
    'deviceId': 'gps-sensor',
    'subscription-key': maps_key,
    'udid' : geofence_udid,
    'lat' : lat,
    'lon' : lon
}
The items in the
paramsdictionary correspond to the key-value pairs used when calling the web API via curl. -
Add the following lines of code to call the web API:
response = requests.get(url, params=params)
response_body = json.loads(response.text)
This calls the URL with the parameters and retrieves a response object.
-
Add the following code below this:
distance = response_body['geometries'][0]['distance']

if distance == 999:
    logging.info('Point is outside geofence')
elif distance > 0:
    logging.info(f'Point is just outside geofence by a distance of {distance}m')
elif distance == -999:
    logging.info(f'Point is inside geofence')
else:
    logging.info(f'Point is just inside geofence by a distance of {distance}m')
This code assumes there is one geometry and extracts the distance from it. It logs different messages based on the distance.
-
Run this code. The logging output will indicate whether the GPS coordinates are inside or outside the geofence, along with the distance if the point is within 50 meters. Test this code with different geofences based on your GPS sensor’s location. Try moving the sensor (e.g., tethered to WiFi from a mobile phone or with different coordinates on the virtual IoT device) to observe changes.
-
When ready, deploy this code to your Functions app in the cloud. Don’t forget to deploy the new Application Settings.
⚠️ Refer to the instructions for uploading Application Settings from project 2, lesson 5 if needed.
⚠️ Refer to the instructions for deploying your Functions app from project 2, lesson 5 if needed.
💁 You can find this code in the code/functions folder.
🚀 Challenge
In this lesson, you added one geofence using a GeoJSON file with a single polygon. You can upload multiple polygons simultaneously, as long as they have different geometryId values in the properties section.
Try uploading a GeoJSON file with multiple polygons and modify your code to determine which polygon the GPS coordinates are closest to or inside.
Post-lecture quiz
Review & Self Study
- Learn more about geofences and their use cases on the Geofencing page on Wikipedia.
- Explore the Azure Maps geofencing API in the Microsoft Azure Maps Spatial - Get Geofence documentation.
- Read about consumer groups in the Features and terminology in Azure Event Hubs - Event consumers documentation on Microsoft Docs.
Assignment
Send notifications using Twilio
Disclaimer:
This document has been translated using the AI translation service Co-op Translator. While we aim for accuracy, please note that automated translations may include errors or inaccuracies. The original document in its native language should be regarded as the authoritative source. For critical information, professional human translation is advised. We are not responsible for any misunderstandings or misinterpretations resulting from the use of this translation.