|
|
4 weeks ago | |
|---|---|---|
| .. | ||
| README.md | 4 weeks ago | |
| assignment.md | 4 weeks ago | |
| single-board-computer-x509.md | 4 weeks ago | |
| wio-terminal-x509.md | 4 weeks ago | |
README.md
Keep your plant secure
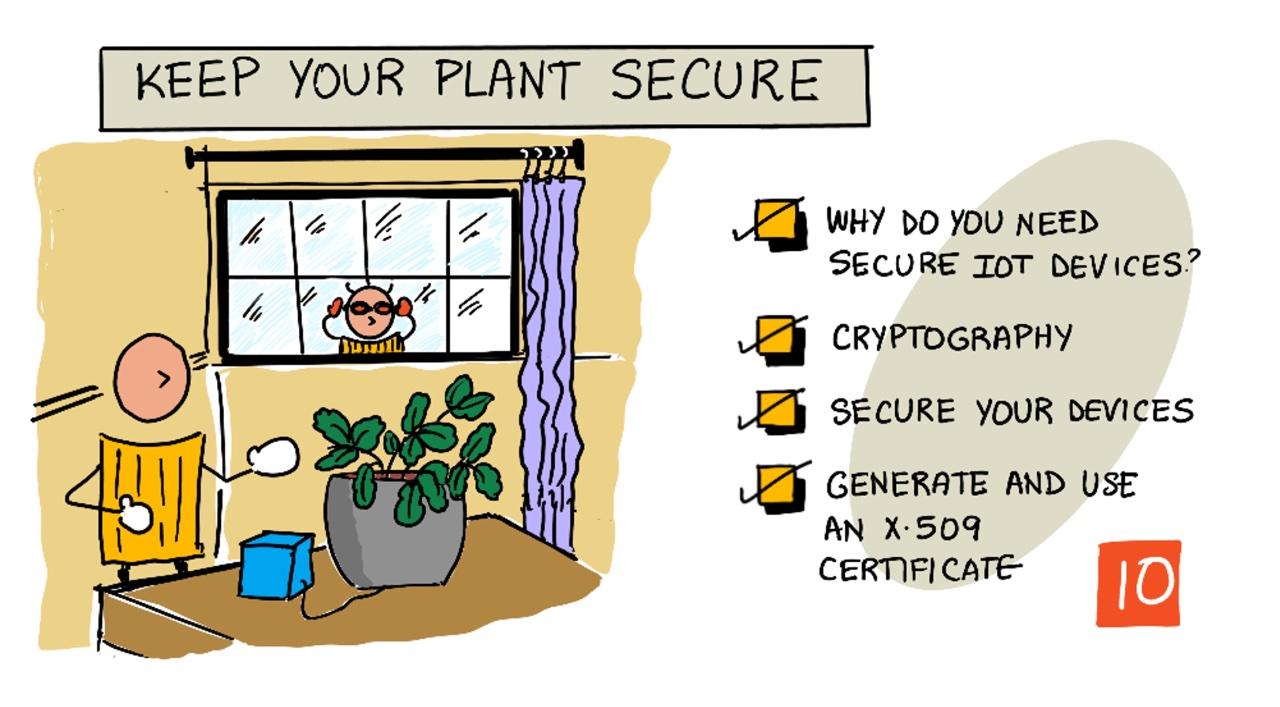
Sketchnote by Nitya Narasimhan. Click the image for a larger version.
Pre-lecture quiz
Introduction
In the previous lessons, you built a soil monitoring IoT device and connected it to the cloud. But what if hackers working for a competing farmer managed to take control of your IoT devices? They could send false high soil moisture readings so your plants never get watered, or turn on your irrigation system continuously, drowning your plants and costing you a fortune in water bills.
In this lesson, you'll learn how to secure IoT devices. Since this is the final lesson for this project, you'll also learn how to clean up your cloud resources to avoid unnecessary costs.
This lesson will cover:
- Why do you need to secure IoT devices?
- Cryptography
- Secure your IoT devices
- Generate and use an X.509 certificate
🗑 This is the last lesson in this project, so after completing this lesson and the assignment, don't forget to clean up your cloud services. You will need the services to complete the assignment, so make sure to complete that first.
Refer to the clean up your project guide if necessary for instructions on how to do this.
Why do you need to secure IoT devices?
IoT security ensures that only authorized devices can connect to your cloud IoT service and send telemetry, and only your cloud service can send commands to your devices. IoT data can include sensitive information, such as medical or personal data, so your application must prioritize security to prevent data leaks.
If your IoT application isn't secure, several risks arise:
- A fake device could send incorrect data, causing your application to respond inappropriately. For instance, it could send constant high soil moisture readings, preventing your irrigation system from turning on, leading to plant death.
- Unauthorized users could access data from IoT devices, including sensitive or business-critical information.
- Hackers could send commands to manipulate a device in ways that could damage it or connected hardware.
- By accessing an IoT device, hackers could infiltrate additional networks and gain access to private systems.
- Malicious users could exploit personal data for blackmail.
These scenarios are not hypothetical—they happen frequently. Here are some real-world examples:
- In 2018, hackers exploited an open WiFi access point on a fish tank thermostat to infiltrate a casino's network and steal data. The Hacker News - Casino Gets Hacked Through Its Internet-Connected Fish Tank Thermometer
- In 2016, the Mirai Botnet launched a denial-of-service attack against Dyn, an Internet service provider, disrupting large portions of the Internet. The botnet used malware to connect to IoT devices like DVRs and cameras with default usernames and passwords, then launched the attack. The Guardian - DDoS attack that disrupted internet was largest of its kind in history, experts say
- Spiral Toys had a database of users of their CloudPets connected toys publicly accessible online. Troy Hunt - Data from connected CloudPets teddy bears leaked and ransomed, exposing kids' voice messages.
- Strava tagged runners you passed and displayed their routes, allowing strangers to see where you live. Kim Komndo - Fitness app could lead a stranger right to your home — change this setting.
✅ Do some research: Look for more examples of IoT hacks and data breaches, especially involving personal items like Internet-connected toothbrushes or scales. Consider the impact these hacks could have on victims or customers.
💁 Security is a vast topic, and this lesson will only cover some basics related to connecting your device to the cloud. Other topics, such as monitoring data changes during transmission, hacking devices directly, or altering device configurations, won't be covered. IoT hacking is such a significant threat that tools like Azure Defender for IoT have been developed. These tools are similar to the antivirus and security software you might use on your computer but are designed for small, low-powered IoT devices.
Cryptography
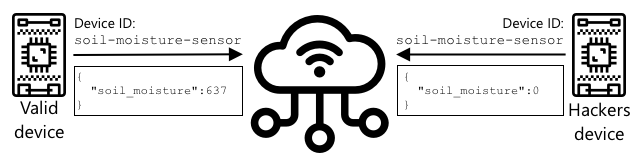
When a device connects to an IoT service, it uses an ID to identify itself. The problem is that this ID can be cloned—a hacker could set up a malicious device using the same ID as a legitimate device but send false data.
The solution is to scramble the data being sent using a value known only to the device and the cloud. This process is called encryption, and the value used to encrypt the data is called an encryption key.
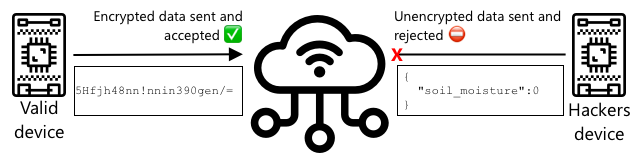
The cloud service can then unscramble the data using a process called decryption, using either the same encryption key or a decryption key. If the encrypted message cannot be decrypted with the key, the device is deemed compromised, and the message is rejected.
The method of performing encryption and decryption is known as cryptography.
Early cryptography
The earliest forms of cryptography were substitution ciphers, dating back 3,500 years. Substitution ciphers involve replacing one letter with another. For example, the Caesar cipher shifts the alphabet by a specific number of letters, known only to the sender and recipient.
The Vigenère cipher advanced this by using words to encrypt text, so each letter in the original text was shifted by a different amount rather than a fixed number.
Cryptography has been used for various purposes, such as protecting a potter's glaze recipe in ancient Mesopotamia, writing secret love notes in India, or safeguarding ancient Egyptian magical spells.
Modern cryptography
Modern cryptography is far more sophisticated, making it much harder to crack than earlier methods. It uses complex mathematics to encrypt data, with an enormous number of possible keys, making brute-force attacks impractical.
Cryptography is widely used for secure communication. For example, if you're reading this page on GitHub, the website address likely starts with HTTPS, indicating that the communication between your browser and GitHub's servers is encrypted. Even if someone intercepts the internet traffic between your browser and GitHub, they won't be able to read the data because it's encrypted. Your computer might also encrypt all the data on your hard drive, ensuring that if someone steals it, they can't access your data without your password.
🎓 HTTPS stands for HyperText Transfer Protocol Secure
Unfortunately, not everything is secure. Some devices lack security entirely, while others use easily crackable keys or even the same key for all devices of a particular type. There have been cases of highly personal IoT devices with identical passwords for WiFi or Bluetooth connections. If you can connect to your own device, you can connect to someone else's, potentially accessing private data or controlling their device.
💁 Despite the complexity of modern cryptography and claims that breaking encryption could take billions of years, the advent of quantum computing has raised concerns about breaking all known encryption in a very short time!
Symmetric and asymmetric keys
Encryption comes in two types: symmetric and asymmetric.
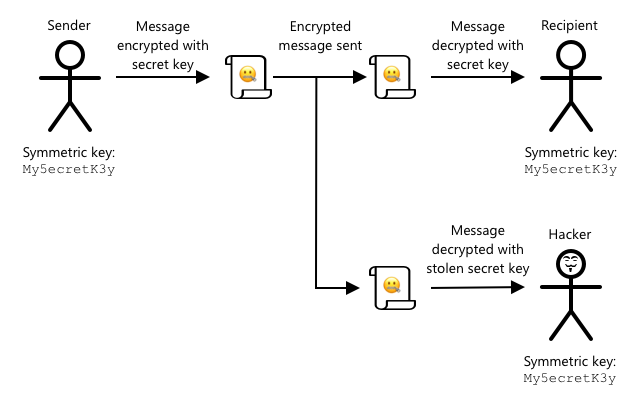
Symmetric encryption uses the same key for both encrypting and decrypting data. Both the sender and receiver must know the same key. This method is less secure because the key must be shared. For the sender to send an encrypted message, they first need to share the key with the recipient.
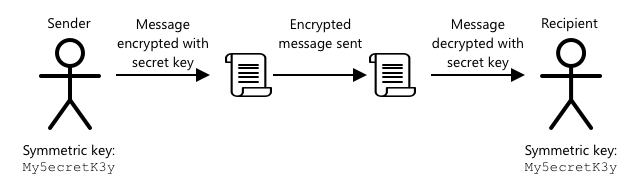
If the key is intercepted during transmission or if either party is hacked, the encryption can be compromised.
Asymmetric encryption uses two keys: an encryption key and a decryption key, known as a public/private key pair. The public key encrypts the message but cannot decrypt it, while the private key decrypts the message but cannot encrypt it.
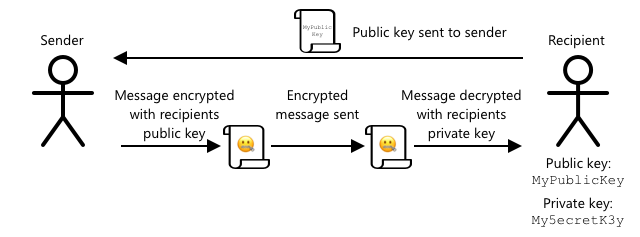
The recipient shares their public key, which the sender uses to encrypt the message. Once the message is sent, the recipient decrypts it with their private key. Asymmetric encryption is more secure because the private key is kept confidential and never shared. The public key can be freely distributed since it only encrypts messages.
Symmetric encryption is faster, while asymmetric encryption is more secure. Some systems use both: asymmetric encryption to securely share the symmetric key, and symmetric encryption for faster data encryption and decryption.
Secure your IoT devices
IoT devices can be secured using symmetric or asymmetric encryption. Symmetric encryption is simpler but less secure.
Symmetric keys
When you set up your IoT device to interact with IoT Hub, you used a connection string. An example connection string is:
HostName=soil-moisture-sensor.azure-devices.net;DeviceId=soil-moisture-sensor;SharedAccessKey=Bhry+ind7kKEIDxubK61RiEHHRTrPl7HUow8cEm/mU0=
This connection string consists of three parts separated by semicolons, with each part containing a key and a value:
| Key | Value | Description |
|---|---|---|
| HostName | soil-moisture-sensor.azure-devices.net |
The URL of the IoT Hub |
| DeviceId | soil-moisture-sensor |
The unique ID of the device |
| SharedAccessKey | Bhry+ind7kKEIDxubK61RiEHHRTrPl7HUow8cEm/mU0= |
A symmetric key known by the device and the IoT Hub |
The last part of this connection string, the SharedAccessKey, is the symmetric key shared between the device and the IoT Hub. This key is never transmitted between the device and the cloud. Instead, it is used to encrypt data sent or received.
✅ Do an experiment: What do you think will happen if you change the SharedAccessKey part of the connection string when connecting your IoT device? Try it out.
When the device first connects, it sends a shared access signature (SAS) token containing the IoT Hub URL, a timestamp indicating when the token expires (usually one day from the current time), and a signature. This signature includes the URL and expiry time encrypted with the shared access key from the connection string.
The IoT Hub decrypts the signature using the shared access key. If the decrypted value matches the URL and expiry time, the device is allowed to connect. It also checks that the current time is before the expiry time to prevent a malicious device from capturing and reusing the SAS token of a legitimate device.
This method elegantly verifies the sender's identity. By sending both encrypted and decrypted versions of known data, the server can confirm the device's authenticity by ensuring the decrypted data matches the original. If it matches, both the sender and recipient share the same symmetric encryption key. 💁 Because of the expiration time, your IoT device must have the correct time, typically obtained from an NTP server. If the time is incorrect, the connection will not succeed. After the connection, all data sent to the IoT Hub from the device, or to the device from the IoT Hub, will be encrypted using the shared access key.
✅ What do you think will happen if multiple devices share the same connection string?
💁 Storing this key in your code is a bad security practice. If a hacker gains access to your source code, they can retrieve your key. Additionally, it complicates the release process, as you would need to recompile the code with an updated key for every device. A better approach is to load this key from a hardware security module—a chip on the IoT device that securely stores encrypted values accessible by your code.
While learning IoT, it’s often easier to include the key in your code, as you did in an earlier lesson. However, you must ensure this key is not checked into public source code repositories.
Devices have two keys and two corresponding connection strings. This allows you to rotate the keys—switching from one key to another if the first is compromised—and regenerate the first key.
X.509 certificates
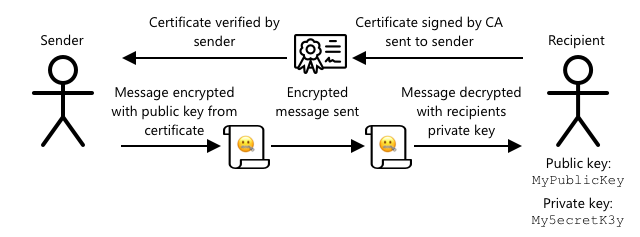
When using asymmetric encryption with a public/private key pair, you need to share your public key with anyone who wants to send you data. The challenge is ensuring the recipient knows it’s your public key and not someone pretending to be you. Instead of sharing just the key, you can provide your public key within a certificate verified by a trusted third party, known as an X.509 certificate.
X.509 certificates are digital documents containing the public key part of the public/private key pair. They are typically issued by trusted organizations called Certification Authorities (CAs) and are digitally signed by the CA to confirm the key’s validity and origin. You trust the certificate—and the public key it contains—because you trust the CA, much like you trust a passport or driver’s license because you trust the issuing country. Certificates can be costly, but you can also create a 'self-signed' certificate for testing purposes, which is signed by you.
💁 Never use a self-signed certificate in a production environment.
These certificates include various fields, such as the identity of the public key owner, details about the issuing CA, the certificate’s validity period, and the public key itself. Before using a certificate, it’s good practice to verify it by checking that it was signed by the original CA.
✅ You can find a complete list of the fields in a certificate in the Microsoft Understanding X.509 Public Key Certificates tutorial.
When using X.509 certificates, both the sender and the recipient have their own public and private keys, as well as X.509 certificates containing their public keys. They exchange certificates and use each other’s public keys to encrypt the data they send, while using their private keys to decrypt the data they receive.
One major advantage of using X.509 certificates is that they can be shared across devices. You can create one certificate, upload it to IoT Hub, and use it for all your devices. Each device only needs to know the private key to decrypt messages received from IoT Hub.
The certificate your device uses to encrypt messages sent to the IoT Hub is published by Microsoft. It’s the same certificate used by many Azure services and is sometimes built into the SDKs.
💁 Remember, a public key is public. The Azure public key can only be used to encrypt data sent to Azure, not to decrypt it, so it can be shared freely, even in source code. For example, you can find it in the Azure IoT C SDK source code.
✅ X.509 certificates come with a lot of technical jargon. You can find definitions for some of the terms in The layman’s guide to X.509 certificate jargon.
Generate and use an X.509 certificate
The steps to generate an X.509 certificate are:
-
Create a public/private key pair. One of the most widely used algorithms for this is Rivest–Shamir–Adleman (RSA).
-
Submit the public key with associated data for signing, either by a CA or through self-signing.
The Azure CLI includes commands to create a new device identity in IoT Hub, automatically generate the public/private key pair, and create a self-signed certificate.
💁 If you want to see the detailed steps instead of using the Azure CLI, check out the Using OpenSSL to create self-signed certificates tutorial in the Microsoft IoT Hub documentation.
Task - create a device identity using an X.509 certificate
-
Run the following command to register the new device identity and automatically generate the keys and certificates:
az iot hub device-identity create --device-id soil-moisture-sensor-x509 \
                                  --am x509_thumbprint \
                                  --output-dir . \
                                  --hub-name <hub_name>
Replace
<hub_name>with the name of your IoT Hub.This will create a device with the ID
soil-moisture-sensor-x509to distinguish it from the device identity created in the previous lesson. The command will also generate two files in the current directory:soil-moisture-sensor-x509-key.pem- contains the private key for the device.soil-moisture-sensor-x509-cert.pem- the X.509 certificate file for the device.
Keep these files secure! The private key file should never be checked into public source code repositories.
Task - use the X.509 certificate in your device code
Follow the relevant guide to connect your IoT device to the cloud using the X.509 certificate:
🚀 Challenge
There are multiple ways to create, manage, and delete Azure services like Resource Groups and IoT Hubs. One option is the Azure Portal, a web-based interface with a graphical user interface (GUI) for managing Azure services.
Visit portal.azure.com and explore the portal. Try creating an IoT Hub using the portal, then delete it.
Hint - When creating services through the portal, you don’t need to create a Resource Group beforehand; one can be created during the service creation process. Be sure to delete it when you’re done!
You can find extensive documentation, tutorials, and guides on the Azure Portal in the Azure portal documentation.
Post-lecture quiz
Review & Self Study
- Learn about the history of cryptography on the History of cryptography page on Wikipedia.
- Read more about X.509 certificates on the X.509 page on Wikipedia.
Assignment
Disclaimer:
This document has been translated using the AI translation service Co-op Translator. While we aim for accuracy, please note that automated translations may include errors or inaccuracies. The original document in its native language should be regarded as the authoritative source. For critical information, professional human translation is advised. We are not responsible for any misunderstandings or misinterpretations resulting from the use of this translation.