|
|
3 weeks ago | |
|---|---|---|
| .. | ||
| README.md | 3 weeks ago | |
| assignment.md | 3 weeks ago | |
| single-board-computer-connect-hub.md | 3 weeks ago | |
| wio-terminal-connect-hub.md | 3 weeks ago | |
README.md
Migrate your plant to the cloud
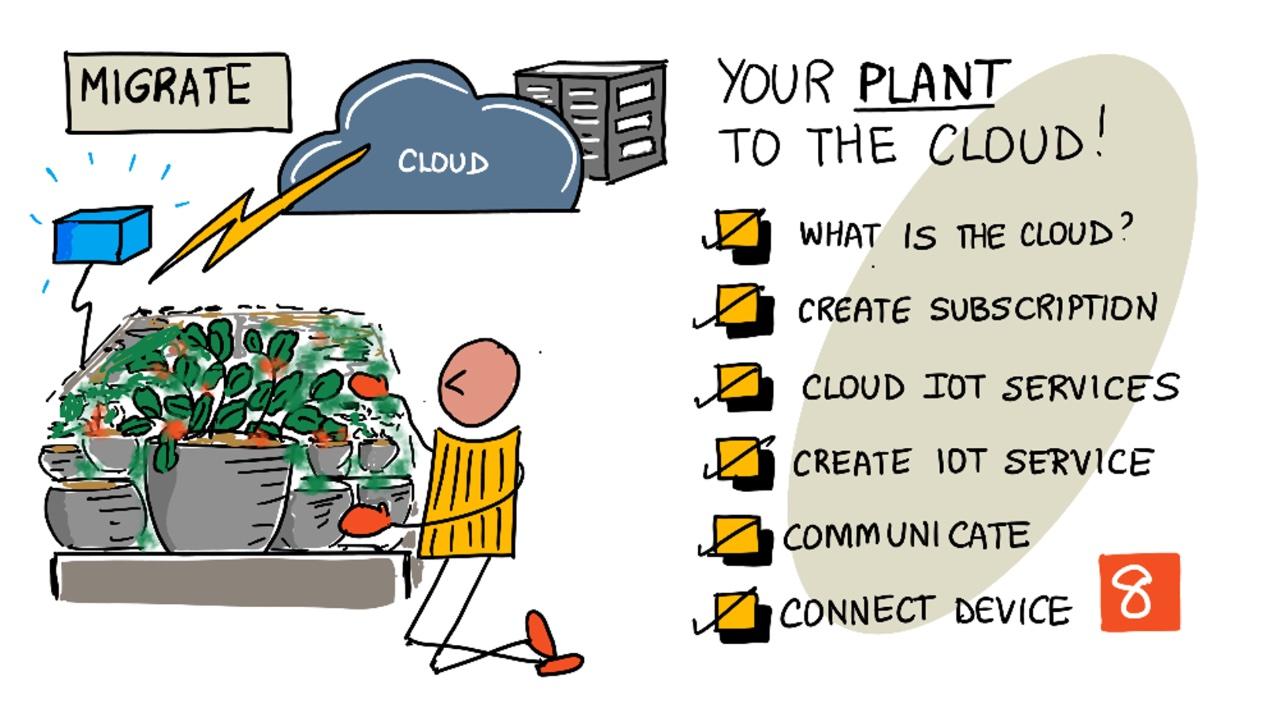
Sketchnote by Nitya Narasimhan. Click the image for a larger version.
This lesson was taught as part of the IoT for Beginners Project 2 - Digital Agriculture series from the Microsoft Reactor.
Pre-lecture quiz
Introduction
In the previous lesson, you learned how to connect your plant to an MQTT broker and control a relay using server code running locally. This is the foundation of an internet-connected automated watering system, which can be used for anything from a single plant at home to large-scale commercial farms.
While the IoT device communicated with a public MQTT broker to demonstrate the concept, this approach is neither the most reliable nor the most secure. In this lesson, you'll learn about the cloud and the IoT capabilities offered by public cloud services. You'll also discover how to migrate your plant from the public MQTT broker to one of these cloud services.
In this lesson, we'll cover:
- What is the cloud?
- Create a cloud subscription
- Cloud IoT services
- Create an IoT service in the cloud
- Communicate with IoT Hub
- Connect your device to the IoT service
What is the cloud?
Before the cloud, companies that wanted to provide services to their employees (like databases or file storage) or to the public (like websites) had to build and manage their own data centers. These could range from a small room with a few computers to a large building filled with servers. Companies were responsible for everything, including:
- Purchasing computers
- Maintaining hardware
- Managing power and cooling
- Setting up networking
- Ensuring security, both for the building and the software
- Installing and updating software
This approach was expensive, required a diverse set of skilled employees, and was slow to adapt to changing needs. For example, an online store preparing for a busy holiday season would need months to buy, configure, and install additional hardware and software. After the holiday season, when demand dropped, the extra hardware would sit idle until the next busy period.
✅ Do you think this setup allowed companies to respond quickly? If an online clothing retailer suddenly became popular because a celebrity was seen wearing their clothes, would they be able to scale their computing power fast enough to handle the surge in orders?
Someone else's computer
The cloud is often humorously described as "someone else's computer." The concept is simple: instead of buying computers, you rent them from a cloud computing provider. These providers manage massive data centers and handle everything, including hardware installation, power and cooling, networking, security, updates, and more. As a customer, you rent the computing resources you need, scaling up during high demand and scaling down when demand decreases. These cloud data centers are located all over the world.


These data centers can span several square kilometers. The images above show a Microsoft cloud data center, including its initial size and planned expansion. The cleared area for expansion covers over 5 square kilometers.
💁 These data centers consume significant amounts of power, and some even have their own power stations. Due to their size and the investments made by cloud providers, they are often environmentally friendly. They are more efficient than numerous small data centers, primarily use renewable energy, and work to reduce waste, minimize water usage, and replant forests to offset deforestation caused by construction. Learn more about sustainability efforts by one cloud provider on the Azure sustainability site.
✅ Do some research: Look into major cloud providers like Azure from Microsoft or GCP from Google. How many data centers do they have, and where are they located?
Using the cloud reduces costs for companies and allows them to focus on their core business, leaving cloud management to the provider. Companies no longer need to rent or buy data center space, pay for connectivity and power, or hire experts. Instead, they pay a single monthly bill to the cloud provider, who handles everything.
Cloud providers leverage economies of scale to lower costs, buying hardware in bulk, investing in tools to streamline maintenance, and even designing custom hardware to enhance their services.
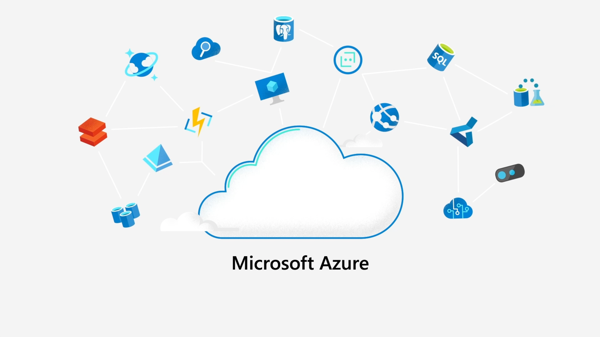
Microsoft Azure
Azure is Microsoft's developer-focused cloud platform, and it's the cloud you'll use in these lessons. The video below provides a brief overview of Azure:
Create a cloud subscription
To use cloud services, you'll need to sign up for a subscription with a cloud provider. For this lesson, you'll sign up for a Microsoft Azure subscription. If you already have an Azure subscription, you can skip this step. The subscription details provided here are accurate at the time of writing but may change.
💁 If you're accessing these lessons through your school, you may already have an Azure subscription available. Check with your teacher.
There are two types of free Azure subscriptions you can sign up for:
-
Azure for Students - Designed for students aged 18 and older. No credit card is required, and you validate your student status using your school email address. You'll receive $100 in cloud credits and access to free services, including a free version of an IoT service. This subscription lasts for 12 months and can be renewed annually as long as you're a student.
-
Azure free subscription - Available to anyone who isn't a student. A credit card is required for verification, but it won't be charged unless you upgrade to a paid plan. You'll receive $200 in credits for the first 30 days and access to free tiers of Azure services. Once your credits are used, your card won't be charged unless you opt for a pay-as-you-go subscription.
💁 Microsoft also offers an Azure for Students Starter subscription for students under 18, but it doesn't support IoT services at the time of writing.
Task - sign up for a free cloud subscription
If you're a student aged 18 or older, you can sign up for an Azure for Students subscription. You'll need to validate your student status using a school email address. You can do this in two ways:
-
Sign up for a GitHub Student Developer Pack at education.github.com/pack. This pack includes access to various tools and offers, including GitHub and Microsoft Azure. After signing up, you can activate the Azure for Students offer.
-
Sign up directly for an Azure for Students account at azure.microsoft.com/free/students.
⚠️ If your school email address isn't recognized, raise an issue in this repo, and we'll check if it can be added to the Azure for Students allow list.
If you're not a student or don't have a valid school email address, you can sign up for an Azure Free subscription.
- Sign up for an Azure Free Subscription at azure.microsoft.com/free
Cloud IoT services
The public test MQTT broker you've been using is a great learning tool but has several limitations for commercial use:
- Reliability - It's a free service with no guarantees and could be shut down at any time.
- Security - It's public, meaning anyone could intercept your data or send commands to your devices.
- Performance - It's designed for limited test messages and can't handle high volumes of data.
- Discovery - There's no way to identify connected devices.
Cloud IoT services address these issues. They are maintained by large cloud providers who prioritize reliability and are ready to resolve problems. They include built-in security to prevent unauthorized access and ensure data privacy. These services are also highly scalable, capable of handling millions of messages daily.
💁 While these services come with a monthly fee, most cloud providers offer free versions with limited features, which are sufficient for developers to learn. In this lesson, you'll use a free version.
IoT devices connect to cloud services using either a device SDK (a library that simplifies interaction with the service) or directly through communication protocols like MQTT or HTTP. The device SDK is typically the easiest option, as it handles tasks like topic management and security.
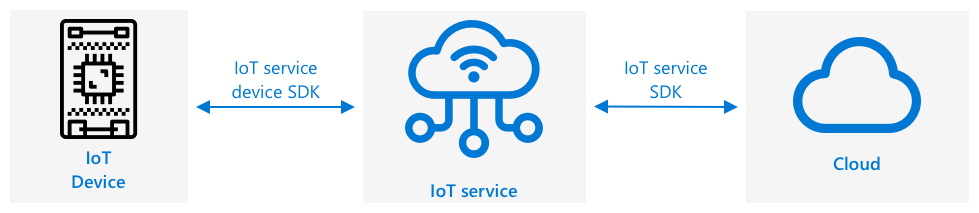
Your device communicates with other parts of your application through the service, similar to how you sent telemetry and received commands via MQTT. This is usually done using a service SDK or similar library. Messages from your device are sent to the service, where other components of your application can access them, and messages can be sent back to your device.
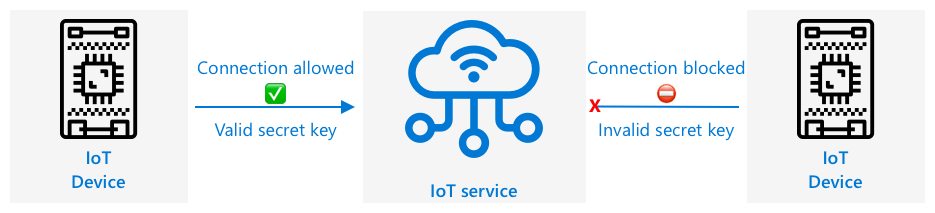
These services enforce security by recognizing authorized devices, either through pre-registration or by using secret keys or certificates for first-time registration. Unauthorized devices are denied access, and their messages are ignored.
✅ Do some research: What are the risks of having an open IoT service where any device or code can connect? Can you find examples of hackers exploiting such vulnerabilities?
Other components of your application can connect to the IoT service to monitor connected devices, send commands, or interact with them individually or in bulk. 💁 IoT services also offer extra features, and cloud providers have additional services and applications that can be integrated with the service. For instance, if you want to save all the telemetry messages sent by all devices in a database, it usually takes just a few clicks in the cloud provider's configuration tool to link the service to a database and stream the data into it.
Create an IoT service in the cloud
Now that you have an Azure subscription, you can sign up for an IoT service. Microsoft's IoT service is called Azure IoT Hub.
![]()
The video below provides a brief overview of Azure IoT Hub:
🎥 Click the image above to watch the video
✅ Take a moment to research and read the overview of IoT Hub in the Microsoft IoT Hub documentation.
Azure's cloud services can be managed through a web-based portal or a command-line interface (CLI). For this task, you will use the CLI.
Task - Install the Azure CLI
To use the Azure CLI, you first need to install it on your PC or Mac.
-
Follow the instructions in the Azure CLI documentation to install the CLI.
-
The Azure CLI supports various extensions that add functionality to manage a wide range of Azure services. Install the IoT extension by running the following command in your command line or terminal:
az extension add --name azure-iot -
Log in to your Azure subscription from the Azure CLI by running the following command in your command line or terminal:
az loginA web page will open in your default browser. Log in using the account associated with your Azure subscription. Once logged in, you can close the browser tab.
-
If you have multiple Azure subscriptions, such as one provided by your school and another Azure for Students subscription, you need to select the one you want to use. Run the following command to list all subscriptions you have access to:
az account list --output tableThe output will display the name of each subscription along with its
SubscriptionId.➜ ~ az account list --output table Name CloudName SubscriptionId State IsDefault ---------------------- ----------- ------------------------------------ ------- ----------- School-subscription AzureCloud cb30cde9-814a-42f0-a111-754cb788e4e1 Enabled True Azure for Students AzureCloud fa51c31b-162c-4599-add6-781def2e1fbf Enabled FalseTo select the subscription you want to use, run the following command:
az account set --subscription <SubscriptionId>Replace
<SubscriptionId>with the ID of the subscription you want to use. After running this command, re-run the command to list your accounts. TheIsDefaultcolumn will now showTruefor the subscription you just set.
Task - Create a resource group
Azure services, such as IoT Hub instances, virtual machines, databases, or AI services, are referred to as resources. Every resource must belong to a Resource Group, which is a logical grouping of one or more resources.
💁 Resource groups allow you to manage multiple services at once. For example, after completing all the lessons for this project, you can delete the resource group, and all the resources within it will be deleted automatically.
-
Azure has multiple data centers worldwide, divided into regions. When creating an Azure resource or resource group, you must specify the region where it will be created. Run the following command to get a list of locations:
az account list-locations --output tableA list of locations will appear. This list is extensive.
💁 At the time of writing, there are 65 locations available for deployment.
    ➜  ~ az account list-locations --output table
DisplayName               Name                 RegionalDisplayName
------------------------  -------------------  -------------------------------------
East US                   eastus               (US) East US
East US 2                 eastus2              (US) East US 2
South Central US          southcentralus       (US) South Central US
...
Note the value in the
Namecolumn for the region closest to you. You can view the regions on a map on the Azure geographies page. -
Run the following command to create a resource group called
soil-moisture-sensor. Resource group names must be unique within your subscription.az group create --name soil-moisture-sensor \ --location <location>Replace
<location>with the location you selected in the previous step.
Task - Create an IoT Hub
You can now create an IoT Hub resource within your resource group.
-
Use the following command to create your IoT Hub resource:
az iot hub create --resource-group soil-moisture-sensor \
                  --sku F1 \
                  --partition-count 2 \
                  --name <hub_name>
Replace
<hub_name>with a name for your hub. This name must be globally unique—no other IoT Hub created by anyone else can have the same name. The name is used in a URL that points to the hub, so it must be unique. Use something likesoil-moisture-sensor-followed by a unique identifier, such as random words or your name.The
--sku F1option specifies the free tier. The free tier supports 8,000 messages per day and includes most features of the paid tiers.🎓 Azure services have different pricing levels, referred to as tiers. Each tier offers different features or data volumes at varying costs.
💁 To learn more about pricing, check out the Azure IoT Hub pricing guide.
The
--partition-count 2option defines the number of data streams the IoT Hub supports. More partitions reduce data blocking when multiple entities read and write to the IoT Hub. While partitions are outside the scope of these lessons, this value must be set to create a free-tier IoT Hub.💁 You can only have one free-tier IoT Hub per subscription.
The IoT Hub will be created. This process may take a minute or so.
Communicate with IoT Hub
In the previous lesson, you used MQTT to send messages back and forth on different topics, with each topic serving a specific purpose. Instead of using different topics, IoT Hub provides several defined methods for devices to communicate with the Hub and vice versa.
💁 Behind the scenes, communication between IoT Hub and your device can use MQTT, HTTPS, or AMQP.
-
Device-to-cloud (D2C) messages: These are messages sent from a device to IoT Hub, such as telemetry data. Your application code can then read these messages from the IoT Hub.
🎓 Internally, IoT Hub uses an Azure service called Event Hubs. When writing code to read messages sent to the hub, these are often referred to as events.
-
Cloud-to-device (C2D) messages: These are messages sent from application code, via IoT Hub, to an IoT device.
-
Direct method requests: These are messages sent from application code, via IoT Hub, to an IoT device to request specific actions, such as controlling an actuator. These messages require a response so your application code can confirm successful processing.
-
Device twins: These are JSON documents synchronized between the device and IoT Hub. They store settings or properties reported by the device or desired by the IoT Hub.
IoT Hub can store messages and direct method requests for a configurable period (default is one day). If a device or application loses connection, it can retrieve messages sent while offline after reconnecting. Device twins are permanently stored in IoT Hub, so a device can reconnect at any time and retrieve the latest device twin.
✅ Do some research: Read more about these message types in the Device-to-cloud communications guidance and the Cloud-to-device communications guidance in the IoT Hub documentation.
Connect your device to the IoT service
Once the hub is created, your IoT device can connect to it. Only registered devices can connect to the service, so you must register your device first. Upon registration, you will receive a connection string that the device can use to connect. This connection string is device-specific and contains information about the IoT Hub, the device, and a secret key for authentication.
🎓 A connection string is a generic term for a piece of text containing connection details. These are used to connect to IoT Hubs, databases, and other services. Connection strings typically include a service identifier, such as a URL, and security information like a secret key. They are passed to SDKs to establish a connection.
⚠️ Connection strings should be kept secure! Security will be covered in more detail in a future lesson.
Task - Register your IoT device
You can register your IoT device with your IoT Hub using the Azure CLI.
-
Run the following command to register a device:
az iot hub device-identity create --device-id soil-moisture-sensor \
                                  --hub-name <hub_name>
Replace
<hub_name>with the name of your IoT Hub.This will create a device with the ID
soil-moisture-sensor. -
When your IoT device connects to your IoT Hub using the SDK, it will need a connection string containing the hub's URL and a secret key. Run the following command to retrieve the connection string:
az iot hub device-identity connection-string show --device-id soil-moisture-sensor \
                                                  --output table \
                                                  --hub-name <hub_name>
Replace
<hub_name>with the name of your IoT Hub. -
Save the connection string displayed in the output, as you will need it later.
Task - Connect your IoT device to the cloud
Follow the relevant guide to connect your IoT device to the cloud:
Task - Monitor events
For now, you won't update your server code. Instead, you can use the Azure CLI to monitor events from your IoT device.
-
Ensure your IoT device is running and sending soil moisture telemetry data.
-
Run the following command in your command prompt or terminal to monitor messages sent to your IoT Hub:
az iot hub monitor-events --hub-name <hub_name>Replace
<hub_name>with the name of your IoT Hub.Messages will appear in the console output as they are sent by your IoT device.
Starting event monitor, use ctrl-c to stop...
{
    "event": {
        "origin": "soil-moisture-sensor",
        "module": "",
        "interface": "",
        "component": "",
        "payload": "{\"soil_moisture\": 376}"
    }
},
{
    "event": {
        "origin": "soil-moisture-sensor",
        "module": "",
        "interface": "",
        "component": "",
        "payload": "{\"soil_moisture\": 381}"
    }
}
The
payloadcontent will match the message sent by your IoT device.At the time of writing, the
az iotextension does not fully work on Apple Silicon. If you are using an Apple Silicon device, you will need to monitor messages using an alternative method, such as the Azure IoT Tools for Visual Studio Code. -
Messages include several automatically attached properties, such as the timestamp. These are called annotations. To view all message annotations, use the following command:
az iot hub monitor-events --properties anno --hub-name <hub_name>Replace
<hub_name>with the name of your IoT Hub.Messages will appear in the console output as they are sent by your IoT device.
Starting event monitor, use ctrl-c to stop...
{
    "event": {
        "origin": "soil-moisture-sensor",
        "module": "",
        "interface": "",
        "component": "",
        "properties": {},
        "annotations": {
            "iothub-connection-device-id": "soil-moisture-sensor",
            "iothub-connection-auth-method": "{\"scope\":\"device\",\"type\":\"sas\",\"issuer\":\"iothub\",\"acceptingIpFilterRule\":null}",
            "iothub-connection-auth-generation-id": "637553997165220462",
            "iothub-enqueuedtime": 1619976150288,
            "iothub-message-source": "Telemetry",
            "x-opt-sequence-number": 1379,
            "x-opt-offset": "550576",
            "x-opt-enqueued-time": 1619976150277
        },
        "payload": "{\"soil_moisture\": 381}"
    }
}
The time values in the annotations are in UNIX time, representing the number of seconds since midnight on January 1, 1970.
Exit the event monitor when you are done.
Task - Control your IoT device
You can also use the Azure CLI to invoke direct methods on your IoT device.
-
Run the following command in your command prompt or terminal to invoke the
relay_onmethod on the IoT device:az iot hub invoke-device-method --device-id soil-moisture-sensor \ --method-name relay_on \ --method-payload '{}' \ --hub-name <hub_name>Replace
<hub_name>with the name you used for your IoT Hub.
This sends a direct method request for the method specified by method-name. Direct methods can take a payload containing data for the method, and this can be specified in the method-payload parameter as JSON.
You will see the relay turn on, and the corresponding output from your IoT device:
    Direct method received -  relay_on
    ```

1. Repeat the above step, but set the `--method-name` to `relay_off`. You will see the relay turn off and the corresponding output from the IoT device.

---

## 🚀 Challenge

The free tier of IoT Hub allows 8,000 messages a day. The code you wrote sends telemetry messages every 10 seconds. How many messages a day is one message every 10 seconds?

Think about how often soil moisture measurements should be sent. How can you change your code to stay within the free tier and check as often as needed but not too often? What if you wanted to add a second device?

## Post-lecture quiz

[Post-lecture quiz](https://black-meadow-040d15503.1.azurestaticapps.net/quiz/16)

## Review & Self Study

The IoT Hub SDK is open source for both Arduino and Python. In the code repos on GitHub, there are a number of samples showing how to work with different IoT Hub features.

* If you are using a Wio Terminal, check out the [Arduino samples on GitHub](https://github.com/Azure/azure-iot-pal-arduino/tree/master/pal/samples)
* If you are using a Raspberry Pi or Virtual device, check out the [Python samples on GitHub](https://github.com/Azure/azure-iot-sdk-python/tree/master/azure-iot-hub/samples)

## Assignment

[Learn about cloud services](assignment.md)

---

**Disclaimer**:
This document has been translated using the AI translation service [Co-op Translator](https://github.com/Azure/co-op-translator). While we aim for accuracy, please note that automated translations may include errors or inaccuracies. The original document in its native language should be regarded as the authoritative source. For critical information, professional human translation is advised. We are not responsible for any misunderstandings or misinterpretations resulting from the use of this translation.