
 leestott
f6042d81d3
leestott
f6042d81d3
|
1 year ago | |
|---|---|---|
| .. | ||
| solution | 1 year ago | |
| README.md | 1 year ago | |
| assignment.md | 1 year ago | |
| notebook.ipynb | 1 year ago | |
README.md
Cloud တွင် Data Science: "Azure ML SDK" နည်းလမ်း
 |
|---|
| Cloud တွင် Data Science: Azure ML SDK - Sketchnote by @nitya |
အကြောင်းအရာများ:
- Cloud တွင် Data Science: "Azure ML SDK" နည်းလမ်း
Pre-Lecture Quiz
1. အကျဉ်းချုပ်
1.1 Azure ML SDK ဆိုတာဘာလဲ?
Data scientists နှင့် AI developers များသည် Azure Machine Learning SDK ကို အသုံးပြု၍ Azure Machine Learning service ဖြင့် machine learning workflows များကို တည်ဆောက်ပြီး run လုပ်ကြသည်။ Python environment မည်သည့်အမျိုးအစားမဆို (Jupyter Notebooks, Visual Studio Code, သို့မဟုတ် သင်နှစ်သက်သော Python IDE) မှာ service ကို အသုံးပြုနိုင်သည်။
SDK ၏ အဓိက function များမှာ:
- Machine learning experiments တွင် အသုံးပြုမည့် datasets များကို ရှာဖွေ၊ ပြင်ဆင်၊ lifecycle ကို စီမံခန့်ခွဲခြင်း။
- Cloud resources များကို စီမံခန့်ခွဲခြင်း (monitoring, logging, organizing)။
- မော်ဒယ်များကို local မှာ training လုပ်ခြင်း သို့မဟုတ် GPU-accelerated cloud resources အသုံးပြု၍ training လုပ်ခြင်း။
- Automated machine learning ကို အသုံးပြုခြင်း။ Configuration parameters နှင့် training data ကို input လုပ်ပြီး အကောင်းဆုံးမော်ဒယ်ကို ရှာဖွေခြင်း။
- Web services များကို deploy လုပ်၍ trained models များကို RESTful services အဖြစ် ပြောင်းလဲခြင်း။
Azure Machine Learning SDK အကြောင်းပိုမိုလေ့လာရန်
ယခင်သင်ခန်းစာ တွင် Low code/No code နည်းလမ်းဖြင့် မော်ဒယ်ကို training, deployment, consumption လုပ်ပုံကို လေ့လာခဲ့ပါသည်။ Heart Failure dataset ကို အသုံးပြု၍ Heart failure prediction model ကို ဖန်တီးခဲ့ပါသည်။ ယခုသင်ခန်းစာတွင် အတူတူသောအရာကို Azure Machine Learning SDK အသုံးပြု၍ ပြုလုပ်မည်ဖြစ်သည်။
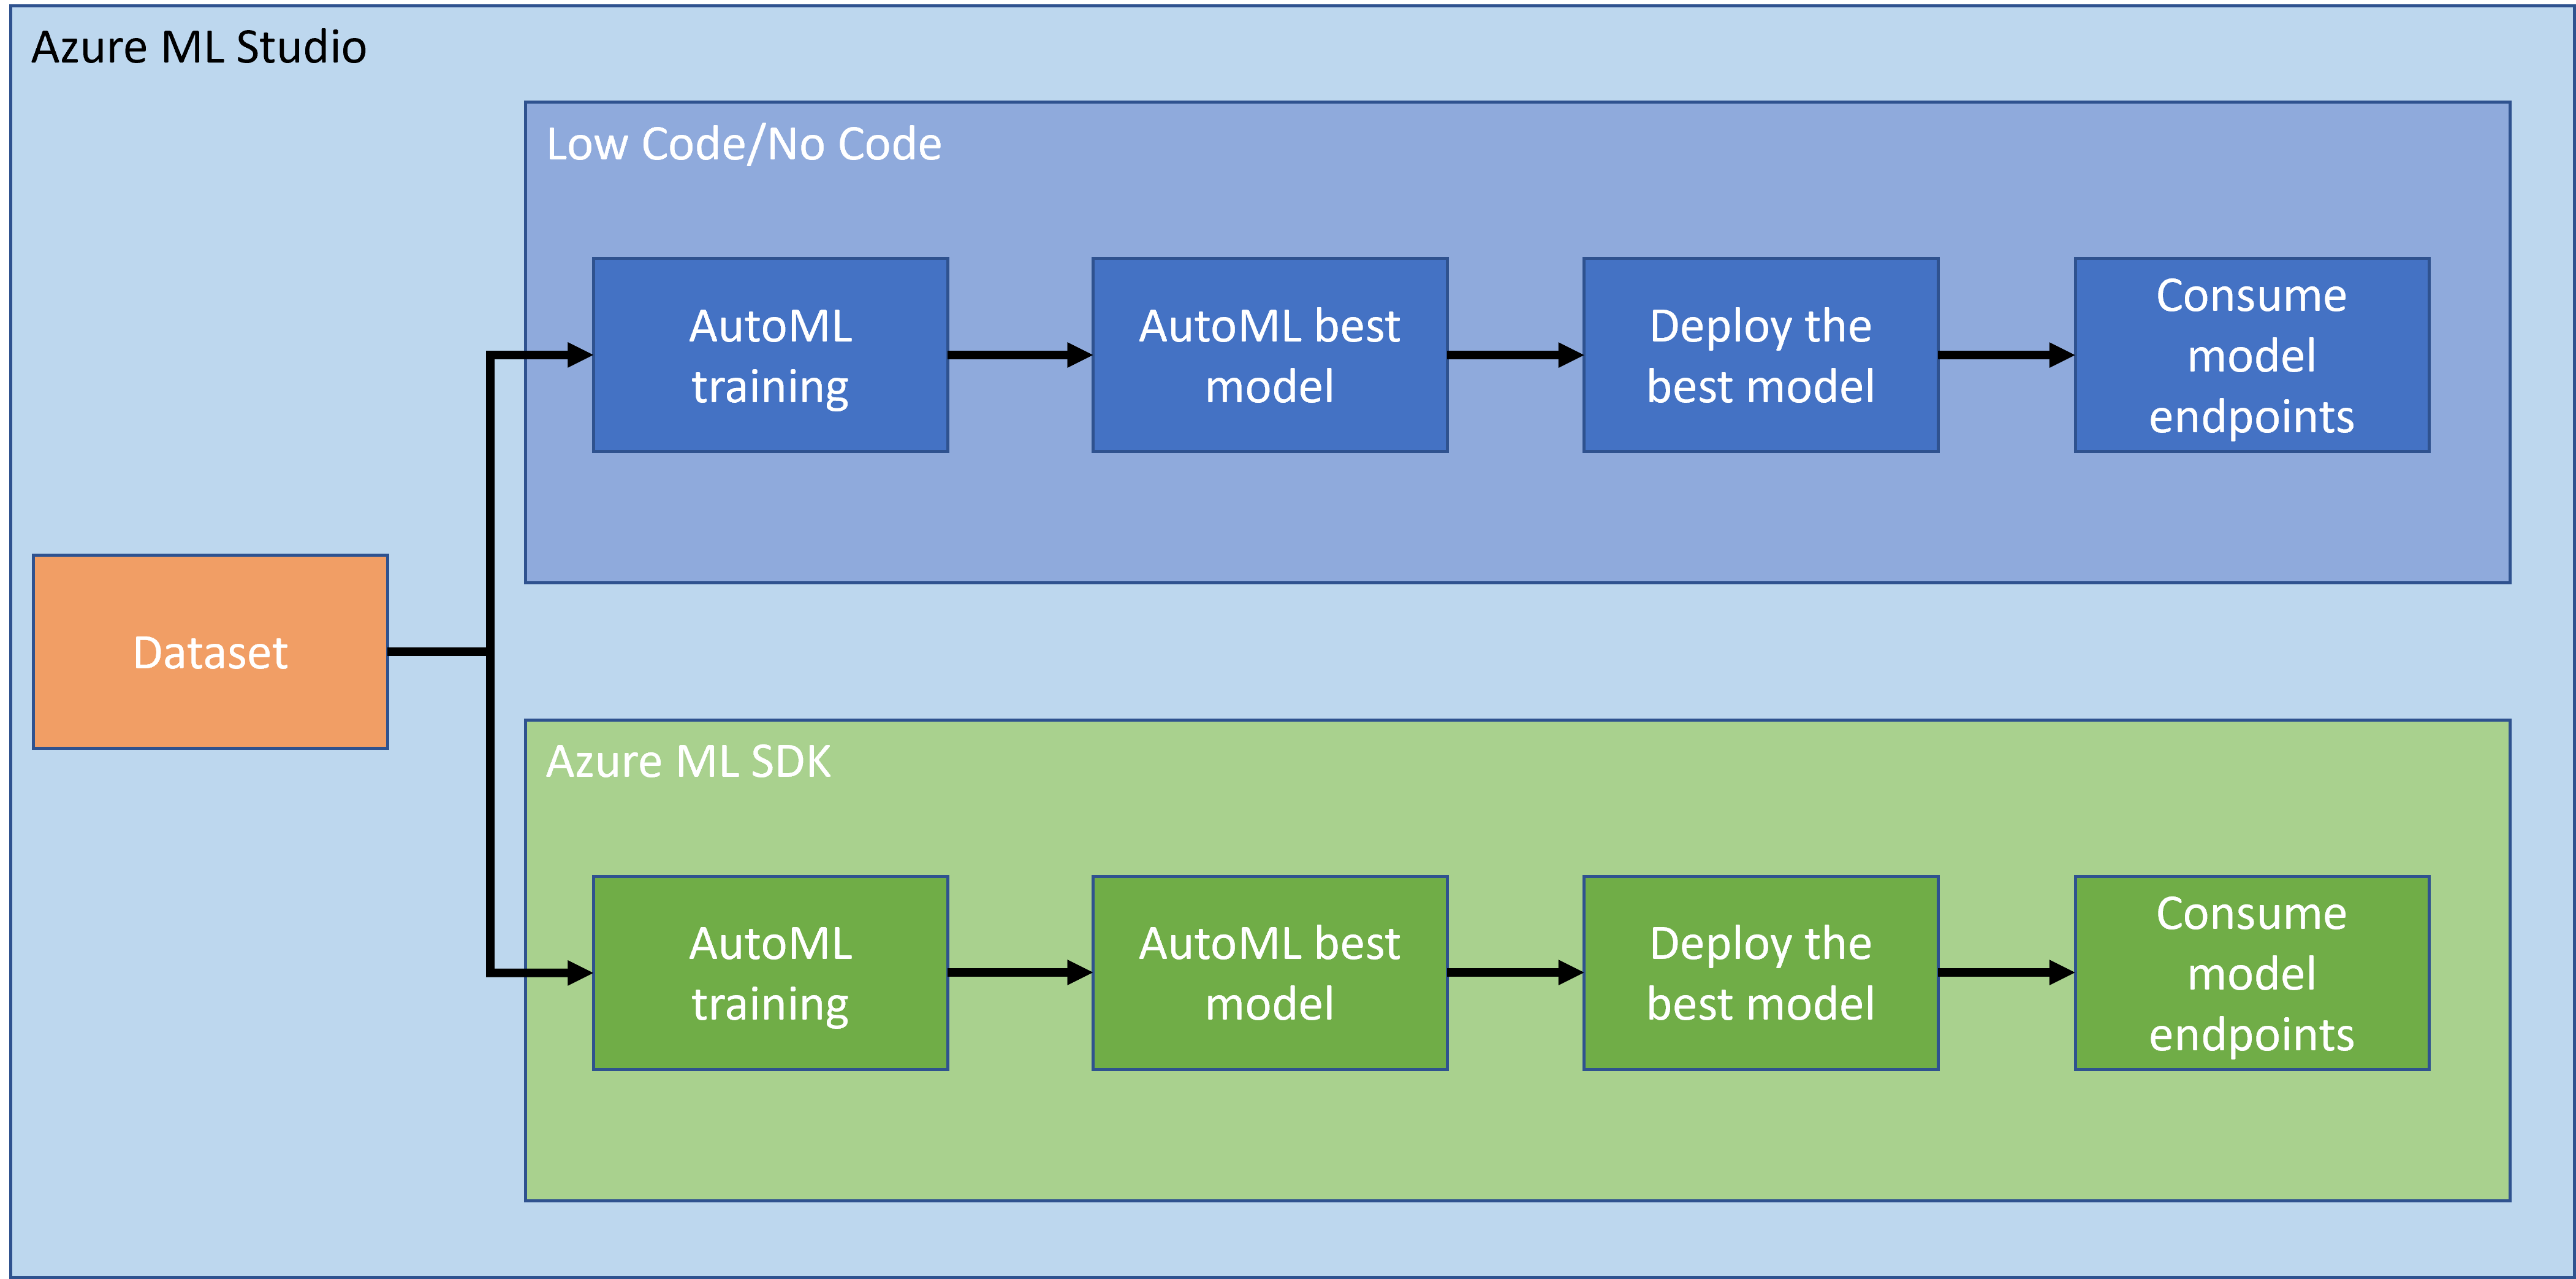
1.2 နှလုံးရောဂါခန့်မှန်းမှု project နှင့် dataset အကျဉ်းချုပ်
ဒီနေရာ တွင် Heart failure prediction project နှင့် dataset အကျဉ်းချုပ်ကို ကြည့်ပါ။
2. Azure ML SDK ဖြင့် မော်ဒယ်တစ်ခုကို training လုပ်ခြင်း
2.1 Azure ML workspace တစ်ခုကို ဖန်တီးခြင်း
ရိုးရှင်းစွာ Jupyter notebook တွင် အလုပ်လုပ်မည်ဖြစ်သည်။ ဒါကြောင့် Workspace နှင့် compute instance ရှိပြီးသားဖြစ်ရမည်။ Workspace ရှိပြီးသားဖြစ်ပါက 2.3 Notebook creation အပိုင်းသို့ တိုက်ရိုက်သွားနိုင်သည်။
Workspace မရှိသေးပါက ယခင်သင်ခန်းစာ တွင် 2.1 Azure ML workspace ဖန်တီးခြင်း အပိုင်းကို လိုက်နာ၍ Workspace တစ်ခုကို ဖန်တီးပါ။
2.2 Compute instance တစ်ခုကို ဖန်တီးခြင်း
Azure ML workspace တွင် Compute menu သို့သွားပါ။ Compute resources များကို တွေ့နိုင်ပါသည်။
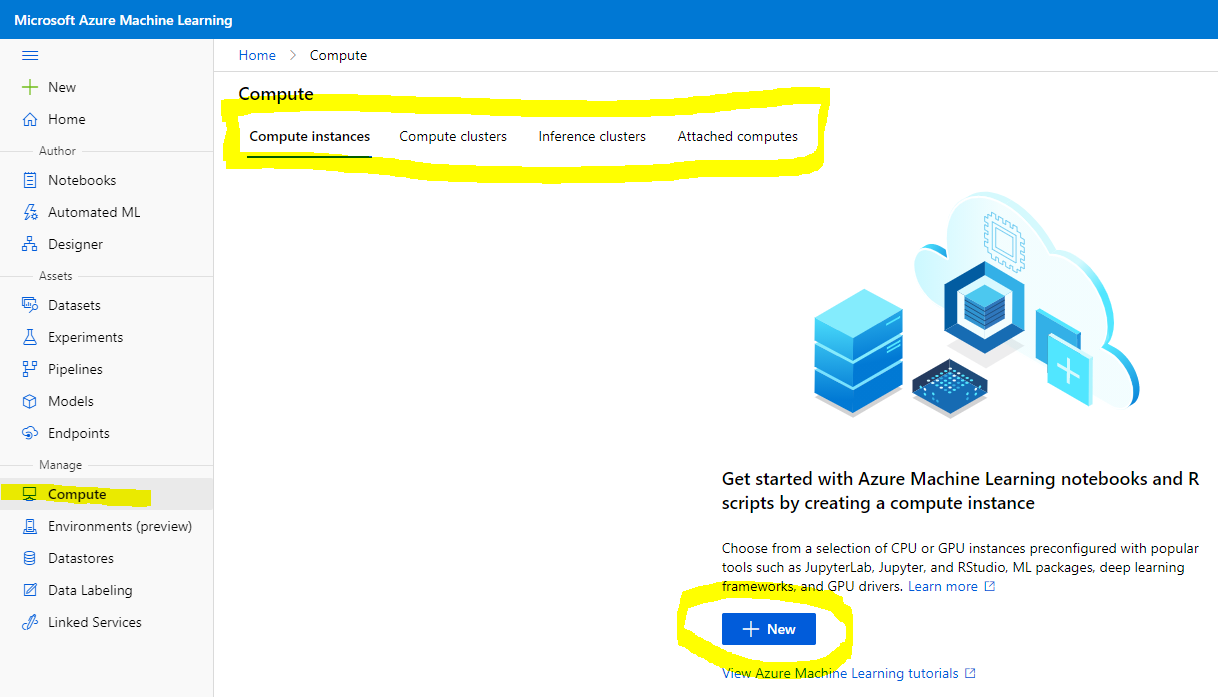
Jupyter notebook ကို provision လုပ်ရန် compute instance တစ်ခုကို ဖန်တီးပါ။
-
- New button ကို နှိပ်ပါ။
- Compute instance အမည်ပေးပါ။
- CPU/GPU, VM size နှင့် core number ကို ရွေးပါ။
- Create button ကို နှိပ်ပါ။
Compute instance တစ်ခုကို ဖန်တီးပြီးပါပြီ! Creating Notebooks section တွင် Notebook ဖန်တီးရန် Compute instance ကို အသုံးပြုမည်။
2.3 Dataset ကို load လုပ်ခြင်း
Dataset ကို upload မလုပ်ရသေးပါက ယခင်သင်ခန်းစာ တွင် 2.3 Dataset ကို load လုပ်ခြင်း အပိုင်းကို ကြည့်ပါ။
2.4 Notebooks ဖန်တီးခြင်း
NOTE: နောက်ထပ်အဆင့်တွင် Notebook အသစ်တစ်ခုကို စတင်ဖန်တီးနိုင်သလို ယခင်ဖန်တီးထားသော notebook ကို upload လုပ်နိုင်ပါသည်။ Upload လုပ်ရန် "Notebook" menu ကို နှိပ်ပြီး notebook ကို upload လုပ်ပါ။
Notebook များသည် Data Science လုပ်ငန်းစဉ်တွင် အရေးပါသောအခန်းကဏ္ဍတစ်ခုဖြစ်သည်။ EDA (Exploratory Data Analysis) ပြုလုပ်ခြင်း၊ compute cluster သို့ ခေါ်သွား၍ မော်ဒယ် training လုပ်ခြင်း၊ inference cluster သို့ ခေါ်သွား၍ endpoint deploy လုပ်ခြင်းတို့အတွက် အသုံးပြုနိုင်သည်။
Notebook ဖန်တီးရန် Jupyter notebook instance ကို run လုပ်နေသော compute node တစ်ခုလိုအပ်သည်။ Azure ML workspace သို့ ပြန်သွားပြီး Compute instances ကို click လုပ်ပါ။ ယခင်ဖန်တီးထားသော compute instance ကို တွေ့ရမည်။
- Applications အပိုင်းတွင် Jupyter option ကို click လုပ်ပါ။
- "Yes, I understand" box ကို check လုပ်ပြီး Continue button ကို click လုပ်ပါ။
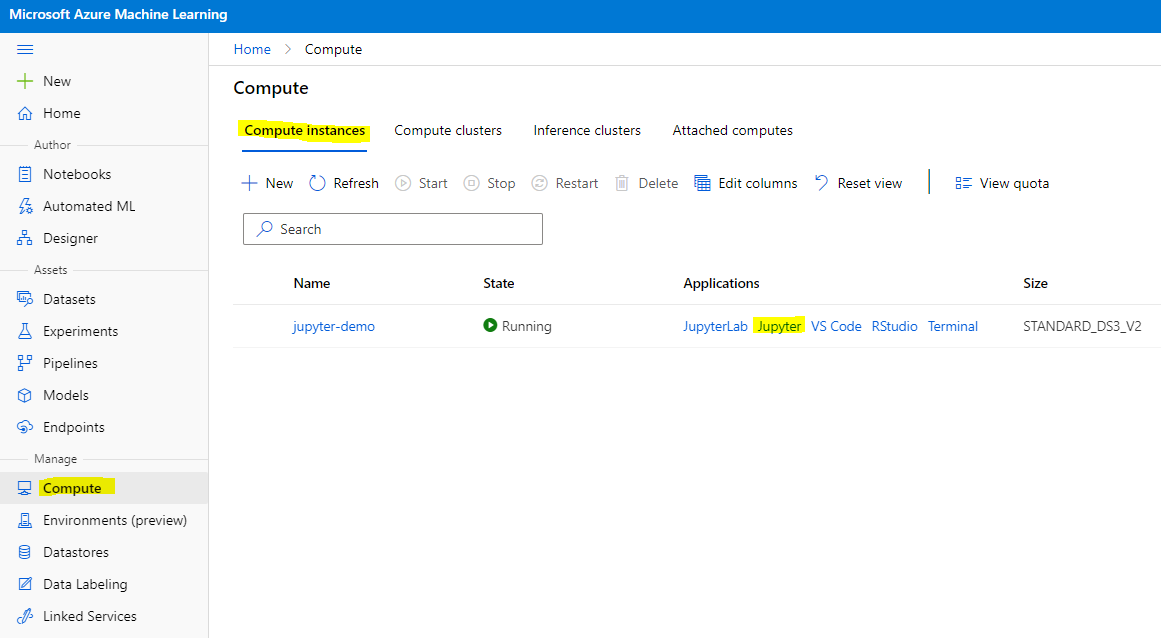
- Jupyter notebook instance ကို browser tab အသစ်တွင် ဖွင့်ပါ။ "New" button ကို click လုပ်၍ notebook တစ်ခုကို ဖန်တီးပါ။
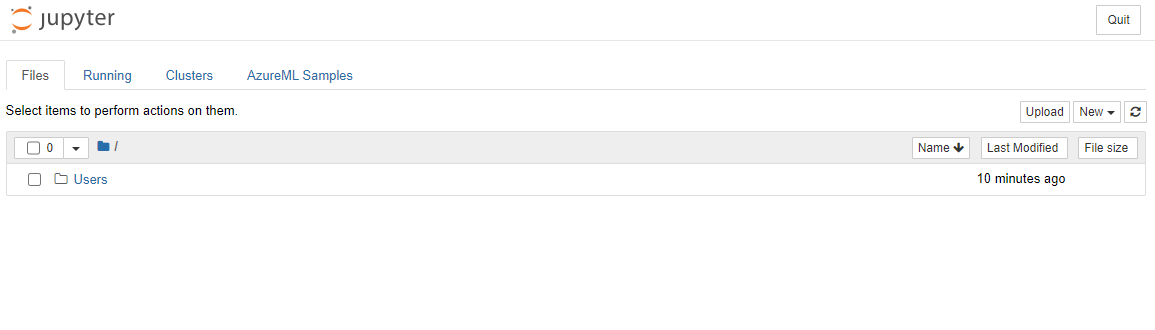
Notebook ရရှိပြီးပါက Azure ML SDK ဖြင့် မော်ဒယ် training လုပ်နိုင်ပါပြီ။
2.5 မော်ဒယ် training လုပ်ခြင်း
သင့်တွင် မည်သည့်အခါမဆို သ nghi doute ရှိပါက Azure ML SDK documentation ကို ကြည့်ပါ။ ဒီသင်ခန်းစာတွင် အသုံးပြုမည့် modules များကို နားလည်ရန် လိုအပ်သော အချက်အလက်များ ပါဝင်သည်။
2.5.1 Workspace, experiment, compute cluster နှင့် dataset ကို setup လုပ်ခြင်း
Configuration file မှ workspace ကို load လုပ်ရန် အောက်ပါ code ကို အသုံးပြုပါ:
from azureml.core import Workspace
ws = Workspace.from_config()
ဒီ code သည် Workspace အမျိုးအစား object ကို return ပြန်ပါသည်။ Workspace ကို represent လုပ်သည်။ Experiment တစ်ခုကို ဖန်တီးရန် အောက်ပါ code ကို အသုံးပြုပါ:
from azureml.core import Experiment
experiment_name = 'aml-experiment'
experiment = Experiment(ws, experiment_name)
Workspace မှ experiment ကို request လုပ်၍ experiment name ဖြင့် ရယူနိုင်သည်။ Experiment name သည် 3-36 characters ရှိရမည်၊ အက္ခရာ သို့မဟုတ် နံပါတ်ဖြင့် စရမည်၊ အက္ခရာ၊ နံပါတ်၊ underscores နှင့် dashes များသာ ပါဝင်နိုင်သည်။ Workspace တွင် experiment မရှိပါက အသစ်တစ်ခုကို ဖန်တီးမည်။
Training အတွက် compute cluster တစ်ခုကို ဖန်တီးရန် အောက်ပါ code ကို အသုံးပြုပါ။ ဒီအဆင့်သည် မိနစ်အနည်းငယ်ကြာနိုင်သည်။
from azureml.core.compute import AmlCompute

aml_name = "heart-f-cluster"
try:
    aml_compute = AmlCompute(ws, aml_name)
    print('Found existing AML compute context.')
except:
    print('Creating new AML compute context.')
    aml_config = AmlCompute.provisioning_configuration(vm_size = "Standard_D2_v2", min_nodes=1, max_nodes=3)
    aml_compute = AmlCompute.create(ws, name = aml_name, provisioning_configuration = aml_config)
    aml_compute.wait_for_completion(show_output = True)

cts = ws.compute_targets
compute_target = cts[aml_name]
Workspace မှ dataset ကို dataset name ဖြင့် ရယူနိုင်သည်။
dataset = ws.datasets['heart-failure-records']
df = dataset.to_pandas_dataframe()
df.describe()
2.5.2 AutoML Configuration နှင့် training
AutoML configuration ကို set လုပ်ရန် AutoMLConfig class ကို အသုံးပြုပါ။
Doc တွင် ဖော်ပြထားသည့်အတိုင်း parameters များစွာရှိပြီး သင့် project အတွက် အောက်ပါ parameters များကို အသုံးပြုမည်:
experiment_timeout_minutes: Experiment run လုပ်နိုင်သည့် အချိန်အများဆုံး (မိနစ်)။max_concurrent_iterations: Experiment အတွက် training iterations အများဆုံး။primary_metric: Experiment status ကို သတ်မှတ်ရန် primary metric။compute_target: Automated Machine Learning experiment ကို run လုပ်ရန် Azure Machine Learning compute target။task: Run လုပ်မည့် task အမျိုးအစား။ 'classification', 'regression', 'forecasting' တစ်ခုခုဖြစ်နိုင်သည်။training_data: Experiment အတွင်း training data အဖြစ် အသုံးပြုမည့် data။label_column_name: Label column name။path: Azure Machine Learning project folder ၏ full path။enable_early_stopping: အချိန်တိုအတွင်း score မတိုးတက်ပါက early termination ကို enable လုပ်မည်။featurization: Featurization step ကို auto/manual/customize လုပ်မည်။debug_log: Debug information ကို ရေးသားမည့် log file။
from azureml.train.automl import AutoMLConfig

project_folder = './aml-project'

automl_settings = {
    "experiment_timeout_minutes": 20,
    "max_concurrent_iterations": 3,
    "primary_metric" : 'AUC_weighted'
}

automl_config = AutoMLConfig(compute_target=compute_target,
                             task = "classification",
                             training_data=dataset,
                             label_column_name="DEATH_EVENT",
                             path = project_folder,
                             enable_early_stopping= True,
                             featurization= 'auto',
                             debug_log = "automl_errors.log",
                             **automl_settings
                            )
Configuration set ပြီးပါက အောက်ပါ code ကို အသုံးပြု၍ မော်ဒယ် training လုပ်နိုင်သည်။ ဒီအဆင့်သည် cluster size ပေါ်မူတည်၍ တစ်နာရီအထိ ကြာနိုင်သည်။
remote_run = experiment.submit(automl_config)
RunDetails widget ကို run လုပ်၍ experiment များကို ပြသနိုင်သည်။
from azureml.widgets import RunDetails
RunDetails(remote_run).show()
3. Azure ML SDK ဖြင့် မော်ဒယ် deployment နှင့် endpoint ကို အသုံးပြုခြင်း
3.1 အကောင်းဆုံးမော်ဒယ်ကို save လုပ်ခြင်း
remote_run သည် AutoMLRun အမျိုးအစား object ဖြစ်သည်။ ဒီ object တွင် get_output() method ပါဝင်ပြီး အကောင်းဆုံး run နှင့် အဆင်ပြေသော fitted model ကို return ပြန်သည်။
best_run, fitted_model = remote_run.get_output()
အကောင်းဆုံးမော်ဒယ်၏ parameters ကို print လုပ်၍ ကြည့်နိုင်သည်။ get_properties() method ကို အသုံးပြု၍ properties ကို ကြည့်နိုင်သည်။
best_run.get_properties()
အကောင်းဆုံးမော်ဒယ်ကို register_model method ဖြင့် register လုပ်ပါ။
model_name = best_run.properties['model_name']
script_file_name = 'inference/score.py'
best_run.download_file('outputs/scoring_file_v_1_0_0.py', 'inference/score.py')
description = "aml heart failure project sdk"
model = best_run.register_model(model_name = model_name,
                                model_path = './outputs/',
                                description = description,
                                tags = None)
3.2 မော်ဒယ် Deployment
အကောင်းဆုံးမော်ဒယ်ကို save လုပ်ပြီးပါက InferenceConfig class ကို အသုံးပြု၍ deploy လုပ်နိုင်သည်။ InferenceConfig သည် deployment အတွက် custom environment settings ကို represent လုပ်သည်။ AciWebservice class သည် Azure Container Instances တွင် web service endpoint အဖြစ် deploy လုပ်ထားသော machine learning model ကို represent လုပ်သည်။ Deploy လုပ်ထားသော service သည် load-balanced HTTP endpoint ဖြစ်ပြီး REST API ပါဝင်သည်။ API သို့ data ပို့ပြီး မော်ဒယ်မှ prediction ကို ရယူနိုင်သည်။
မော်ဒယ်ကို deploy method ဖြင့် deploy လုပ်ပါ။
from azureml.core.model import InferenceConfig, Model
from azureml.core.webservice import AciWebservice

inference_config = InferenceConfig(entry_script=script_file_name, environment=best_run.get_environment())

aciconfig = AciWebservice.deploy_configuration(cpu_cores = 1,
                                               memory_gb = 1,
                                               tags = {'type': "automl-heart-failure-prediction"},
                                               description = 'Sample service for AutoML Heart Failure Prediction')

aci_service_name = 'automl-hf-sdk'
aci_service = Model.deploy(ws, aci_service_name, [model], inference_config, aciconfig)
aci_service.wait_for_deployment(True)
print(aci_service.state)
ဒီအဆင့်သည် မိနစ်အနည်းငယ်ကြာနိုင်သည်။
3.3 Endpoint အသုံးပြုခြင်း
Endpoint ကို အသုံးပြုရန် sample input တစ်ခုကို ဖန်တီးပါ:
data = {
    "data":
    [
        {
            'age': "60",
            'anaemia': "false",
            'creatinine_phosphokinase': "500",
            'diabetes': "false",
            'ejection_fraction': "38",
            'high_blood_pressure': "false",
            'platelets': "260000",
            'serum_creatinine': "1.40",
            'serum_sodium': "137",
            'sex': "false",
            'smoking': "false",
            'time': "130",
        },
    ],
}

test_sample = str.encode(json.dumps(data))
ပြီးနောက် input ကို မော်ဒယ်သို့ ပို့၍ prediction ရယူနိုင်သည်:
response = aci_service.run(input_data=test_sample)
response
ဤအရာသည် '{"result": [false]}' ကို output ပြုလုပ်သင့်သည်။ ဤသည်မှာ ကျွန်ုပ်တို့ endpoint သို့ ပေးပို့ခဲ့သော လူနာ input သည် false ဟုခန့်မှန်းချက်ကို ဖန်တီးခဲ့သည်။ အဆိုပါ false သည် ဤပုဂ္ဂိုလ်သည် နှလုံးရောဂါဖြစ်နိုင်ခြေမရှိကြောင်းကို ဆိုလိုသည်။
ဂုဏ်ယူပါတယ်! Azure ML SDK ကို အသုံးပြု၍ Azure ML ပေါ်တွင် သင်တန်းပေးပြီး deploy လုပ်ထားသော မော်ဒယ်ကို သင်အသုံးပြုနိုင်ခဲ့ပါပြီ!
NOTE: သင်၏ project ကို ပြီးမြောက်သွားသောအခါတွင် resource အားလုံးကို မေ့မလွဲဖျက်ပစ်ပါ။
🚀 စိန်ခေါ်မှု
SDK ကို အသုံးပြု၍ ပြုလုပ်နိုင်သော အခြားအရာများစွာရှိပါသေးသည်။ သို့သော် အကောင်းဆုံး သင်ခန်းစာတွင် အားလုံးကို မဖော်ပြနိုင်ပါ။ ကောင်းသော သတင်းကတော့ SDK documentation ကို လေ့လာသင်ယူခြင်းဖြင့် သင်ကိုယ်တိုင်အတွက် အတော်လေးအထောက်အကူဖြစ်စေမည်ဖြစ်သည်။ Azure ML SDK documentation ကို ကြည့်ပြီး Pipeline class ကို ရှာဖွေပါ။ Pipeline သည် workflow အနေဖြင့် အဆင့်ဆင့်အဆောင်အဆောင်များကို စီစဉ်နိုင်သော collection ဖြစ်သည်။
HINT: SDK documentation သို့ သွားပြီး "Pipeline" ကဲ့သို့သော keyword များကို ရှာဖွေပါ။ သင်သည် azureml.pipeline.core.Pipeline class ကို ရလဒ်များတွင် တွေ့ရမည်ဖြစ်သည်။
Post-lecture quiz
ပြန်လည်သုံးသပ်ခြင်းနှင့် ကိုယ်တိုင်လေ့လာခြင်း
ဤသင်ခန်းစာတွင် သင်သည် Azure ML SDK ကို cloud ပေါ်တွင် အသုံးပြု၍ နှလုံးရောဂါဖြစ်နိုင်ခြေကို ခန့်မှန်းရန် မော်ဒယ်ကို သင်တန်းပေး၊ deploy လုပ်ခြင်းနှင့် အသုံးပြုခြင်းကို လေ့လာခဲ့ပါသည်။ Azure ML SDK အကြောင်းကို ပိုမိုသိရှိရန် documentation ကို ကြည့်ပါ။ Azure ML SDK ကို အသုံးပြု၍ သင်၏ကိုယ်ပိုင်မော်ဒယ်ကို ဖန်တီးကြည့်ပါ။
အိမ်စာ
Azure ML SDK ကို အသုံးပြု၍ Data Science project
အကြောင်းကြားချက်:
ဤစာရွက်စာတမ်းကို AI ဘာသာပြန်ဝန်ဆောင်မှု Co-op Translator ကို အသုံးပြု၍ ဘာသာပြန်ထားပါသည်။ ကျွန်ုပ်တို့သည် တိကျမှုအတွက် ကြိုးစားနေသော်လည်း၊ အလိုအလျောက် ဘာသာပြန်မှုများတွင် အမှားများ သို့မဟုတ် မတိကျမှုများ ပါဝင်နိုင်သည်ကို သတိပြုပါ။ မူရင်းဘာသာစကားဖြင့် ရေးသားထားသော စာရွက်စာတမ်းကို အာဏာရှိသော ရင်းမြစ်အဖြစ် သတ်မှတ်သင့်ပါသည်။ အရေးကြီးသော အချက်အလက်များအတွက် လူ့ဘာသာပြန်ပညာရှင်များမှ ပရော်ဖက်ရှင်နယ် ဘာသာပြန်မှုကို အကြံပြုပါသည်။ ဤဘာသာပြန်မှုကို အသုံးပြုခြင်းမှ ဖြစ်ပေါ်လာသော အလွဲအမှားများ သို့မဟုတ် အနားယူမှုများအတွက် ကျွန်ုပ်တို့သည် တာဝန်မယူပါ။