|
|
2 weeks ago | |
|---|---|---|
| .. | ||
| README.md | 2 weeks ago | |
| assignment.md | 3 weeks ago | |
README.md
Cloud တွင် Data Science: "Low code/No code" နည်းလမ်း
 |
|---|
| Cloud တွင် Data Science: Low Code - Sketchnote by @nitya |
အကြောင်းအရာများ:
- Cloud တွင် Data Science: "Low code/No code" နည်းလမ်း
Pre-Lecture quiz
1. အကျဉ်းချုပ်
1.1 Azure Machine Learning ဆိုတာဘာလဲ?
Azure cloud platform သည် 200 ကျော်သော ထုတ်ကုန်များနှင့် cloud ဝန်ဆောင်မှုများကို ပေးစွမ်းပြီး သင့်ရဲ့ အစီအစဉ်အသစ်များကို ဖန်တီးရန် အကူအညီပေးသည်။
Data scientist များသည် အချက်အလက်များကို စူးစမ်းခြင်း၊ ကြိုတင်လုပ်ဆောင်ခြင်းနှင့် မော်ဒယ်လေ့ကျင့်မှု algorithm များကို စမ်းသပ်ခြင်းတို့တွင် အချိန်များစွာ သုံးစွဲရသည်။ အချိန်ကုန်လွန်မှုများကြောင့် အဆင့်မြင့် hardware များကို မထိရောက်စွာ အသုံးပြုရတတ်သည်။
Azure ML သည် Azure တွင် machine learning ဖြေရှင်းချက်များကို ဖန်တီးခြင်းနှင့် လုပ်ဆောင်ခြင်းအတွက် cloud-based platform တစ်ခုဖြစ်သည်။
ဤ platform တွင် data scientist များအတွက် အချက်အလက်များကို ပြင်ဆင်ခြင်း၊ မော်ဒယ်များကို လေ့ကျင့်ခြင်း၊ အတိအကျ အချက်အလက်များကို ထုတ်ဝေခြင်းနှင့် အသုံးပြုမှုများကို စောင့်ကြည့်ခြင်းတို့အတွက် အကူအညီပေးသော feature များစွာ ပါဝင်သည်။ အဓိကအားဖြင့် မော်ဒယ်လေ့ကျင့်မှုတွင် အချိန်ကုန်လွန်မှုများကို အလိုအလျောက်လုပ်ဆောင်ခြင်းဖြင့် ထိရောက်မှုကို မြှင့်တင်ပေးသည်။ ထို့အပြင် cloud-based compute resources များကို အသုံးပြု၍ အချက်အလက်များကို အကျိုးရှိစွာ စီမံခန့်ခွဲနိုင်သည်။
Azure ML သည် developer များနှင့် data scientist များအတွက် machine learning workflow များကို စီမံခန့်ခွဲရန် လိုအပ်သော tools များအားလုံးကို ပေးသည်။ ဤ tools များတွင် ပါဝင်သည်မှာ-
- Azure Machine Learning Studio: မော်ဒယ်လေ့ကျင့်ခြင်း၊ တင်သွင်းခြင်း၊ automation၊ tracking နှင့် asset management အတွက် low-code နှင့် no-code ရွေးချယ်မှုများကို ပေးသော web portal ဖြစ်သည်။
- Jupyter Notebooks: ML မော်ဒယ်များကို prototype နှင့် စမ်းသပ်ရန် အလျင်အမြန်။
- Azure Machine Learning Designer: drag-n-drop modules ဖြင့် low-code ပတ်ဝန်းကျင်တွင် စမ်းသပ်မှုများကို ဖန်တီးပြီး pipeline များကို တင်သွင်းနိုင်သည်။
- Automated machine learning UI (AutoML): ML မော်ဒယ်ဖွံ့ဖြိုးမှု၏ iterative task များကို အလိုအလျောက်လုပ်ဆောင်ခြင်း။
- Data Labelling: အချက်အလက်များကို အလိုအလျောက် label လုပ်ရန် ML tool တစ်ခု။
- Machine learning extension for Visual Studio Code: ML project များကို ဖန်တီးခြင်းနှင့် စီမံခန့်ခွဲရန် အပြည့်အစုံ development environment တစ်ခု။
- Machine learning CLI: command line မှ Azure ML resources များကို စီမံခန့်ခွဲရန် command များကို ပေးသည်။
- PyTorch, TensorFlow, Scikit-learn စသည်တို့နှင့် open-source frameworks များနှင့် ပေါင်းစပ်မှု: ML process အဆုံးအထိ စီမံခန့်ခွဲရန်။
- MLflow: ML experiment များ၏ life cycle ကို စီမံခန့်ခွဲရန် open-source library တစ်ခု။
1.2 Heart Failure Prediction Project:
Project တစ်ခုကို ဖန်တီးခြင်းနှင့် တည်ဆောက်ခြင်းသည် သင်၏ ကျွမ်းကျင်မှုနှင့် အသိပညာကို စမ်းသပ်ရန် အကောင်းဆုံးနည်းလမ်းဖြစ်သည်။
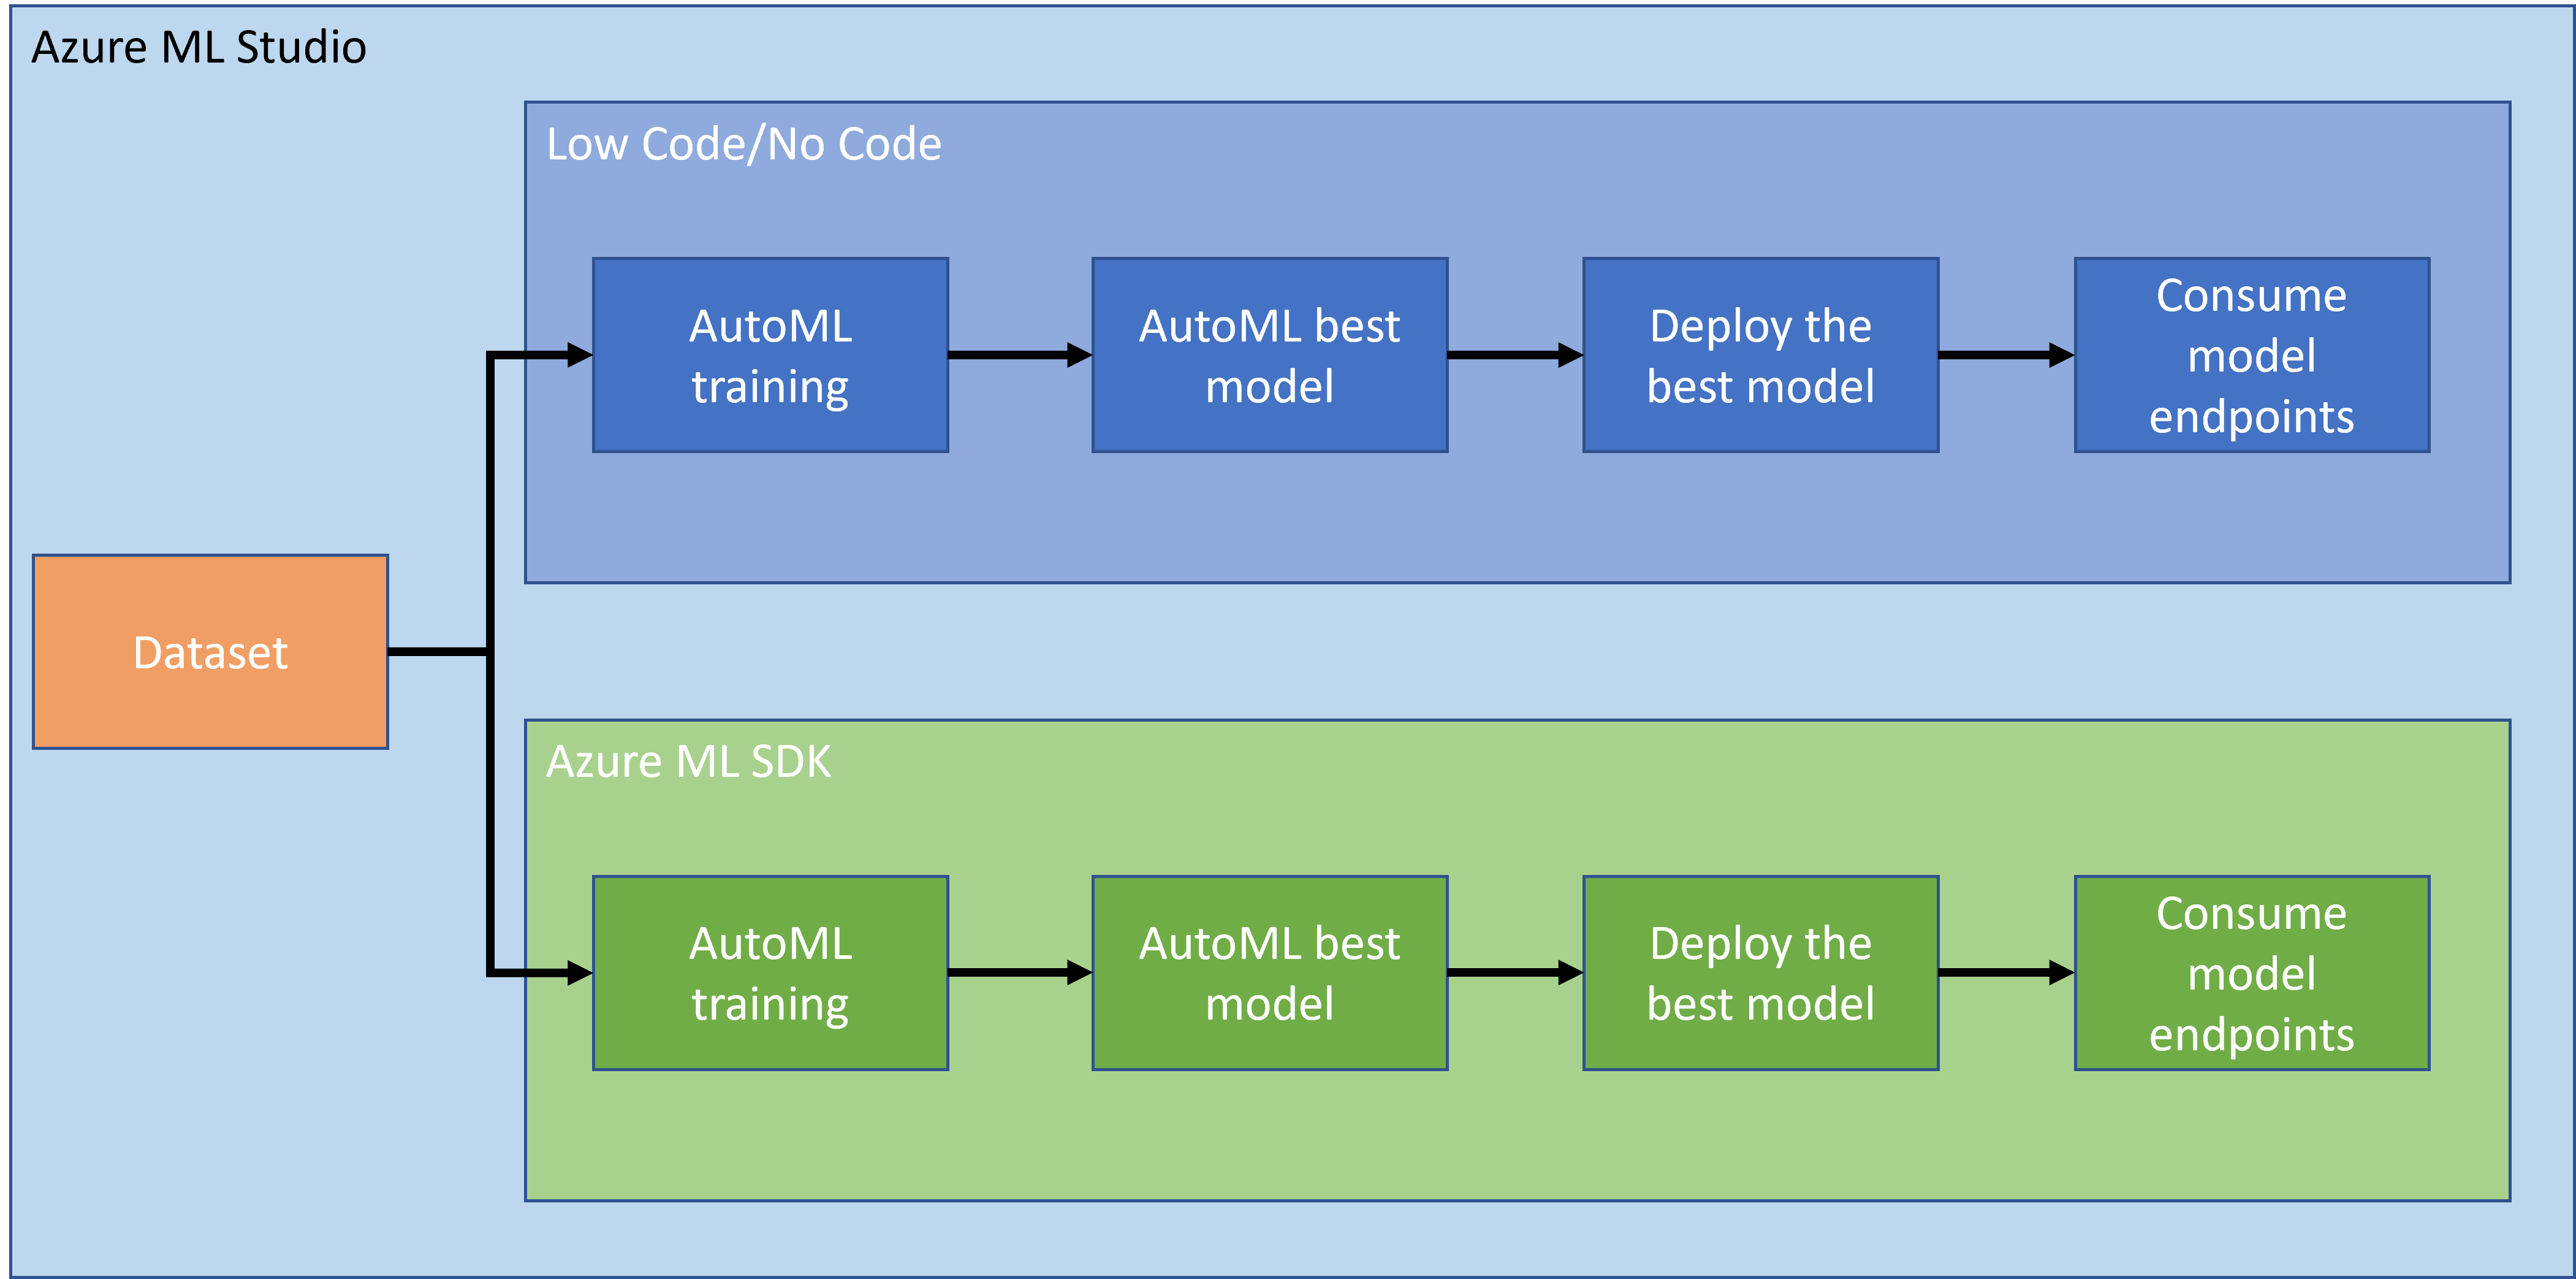
ဤသင်ခန်းစာတွင် Heart Failure Prediction Project ကို Azure ML Studio တွင် Low code/No code နည်းလမ်းနှင့် Azure ML SDK နည်းလမ်းတို့ဖြင့် တည်ဆောက်ခြင်းကို လေ့လာမည်။
Low code/No code နည်းလမ်းသည် GUI (Graphical User Interface) ကို အသုံးပြု၍ စတင်ရန် လွယ်ကူပြီး code အတွေ့အကြုံမလိုအပ်ပါ။
သို့သော် project တစ်ခုသည် production-ready ဖြစ်လာသည်နှင့် GUI ဖြင့် resource များကို ဖန်တီးရန် မလုံလောက်တော့ပါ။
ဤအချိန်တွင် Azure ML SDK ကို အသုံးပြုနိုင်ရန် သိရှိထားရမည်ဖြစ်သည်။
| Low code/No code | Azure ML SDK | |
|---|---|---|
| Code ကျွမ်းကျင်မှု | မလိုအပ် | လိုအပ် |
| ဖွံ့ဖြိုးမှုအချိန် | လွယ်ကူနှင့် မြန် | Code ကျွမ်းကျင်မှုအပေါ် မူတည် |
| Production-ready | မဟုတ် | ဟုတ် |
1.3 Heart Failure Dataset:
Cardiovascular diseases (CVDs) သည် ကမ္ဘာ့သေဆုံးမှုများ၏ 31% ကို ဖြစ်စေသော အကြီးဆုံးအကြောင်းရင်းဖြစ်သည်။
တည်းဖြတ်မှုများ၊ အစားအစာမကျန်းမာမှု၊ အလေးချိန်ပိုများခြင်း၊ ရေရှည်အလှုပ်ရှားမှုမရှိခြင်းနှင့် အရက်သောက်မှုများကို feature များအဖြစ် အသုံးပြု၍ CVD ဖြစ်နိုင်မှုကို ခန့်မှန်းနိုင်သည်။
Kaggle တွင် Heart Failure dataset ကို public အဖြစ် ရရှိနိုင်ပြီး project အတွက် အသုံးပြုမည်။
ဤ dataset သည် 13 columns (12 features နှင့် 1 target variable) နှင့် 299 rows ပါဝင်သော tabular dataset ဖြစ်သည်။
| Variable name | Type | Description | Example | |
|---|---|---|---|---|
| 1 | age | numerical | လူနာ၏ အသက် | 25 |
| 2 | anaemia | boolean | အနီရောင်သွေးဆဲလ်များ သို့မဟုတ် haemoglobin လျော့နည်းမှု | 0 or 1 |
| 3 | creatinine_phosphokinase | numerical | သွေးထဲရှိ CPK enzyme အဆင့် | 542 |
| 4 | diabetes | boolean | လူနာသည် ဆီးချိုရောဂါရှိ/မရှိ | 0 or 1 |
| 5 | ejection_fraction | numerical | နှလုံး contraction တစ်ခုစီတွင် သွေးထွက်မှု ရာခိုင်နှုန်း | 45 |
| 6 | high_blood_pressure | boolean | လူနာသည် သွေးတိုးရောဂါရှိ/မရှိ | 0 or 1 |
| 7 | platelets | numerical | သွေးထဲရှိ platelets အရေအတွက် | 149000 |
| 8 | serum_creatinine | numerical | သွေးထဲရှိ serum creatinine အဆင့် | 0.5 |
| 9 | serum_sodium | numerical | သွေးထဲရှိ serum sodium အဆင့် | jun |
| 10 | sex | boolean | အမျိုးသမီး သို့မဟုတ် အမျိုးသား | 0 or 1 |
| 11 | smoking | boolean | လူနာသည် ဆေးလိပ်သောက်/မသောက် | 0 or 1 |
| 12 | time | numerical | follow-up အချိန် (ရက်) | 4 |
| ---- | --------------------------- | ----------------- | ----------------------------------------------------------- | ------------------- |
| 21 | DEATH_EVENT [Target] | boolean | follow-up အချိန်အတွင်း လူနာ သေဆုံး/မသေဆုံး | 0 or 1 |
Dataset ရရှိပြီးပါက Azure တွင် project ကို စတင်နိုင်ပါသည်။
2. Azure ML Studio တွင် Low code/No code နည်းလမ်းဖြင့် မော်ဒယ်ကို လေ့ကျင့်ခြင်း
2.1 Azure ML workspace တစ်ခု ဖန်တီးခြင်း
Azure ML တွင် မော်ဒယ်ကို လေ့ကျင့်ရန်အတွက် အရင်ဆုံး Azure ML workspace တစ်ခု ဖန်တီးရမည်။
Workspace သည် Azure Machine Learning အတွက် အထက်ဆုံး resource ဖြစ်ပြီး ML workflow များကို စီမံခန့်ခွဲရန် အချက်အလက်များကို စုစည်းထားသည်။
Workspace သည် training run များ၏ မှတ်တမ်းများ၊ log များ၊ metrics များ၊ output များနှင့် script များ၏ snapshot ကို သိမ်းဆည်းထားသည်။
ဤအချက်အလက်များကို အသုံးပြု၍ အကောင်းဆုံး မော်ဒယ်ကို ရွေးချယ်နိုင်သည်။ Learn more
Browser အနေနှင့် operating system နှင့် ကိုက်ညီသော နောက်ဆုံး version ကို အသုံးပြုရန် အကြံပြုသည်။
အောက်ပါ browser များကို အထောက်အပံ့ပေးသည်-
- Microsoft Edge (နောက်ဆုံး version)
- Safari (Mac အတွက် နောက်ဆုံး version)
- Chrome (နောက်ဆုံး version)
- Firefox (နောက်ဆုံး version)
Azure Machine Learning ကို အသုံးပြုရန်အတွက် သင့် Azure subscription တွင် workspace တစ်ခု ဖန်တီးပါ။
ဤ workspace ကို ML workload များနှင့် ဆက်စပ်သော data, compute resources, code, models နှင့် artifacts များကို စီမံခန့်ခွဲရန် အသုံးပြုနိုင်သည်။
မှတ်ချက်: Azure ML workspace ရှိနေသည့်အချိန်အတွင်း သင့် Azure subscription တွင် data storage အတွက် အနည်းငယ် ကုန်ကျမှုရှိမည်ဖြစ်သည်။
Workspace ကို မသုံးတော့ပါက delete လုပ်ရန် အကြံပြုသည်။
-
Microsoft credentials ဖြင့် Azure portal တွင် sign in လုပ်ပါ။
-
+Create a resource ကို ရွေးချယ်ပါ။
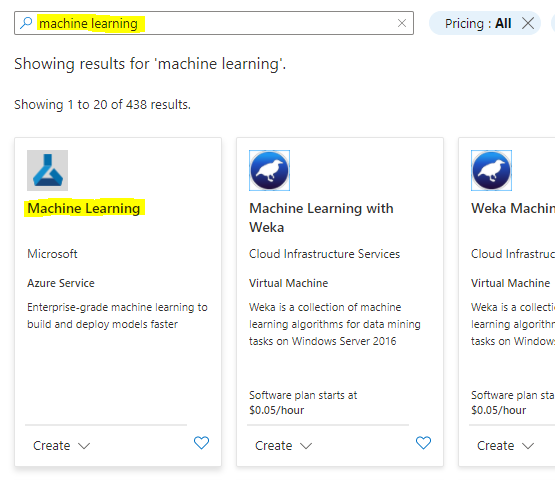
Machine Learning ကို ရှာဖွေပြီး Machine Learning tile ကို ရွေးချယ်ပါ။
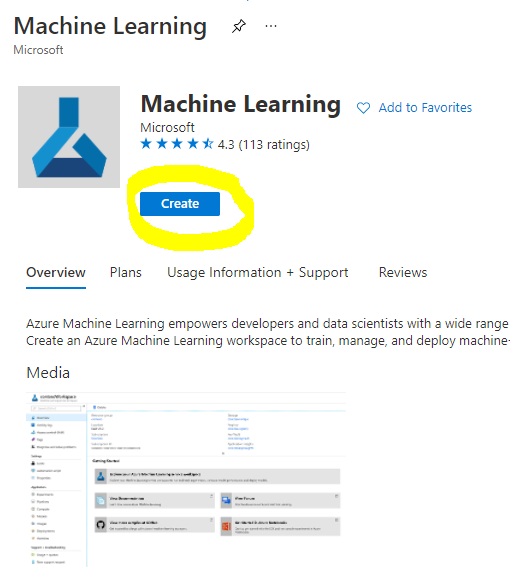
Create button ကို နှိပ်ပါ။
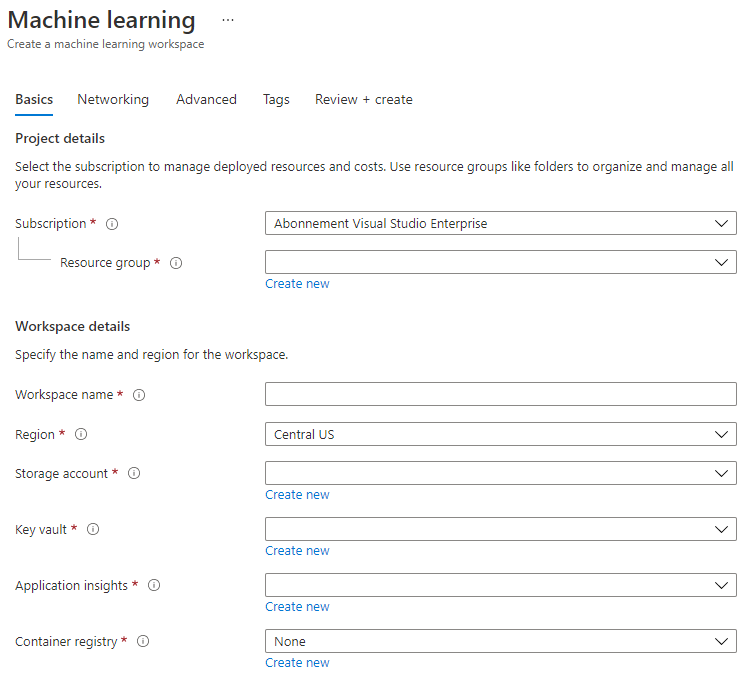
အောက်ပါအတိုင်း setting များကို ဖြည့်ပါ-
- Subscription: သင့် Azure subscription
- Resource group: Resource group တစ်ခု ဖန်တီး/ရွေးချယ်ပါ
- Workspace name: Workspace အတွက် ထူးခြားသော နာမည်တစ်ခု ထည့်ပါ
- Region: သင့်နီးစပ်ရာ ဒေသကို ရွေးချယ်ပါ
- Storage account: Workspace အတွက် default storage account
- Key vault: Workspace အတွက် default key vault
- Application insights: Workspace အတွက် default application insights resource
- Container registry: မော်ဒယ်ကို container သို့ deploy လုပ်သောအခါ auto ဖန်တီးမည်။
- Create + review ကို နှိပ်ပြီး create button ကို နှိပ်ပါ။
-
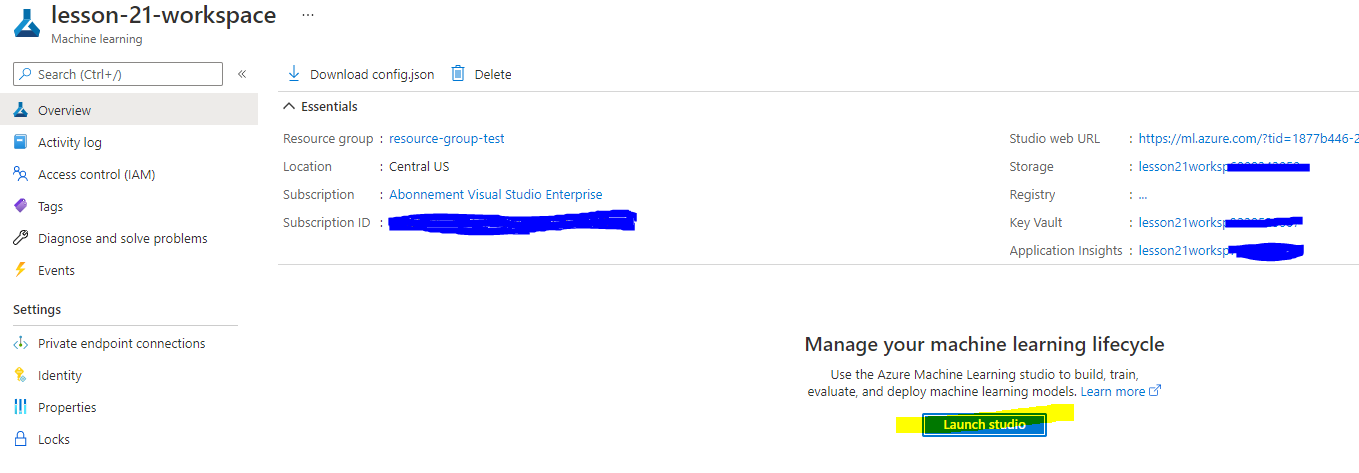
Workspace ဖန်တီးမှုအတွက် မိနစ်အနည်းငယ် စောင့်ပါ။ ပြီးလျှင် portal တွင် workspace ကို သွားပါ။
Machine Learning Azure service မှ workspace ကို ရှာနိုင်သည်။ -
Workspace ၏ Overview page တွင် Azure Machine Learning studio ကို launch လုပ်ပါ (သို့မဟုတ် browser tab အသစ်တွင် https://ml.azure.com သို့ သွားပါ)။
Microsoft account ဖြင့် Azure Machine Learning studio တွင် sign in လုပ်ပါ။
Azure directory, subscription နှင့် Azure ML workspace ကို ရွေးချယ်ပါ။
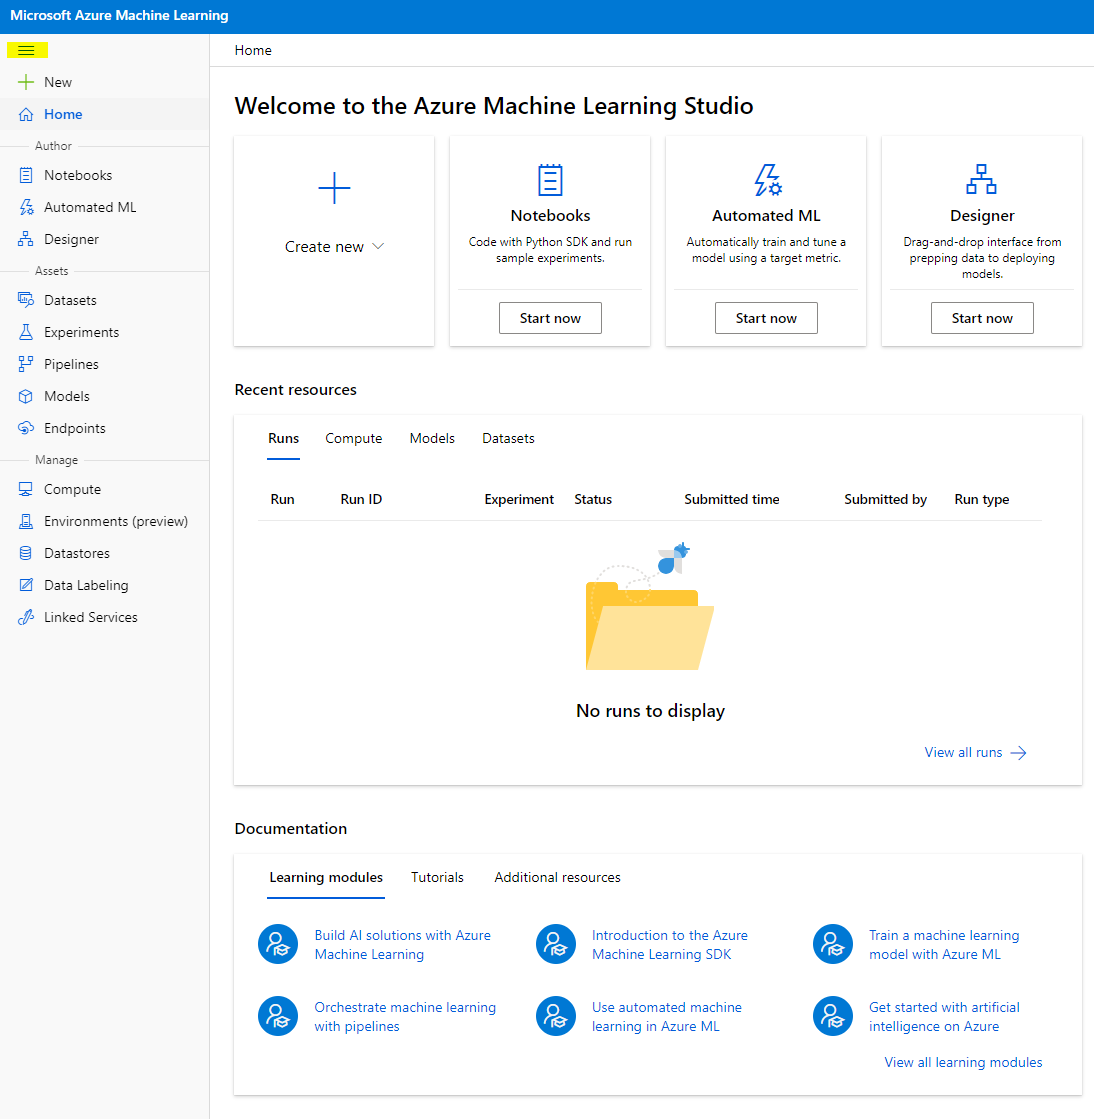
- Azure Machine Learning studio တွင် ☰ icon ကို toggle လုပ်၍ interface ၏ စာမျက်နှာများကို ကြည့်ပါ။
Workspace resources များကို စီမံခန့်ခွဲရန် ဤစာမျက်နှာများကို အသုံးပြုနိုင်သည်။
Workspace ကို Azure portal မှ စီမံနိုင်သော်လည်း data scientist များနှင့် ML operations engineer များအတွက် Azure ML Studio သည် ပိုမိုအာရုံစိုက်သော interface ကို ပေးသည်။
2.2 Compute Resources
Compute Resources သည် cloud-based resource များဖြစ်ပြီး မော်ဒယ်လေ့ကျင့်ခြင်းနှင့် data စူးစမ်းမှုလုပ်ငန်းစဉ်များကို run လုပ်နိုင်သည်။
Compute resource များတွင် အောက်ပါအမျိုးအစား ၄ မျိုး ပါဝင်သည်-
- Compute Instances: Data scientist များအတွက် development workstation များဖြစ်ပြီး data နှင့် မော်ဒယ်များကို အလုပ်လုပ်ရန် အသုံးပြုနိုင်သည်။
Virtual Machine (VM) တစ်ခု ဖန်တီးပြီး notebook instance ကို launch လုပ်ပါ။
Notebook မှ compute cluster ကို ခေါ်၍ မော်ဒယ်ကို လေ့ကျင့်နိုင်သည်။ - Compute Clusters: VM များ၏ scalable cluster များဖြစ်ပြီး experiment code များကို on-demand ဖြင့် process လုပ်ရန် အသုံးပြုသည်။
မော်ဒယ်ကို လေ့ကျင့်ရန် compute cluster များလိုအပ်သည်။
GPU သို့မဟုတ် CPU resource များကို အသုံးပြုနိုင်သည်။ - Inference Clusters: ML မော်ဒယ်များကို deploy လုပ်ရန် target များဖြစ်သည်။
- Attached Compute: Azure ရဲ့ Virtual Machines သို့မဟုတ် Azure Databricks clusters ကဲ့သို့သော ရှိပြီးသား Azure compute resources များနှင့် ချိတ်ဆက်ထားသည်။
2.2.1 သင့် compute resources အတွက် ရွေးချယ်မှုများကို မှန်ကန်စွာ ရွေးချယ်ခြင်း
Compute resource တစ်ခုကို ဖန်တီးရာတွင် အရေးကြီးသော ဆုံးဖြတ်ချက်များဖြစ်နိုင်သော အချက်အလက်များကို စဉ်းစားရန် လိုအပ်သည်။
CPU သို့မဟုတ် GPU လိုအပ်ပါသလား?
CPU (Central Processing Unit) သည် ကွန်ပျူတာပရိုဂရမ်ကို ဖော်ဆောင်ရန် လိုအပ်သော အမိန့်များကို အကောင်အထည်ဖော်ပေးသည့် အီလက်ထရောနစ် စက်ကိရိယာဖြစ်သည်။ GPU (Graphics Processing Unit) သည် ဂရပ်ဖစ်ဆိုင်ရာ ကုဒ်များကို အလွန်မြန်ဆန်စွာ အကောင်အထည်ဖော်နိုင်သော အထူးပြု အီလက်ထရောနစ် စက်ကိရိယာဖြစ်သည်။
CPU နှင့် GPU architecture အကြား အဓိကကွာခြားချက်မှာ CPU သည် အမျိုးမျိုးသော တာဝန်များကို မြန်ဆန်စွာ (CPU clock speed ဖြင့် တိုင်းတာသည်) ဆောင်ရွက်ရန် ရည်ရွယ်ထားပြီး တစ်ချိန်တည်းတွင် လုပ်ဆောင်နိုင်သော တာဝန်များအရေအတွက်မှာ ကန့်သတ်ထားသည်။ GPU များသည် parallel computing အတွက် ရည်ရွယ်ထားပြီး deep learning tasks များတွင် ပိုမိုထူးချွန်သည်။
| CPU | GPU |
|---|---|
| စျေးနှုန်း ပိုသက်သာ | စျေးနှုန်း ပိုကြီး |
| တစ်ချိန်တည်းတွင် လုပ်ဆောင်နိုင်မှု အနည်းဆုံး | တစ်ချိန်တည်းတွင် လုပ်ဆောင်နိုင်မှု အများဆုံး |
| Deep learning မော်ဒယ်များကို လေ့ကျင့်ရာတွင် ပိုနှေး | Deep learning အတွက် အကောင်းဆုံး |
Cluster Size
Cluster size ပိုကြီးလျှင် စျေးနှုန်းပိုကြီးသော်လည်း တုံ့ပြန်မှု ပိုမိုကောင်းမွန်လာမည်။ ထို့ကြောင့် အချိန်ရှိပြီး ငွေမလုံလောက်ပါက cluster size သေးငယ်သော cluster ကို စတင်သုံးပါ။ အချိန်မရှိပြီး ငွေရှိပါက cluster size ကြီးမားသော cluster ကို စတင်သုံးပါ။
VM Size
RAM, disk, core အရေအတွက်နှင့် clock speed size ကို သင့်အချိန်နှင့် ဘတ်ဂျက်အခြေအနေအရ ပြောင်းလဲနိုင်သည်။ အဆိုပါ parameters များအားလုံးကို တိုးမြှင့်ခြင်းသည် စျေးကြီးလာမည်ဖြစ်သော်လည်း performance ပိုမိုကောင်းမွန်လာမည်။
Dedicated သို့မဟုတ် Low-Priority Instances?
Low-priority instance သည် interruptible ဖြစ်သည်။ Microsoft Azure သည် အဆိုပါ resources များကို အခြား task များတွင် အသုံးပြုနိုင်ပြီး job ကို ခေတ္တရပ်တန့်နိုင်သည်။ Dedicated instance သို့မဟုတ် non-interruptible သည် သင့်ခွင့်ပြုချက်မရှိဘဲ job ကို ရပ်တန့်မည်မဟုတ်ပါ။
ဤအချက်သည် အချိန်နှင့် ငွေကြေးအခြေအနေကို ထည့်စဉ်းစားရန် လိုအပ်သည်။ Interruptible instances များသည် Dedicated instances များထက် စျေးနှုန်း သက်သာသည်။
2.2.2 Compute cluster ဖန်တီးခြင်း
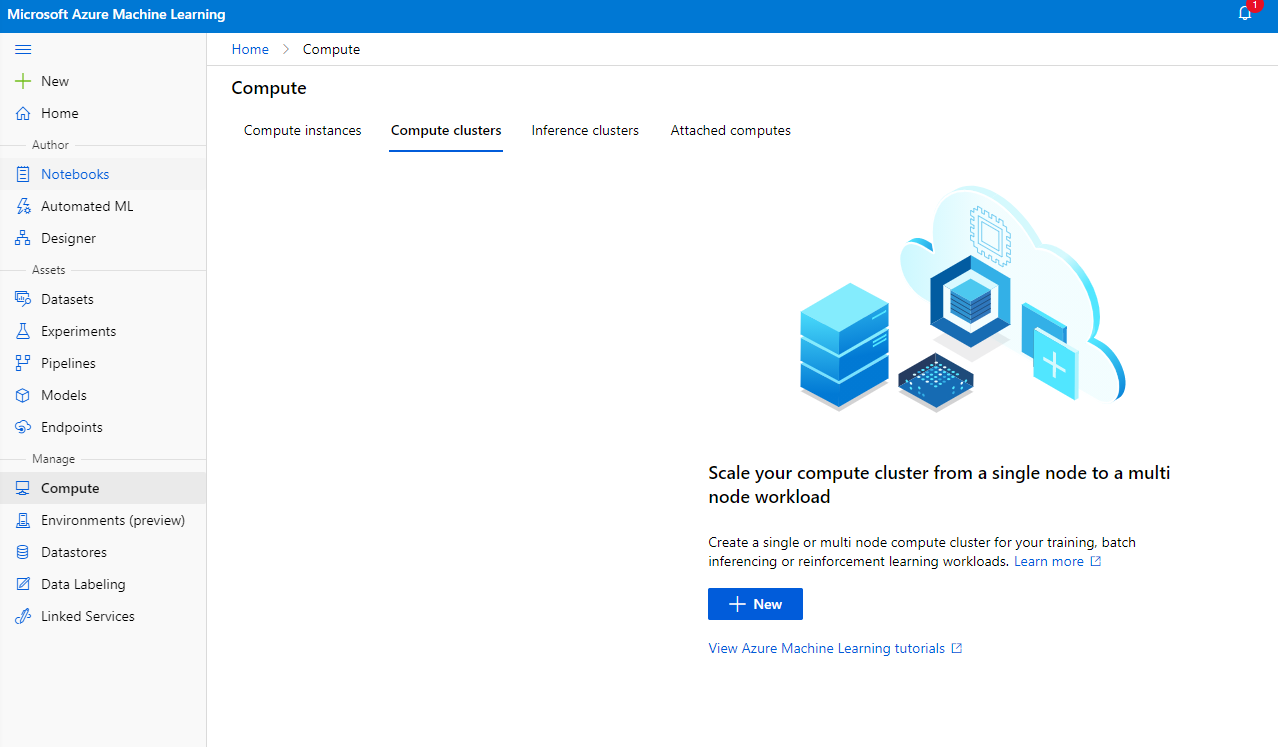
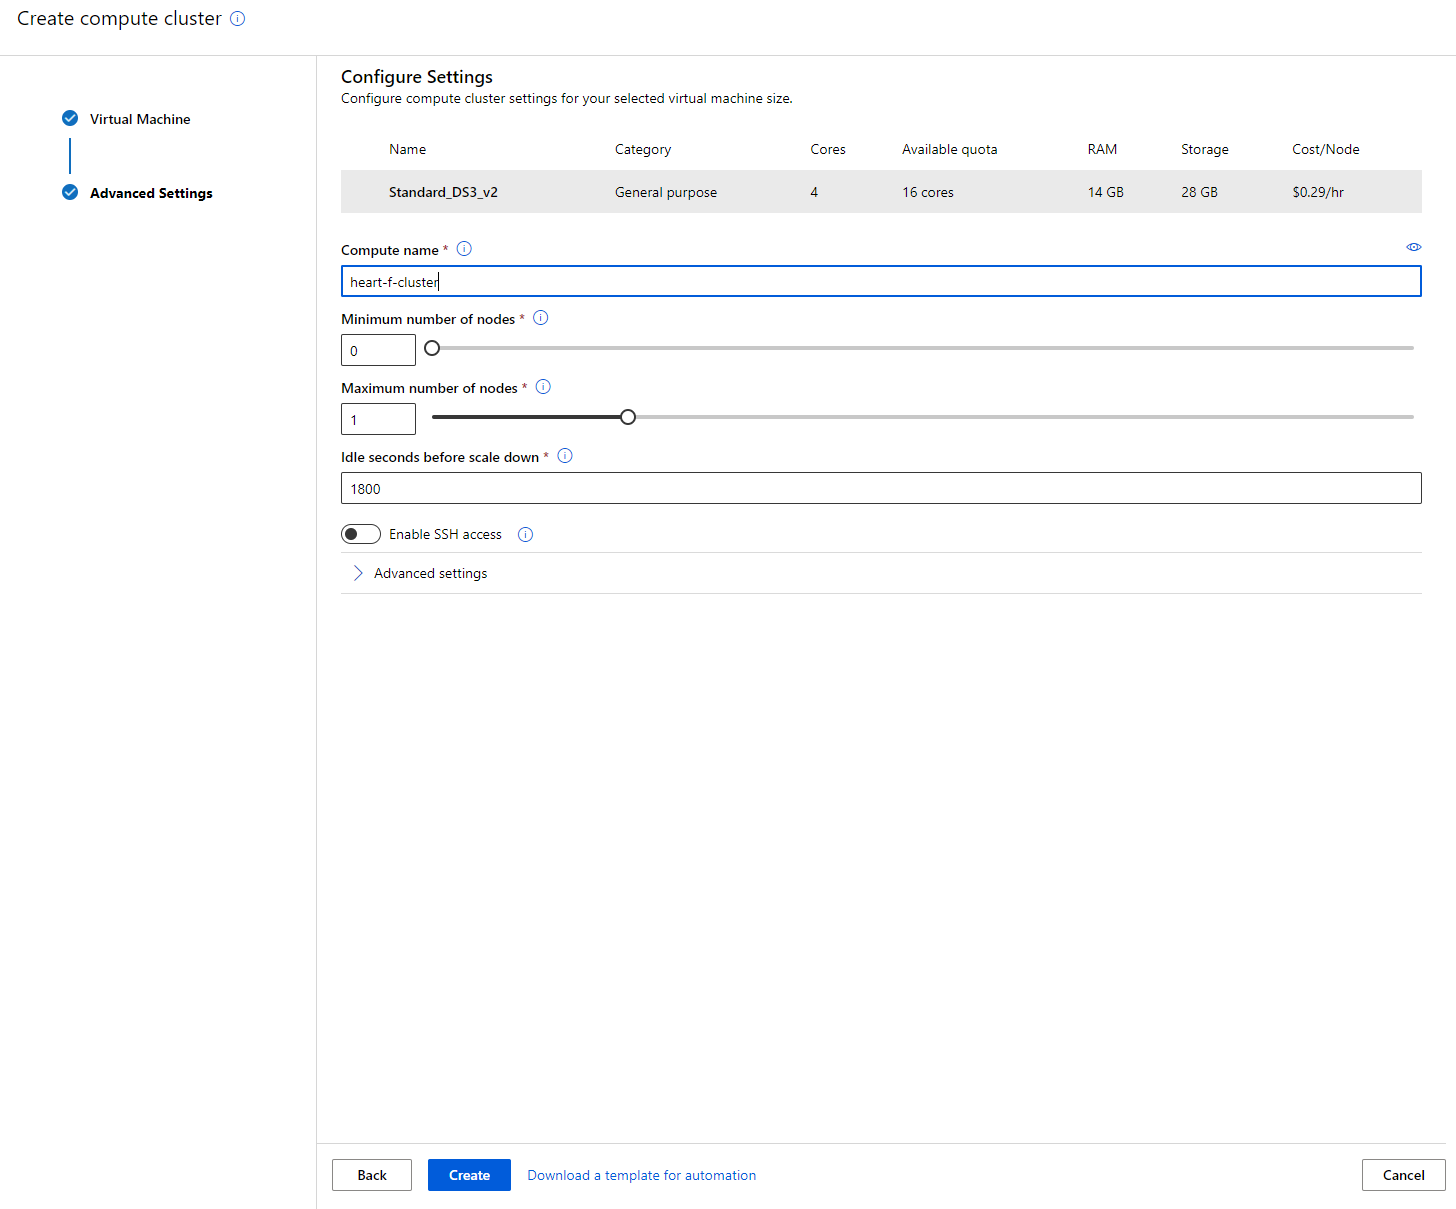
Azure ML workspace တွင် Compute ကို သွားပြီး compute instances, compute clusters, inference clusters နှင့် attached compute များကို ကြည့်နိုင်သည်။ ဤ project အတွက် မော်ဒယ်ကို လေ့ကျင့်ရန် compute cluster တစ်ခုလိုအပ်သည်။ Studio တွင် "Compute" menu ကို နှိပ်ပြီး "Compute cluster" tab ကို ရွေးချယ်ပါ။ "+ New" button ကို နှိပ်ပြီး compute cluster တစ်ခု ဖန်တီးပါ။
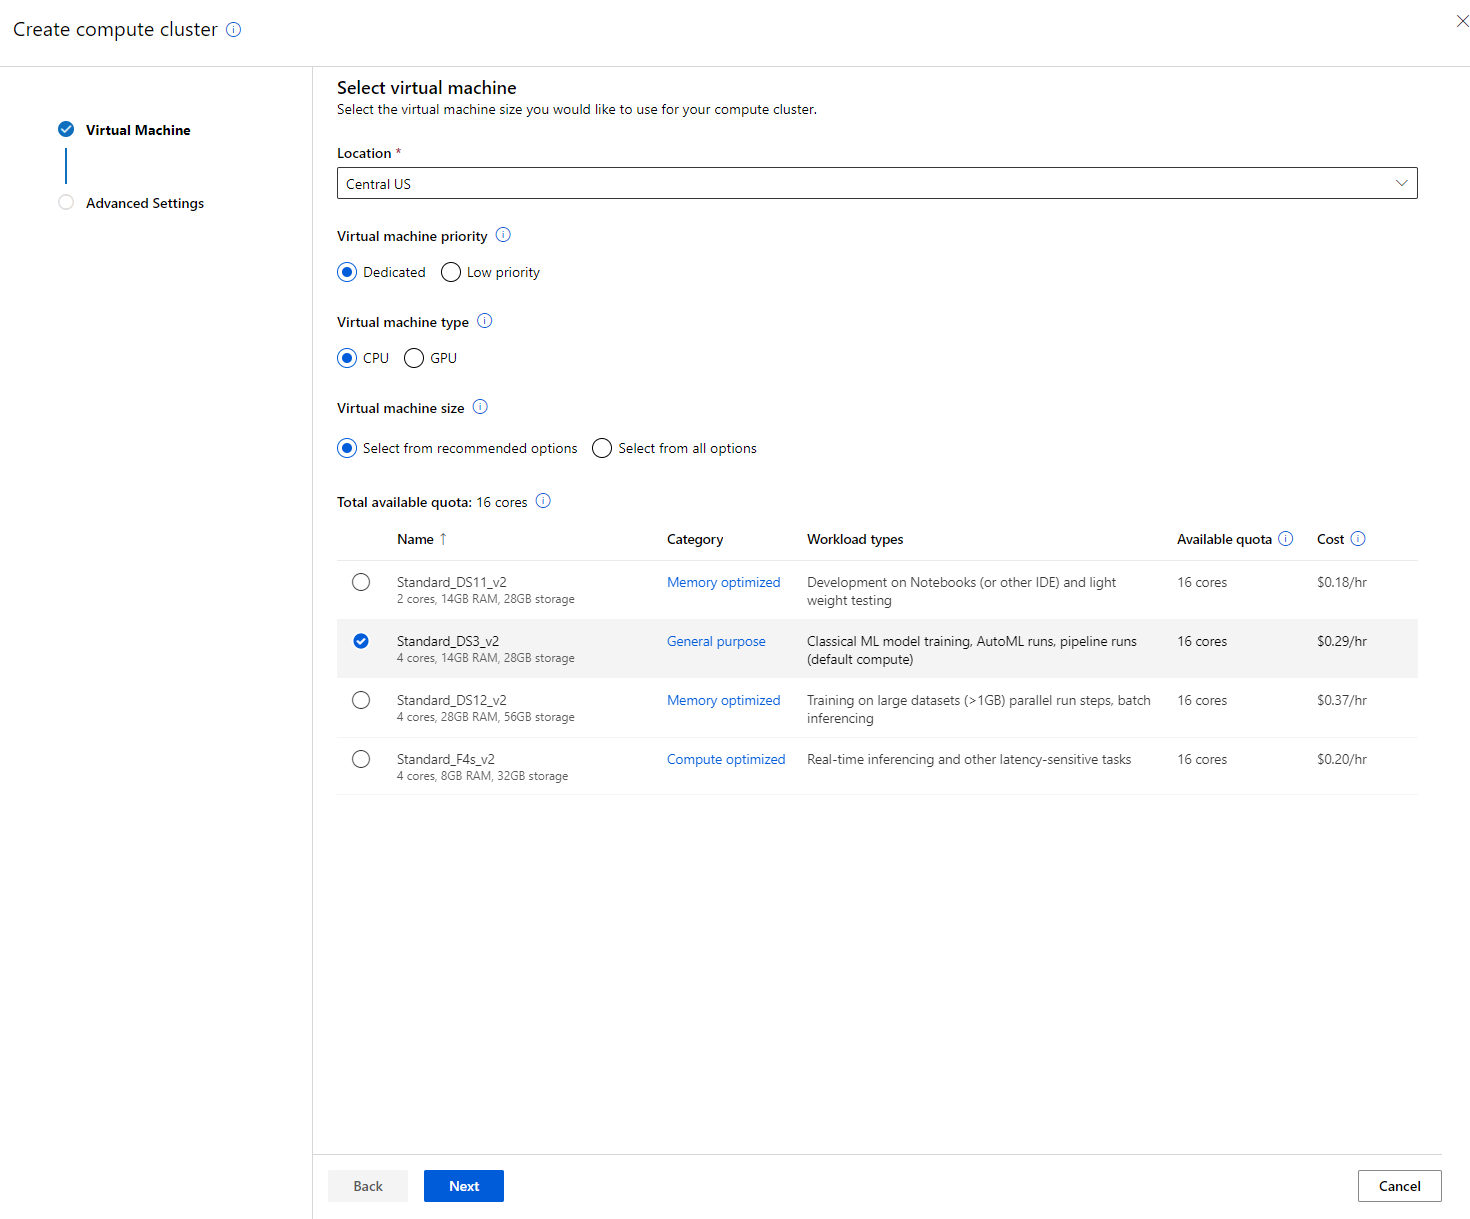
- Dedicated vs Low priority, CPU or GPU, VM size နှင့် core number ကို ရွေးချယ်ပါ (ဤ project အတွက် default settings ကို ထားနိုင်သည်)။
- Next button ကို နှိပ်ပါ။
- Cluster ကို compute name တစ်ခုပေးပါ။
- Minimum/Maximum nodes အရေအတွက်, Idle seconds before scale down, SSH access ကို ရွေးချယ်ပါ။ Minimum nodes အရေအတွက် 0 ဖြစ်ပါက cluster idle ဖြစ်နေစဉ် ငွေကို သက်သာစေမည်။ Maximum nodes အရေအတွက် ပိုများလျှင် training ပိုမိုမြန်ဆန်မည်။ Maximum nodes အရေအတွက်အတွက် အကြံပြုချက်မှာ 3 ဖြစ်သည်။
- "Create" button ကို နှိပ်ပါ။ ဤအဆင့်သည် မိနစ်အနည်းငယ်ကြာနိုင်သည်။
အံ့မခန်းပါပဲ! Compute cluster ရှိပြီးနောက် Azure ML Studio သို့ data ကို load လုပ်ရန် လိုအပ်ပါသည်။
2.3 Dataset ကို Load လုပ်ခြင်း
-
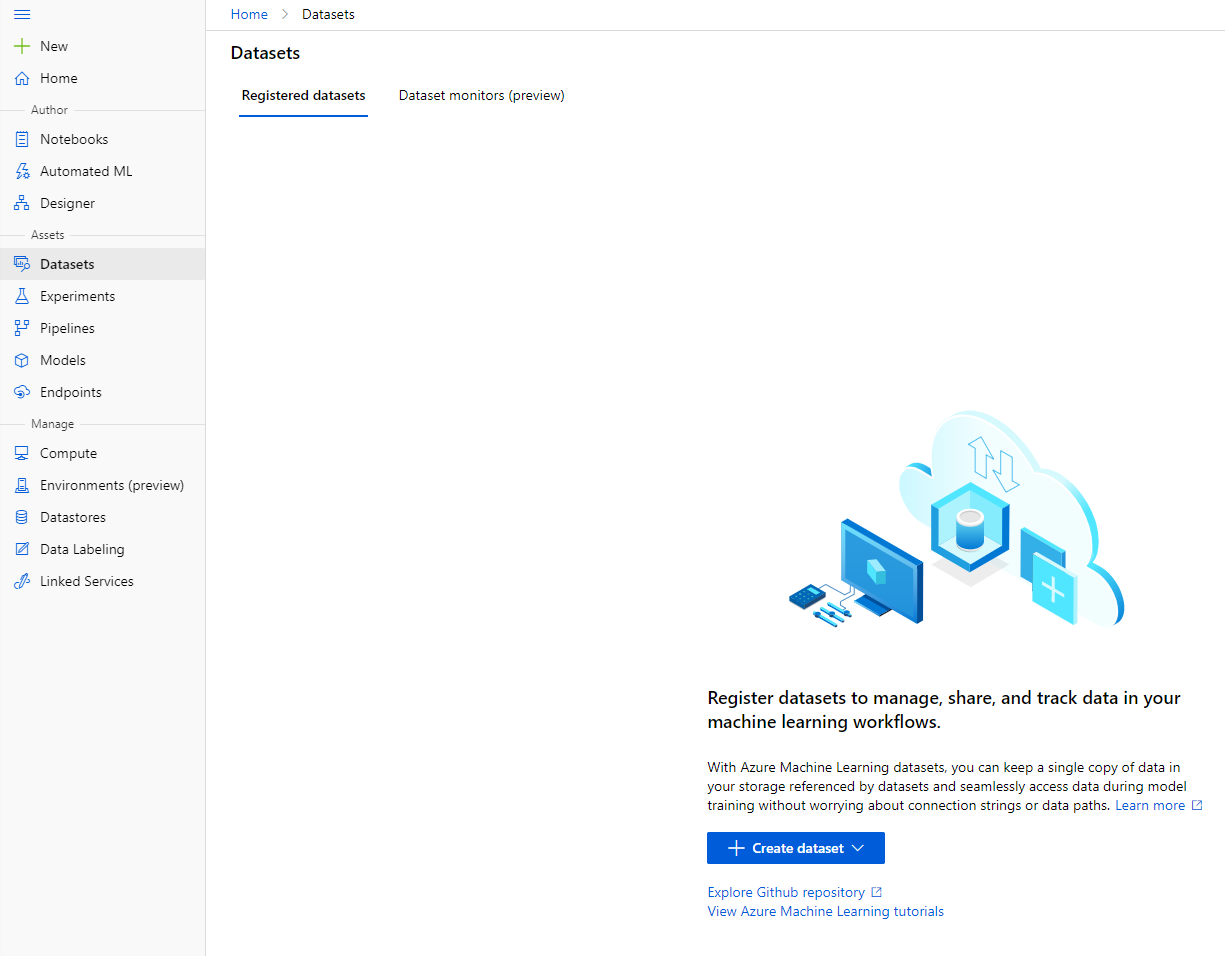
Azure ML workspace တွင် "Datasets" ကို left menu တွင် နှိပ်ပြီး "+ Create dataset" button ကို နှိပ်ပါ။ "From local files" option ကို ရွေးချယ်ပြီး ယခင်က download လုပ်ထားသော Kaggle dataset ကို ရွေးပါ။
-
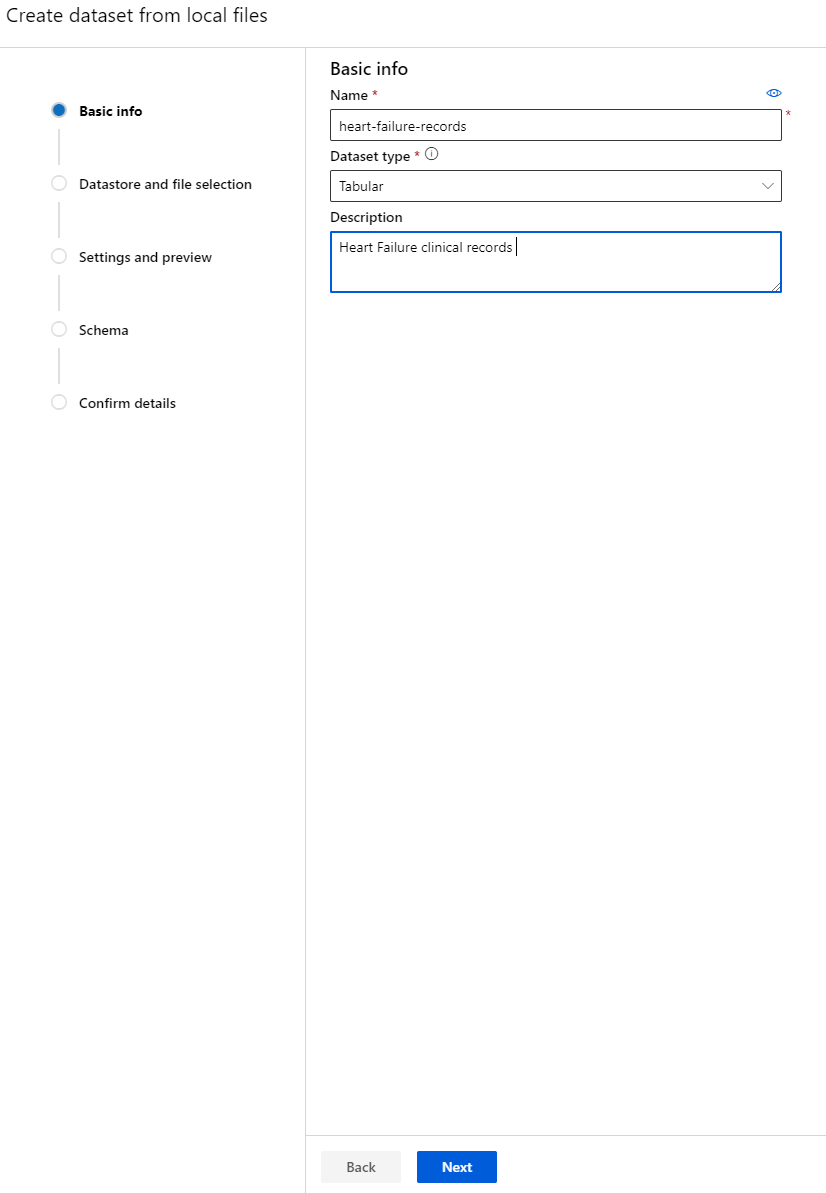
Dataset ကို name, type နှင့် description တစ်ခုပေးပါ။ Next ကို နှိပ်ပါ။ Files မှ data ကို upload လုပ်ပါ။ Next ကို နှိပ်ပါ။
-
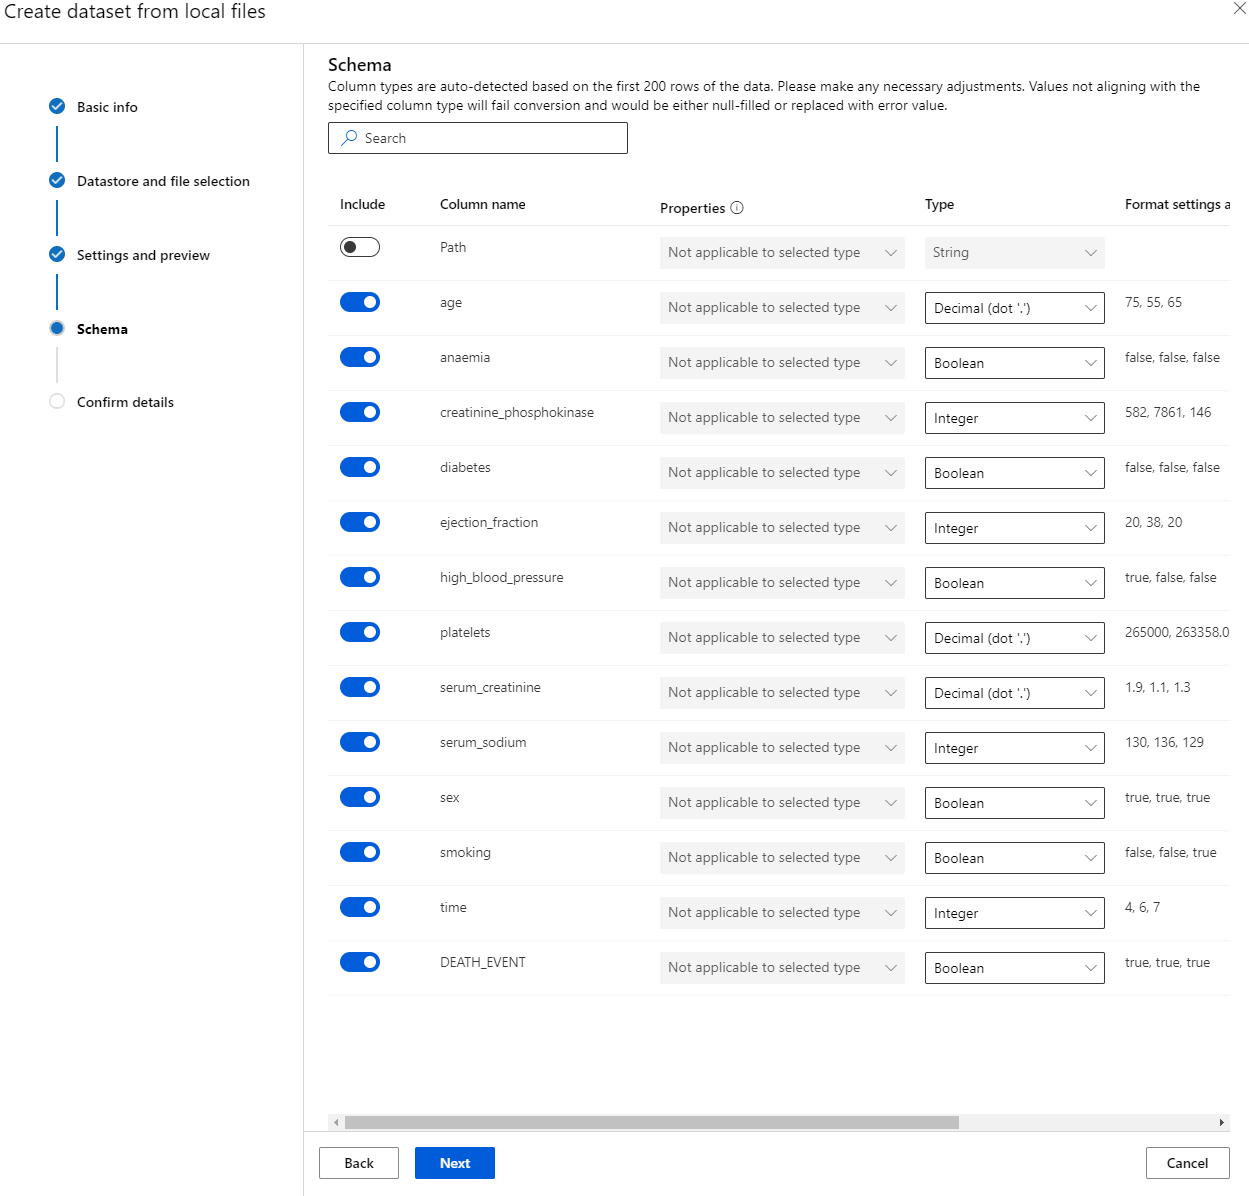
Schema တွင် anaemia, diabetes, high blood pressure, sex, smoking, နှင့် DEATH_EVENT အတွက် data type ကို Boolean သို့ ပြောင်းပါ။ Next ကို နှိပ်ပြီး Create ကို နှိပ်ပါ။
အလွန်ကောင်းမွန်ပါသည်! Dataset ရှိပြီး compute cluster ဖန်တီးပြီးနောက် မော်ဒယ်ကို training စတင်နိုင်ပါပြီ။
2.4 AutoML ဖြင့် Low code/No Code training
Traditional machine learning model ဖွံ့ဖြိုးတိုးတက်မှုသည် အရင်းအမြစ်များကို အလွန်လိုအပ်ပြီး domain knowledge နှင့် အချိန်များကို model များစွာ ဖန်တီးရန်နှင့် နှိုင်းယှဉ်ရန် လိုအပ်သည်။ Automated machine learning (AutoML) သည် machine learning model ဖွံ့ဖြိုးတိုးတက်မှု၏ အချိန်စားသော iterative tasks များကို အလိုအလျောက်လုပ်ဆောင်ခြင်းဖြစ်သည်။
AutoML သည် data scientists, analysts, နှင့် developers များကို ML models များကို အကျယ်အဝန်း, ထိရောက်မှု, နှင့် ထုတ်လုပ်မှုမြင့်မားစွာ ဖန်တီးရန် ခွင့်ပြုသည်။ Learn more
-
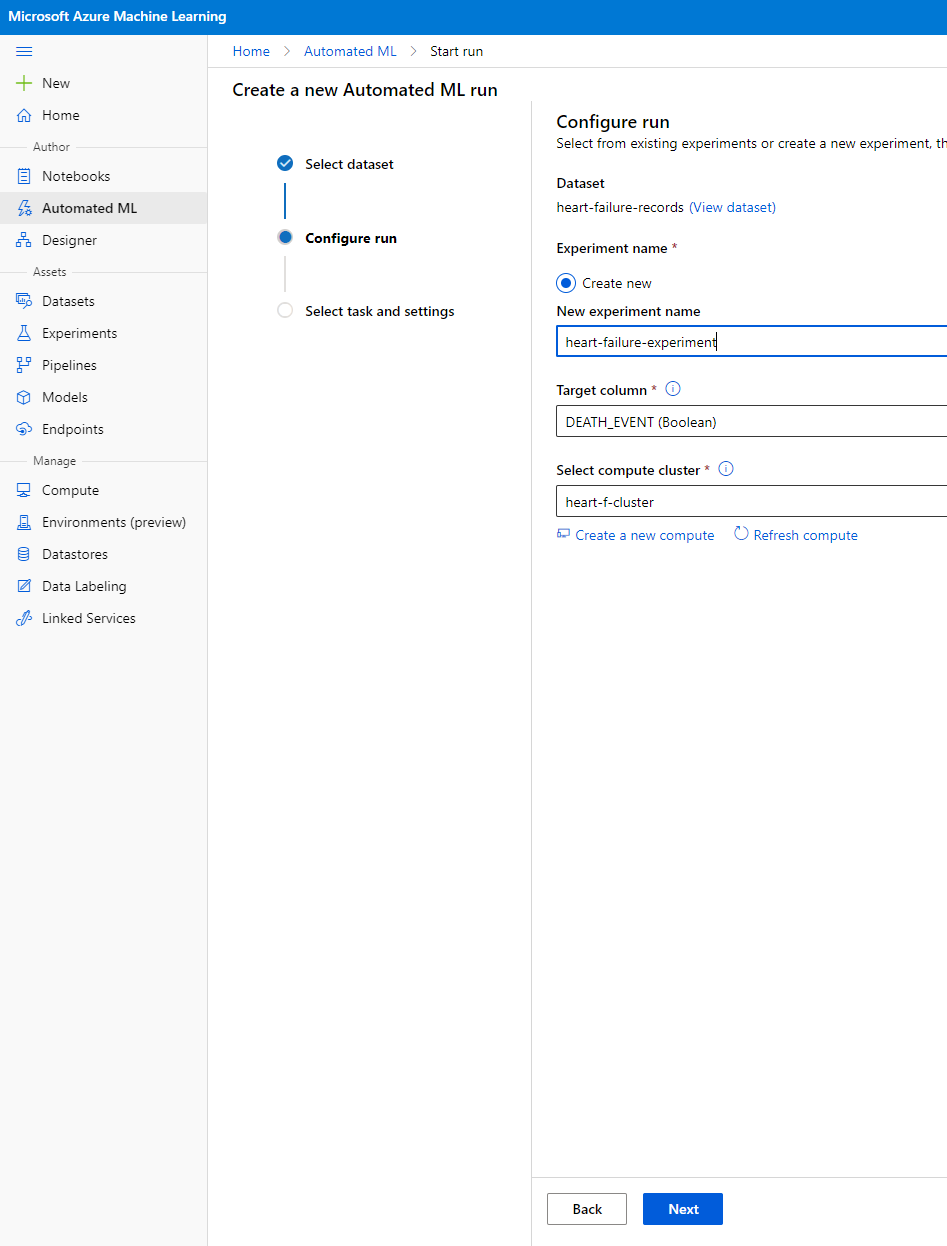
Azure ML workspace တွင် "Automated ML" ကို left menu တွင် နှိပ်ပြီး upload လုပ်ထားသော dataset ကို ရွေးပါ။ Next ကို နှိပ်ပါ။
-
Experiment name အသစ်, target column (DEATH_EVENT) နှင့် ဖန်တီးထားသော compute cluster ကို ထည့်ပါ။ Next ကို နှိပ်ပါ။
-
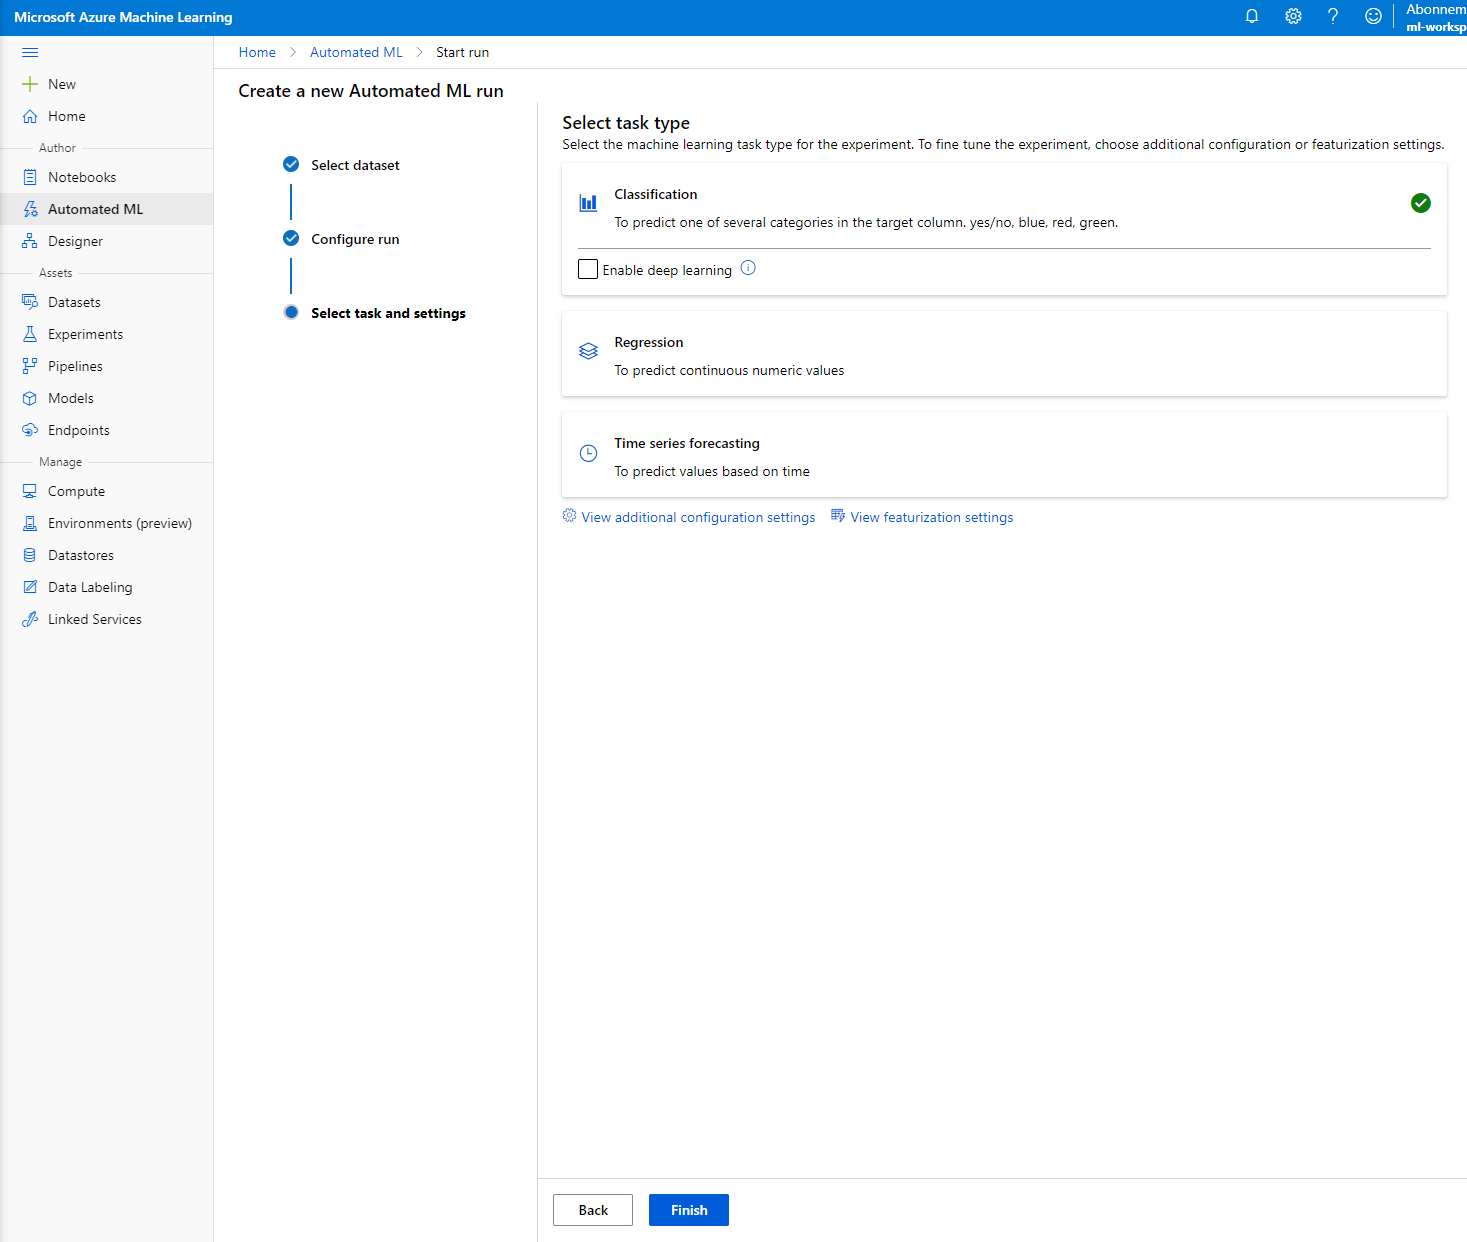
"Classification" ကို ရွေးပြီး Finish ကို နှိပ်ပါ။ ဤအဆင့်သည် compute cluster size အပေါ်မူတည်၍ 30 မိနစ်မှ 1 နာရီကြာနိုင်သည်။
-
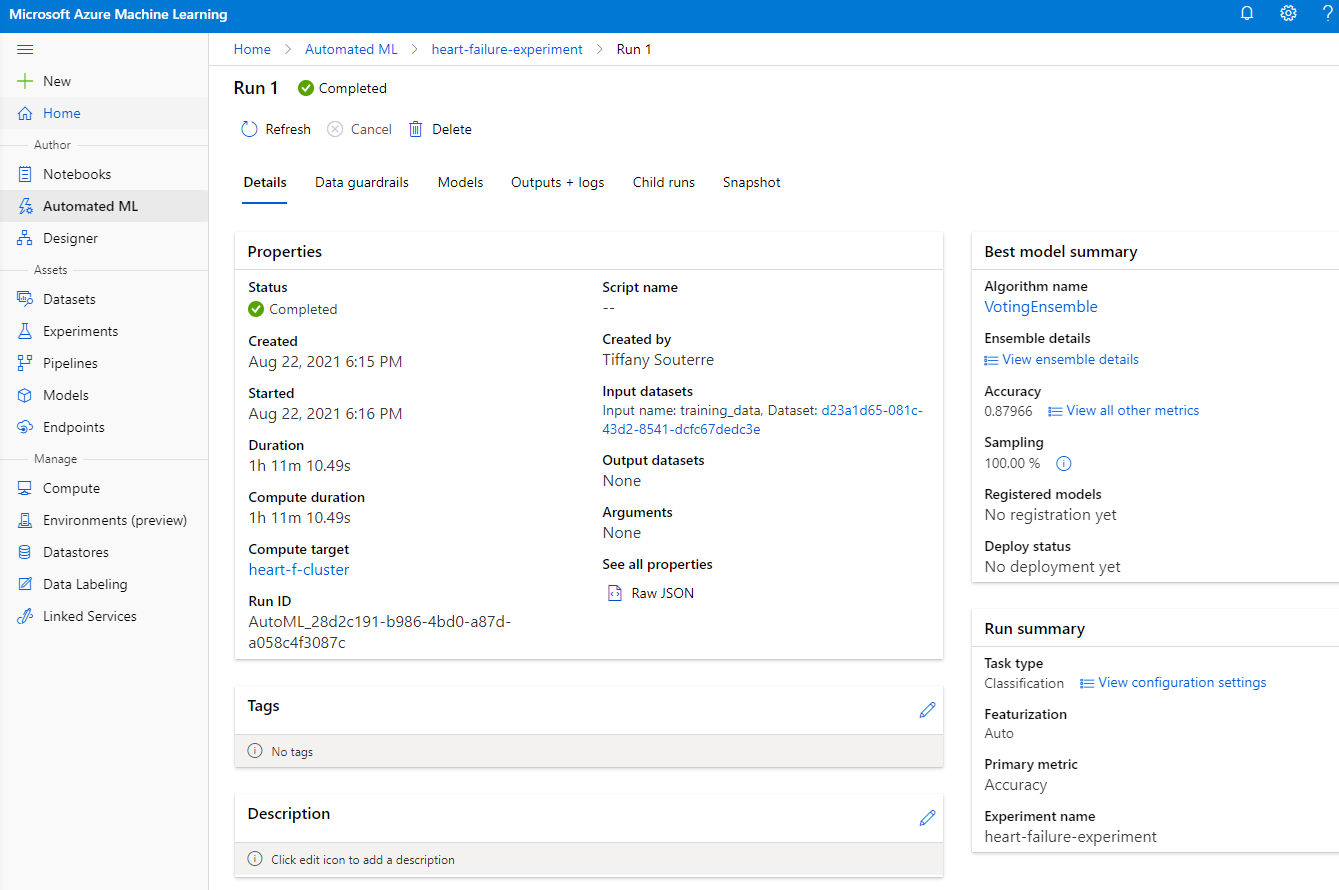
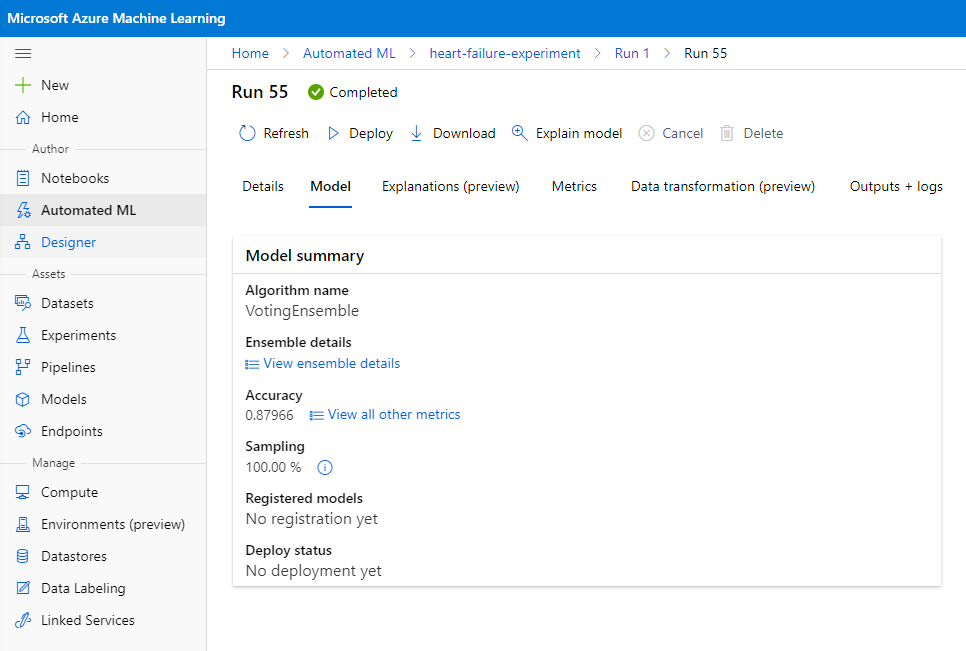
Run ပြီးဆုံးပြီးနောက် "Automated ML" tab ကို နှိပ်ပြီး run ကို ရွေးပါ။ "Best model summary" card တွင် Algorithm ကို နှိပ်ပါ။
ဒီနေရာမှာ AutoML ဖန်တီးထားသော အကောင်းဆုံး model အကြောင်းအရာကို အသေးစိတ်ကြည့်နိုင်ပါသည်။ Models tab တွင် အခြား mode များကိုလည်း စူးစမ်းနိုင်ပါသည်။ Explanations (preview button) တွင် models များကို စစ်ဆေးရန် အချိန်ယူပါ။ AutoML ရွေးချယ်ထားသော အကောင်းဆုံး model ကို ရွေးချယ်ပြီးနောက် model ကို deploy လုပ်ပုံကို ကြည့်မည်။
3. Low code/No Code model deployment နှင့် endpoint consumption
3.1 Model deployment
Automated machine learning interface သည် အကောင်းဆုံး model ကို web service အဖြစ် deploy လုပ်ရန် အဆင့်အနည်းငယ်သာ လိုအပ်သည်။ Deployment သည် model ကို အသစ်သော data အပေါ် အတိအကျခန့်မှန်းနိုင်ရန်နှင့် အခွင့်အလမ်းများကို ရှာဖွေရန် အတူတကွပေါင်းစပ်ခြင်းဖြစ်သည်။
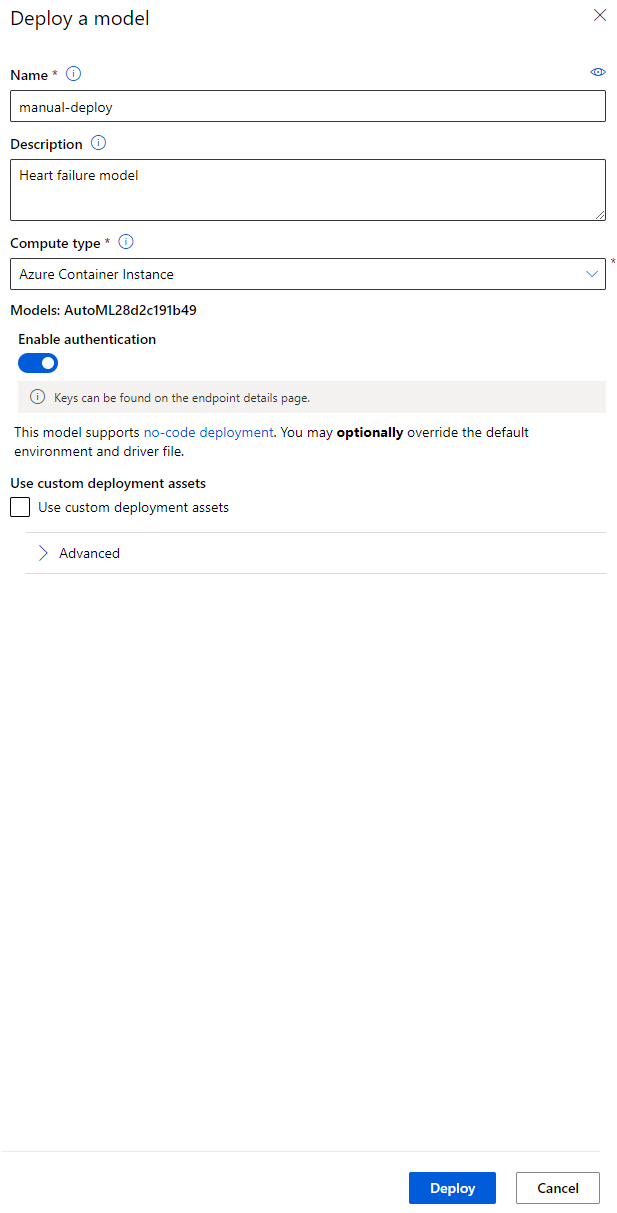
Best model description တွင် "Deploy" button ကို နှိပ်ပါ။
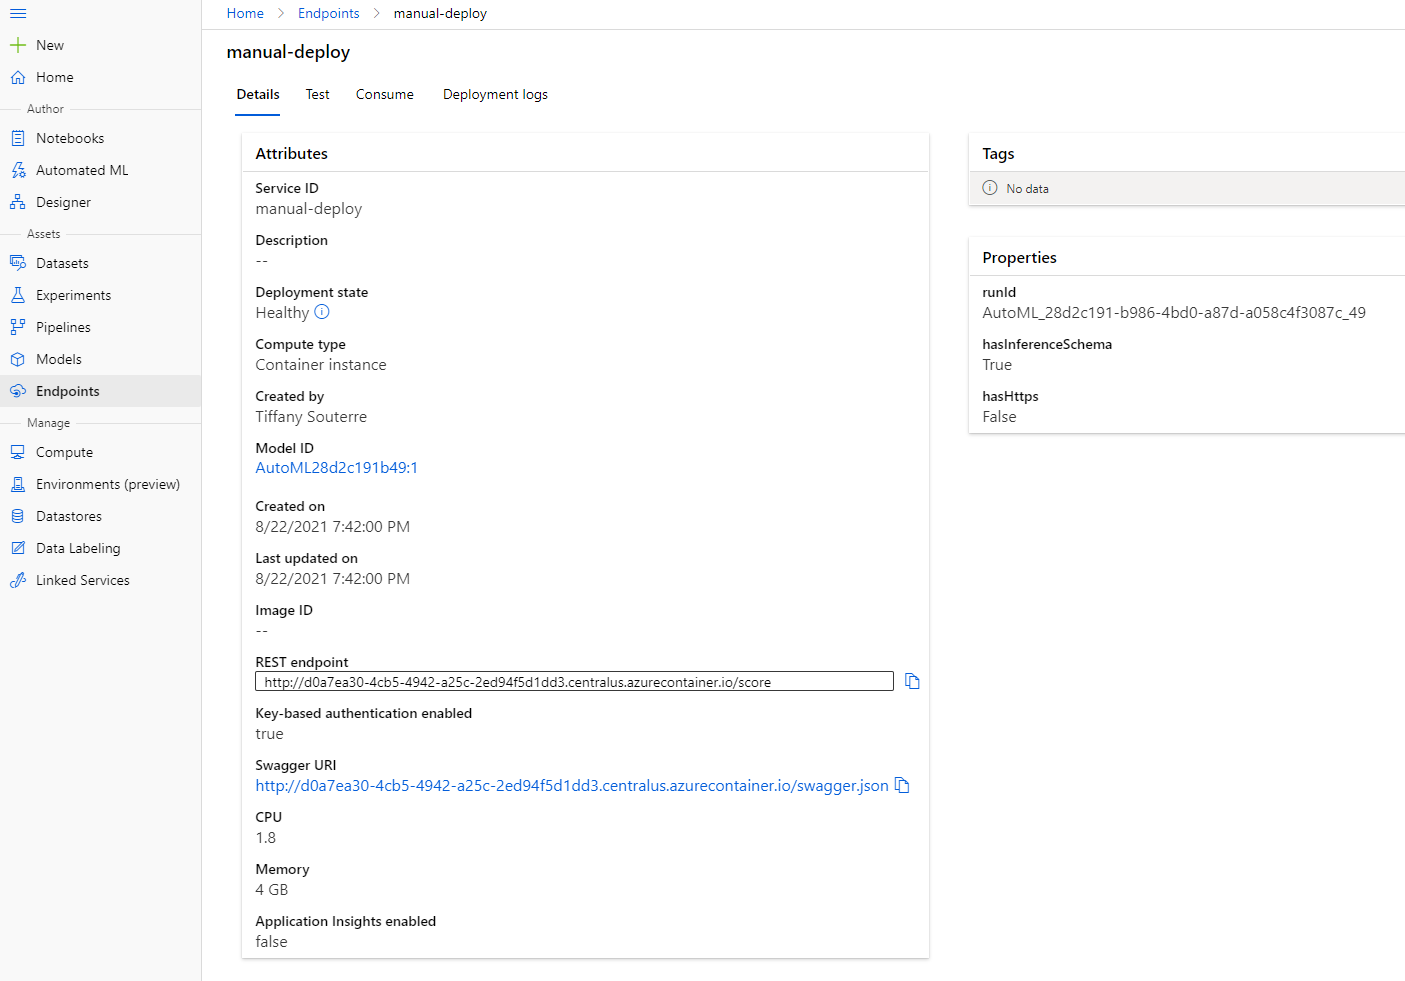
- Name, description, compute type (Azure Container Instance), authentication ကို enable လုပ်ပြီး Deploy ကို နှိပ်ပါ။ ဤအဆင့်သည် 20 မိနစ်ခန့်ကြာနိုင်သည်။ Deployment process တွင် model ကို register လုပ်ခြင်း, resources များကို ဖန်တီးခြင်းနှင့် web service အတွက် configure လုပ်ခြင်းတို့ ပါဝင်သည်။ Deploy status အောက်တွင် status message တစ်ခု ပေါ်လာမည်။ Refresh ကို အကြိမ်ကြိမ်နှိပ်ပြီး deployment status ကို စစ်ဆေးပါ။ Status "Healthy" ဖြစ်ပါက deploy လုပ်ပြီး running ဖြစ်နေသည်။
- Deployment ပြီးဆုံးပြီးနောက် Endpoint tab ကို နှိပ်ပြီး deploy လုပ်ထားသော endpoint ကို ရွေးပါ။ Endpoint အကြောင်းအရာအားလုံးကို ဒီနေရာမှာ ကြည့်နိုင်ပါသည်။
အံ့မခန်းပါပဲ! Model ကို deploy လုပ်ပြီးနောက် endpoint consumption ကို စတင်နိုင်ပါပြီ။
3.2 Endpoint consumption
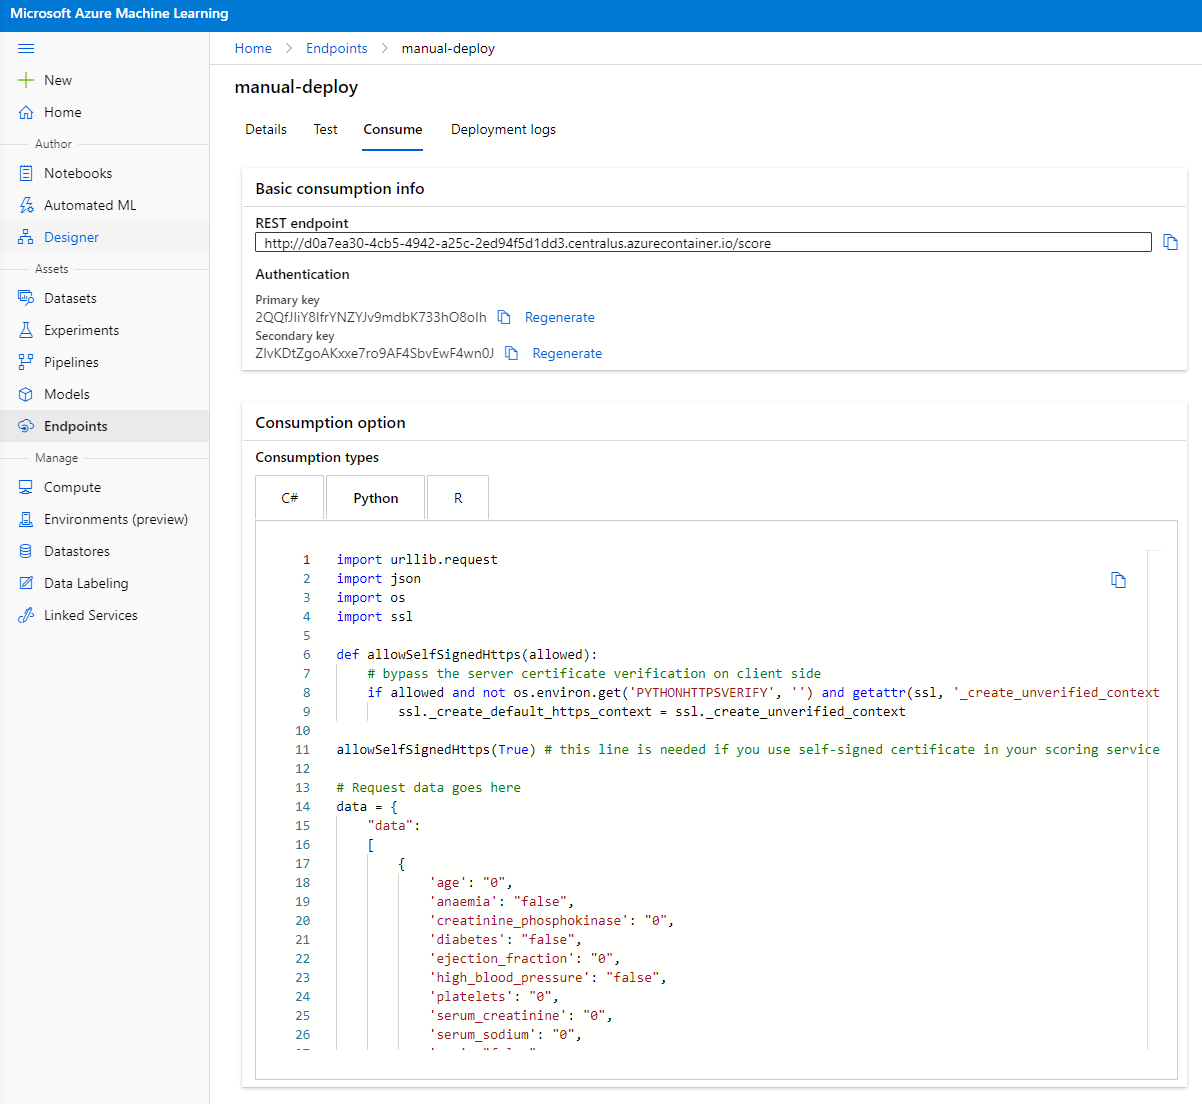
"Consume" tab ကို နှိပ်ပါ။ REST endpoint နှင့် consumption option တွင် python script ကို တွေ့နိုင်ပါသည်။ Python code ကို အချိန်ယူဖတ်ပါ။
ဤ script ကို သင့် local machine မှ တိုက်ရိုက် run လုပ်ပြီး endpoint ကို consume လုပ်နိုင်ပါသည်။
ဤ code မှာ အဓိက 2 လိုင်းကို စဉ်းစားပါ။
url = 'http://98e3715f-xxxx-xxxx-xxxx-9ec22d57b796.centralus.azurecontainer.io/score'
api_key = '' # Replace this with the API key for the web service
url variable သည် consume tab တွင် တွေ့ရသော REST endpoint ဖြစ်ပြီး api_key variable သည် consume tab တွင် တွေ့ရသော primary key ဖြစ်သည် (authentication ကို enable လုပ်ထားပါကသာ ဖြစ်သည်)။ Script သည် endpoint ကို consume လုပ်ပုံမှာ ဤပုံစံဖြစ်သည်။
- Script ကို run လုပ်ပါက အောက်ပါ output ကို တွေ့ရမည်။
    b'"{\\"result\\": [true]}"'
    ```
ဤ output သည် heart failure ရှိမည်ဟု ခန့်မှန်းထားသော အချက်ကို ဆိုလိုသည်။ Script တွင် default data အားလုံးသည် 0 နှင့် false ဖြစ်နေသည်ကို သတိပြုပါ။ အောက်ပါ input sample ဖြင့် data ကို ပြောင်းလဲနိုင်သည်။

```python
data = {
    "data":
    [
        {
            'age': "0",
            'anaemia': "false",
            'creatinine_phosphokinase': "0",
            'diabetes': "false",
            'ejection_fraction': "0",
            'high_blood_pressure': "false",
            'platelets': "0",
            'serum_creatinine': "0",
            'serum_sodium': "0",
            'sex': "false",
            'smoking': "false",
            'time': "0",
        },
        {
            'age': "60",
            'anaemia': "false",
            'creatinine_phosphokinase': "500",
            'diabetes': "false",
            'ejection_fraction': "38",
            'high_blood_pressure': "false",
            'platelets': "260000",
            'serum_creatinine': "1.40",
            'serum_sodium': "137",
            'sex': "false",
            'smoking': "false",
            'time': "130",
        },
    ],
}
Script သည် အောက်ပါ output ကို ပြန်ပေးမည်။
    b'"{\\"result\\": [true, false]}"'
    ```

ဂုဏ်ယူပါတယ်! Azure ML တွင် model ကို train လုပ်ပြီး deploy လုပ်ပြီး endpoint ကို consume လုပ်နိုင်ပါပြီ!

> **_NOTE:_** Project ပြီးဆုံးပါက resources အားလုံးကို delete လုပ်ရန် မမေ့ပါနှင့်။
## 🚀 Challenge

AutoML ဖန်တီးထားသော အကောင်းဆုံး model များ၏ explanations နှင့် details ကို အနီးကပ်ကြည့်ပါ။ အကောင်းဆုံး model သည် အခြား model များထက် အကောင်းဆုံးဖြစ်ရသည့် အကြောင်းရင်းကို နားလည်ရန် ကြိုးစားပါ။ Compare လုပ်ထားသော algorithms များက ဘာတွေလဲ? အကြားကွာခြားချက်များက ဘာတွေလဲ? ဤကိစ္စတွင် အကောင်းဆုံး model သည် ဘာကြောင့် ပိုမိုထူးချွန်သနည်း?

## [Post-lecture quiz](https://ff-quizzes.netlify.app/en/ds/quiz/35)

## Review & Self Study

ဤသင်ခန်းစာတွင် heart failure risk ကို cloud တွင် Low code/No code နည်းဖြင့် ခန့်မှန်းရန် model ကို train, deploy နှင့် consume လုပ်ပုံကို သင်ယူခဲ့သည်။ AutoML ဖန်တီးထားသော model explanations များကို အနီးကပ်ကြည့်ပြီး အကောင်းဆုံး model သည် အခြား model များထက် အကောင်းဆုံးဖြစ်ရသည့် အကြောင်းရင်းကို နားလည်ရန် ကြိုးစားပါ။

Low code/No code AutoML အကြောင်းကို [documentation](https://docs.microsoft.com/azure/machine-learning/tutorial-first-experiment-automated-ml?WT.mc_id=academic-77958-bethanycheum&ocid=AID3041109) မှာ ဆက်လက်ဖတ်ရှုနိုင်ပါသည်။

## Assignment

[Low code/No code Data Science project on Azure ML](assignment.md)

---

**အကြောင်းကြားချက်**:
ဤစာရွက်စာတမ်းကို AI ဘာသာပြန်ဝန်ဆောင်မှု [Co-op Translator](https://github.com/Azure/co-op-translator) ကို အသုံးပြု၍ ဘာသာပြန်ထားပါသည်။ ကျွန်ုပ်တို့သည် တိကျမှုအတွက် ကြိုးစားနေသော်လည်း၊ အလိုအလျောက် ဘာသာပြန်မှုများတွင် အမှားများ သို့မဟုတ် မမှန်ကန်မှုများ ပါဝင်နိုင်သည်ကို သတိပြုပါ။ မူရင်းဘာသာစကားဖြင့် ရေးသားထားသော စာရွက်စာတမ်းကို အာဏာတရားရှိသော ရင်းမြစ်အဖြစ် သတ်မှတ်သင့်ပါသည်။ အရေးကြီးသော အချက်အလက်များအတွက် လူ့ဘာသာပြန်ပညာရှင်များမှ ပရော်ဖက်ရှင်နယ် ဘာသာပြန်မှုကို အကြံပြုပါသည်။ ဤဘာသာပြန်မှုကို အသုံးပြုခြင်းမှ ဖြစ်ပေါ်လာသော အလွဲအလွတ်များ သို့မဟုတ် အနားလွဲမှုများအတွက် ကျွန်ုပ်တို့သည် တာဝန်မယူပါ။