|
|
|
|
|
# 业务开发-基础业务-品牌管理
|
|
|
|
|
|
|
|
|
|
|
|
## 品牌管理
|
|
|
|
|
|
|
|
|
|
|
|
### 1. 品牌管理基本操作
|
|
|
|
|
|
|
|
|
|
|
|
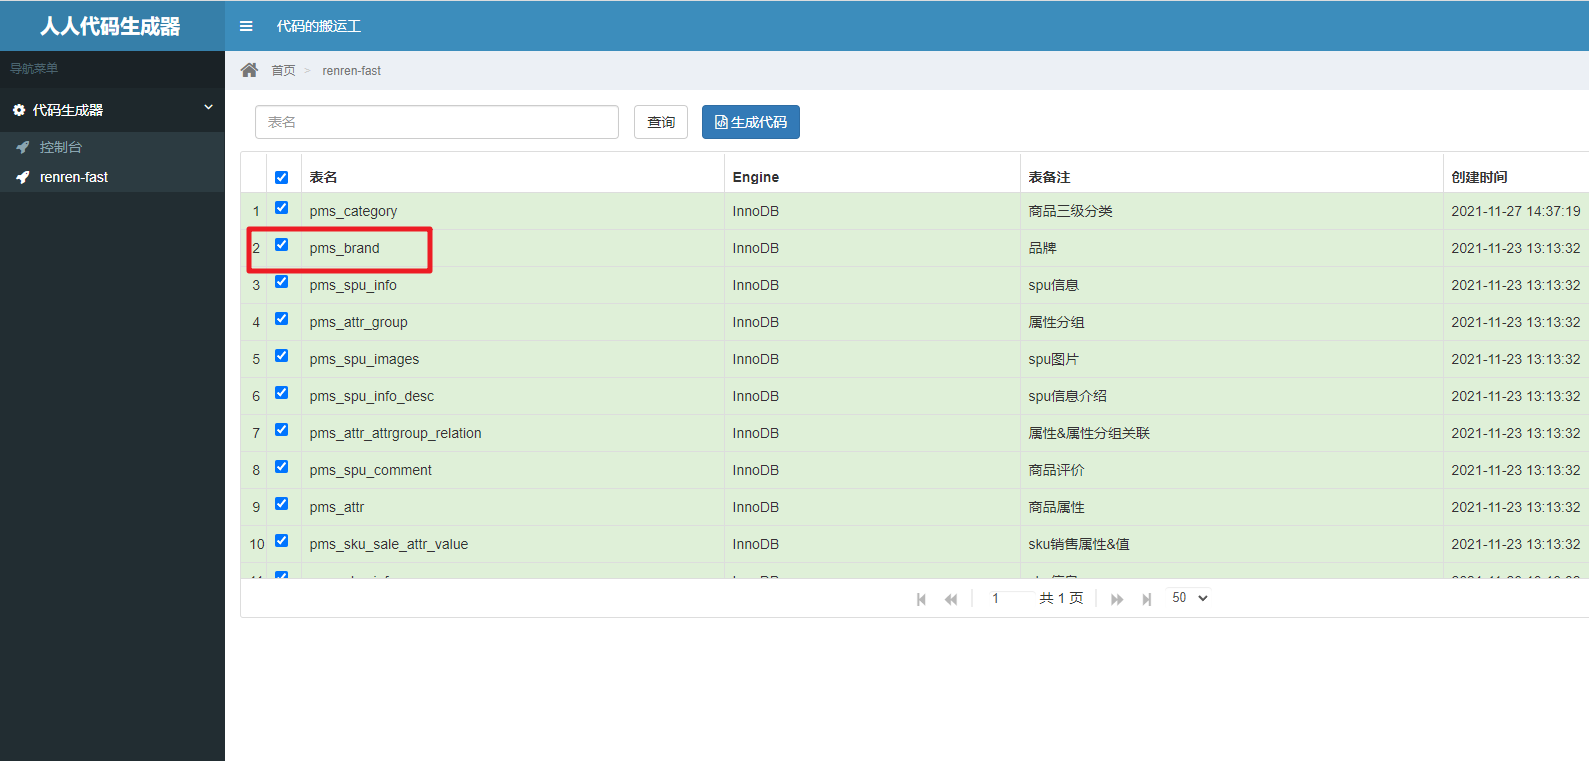
首先完成品牌的基本的操作。就是通过renren-fast-generator项目不光能生成表结构对应的后端模块代码,一会帮我们生成Vue模板代码。
|
|
|
|
|
|
|
|
|
|
|
|
|
|
|
|
|
|
|
|
|
|
|
|
|
|
|
|
|
|
|
|
|
|
|
|
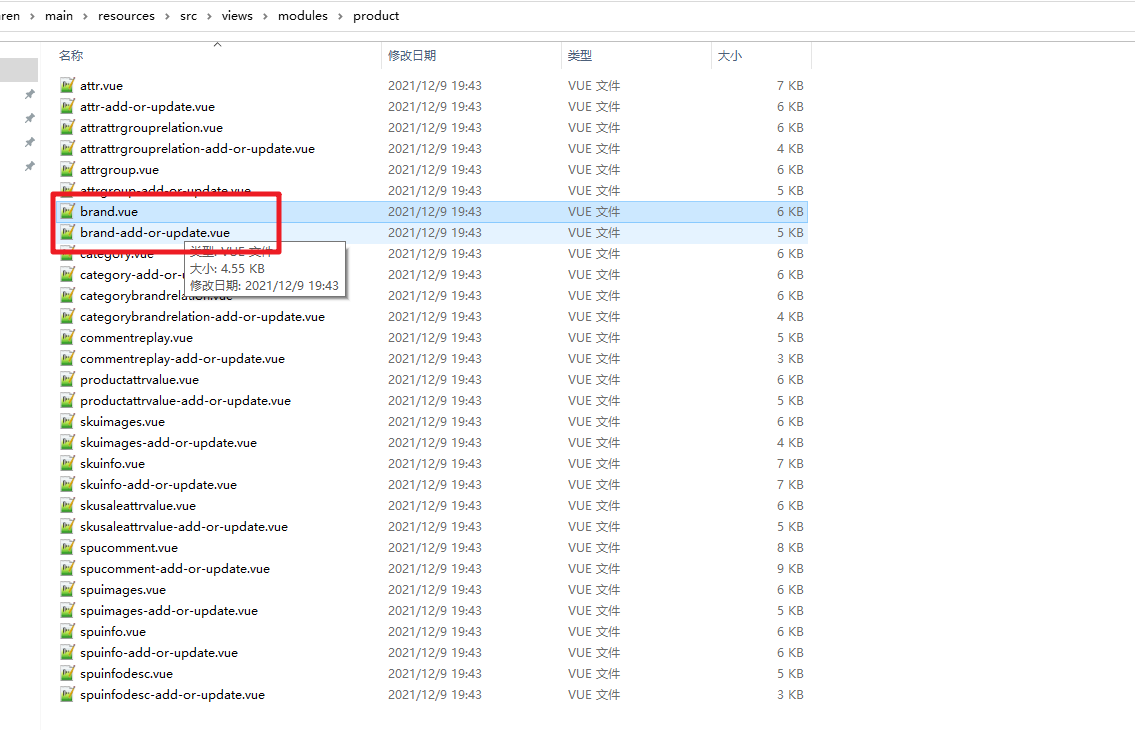
然后我们在前端服务中创建对应的菜单,然后拷贝进我们生成的相关的文件。
|
|
|
|
|
|
|
|
|
|
|
|

|
|
|
|
|
|
|
|
|
|
|
|
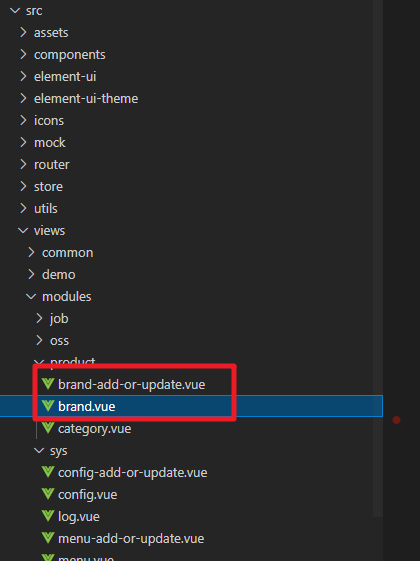
拷贝Brand.vue相关的文件到如下目录中
|
|
|
|
|
|
|
|
|
|
|
|
|
|
|
|
|
|
|
|
|
|
|
|
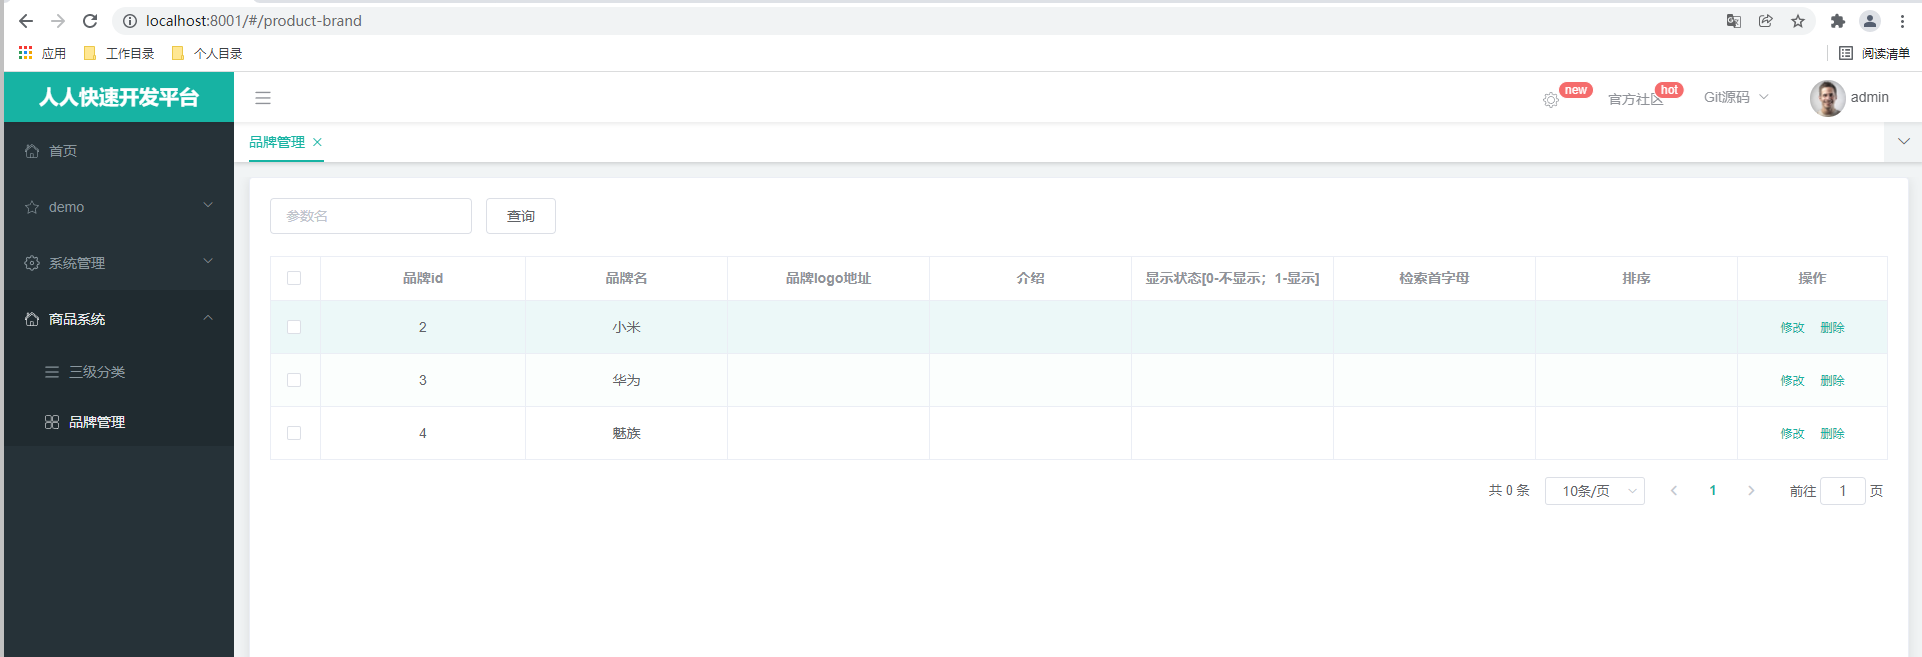
拷贝进来后,我们再去访问品牌页面就可以访问了
|
|
|
|
|
|
|
|
|
|
|
|
|
|
|
|
|
|
|
|
|
|
|
|
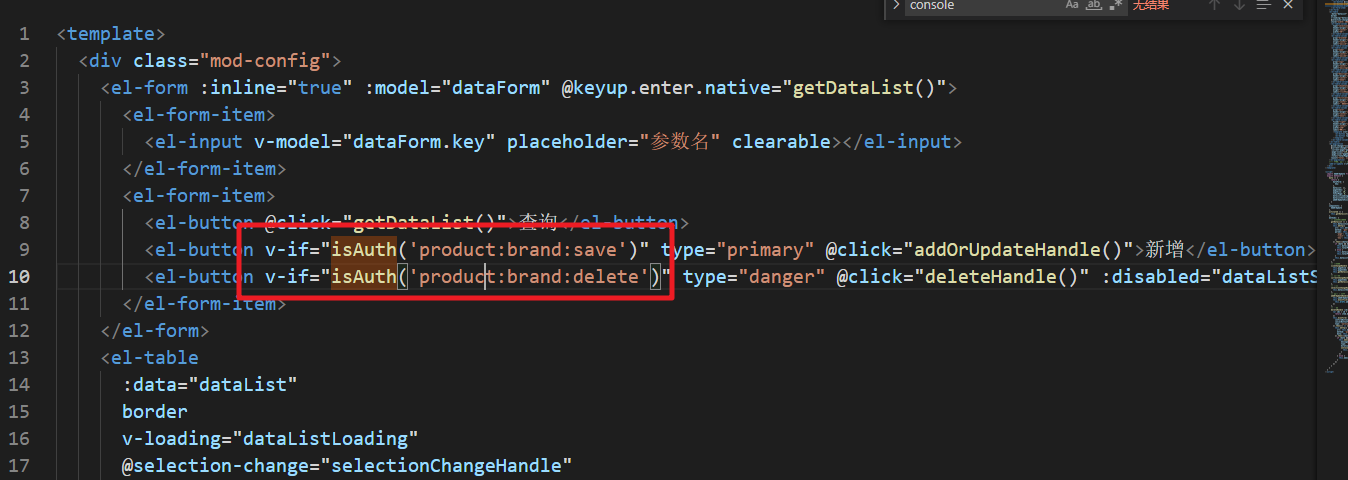
添加和删除按钮没有出来是因为权限的问题,我们可以屏蔽。
|
|
|
|
|
|
|
|
|
|
|
|
|
|
|
|
|
|
|
|
|
|
|
|
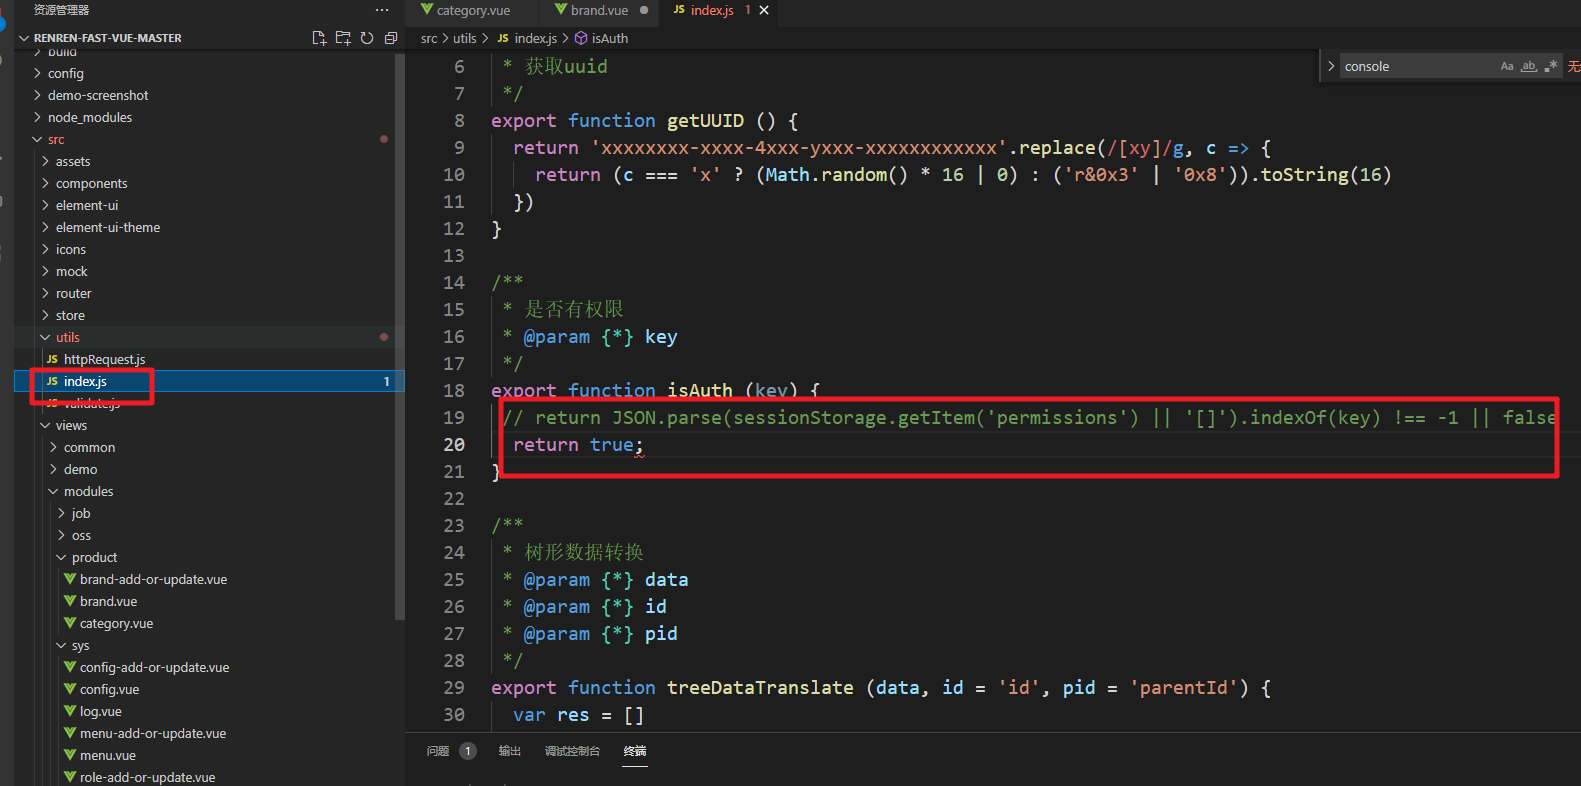
一种方式是去掉上面框出的isAuth方法,第二种就是修改isAuth中的逻辑,直接返回true。
|
|
|
|
|
|
|
|
|
|
|
|
|
|
|
|
|
|
|
|
|
|
|
|

|
|
|
|
|
|
|
|
|
|
|
|
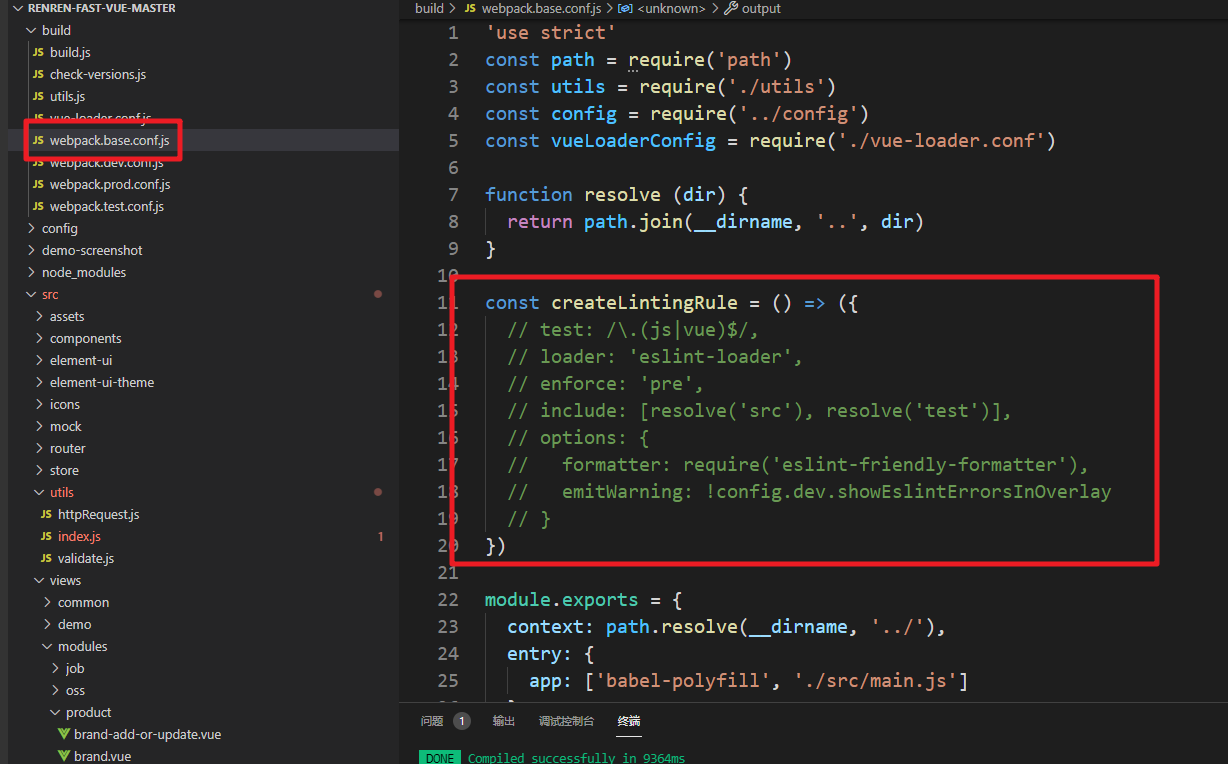
启动vue服务的时候给出了语句检查的警告,直接注销掉
|
|
|
|
|
|
|
|
|
|
|
|
|
|
|
|
|
|
|
|
|
|
|
|
然后就可以通过生成的Vue页面完成brand的简单的CRUD操作。
|
|
|
|
|
|
|
|
|
|
|
|
### 2. 显示状态控制
|
|
|
|
|
|
|
|
|
|
|
|
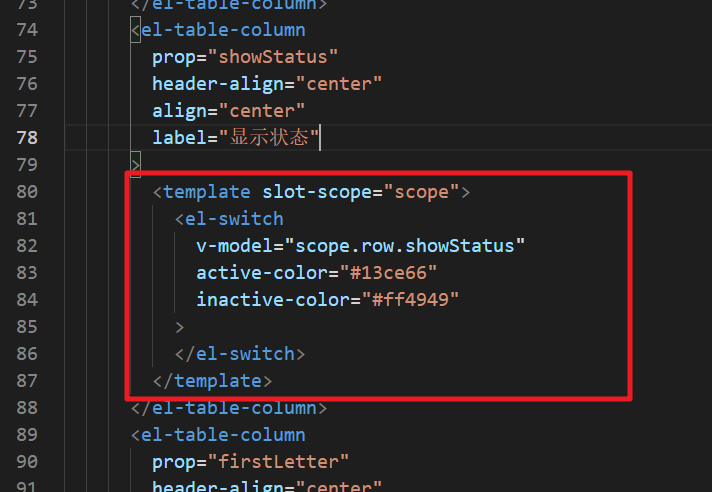
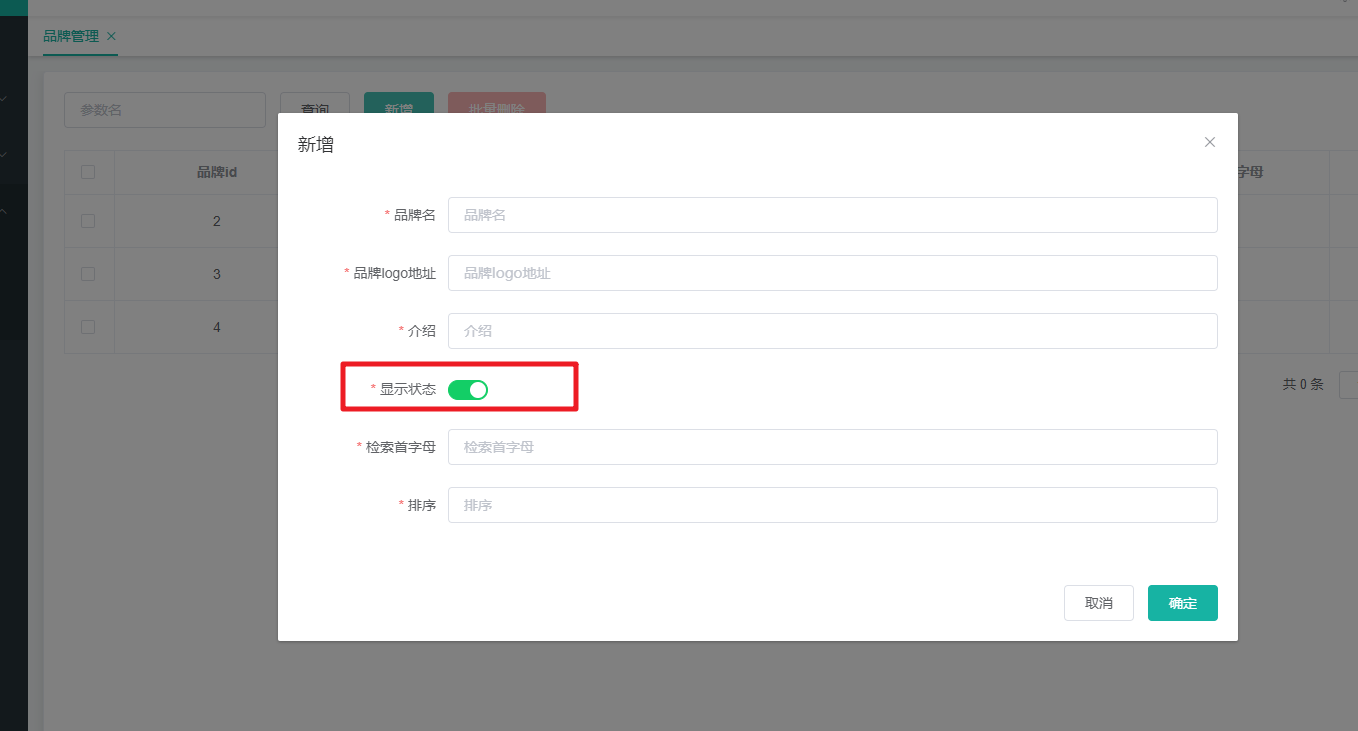
在显示品牌信息的表单中我们可以将品牌的显示状态通过开关按钮来显示,同时在新增和更新的数据中也这么处理
|
|
|
|
|
|
|
|
|
|
|
|

|
|
|
|
|
|
|
|
|
|
|
|

|
|
|
|
|
|
|
|
|
|
|
|
然后将Switch开关放入对应的Table和Form表单中
|
|
|
|
|
|
|
|
|
|
|
|
|
|
|
|
|
|
|
|
|
|
|
|

|
|
|
|
|
|
|
|
|
|
|
|

|
|
|
|
|
|
|
|
|
|
|
|
|
|
|
|
|
|
|
|
|
|
|
|
页面显示OK后我们就需要通过开关操作来更新后台这条记录的状态
|
|
|
|
|
|
|
|
|
|
|
|
```javascript
|
|
|
|
|
|
updateBrandStatus(data){
|
|
|
|
|
|
// 更新当前记录的显示状态
|
|
|
|
|
|
this.$http({
|
|
|
|
|
|
url: this.$http.adornUrl("/product/brand/update"),
|
|
|
|
|
|
method: "post",
|
|
|
|
|
|
data: this.$http.adornData({"brandId":data.brandId,"showStatus":data.showStatus}, false),
|
|
|
|
|
|
}).then(({ data }) => {
|
|
|
|
|
|
this.$message({
|
|
|
|
|
|
message: "状态更新成功",
|
|
|
|
|
|
type: "success",
|
|
|
|
|
|
});
|
|
|
|
|
|
});
|
|
|
|
|
|
}
|
|
|
|
|
|
```
|
|
|
|
|
|
|
|
|
|
|
|
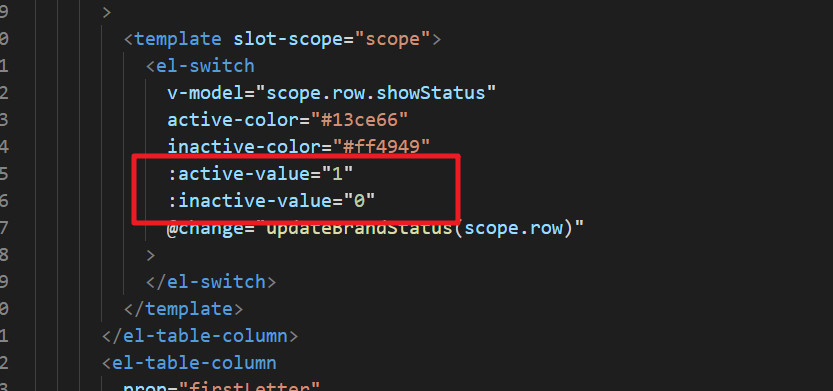
更新下Switch开关的默认值
|
|
|
|
|
|
|
|
|
|
|
|
|
|
|
|
|
|
|
|
|
|
|
|
### 3. 图片管理
|
|
|
|
|
|
|
|
|
|
|
|
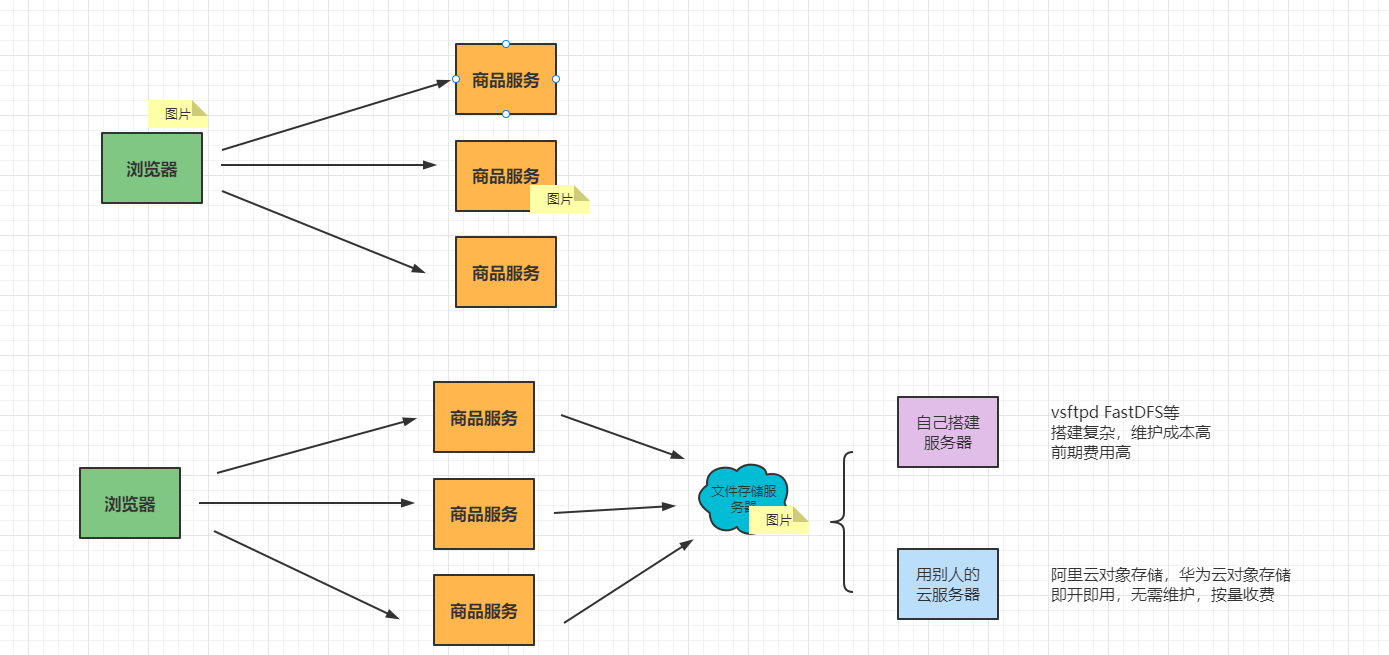
文件存储的几种方式
|
|
|
|
|
|
|
|
|
|
|
|
单体架构可以直接把图片存储在服务器中
|
|
|
|
|
|
|
|
|
|
|
|

|
|
|
|
|
|
|
|
|
|
|
|
但是在分布式环境下面直接存储在WEB服务器中的方式就不可取了,这时我们需要搭建独立的文件存储服务器。
|
|
|
|
|
|
|
|
|
|
|
|
|
|
|
|
|
|
|
|
|
|
|
|
#### 3.1 开通阿里云服务
|
|
|
|
|
|
|
|
|
|
|
|
针对本系统中的相关的文件,图片,文本等统一的交给云服务器管理。阿里云服务地址:https://www.aliyun.com/activity/daily/award?utm_content=se_1010784590
|
|
|
|
|
|
|
|
|
|
|
|
阿里云OSS简介
|
|
|
|
|
|
|
|
|
|
|
|
> 阿里云对象存储服务(Object Storage Service,简称OSS),是阿里云对外提供的海量、安全、低成本、高可靠的云存储服务。您可以通过本文档提供的简单的REST接口,在任何时间、任何地点、任何互联网设备上进行上传和下载数据。基于OSS,您可以搭建出各种多媒体分享网站、网盘、个人和企业数据备份等基于大规模数据的服务。
|
|
|
|
|
|
|
|
|
|
|
|
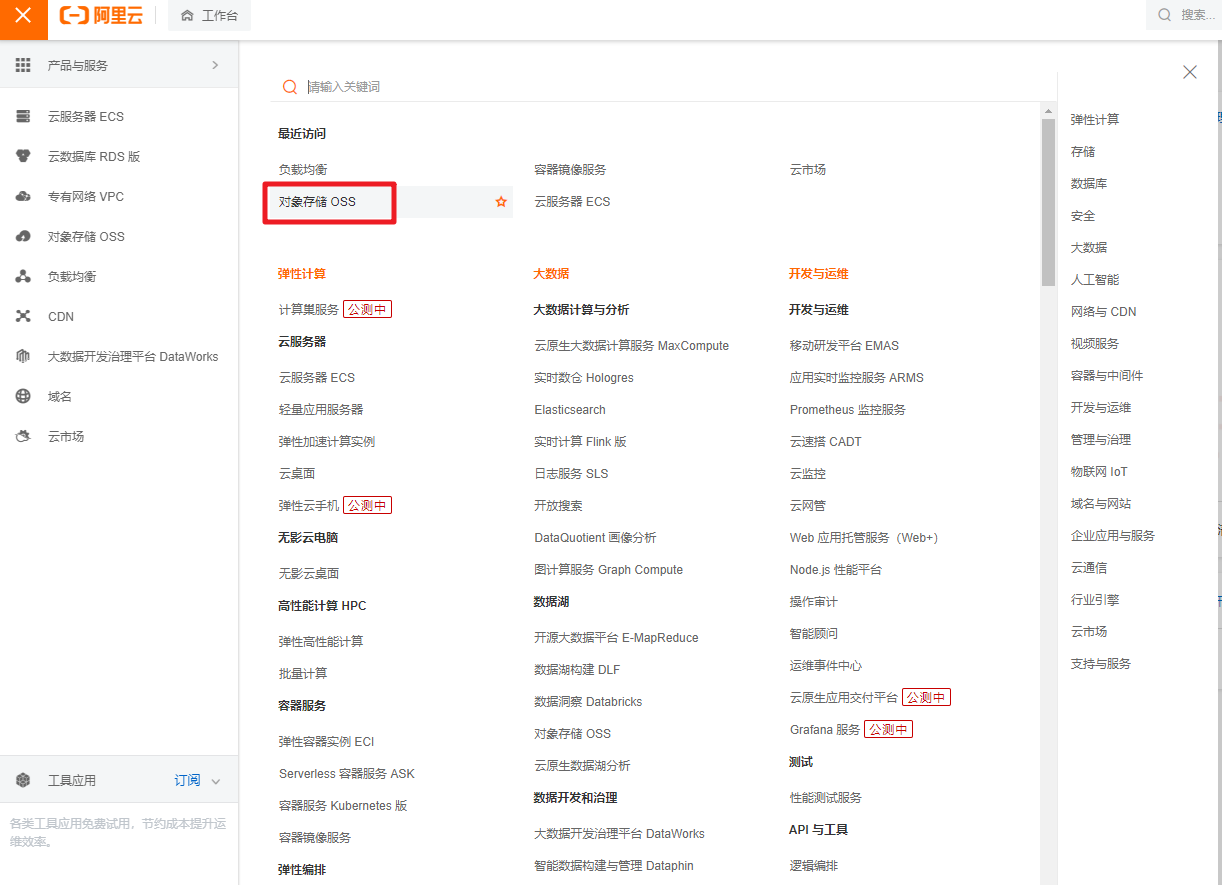
选择对象存储OSS
|
|
|
|
|
|
|
|
|
|
|
|
|
|
|
|
|
|
|
|
|
|
|
|
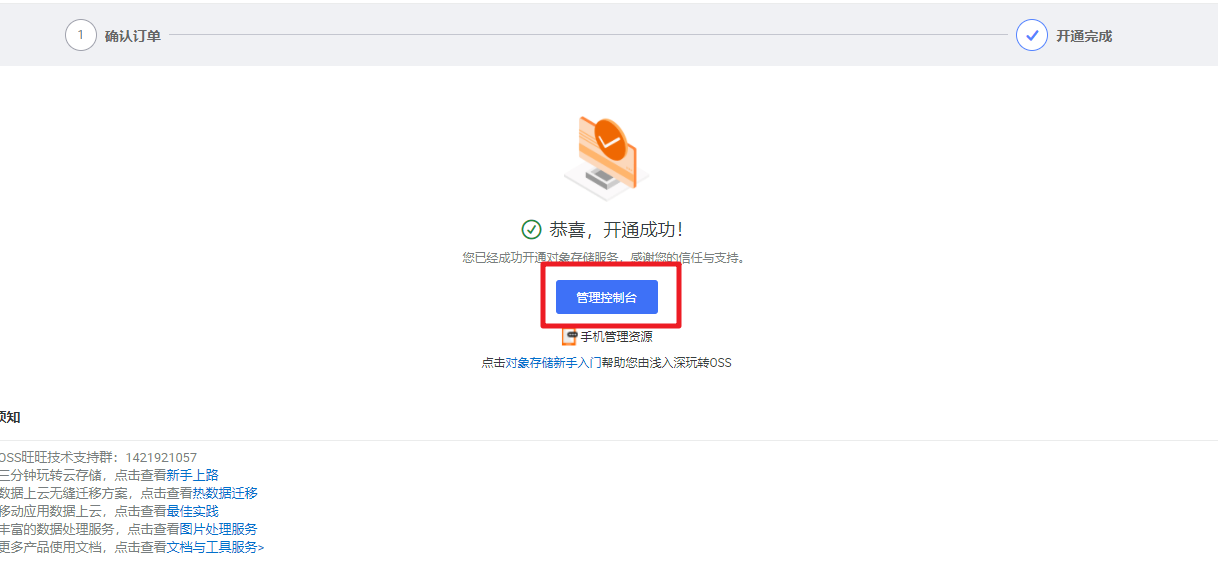
第一次打开没有开通,开通即可
|
|
|
|
|
|
|
|
|
|
|
|

|
|
|
|
|
|
|
|
|
|
|
|
|
|
|
|
|
|
|
|
|
|
|
|
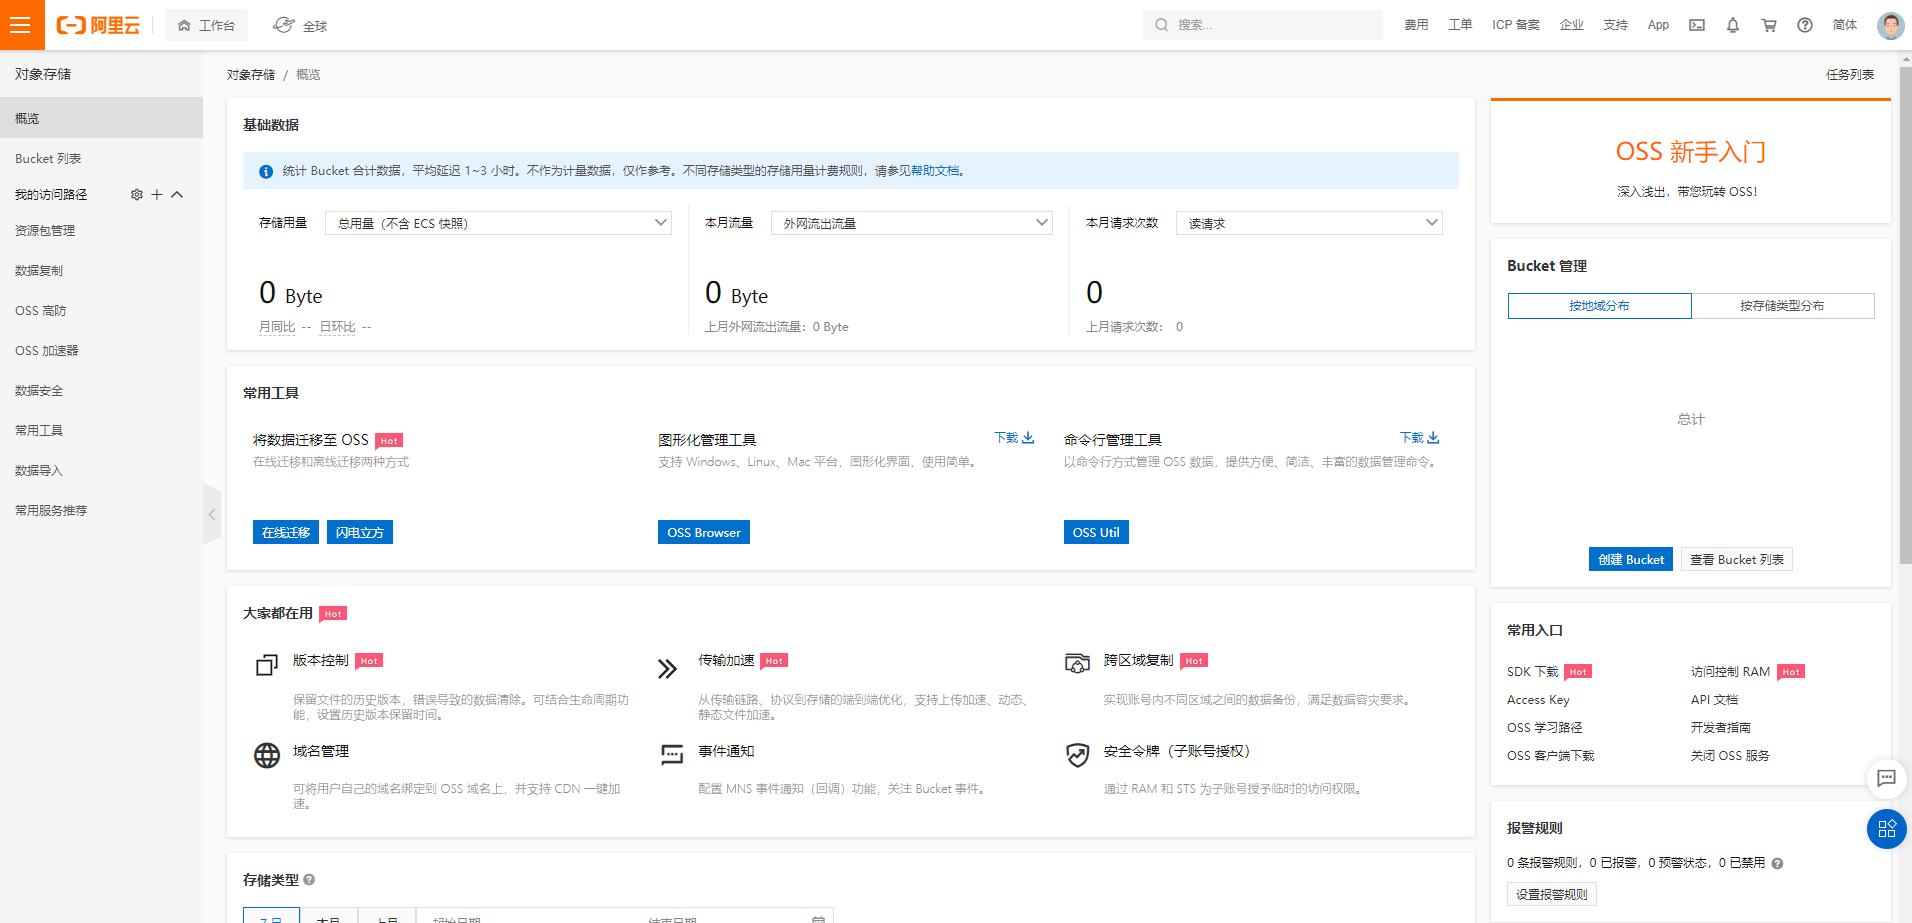
然后进入了OOS对象存储的主页面
|
|
|
|
|
|
|
|
|
|
|
|
|
|
|
|
|
|
|
|
|
|
|
|
查看相关的文档:https://help.aliyun.com/document_detail/31947.html
|
|
|
|
|
|
|
|
|
|
|
|
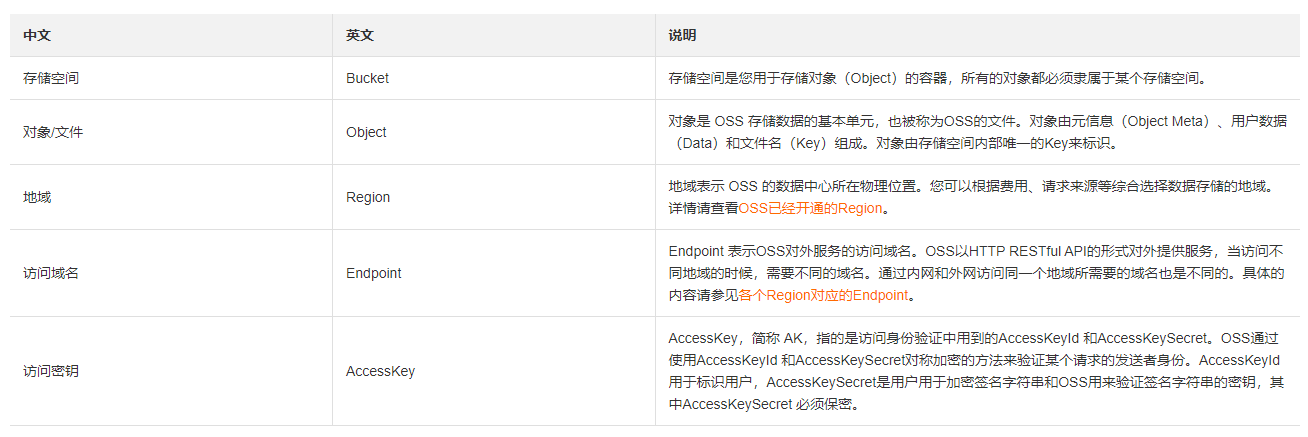
相关术语介绍
|
|
|
|
|
|
|
|
|
|
|
|
|
|
|
|
|
|
|
|
|
|
|
|
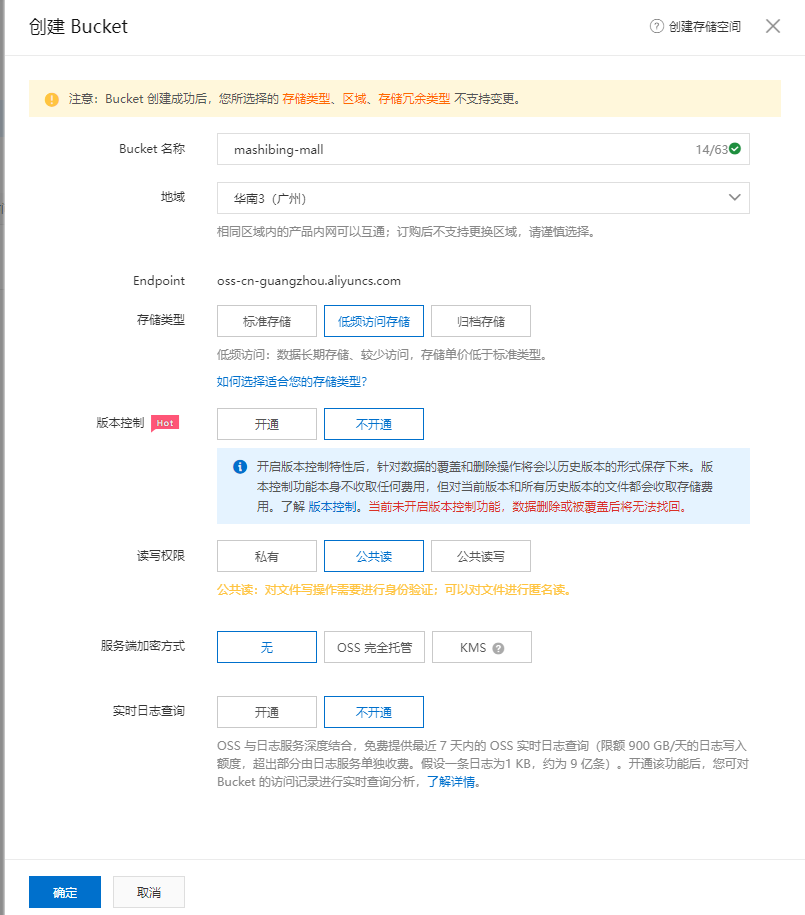
创建Bucket
|
|
|
|
|
|
|
|
|
|
|
|
|
|
|
|
|
|
|
|
|
|
|
|
创建好的效果
|
|
|
|
|
|
|
|
|
|
|
|

|
|
|
|
|
|
|
|
|
|
|
|
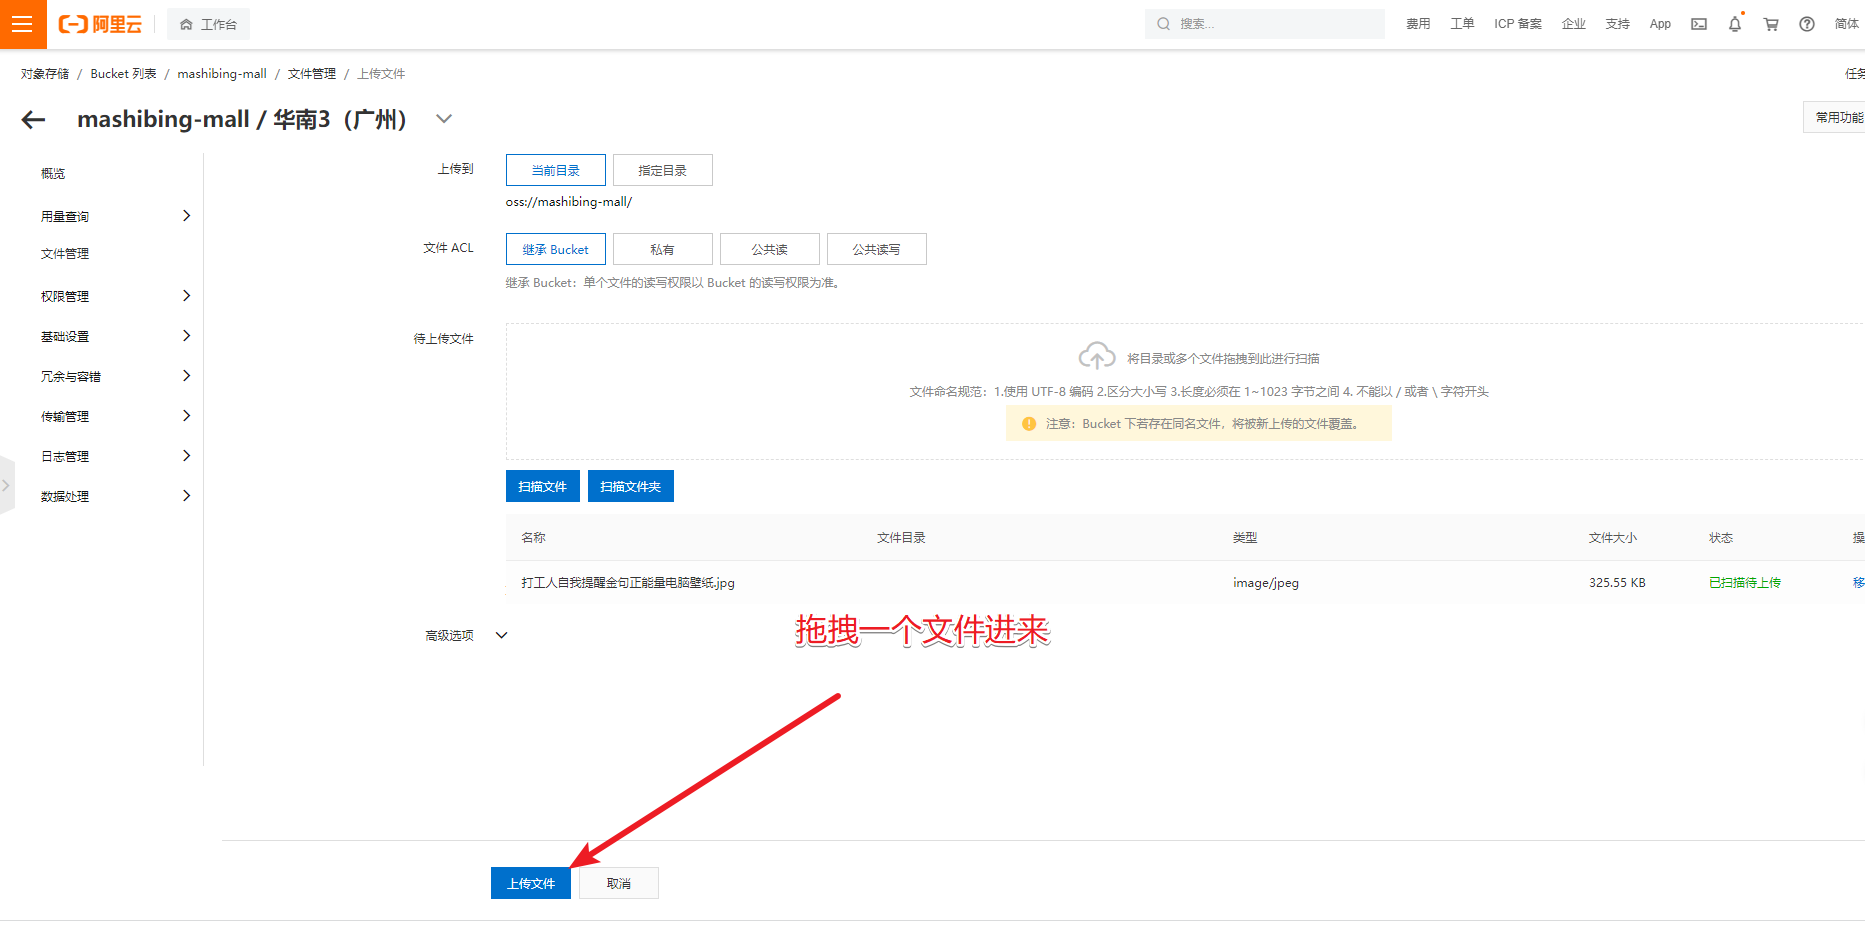
在阿里云中直接操作文件上传
|
|
|
|
|
|
|
|
|
|
|
|

|
|
|
|
|
|
|
|
|
|
|
|
|
|
|
|
|
|
|
|
|
|
|
|

|
|
|
|
|
|
|
|
|
|
|
|
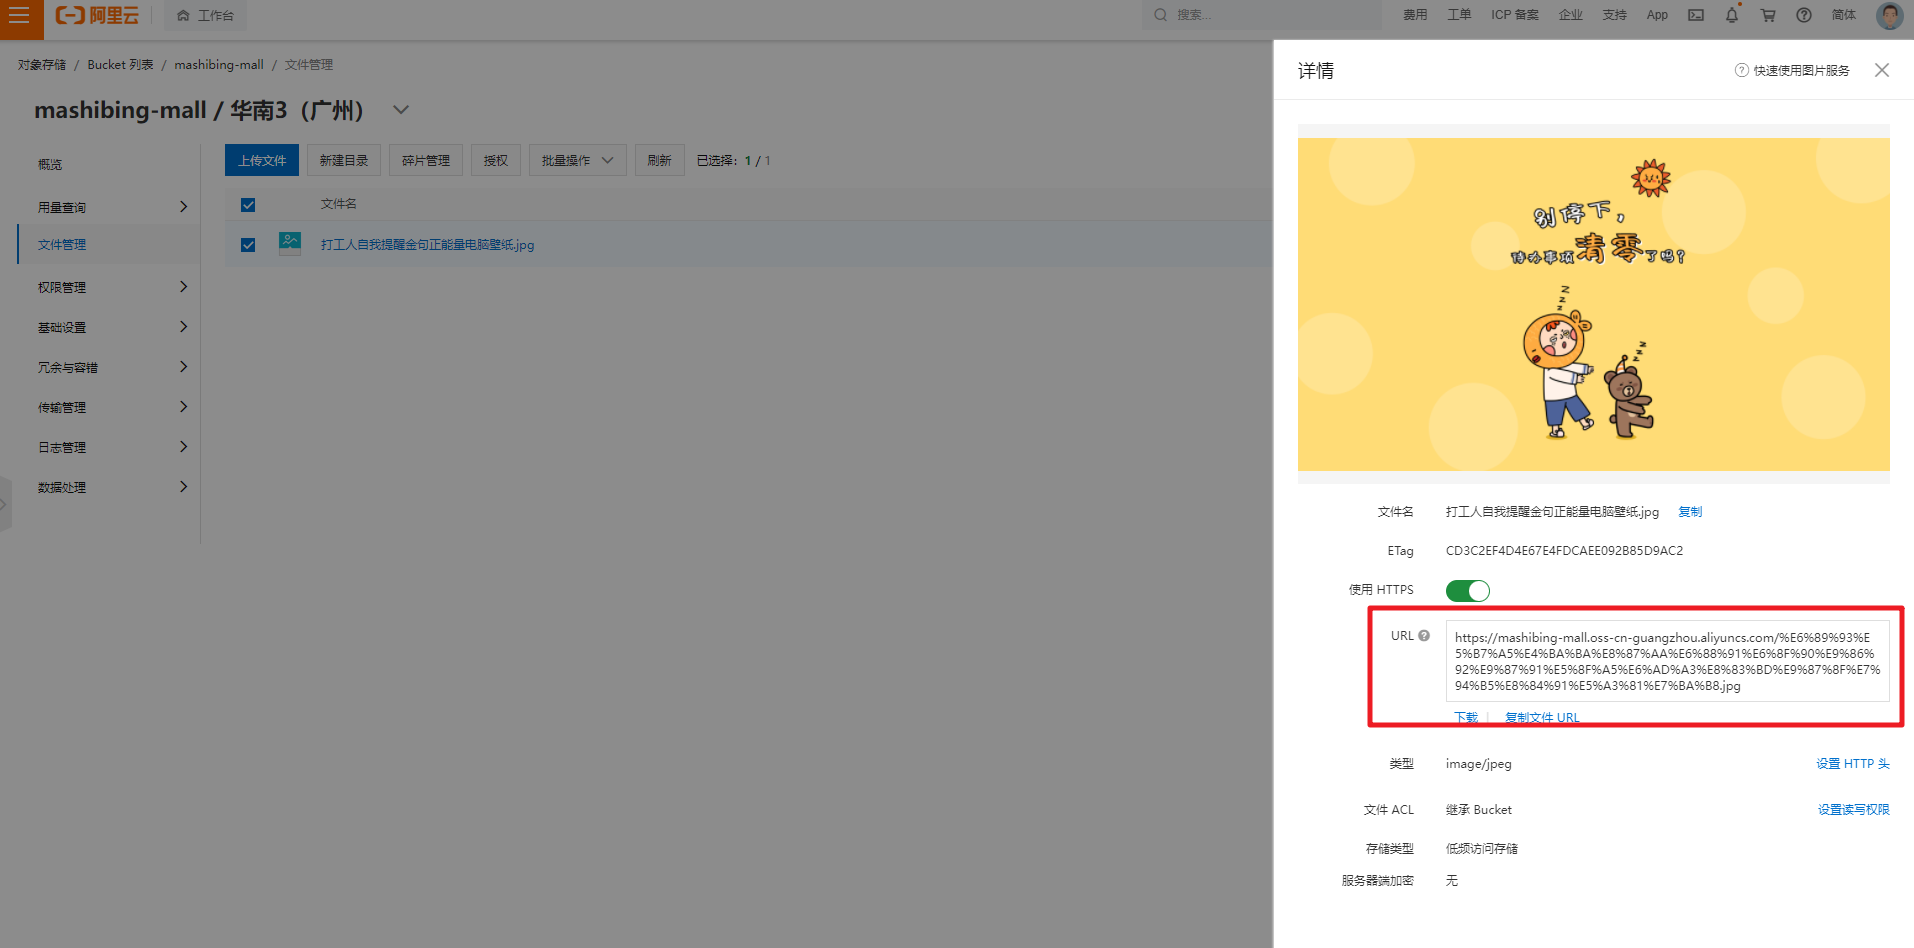
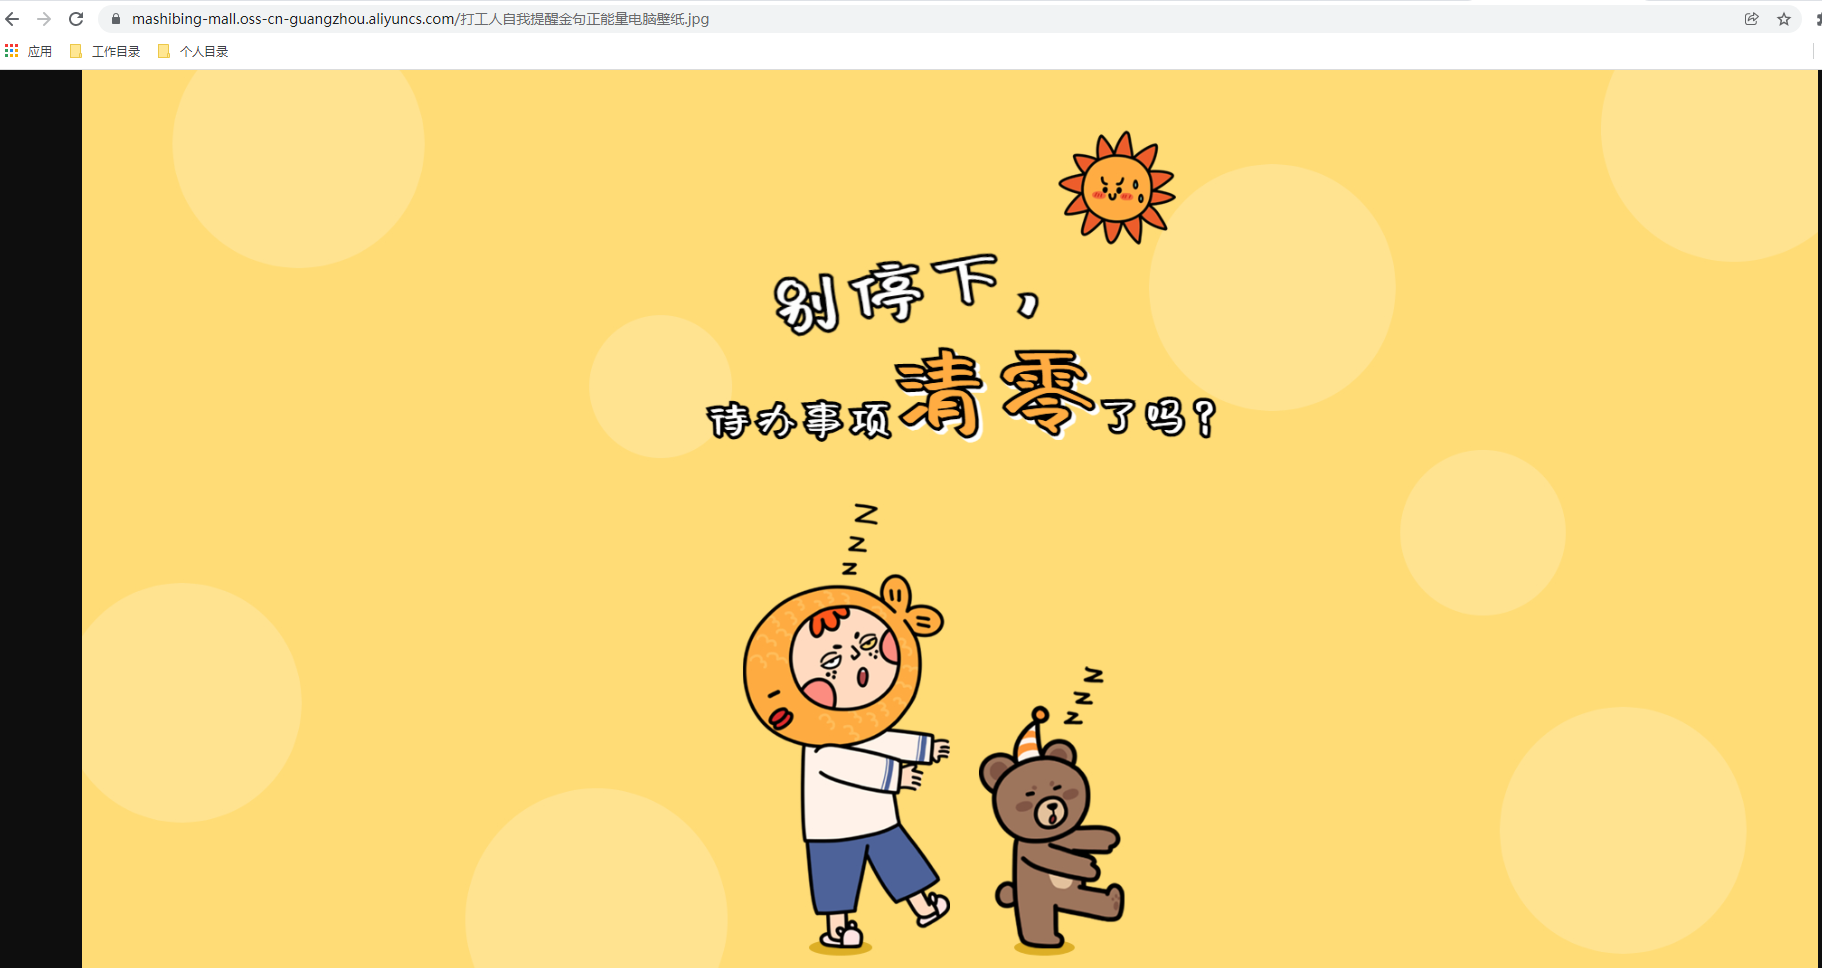
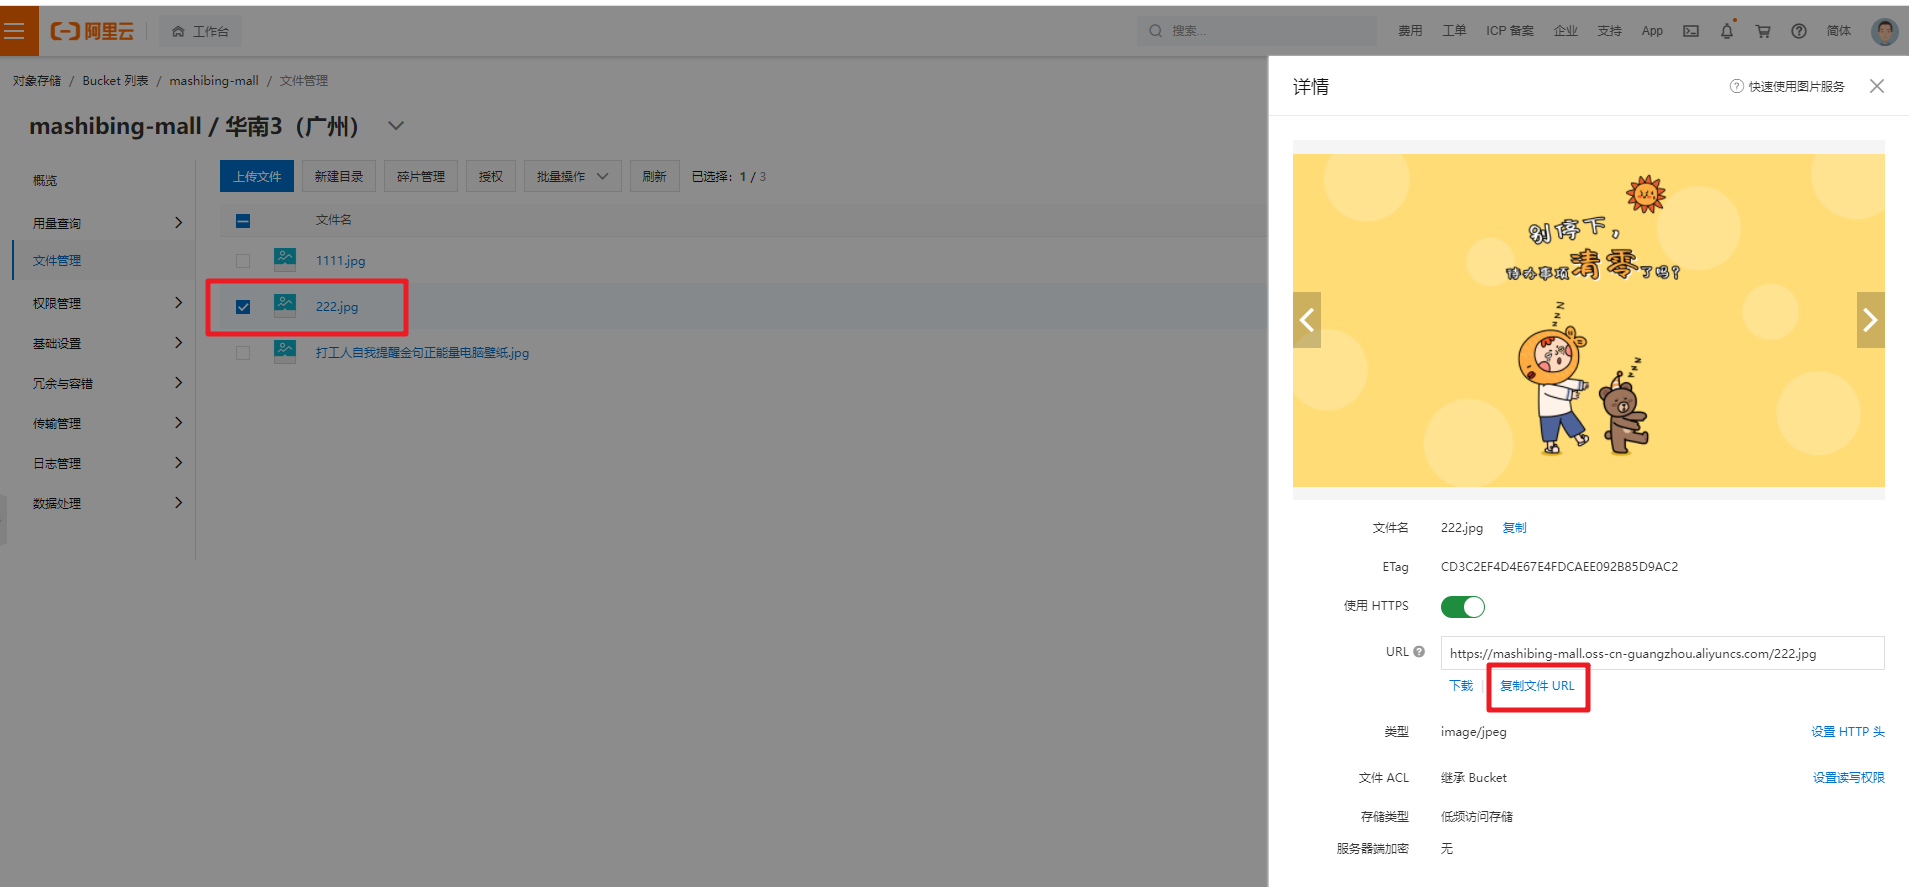
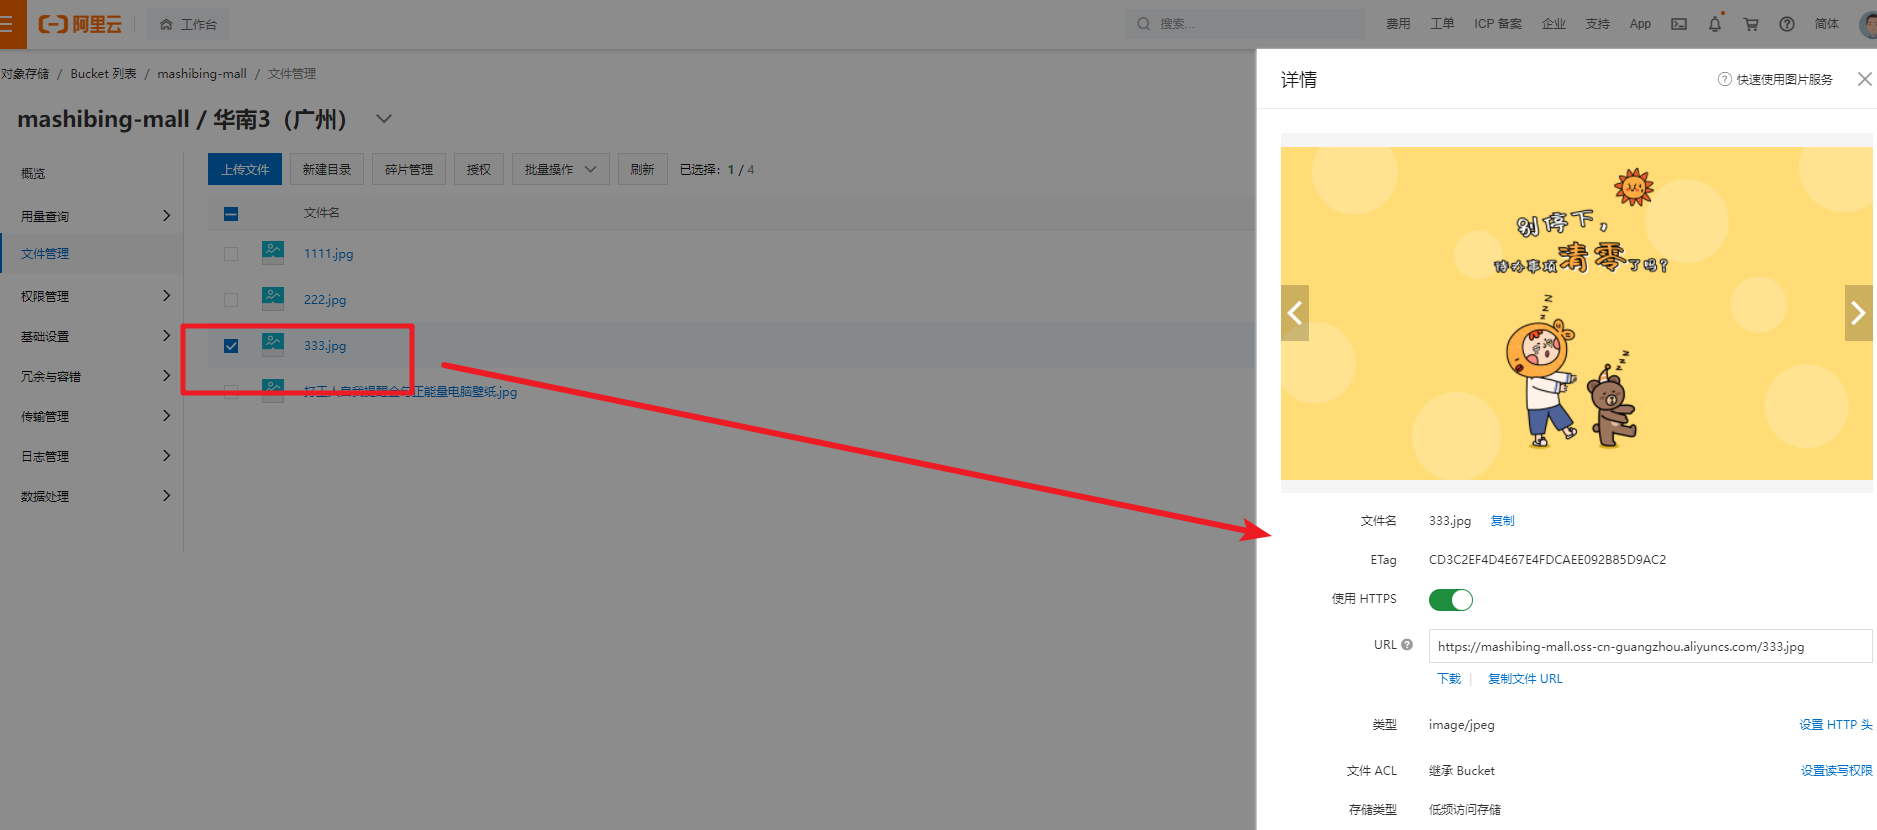
上传成功,我们拿到地址即可访问:
|
|
|
|
|
|
|
|
|
|
|
|
|
|
|
|
|
|
|
|
|
|
|
|
|
|
|
|
|
|
|
|
|
|
|
|
#### 3.2 阿里云API使用
|
|
|
|
|
|
|
|
|
|
|
|
最终我们是需要通过服务代码将图片上传到阿里云OSS服务中,接下来看下代码API如何使用。Java操作的API文档地址:https://help.aliyun.com/document_detail/32008.html?spm=5176.208357.1107607.21.3476390f9Pqw6K
|
|
|
|
|
|
|
|
|
|
|
|
添加相关的依赖
|
|
|
|
|
|
|
|
|
|
|
|
```xml
|
|
|
|
|
|
<dependency>
|
|
|
|
|
|
<groupId>com.aliyun.oss</groupId>
|
|
|
|
|
|
<artifactId>aliyun-sdk-oss</artifactId>
|
|
|
|
|
|
<version>3.10.2</version>
|
|
|
|
|
|
</dependency>
|
|
|
|
|
|
```
|
|
|
|
|
|
|
|
|
|
|
|
|
|
|
|
|
|
|
|
|
|
|
|
|
|
|
|
|
|
|
|
|
|
|
|
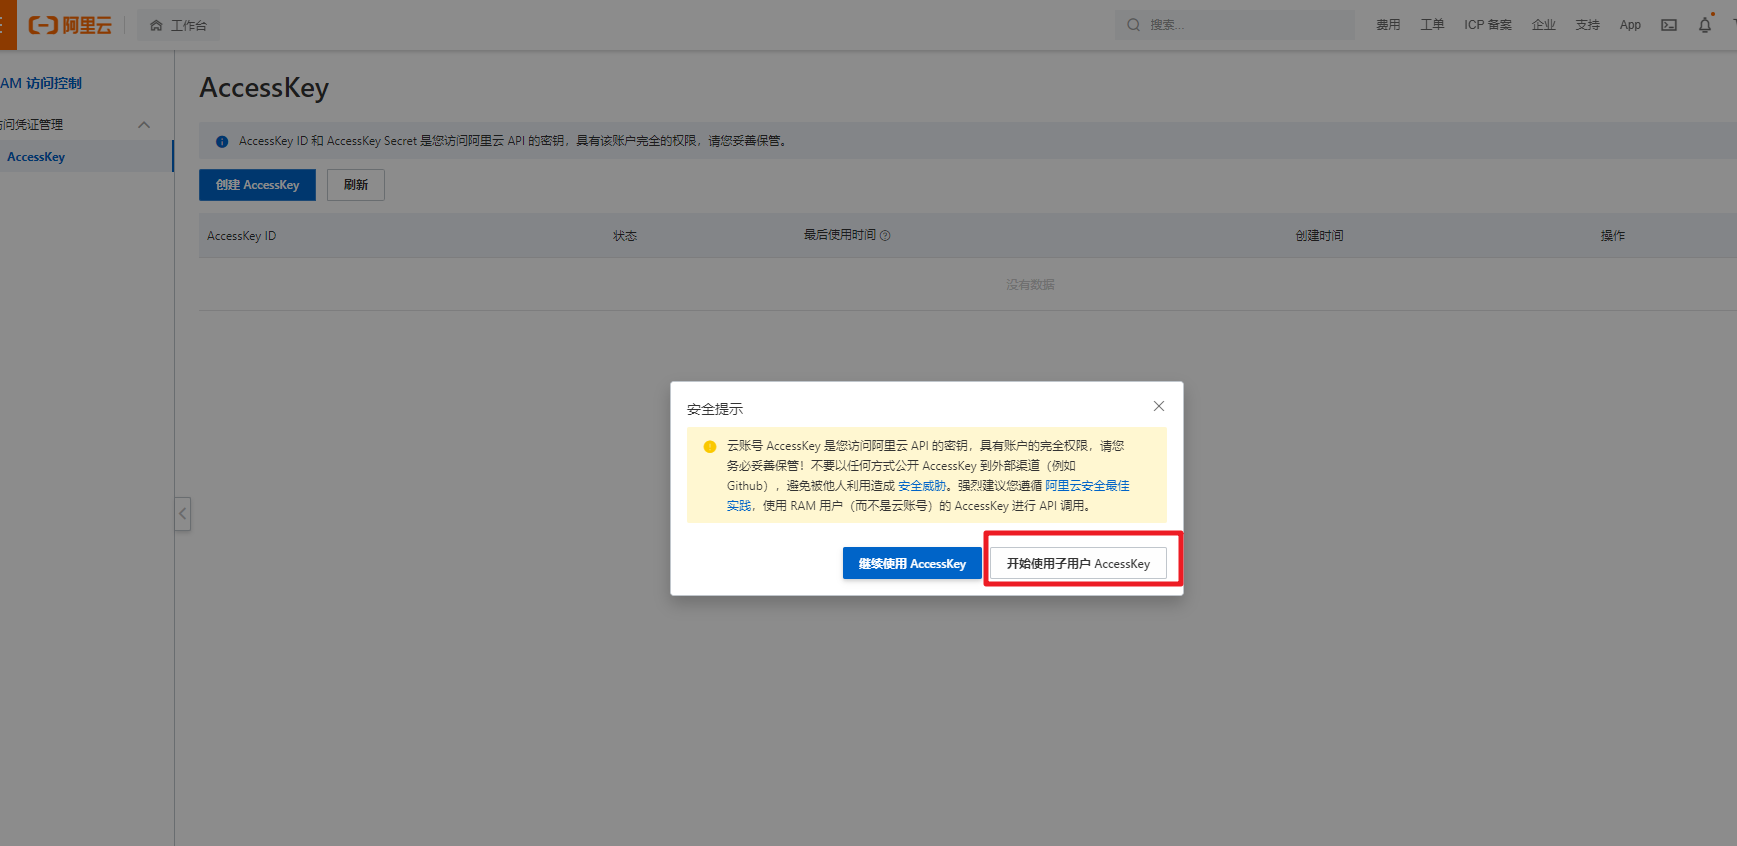
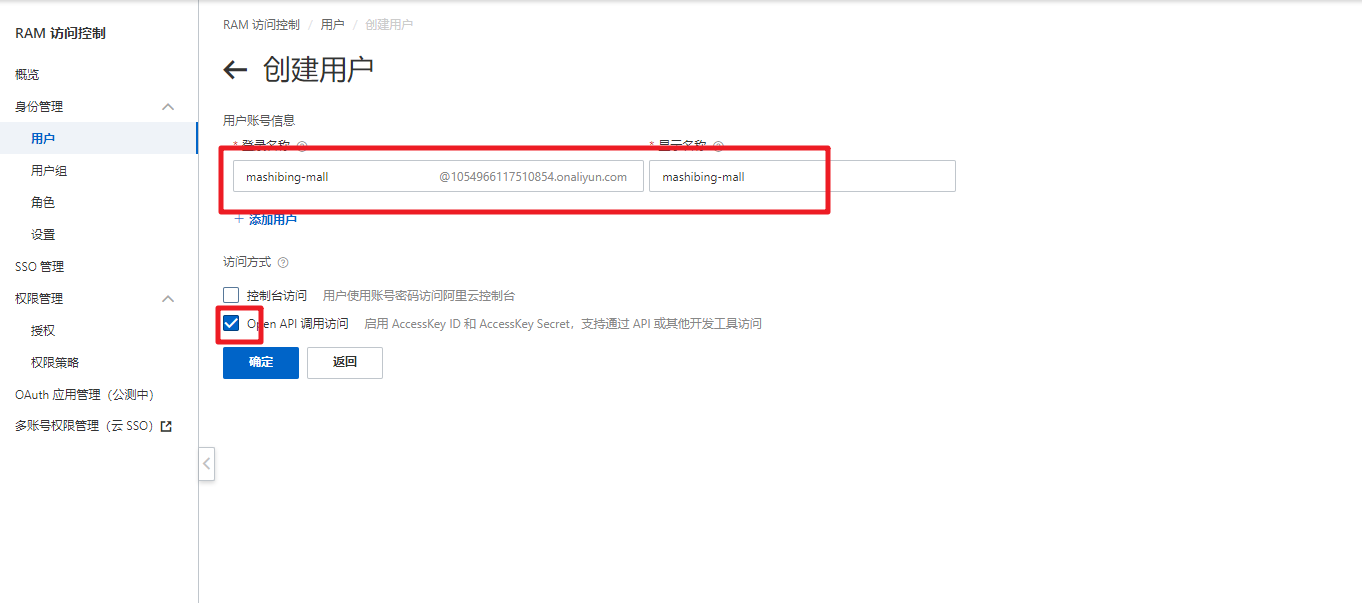
创建子账户
|
|
|
|
|
|
|
|
|
|
|
|

|
|
|
|
|
|
|
|
|
|
|
|
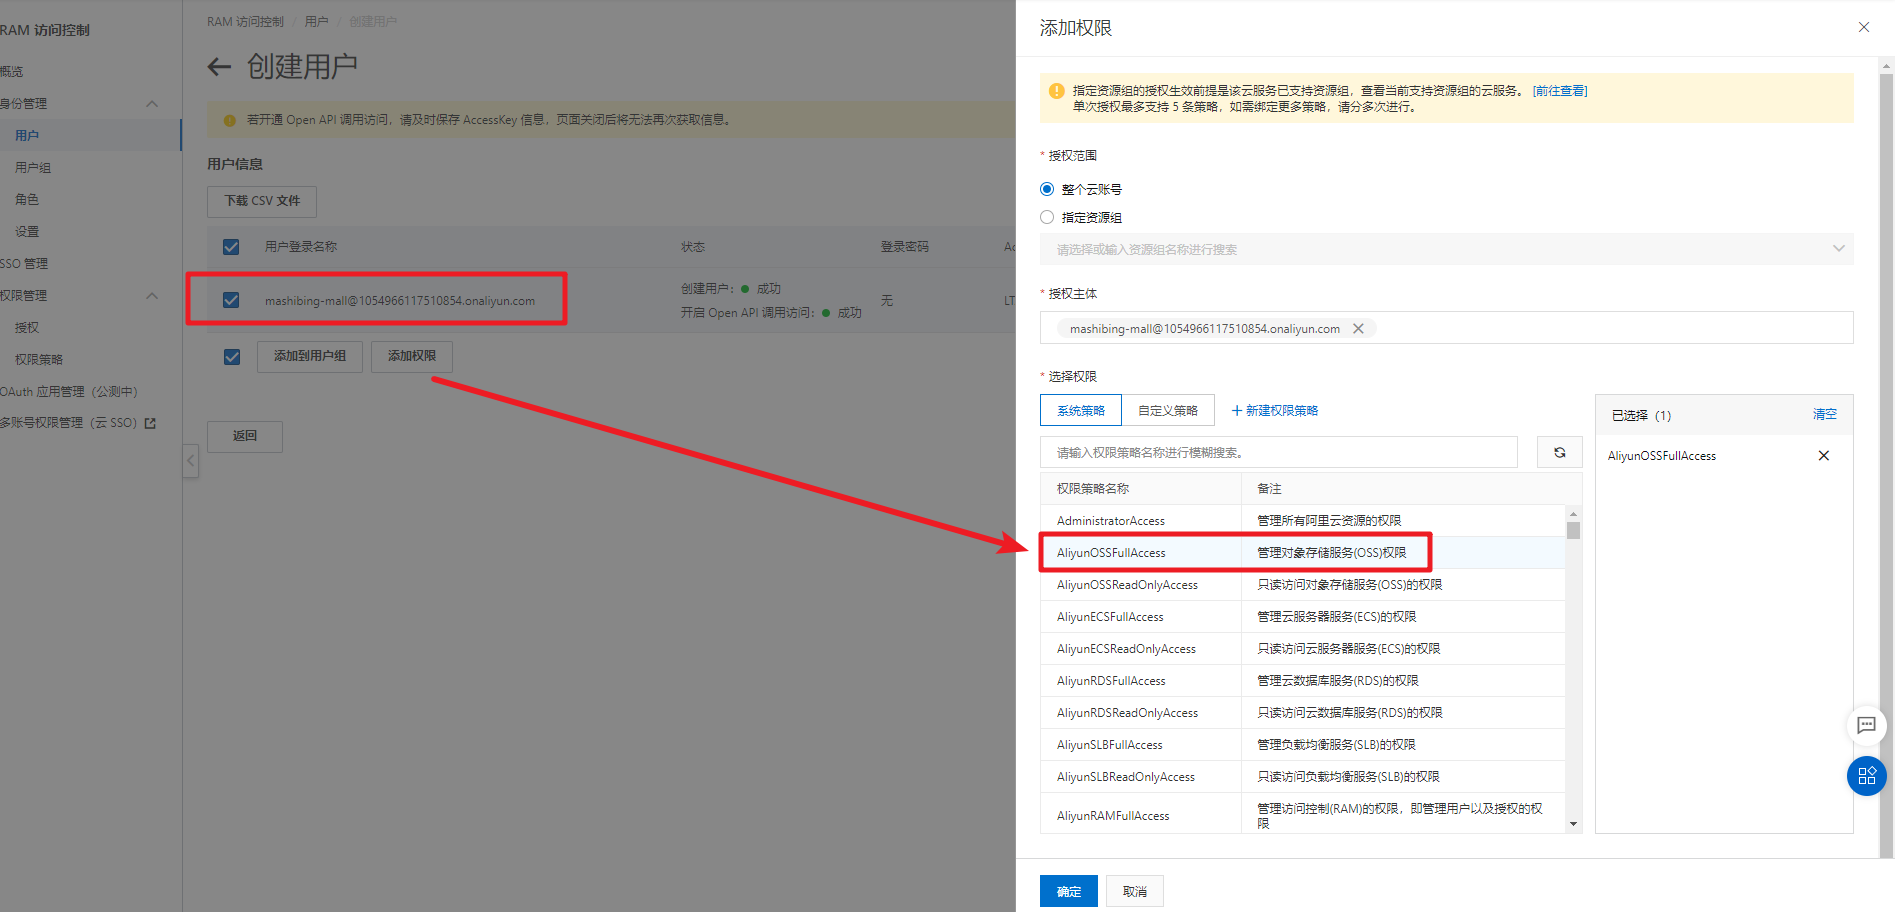
设置对应的权限
|
|
|
|
|
|
|
|
|
|
|
|
|
|
|
|
|
|
|
|
|
|
|
|
通过官方的案例代码测试上传操作
|
|
|
|
|
|
|
|
|
|
|
|
```java
|
|
|
|
|
|
@Test
|
|
|
|
|
|
public void testUploadFile() throws FileNotFoundException {
|
|
|
|
|
|
// yourEndpoint填写Bucket所在地域对应的Endpoint。以华东1(杭州)为例,Endpoint填写为https://oss-cn-hangzhou.aliyuncs.com。
|
|
|
|
|
|
String endpoint = "oss-cn-guangzhou.aliyuncs.com";
|
|
|
|
|
|
// 阿里云账号AccessKey拥有所有API的访问权限,风险很高。强烈建议您创建并使用RAM用户进行API访问或日常运维,请登录RAM控制台创建RAM用户。
|
|
|
|
|
|
String accessKeyId = "*******";
|
|
|
|
|
|
String accessKeySecret = "**********";
|
|
|
|
|
|
|
|
|
|
|
|
// 创建OSSClient实例。
|
|
|
|
|
|
OSS ossClient = new OSSClientBuilder().build(endpoint, accessKeyId, accessKeySecret);
|
|
|
|
|
|
|
|
|
|
|
|
// 填写本地文件的完整路径。如果未指定本地路径,则默认从示例程序所属项目对应本地路径中上传文件流。
|
|
|
|
|
|
InputStream inputStream = new FileInputStream("C:\\Users\\dpb\\Downloads\\1111.jpg");
|
|
|
|
|
|
// 依次填写Bucket名称(例如examplebucket)和Object完整路径(例如exampledir/exampleobject.txt)。Object完整路径中不能包含Bucket名称。
|
|
|
|
|
|
ossClient.putObject("mashibing-mall", "1111.jpg", inputStream);
|
|
|
|
|
|
|
|
|
|
|
|
// 关闭OSSClient。
|
|
|
|
|
|
ossClient.shutdown();
|
|
|
|
|
|
System.out.println("长传图片成功...");
|
|
|
|
|
|
}
|
|
|
|
|
|
```
|
|
|
|
|
|
|
|
|
|
|
|
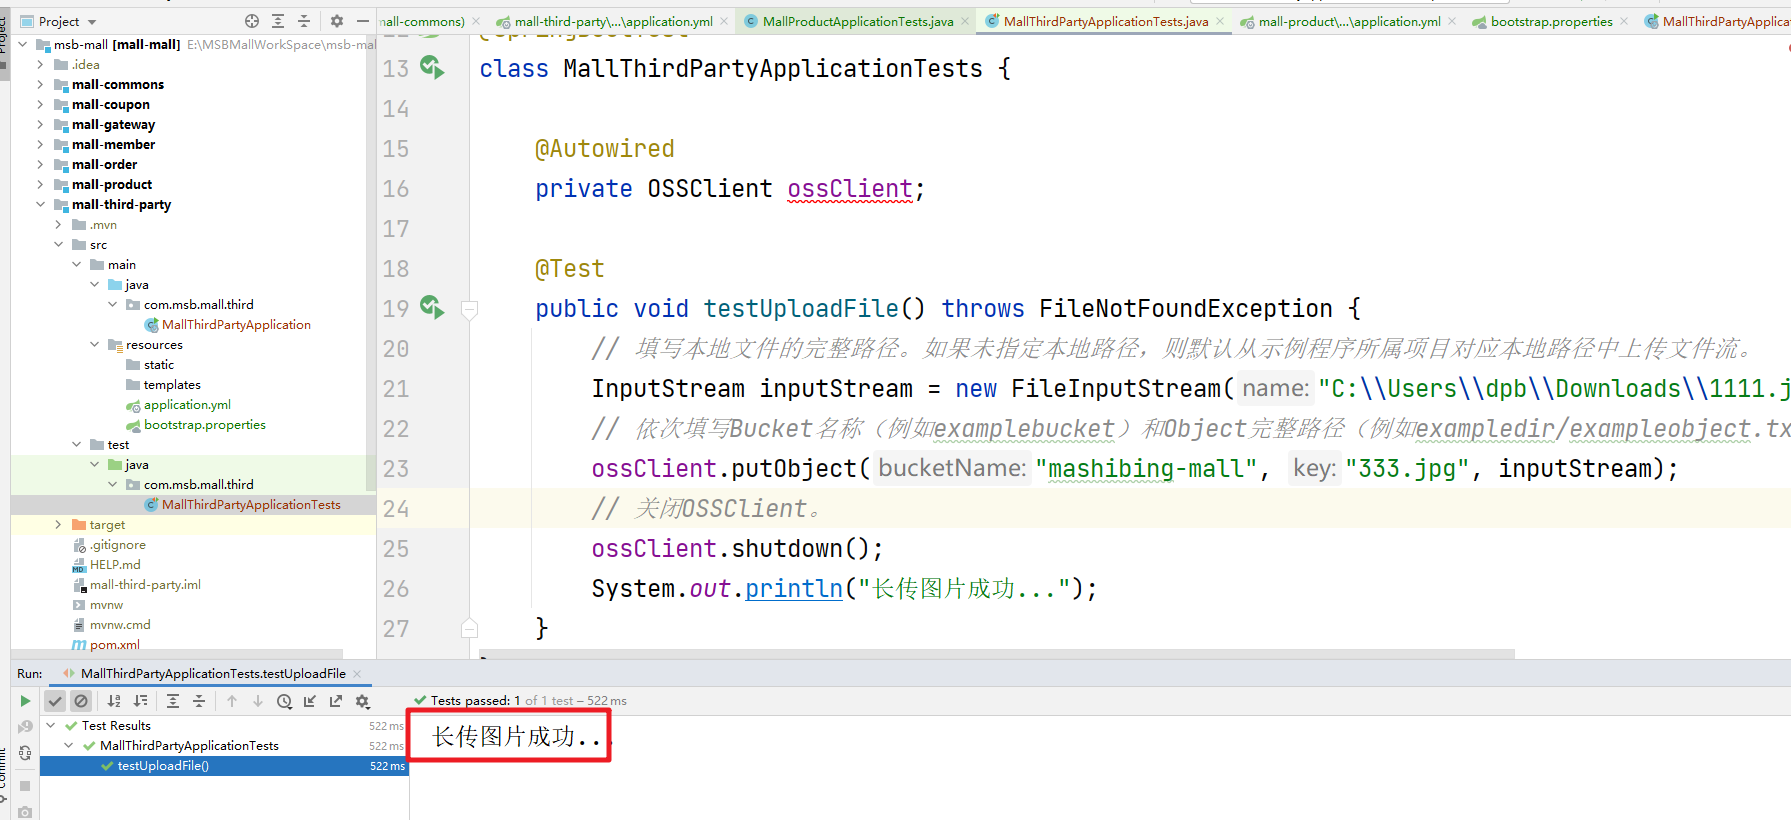
执行成功
|
|
|
|
|
|
|
|
|
|
|
|

|
|
|
|
|
|
|
|
|
|
|
|
#### 3.3 AlibabaOSS服务
|
|
|
|
|
|
|
|
|
|
|
|
直接通过阿里云提供的API操作相对的复杂一些,这时我们可以通过SpringCloudAlibaba OSS服务来简化开发,添加对应的依赖
|
|
|
|
|
|
|
|
|
|
|
|
```xml
|
|
|
|
|
|
<dependency>
|
|
|
|
|
|
<groupId>com.alibaba.cloud</groupId>
|
|
|
|
|
|
<artifactId>spring-cloud-starter-alicloud-oss</artifactId>
|
|
|
|
|
|
</dependency>
|
|
|
|
|
|
```
|
|
|
|
|
|
|
|
|
|
|
|
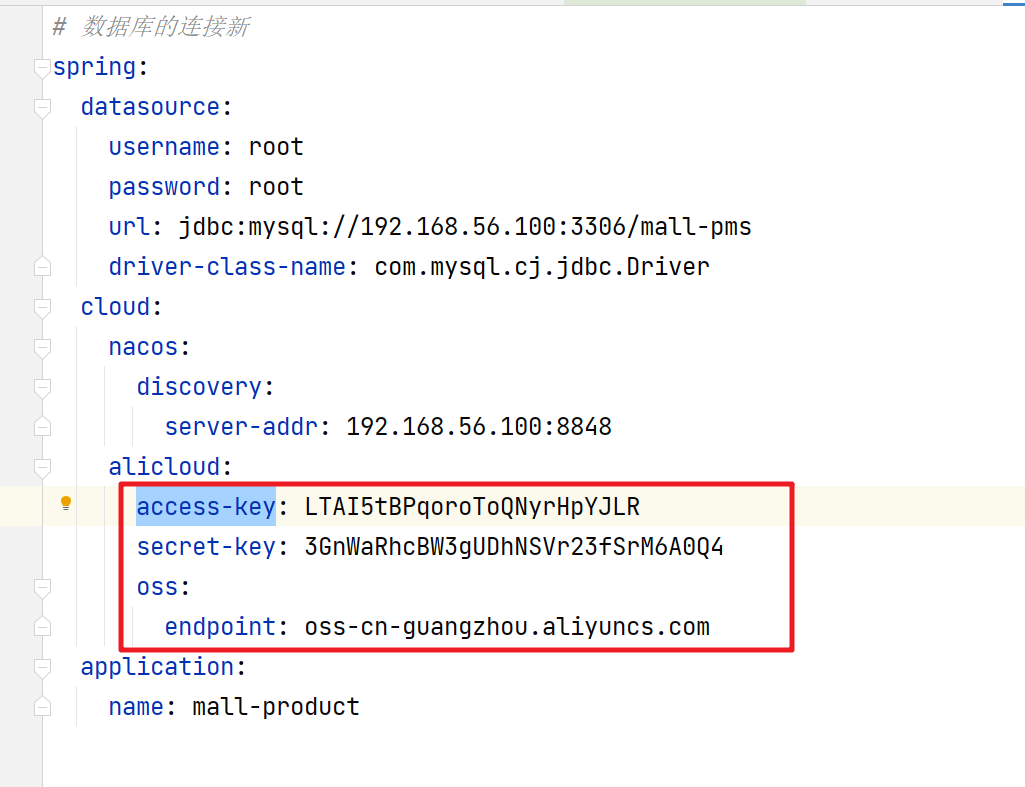
在属性文件中配置对应的AccessKey,SecurtKey和Endpoint
|
|
|
|
|
|
|
|
|
|
|
|
|
|
|
|
|
|
|
|
|
|
|
|
然后我们在业务代码中就可以直接从容器中获取OSSClient对象
|
|
|
|
|
|
|
|
|
|
|
|

|
|
|
|
|
|
|
|
|
|
|
|
|
|
|
|
|
|
|
|
|
|
|
|
#### 3.4 图片上传的方式
|
|
|
|
|
|
|
|
|
|
|
|
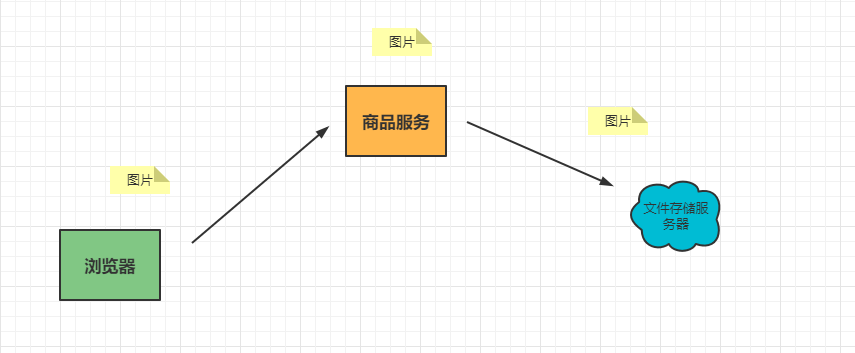
第一种方式:表单提交同步将表单数据和图片都提交到后端服务器中,然后在后端服务器中将图片再上传到阿里云服务中。
|
|
|
|
|
|
|
|
|
|
|
|
|
|
|
|
|
|
|
|
|
|
|
|
但是这种方式的缺点是要做两次上传操作,还有就是将图片和正常的表单信息一起提交影响正常业务的效率。
|
|
|
|
|
|
|
|
|
|
|
|
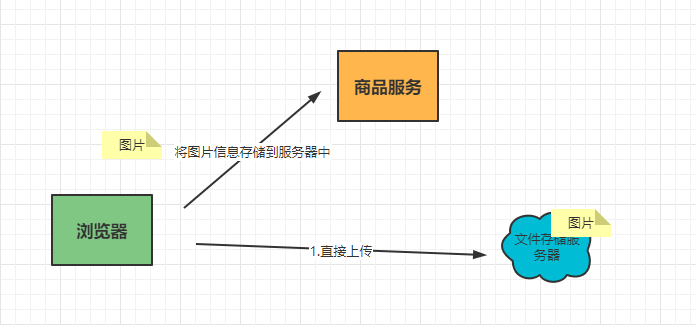
第二种方式就是在客户端直接将图片上传到阿里云服务器中,返回访问的url地址,然后将url访问地址传递到后端服务进而保存在数据库中。
|
|
|
|
|
|
|
|
|
|
|
|
|
|
|
|
|
|
|
|
|
|
|
|
这种方式的缺点是在客户端需要获取AccessKey和SecuretKey,这样将相关的核心数据暴露在前端不安全。
|
|
|
|
|
|
|
|
|
|
|
|
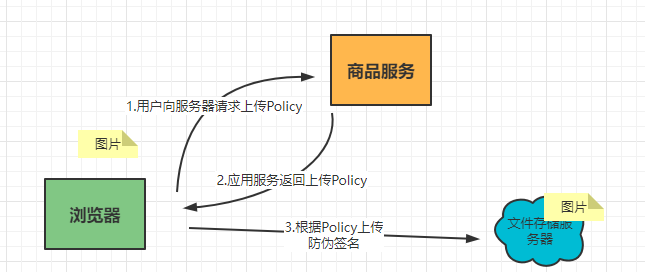
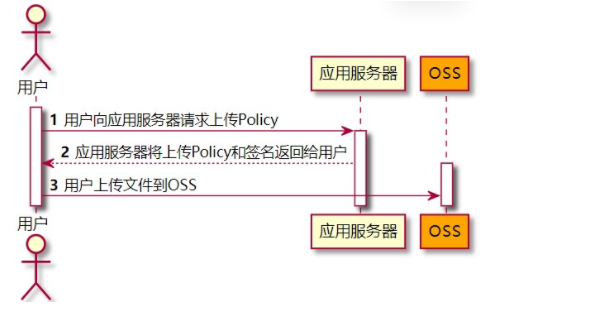
第三种方式就是客户端向服务器获取阿里云的防伪签名,然后直接将图片通过防伪签名上传到阿里云服务器中。这样既提高了效率又保证了安全。
|
|
|
|
|
|
|
|
|
|
|
|
|
|
|
|
|
|
|
|
|
|
|
|
#### 3.5 第三方公共服务
|
|
|
|
|
|
|
|
|
|
|
|
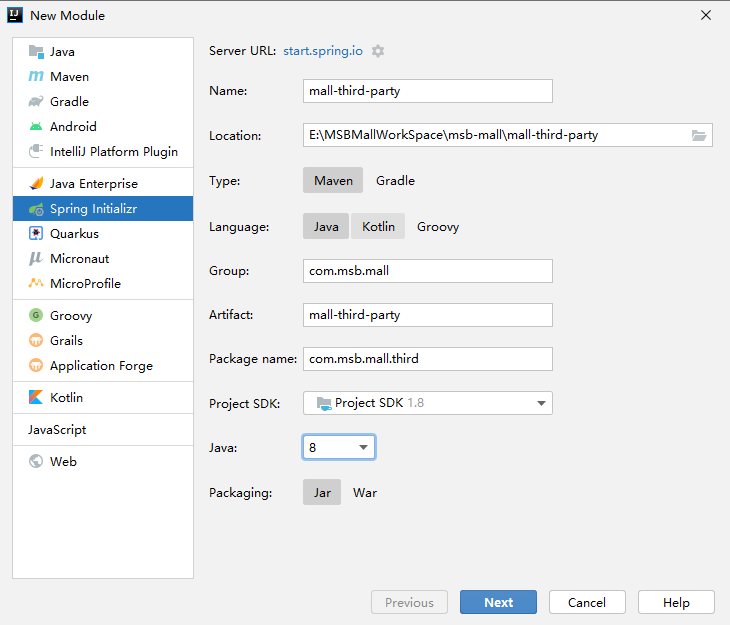
清楚了文件上传的方式后,客户端需要从服务器中获取服务防伪签名信息,同时我们后面还有很多其他的第三方服务,比如发送短信等,这时我们可以专门创建一个第三方的服务来处理这些请求。
|
|
|
|
|
|
|
|
|
|
|
|
|
|
|
|
|
|
|
|
|
|
|
|
修改pom文件中的SpringBoot的版本和SpringCloud的版本使其和其他模块的版本保持一致,然后同步注册中心和配置中心的操作。引入阿里云OSS服务的相关API,并测试即可
|
|
|
|
|
|
|
|
|
|
|
|
```xml
|
|
|
|
|
|
<?xml version="1.0" encoding="UTF-8"?>
|
|
|
|
|
|
<project xmlns="http://maven.apache.org/POM/4.0.0" xmlns:xsi="http://www.w3.org/2001/XMLSchema-instance"
|
|
|
|
|
|
xsi:schemaLocation="http://maven.apache.org/POM/4.0.0 https://maven.apache.org/xsd/maven-4.0.0.xsd">
|
|
|
|
|
|
<modelVersion>4.0.0</modelVersion>
|
|
|
|
|
|
<parent>
|
|
|
|
|
|
<groupId>org.springframework.boot</groupId>
|
|
|
|
|
|
<artifactId>spring-boot-starter-parent</artifactId>
|
|
|
|
|
|
<version>2.4.12</version>
|
|
|
|
|
|
<relativePath/> <!-- lookup parent from repository -->
|
|
|
|
|
|
</parent>
|
|
|
|
|
|
<groupId>com.msb.mall</groupId>
|
|
|
|
|
|
<artifactId>mall-third-party</artifactId>
|
|
|
|
|
|
<version>0.0.1-SNAPSHOT</version>
|
|
|
|
|
|
<name>mall-third-party</name>
|
|
|
|
|
|
<description>第三方服务</description>
|
|
|
|
|
|
<properties>
|
|
|
|
|
|
<java.version>1.8</java.version>
|
|
|
|
|
|
<spring-cloud.version>2020.0.1</spring-cloud.version>
|
|
|
|
|
|
</properties>
|
|
|
|
|
|
<dependencies>
|
|
|
|
|
|
<dependency>
|
|
|
|
|
|
<groupId>com.msb.mall</groupId>
|
|
|
|
|
|
<artifactId>mall-commons</artifactId>
|
|
|
|
|
|
<version>0.0.1-SNAPSHOT</version>
|
|
|
|
|
|
<exclusions>
|
|
|
|
|
|
<exclusion>
|
|
|
|
|
|
<groupId>com.baomidou</groupId>
|
|
|
|
|
|
<artifactId>mybatis-plus-boot-starter</artifactId>
|
|
|
|
|
|
</exclusion>
|
|
|
|
|
|
</exclusions>
|
|
|
|
|
|
</dependency>
|
|
|
|
|
|
<dependency>
|
|
|
|
|
|
<groupId>org.springframework.boot</groupId>
|
|
|
|
|
|
<artifactId>spring-boot-starter-web</artifactId>
|
|
|
|
|
|
</dependency>
|
|
|
|
|
|
<dependency>
|
|
|
|
|
|
<groupId>org.springframework.cloud</groupId>
|
|
|
|
|
|
<artifactId>spring-cloud-starter-openfeign</artifactId>
|
|
|
|
|
|
</dependency>
|
|
|
|
|
|
|
|
|
|
|
|
<dependency>
|
|
|
|
|
|
<groupId>org.springframework.boot</groupId>
|
|
|
|
|
|
<artifactId>spring-boot-starter-test</artifactId>
|
|
|
|
|
|
<scope>test</scope>
|
|
|
|
|
|
</dependency>
|
|
|
|
|
|
<dependency>
|
|
|
|
|
|
<groupId>com.alibaba.cloud</groupId>
|
|
|
|
|
|
<artifactId>spring-cloud-starter-alicloud-oss</artifactId>
|
|
|
|
|
|
<version>2.1.0.RELEASE</version>
|
|
|
|
|
|
</dependency>
|
|
|
|
|
|
</dependencies>
|
|
|
|
|
|
<dependencyManagement>
|
|
|
|
|
|
<dependencies>
|
|
|
|
|
|
<dependency>
|
|
|
|
|
|
<groupId>org.springframework.cloud</groupId>
|
|
|
|
|
|
<artifactId>spring-cloud-dependencies</artifactId>
|
|
|
|
|
|
<version>${spring-cloud.version}</version>
|
|
|
|
|
|
<type>pom</type>
|
|
|
|
|
|
<scope>import</scope>
|
|
|
|
|
|
</dependency>
|
|
|
|
|
|
</dependencies>
|
|
|
|
|
|
</dependencyManagement>
|
|
|
|
|
|
|
|
|
|
|
|
<build>
|
|
|
|
|
|
<plugins>
|
|
|
|
|
|
<plugin>
|
|
|
|
|
|
<groupId>org.springframework.boot</groupId>
|
|
|
|
|
|
<artifactId>spring-boot-maven-plugin</artifactId>
|
|
|
|
|
|
</plugin>
|
|
|
|
|
|
</plugins>
|
|
|
|
|
|
</build>
|
|
|
|
|
|
|
|
|
|
|
|
</project>
|
|
|
|
|
|
|
|
|
|
|
|
```
|
|
|
|
|
|
|
|
|
|
|
|
属性文件:application.yml
|
|
|
|
|
|
|
|
|
|
|
|
```yml
|
|
|
|
|
|
# 数据库的连接新
|
|
|
|
|
|
spring:
|
|
|
|
|
|
cloud:
|
|
|
|
|
|
nacos:
|
|
|
|
|
|
discovery:
|
|
|
|
|
|
server-addr: 192.168.56.100:8848
|
|
|
|
|
|
alicloud:
|
|
|
|
|
|
access-key: LTAI5tBPqoroToQNyrHpYJLR
|
|
|
|
|
|
secret-key: 3GnWaRhcBW3gUDhNSVr23fSrM6A0Q4
|
|
|
|
|
|
oss:
|
|
|
|
|
|
endpoint: oss-cn-guangzhou.aliyuncs.com
|
|
|
|
|
|
application:
|
|
|
|
|
|
name: mall-third
|
|
|
|
|
|
server:
|
|
|
|
|
|
port: 8090
|
|
|
|
|
|
|
|
|
|
|
|
```
|
|
|
|
|
|
|
|
|
|
|
|
bootstrap.property
|
|
|
|
|
|
|
|
|
|
|
|
```properties
|
|
|
|
|
|
spring.application.name=mall-third
|
|
|
|
|
|
spring.cloud.nacos.config.server-addr=192.168.56.100:8848
|
|
|
|
|
|
|
|
|
|
|
|
|
|
|
|
|
|
```
|
|
|
|
|
|
|
|
|
|
|
|
注意在启动类中别忘了放开注册中心
|
|
|
|
|
|
|
|
|
|
|
|

|
|
|
|
|
|
|
|
|
|
|
|
测试图片上传的代码直接拷贝即可
|
|
|
|
|
|
|
|
|
|
|
|
|
|
|
|
|
|
|
|
|
|
|
|
|
|
|
|
|
|
|
|
|
|
|
|
#### 3.6 服务端生成签名
|
|
|
|
|
|
|
|
|
|
|
|
生成签名地址:https://help.aliyun.com/document_detail/31926.htm?spm=a2c4g.11186623.0.0.2688566aJheBNk#concept-en4-sjy-5db
|
|
|
|
|
|
|
|
|
|
|
|
|
|
|
|
|
|
|
|
|
|
|
|
直接通过案例代码改造即可:https://help.aliyun.com/document_detail/91868.htm?spm=a2c4g.11186623.0.0.49c1344eaX3VCA#concept-ahk-rfz-2fb
|
|
|
|
|
|
|
|
|
|
|
|
```java
|
|
|
|
|
|
@RestController
|
|
|
|
|
|
public class OSSController {
|
|
|
|
|
|
|
|
|
|
|
|
@Autowired
|
|
|
|
|
|
private OSS ossClient;
|
|
|
|
|
|
|
|
|
|
|
|
@Value("${spring.cloud.alicloud.oss.endpoint}")
|
|
|
|
|
|
private String endpoint;
|
|
|
|
|
|
@Value("${spring.cloud.alicloud.oss.bucket}")
|
|
|
|
|
|
private String bucket;
|
|
|
|
|
|
@Value("${spring.cloud.alicloud.access-key}")
|
|
|
|
|
|
private String accessId;
|
|
|
|
|
|
|
|
|
|
|
|
@RequestMapping("/oss/policy")
|
|
|
|
|
|
public Map<String, String> getOssPolicy(){
|
|
|
|
|
|
|
|
|
|
|
|
String host = "https://" + bucket + "." + endpoint; // host的格式为 bucketname.endpoint
|
|
|
|
|
|
// callbackUrl为上传回调服务器的URL,请将下面的IP和Port配置为您自己的真实信息。
|
|
|
|
|
|
String format = new SimpleDateFormat("yyyy-MM-dd").format(new Date());
|
|
|
|
|
|
String dir = format+"/"; // 用户上传文件时指定的前缀。
|
|
|
|
|
|
|
|
|
|
|
|
// 创建OSSClient实例。
|
|
|
|
|
|
//OSS ossClient = new OSSClientBuilder().build(endpoint, accessId, accessKey);
|
|
|
|
|
|
Map<String, String> respMap = null;
|
|
|
|
|
|
try {
|
|
|
|
|
|
long expireTime = 30;
|
|
|
|
|
|
long expireEndTime = System.currentTimeMillis() + expireTime * 1000;
|
|
|
|
|
|
Date expiration = new Date(expireEndTime);
|
|
|
|
|
|
// PostObject请求最大可支持的文件大小为5 GB,即CONTENT_LENGTH_RANGE为5*1024*1024*1024。
|
|
|
|
|
|
PolicyConditions policyConds = new PolicyConditions();
|
|
|
|
|
|
policyConds.addConditionItem(PolicyConditions.COND_CONTENT_LENGTH_RANGE, 0, 1048576000);
|
|
|
|
|
|
policyConds.addConditionItem(MatchMode.StartWith, PolicyConditions.COND_KEY, dir);
|
|
|
|
|
|
|
|
|
|
|
|
String postPolicy = ossClient.generatePostPolicy(expiration, policyConds);
|
|
|
|
|
|
byte[] binaryData = postPolicy.getBytes("utf-8");
|
|
|
|
|
|
String encodedPolicy = BinaryUtil.toBase64String(binaryData);
|
|
|
|
|
|
String postSignature = ossClient.calculatePostSignature(postPolicy);
|
|
|
|
|
|
|
|
|
|
|
|
respMap = new LinkedHashMap<String, String>();
|
|
|
|
|
|
respMap.put("accessid", accessId);
|
|
|
|
|
|
respMap.put("policy", encodedPolicy);
|
|
|
|
|
|
respMap.put("signature", postSignature);
|
|
|
|
|
|
respMap.put("dir", dir);
|
|
|
|
|
|
respMap.put("host", host);
|
|
|
|
|
|
respMap.put("expire", String.valueOf(expireEndTime / 1000));
|
|
|
|
|
|
// respMap.put("expire", formatISO8601Date(expiration));
|
|
|
|
|
|
|
|
|
|
|
|
|
|
|
|
|
|
} catch (Exception e) {
|
|
|
|
|
|
// Assert.fail(e.getMessage());
|
|
|
|
|
|
System.out.println(e.getMessage());
|
|
|
|
|
|
} finally {
|
|
|
|
|
|
ossClient.shutdown();
|
|
|
|
|
|
}
|
|
|
|
|
|
return respMap;
|
|
|
|
|
|
}
|
|
|
|
|
|
}
|
|
|
|
|
|
|
|
|
|
|
|
```
|
|
|
|
|
|
|
|
|
|
|
|
相关的属性配置
|
|
|
|
|
|
|
|
|
|
|
|
```yml
|
|
|
|
|
|
# 数据库的连接新
|
|
|
|
|
|
spring:
|
|
|
|
|
|
cloud:
|
|
|
|
|
|
nacos:
|
|
|
|
|
|
discovery:
|
|
|
|
|
|
server-addr: 192.168.56.100:8848
|
|
|
|
|
|
alicloud:
|
|
|
|
|
|
access-key: LTAI5tBPqoroToQNyrHpYJLR
|
|
|
|
|
|
secret-key: 3GnWaRhcBW3gUDhNSVr23fSrM6A0Q4
|
|
|
|
|
|
oss:
|
|
|
|
|
|
endpoint: oss-cn-guangzhou.aliyuncs.com
|
|
|
|
|
|
bucket: mashibing-mall
|
|
|
|
|
|
application:
|
|
|
|
|
|
name: mall-third
|
|
|
|
|
|
server:
|
|
|
|
|
|
port: 8090
|
|
|
|
|
|
|
|
|
|
|
|
```
|
|
|
|
|
|
|
|
|
|
|
|
访问即可:
|
|
|
|
|
|
|
|
|
|
|
|

|
|
|
|
|
|
|
|
|
|
|
|
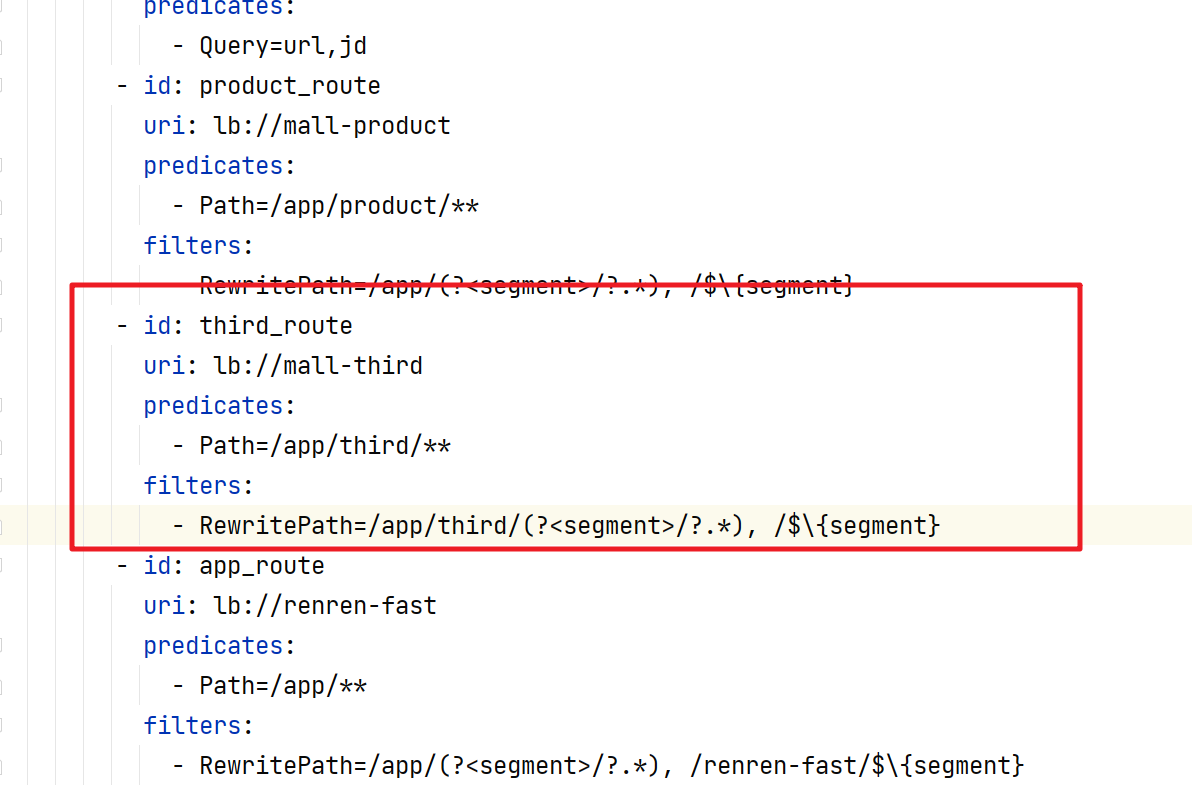
客户端获取服务签名的时候肯定是走的网关路由,所以我们还需要在网关中添加Third服务的路由:
|
|
|
|
|
|
|
|
|
|
|
|
|
|
|
|
|
|
|
|
|
|
|
|
然后通过网关调用获取服务签名
|
|
|
|
|
|
|
|
|
|
|
|

|
|
|
|
|
|
|
|
|
|
|
|
#### 3.7 品牌图片上传
|
|
|
|
|
|
|
|
|
|
|
|
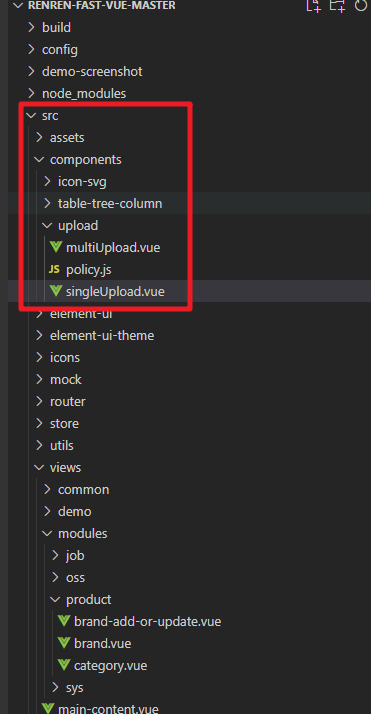
第一个我们需要借助ElementUI中提供的el-upload组件来实现上传操作,我们预先准备了相关的上传代码
|
|
|
|
|
|
|
|
|
|
|
|

|
|
|
|
|
|
|
|
|
|
|
|
然后将这三个文件拷贝到项目目录中
|
|
|
|
|
|
|
|
|
|
|
|
|
|
|
|
|
|
|
|
|
|
|
|
然后在添加修改品牌的窗口中添加上传的组件
|
|
|
|
|
|
|
|
|
|
|
|

|
|
|
|
|
|
|
|
|
|
|
|

|
|
|
|
|
|
|
|
|
|
|
|
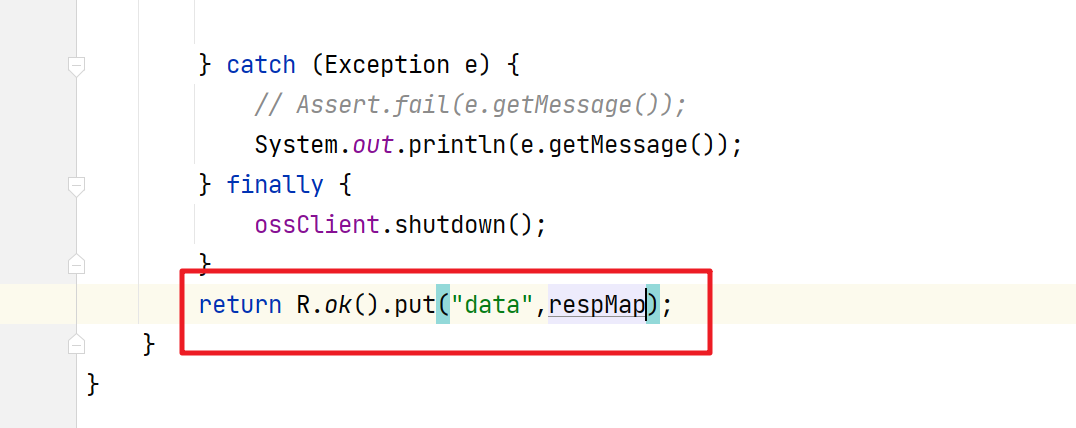
在操作中,我们发下获取的数据是从response.data中获取的,但是我们在服务端返回的是Map数据,没有data封装,这时我们需要调整后端Thrid服务接口的返回信息通过R对象来返回
|
|
|
|
|
|
|
|
|
|
|
|
|
|
|
|
|
|
|
|
|
|
|
|
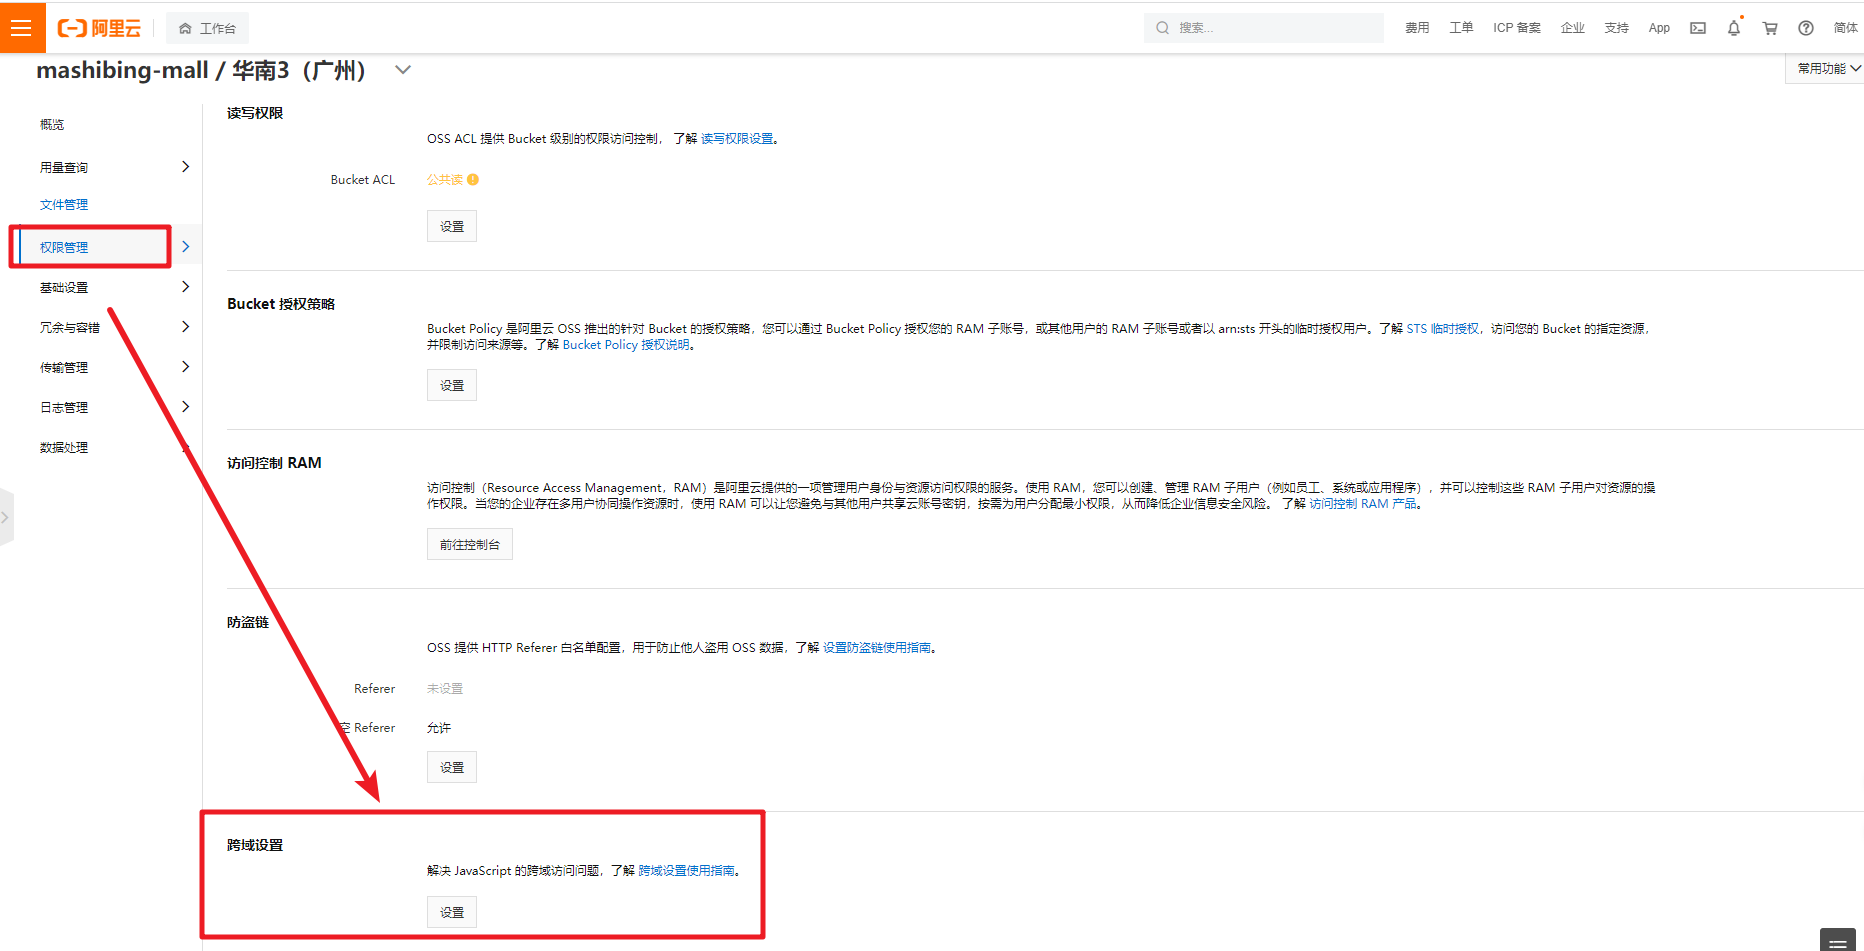
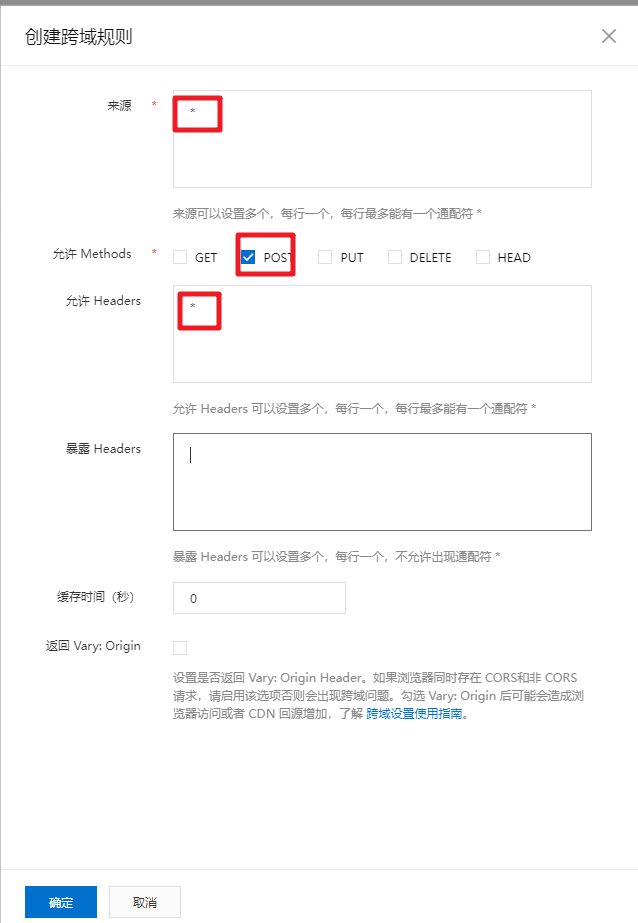
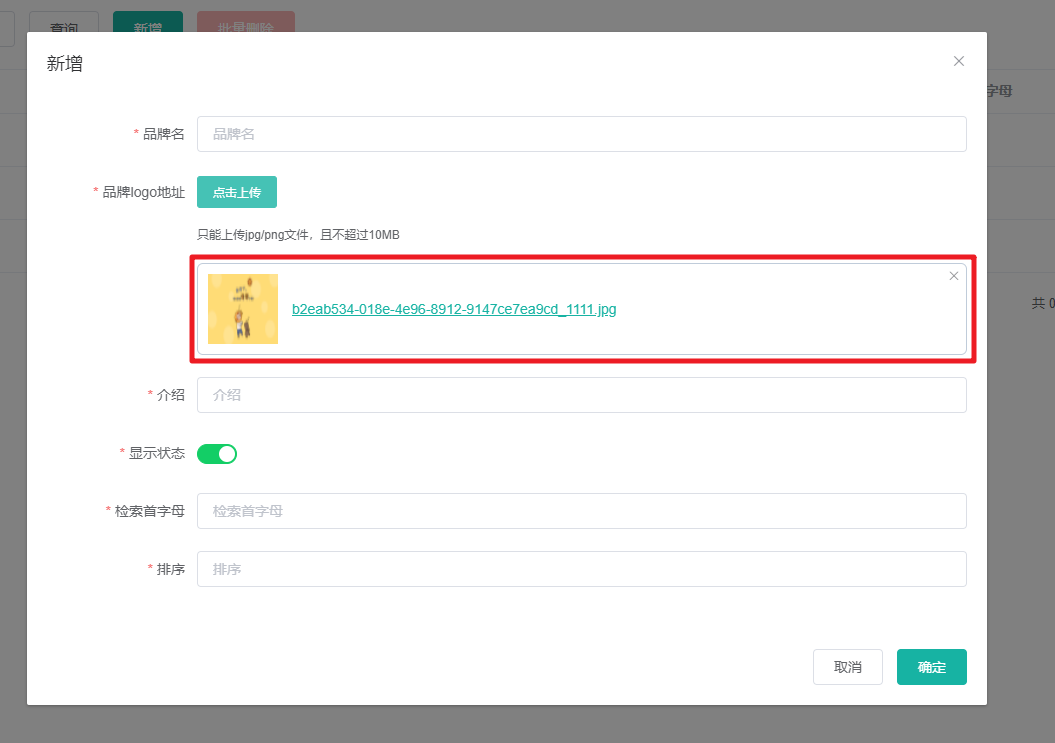
最后OSS上传还会出现跨域问题,参考官方文档配置即可
|
|
|
|
|
|
|
|
|
|
|
|

|
|
|
|
|
|
|
|
|
|
|
|
出现跨域问题的解决方案
|
|
|
|
|
|
|
|
|
|
|
|
|
|
|
|
|
|
|
|
|
|
|
|
|
|
|
|
|
|
|
|
|
|
|
|
|
|
|
|
|
|
|
|
|
|
|
|
然后在OSS服务端也可以看到我们上传成功的文件
|
|
|
|
|
|
|
|
|
|
|
|

|
|
|
|
|
|
|
|
|
|
|
|
单独的文件上传我们就搞定了!
|
|
|
|
|
|
|
|
|
|
|
|
### 4. 添加品牌信息
|
|
|
|
|
|
|
|
|
|
|
|
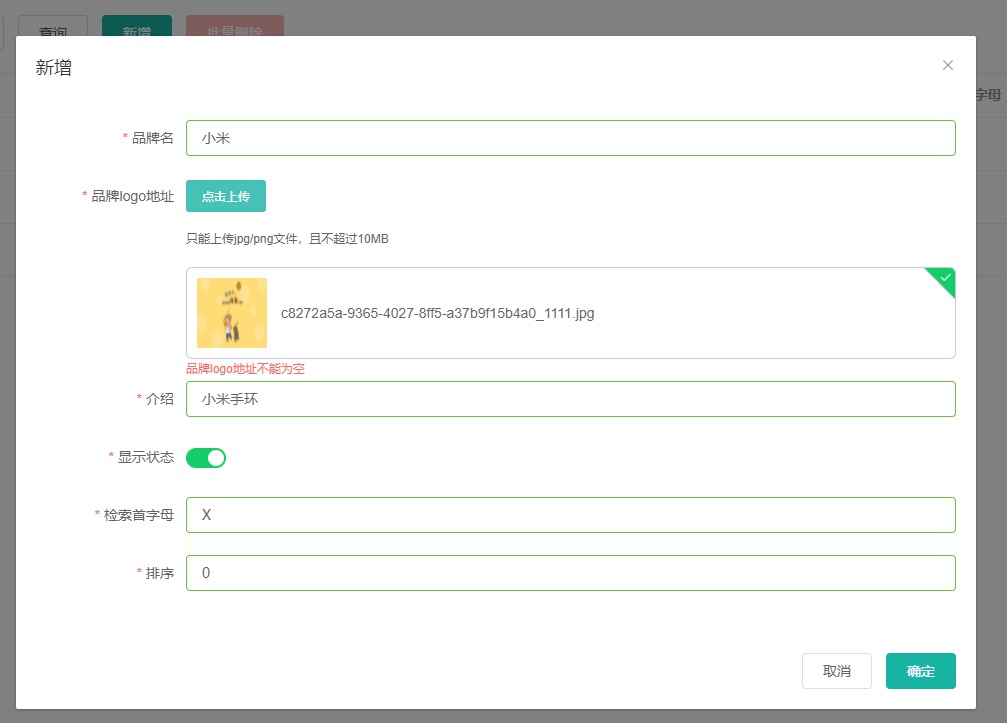
图片上传处理完成后我们就可以实现品牌数据的添加和修改操作
|
|
|
|
|
|
|
|
|
|
|
|
|
|
|
|
|
|
|
|
|
|
|
|
提交后的数据在table中显示的是logo的图片地址,我们需要将其显示出来
|
|
|
|
|
|
|
|
|
|
|
|

|
|
|
|
|
|
|
|
|
|
|
|

|
|
|
|
|
|
|
|
|
|
|
|
### 5. 前端校验
|
|
|
|
|
|
|
|
|
|
|
|
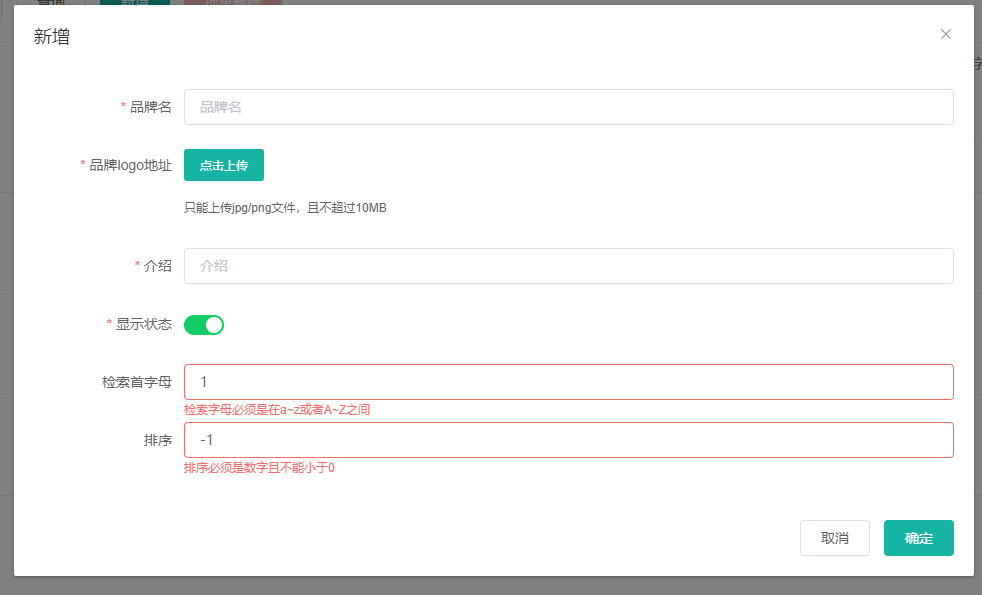
我们在前端提交的表单数据,我们也是需要对提交的数据做相关的校验的
|
|
|
|
|
|
|
|
|
|
|
|
Form 组件提供了表单验证的功能,只需要通过 `rules` 属性传入约定的验证规则,并将 Form-Item 的 `prop` 属性设置为需校验的字段名即可
|
|
|
|
|
|
|
|
|
|
|
|

|
|
|
|
|
|
|
|
|
|
|
|
校验的页面效果
|
|
|
|
|
|
|
|
|
|
|
|
|
|
|
|
|
|
|
|
|
|
|
|
前端数据校验就搞定了。后端校验也是不可避免的
|
|
|
|
|
|
|
|
|
|
|
|
### 6. 后端服务校验
|
|
|
|
|
|
|
|
|
|
|
|
#### 6.1 JSR-303介绍
|
|
|
|
|
|
|
|
|
|
|
|
  JSR是Java Specification Requests的缩写,意思是Java 规范提案。是指向JCP(Java Community Process)提出新增一个标准化技术规范的正式请求。任何人都可以提交JSR,以向Java平台增添新的API和服务。JSR已成为Java界的一个重要标准。
|
|
|
|
|
|
|
|
|
|
|
|
  JSR-303 是JAVA EE 6 中的一项子规范,叫做Bean Validation,Hibernate Validator 是 Bean Validation 的参考实现 . Hibernate Validator 提供了 JSR 303 规范中所有内置 constraint 的实现,除此之外还有一些附加的 constraint。
|
|
|
|
|
|
  Hibernate Validator 是 Bean Validation 的参考实现 . Hibernate Validator 提供了 JSR 303 规范中所有内置 constraint 的实现,除此之外还有一些附加的 constraint。
|
|
|
|
|
|
|
|
|
|
|
|

|
|
|
|
|
|
|
|
|
|
|
|
Hibernate 中填充一部分
|
|
|
|
|
|
|
|
|
|
|
|

|
|
|
|
|
|
|
|
|
|
|
|
#### 6.2 后端校验实现
|
|
|
|
|
|
|
|
|
|
|
|
1.需要在commons服务中添加对应的依赖
|
|
|
|
|
|
|
|
|
|
|
|
```xml
|
|
|
|
|
|
<dependency>
|
|
|
|
|
|
<groupId>org.springframework.boot</groupId>
|
|
|
|
|
|
<artifactId>spring-boot-starter-validation</artifactId>
|
|
|
|
|
|
<version>2.4.12</version>
|
|
|
|
|
|
</dependency>
|
|
|
|
|
|
```
|
|
|
|
|
|
|
|
|
|
|
|
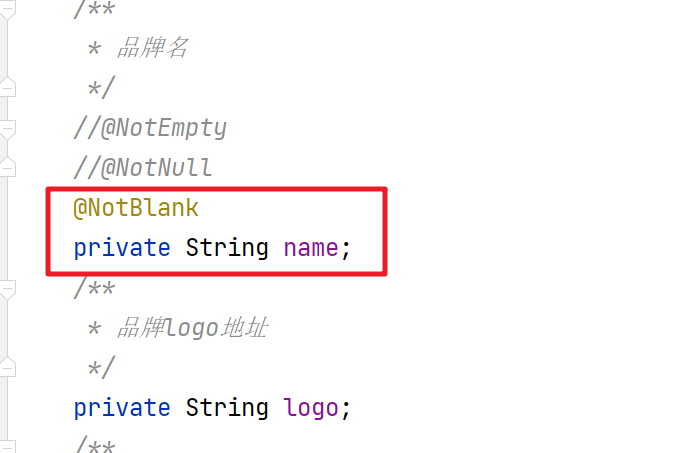
2.在需要校验的Bean的字段头部添加对应的注解
|
|
|
|
|
|
|
|
|
|
|
|
|
|
|
|
|
|
|
|
|
|
|
|
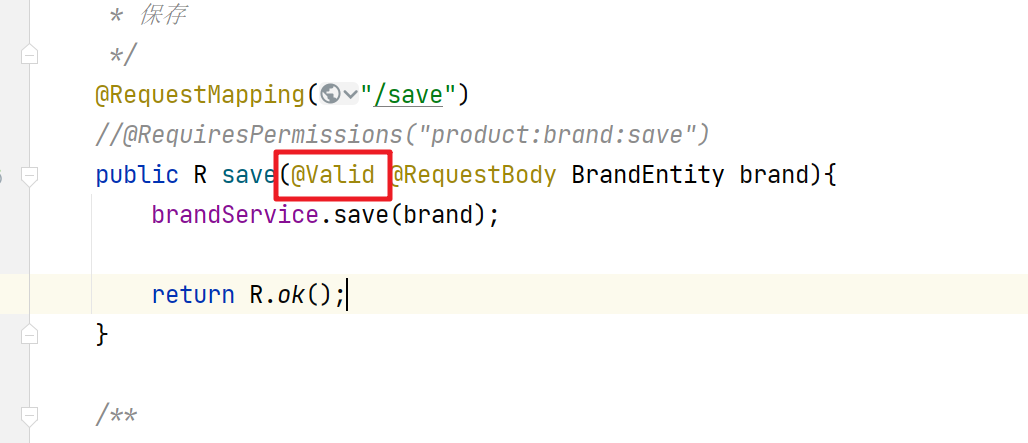
3.通过@Valid注解来开启JSR303的校验
|
|
|
|
|
|
|
|
|
|
|
|
|
|
|
|
|
|
|
|
|
|
|
|
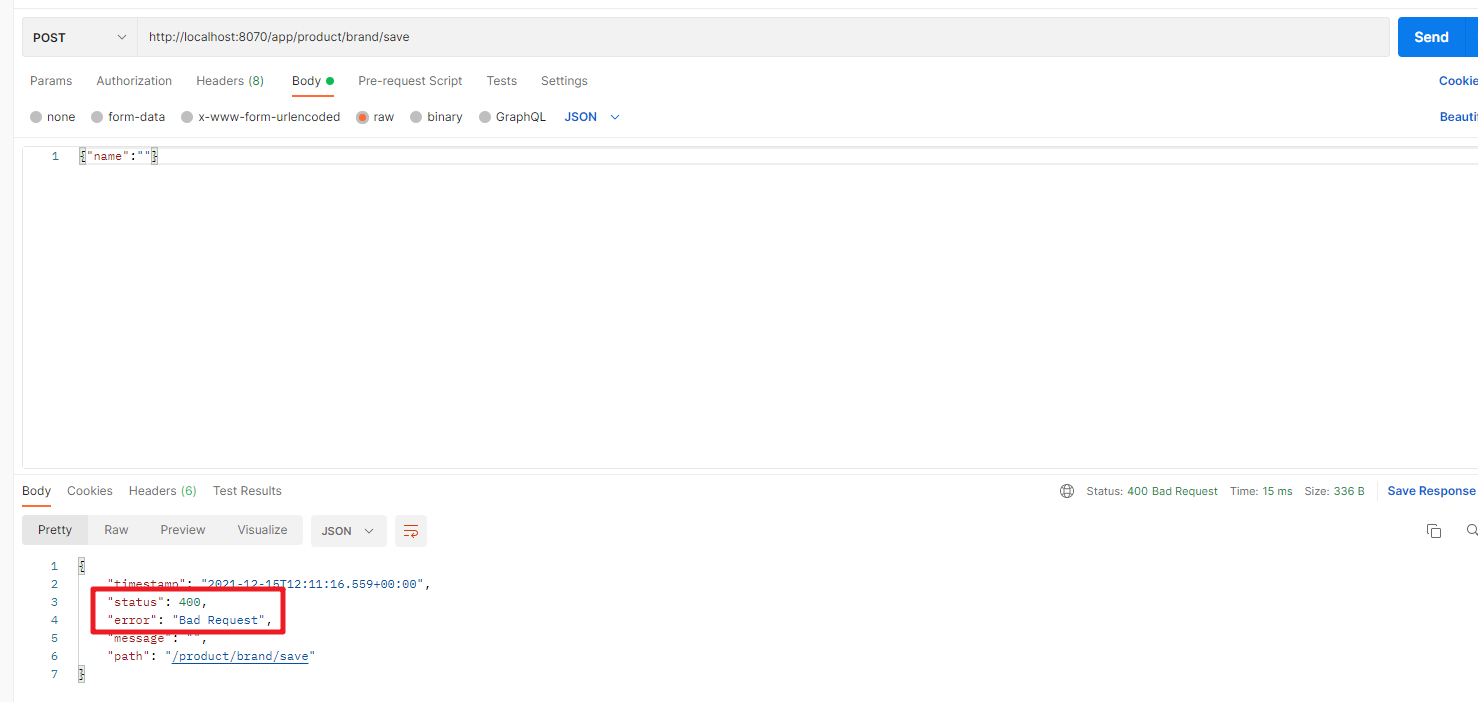
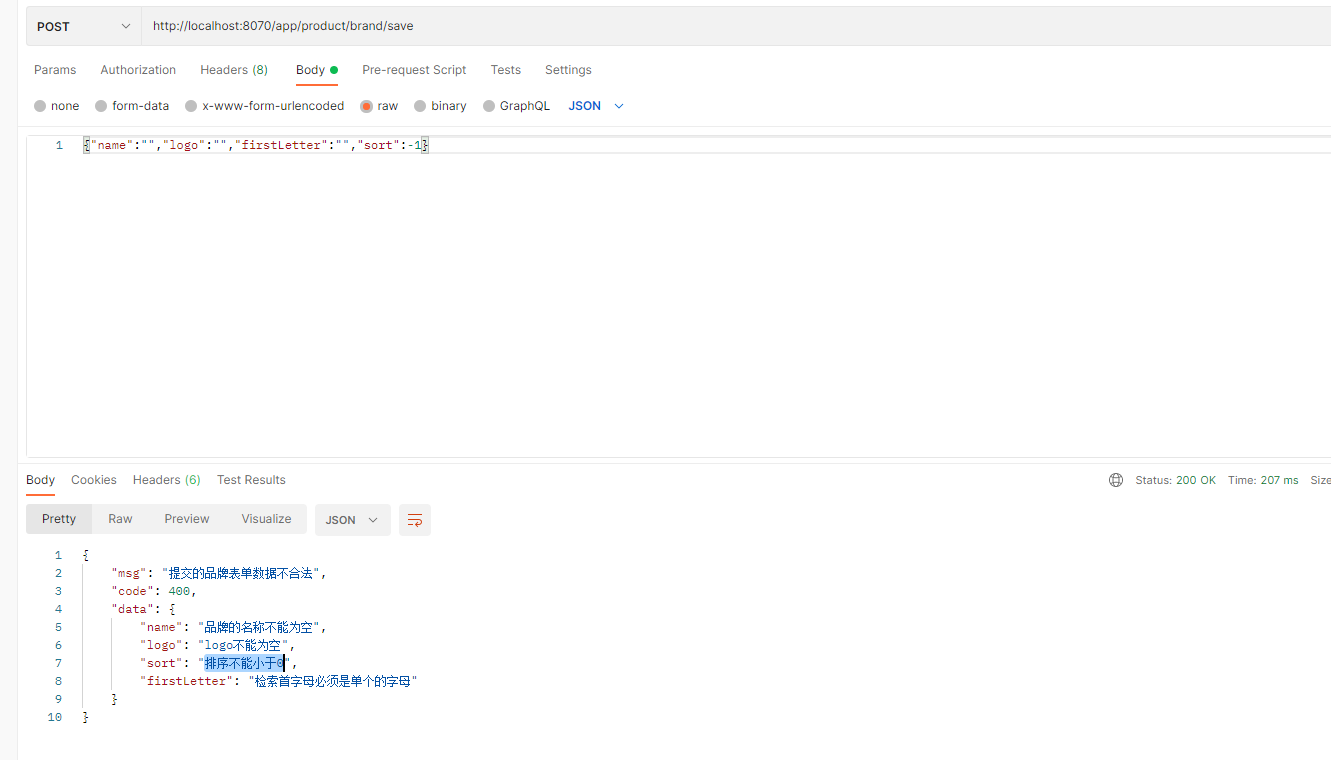
4.测试,通过postman提交空的数据
|
|
|
|
|
|
|
|
|
|
|
|
|
|
|
|
|
|
|
|
|
|
|
|
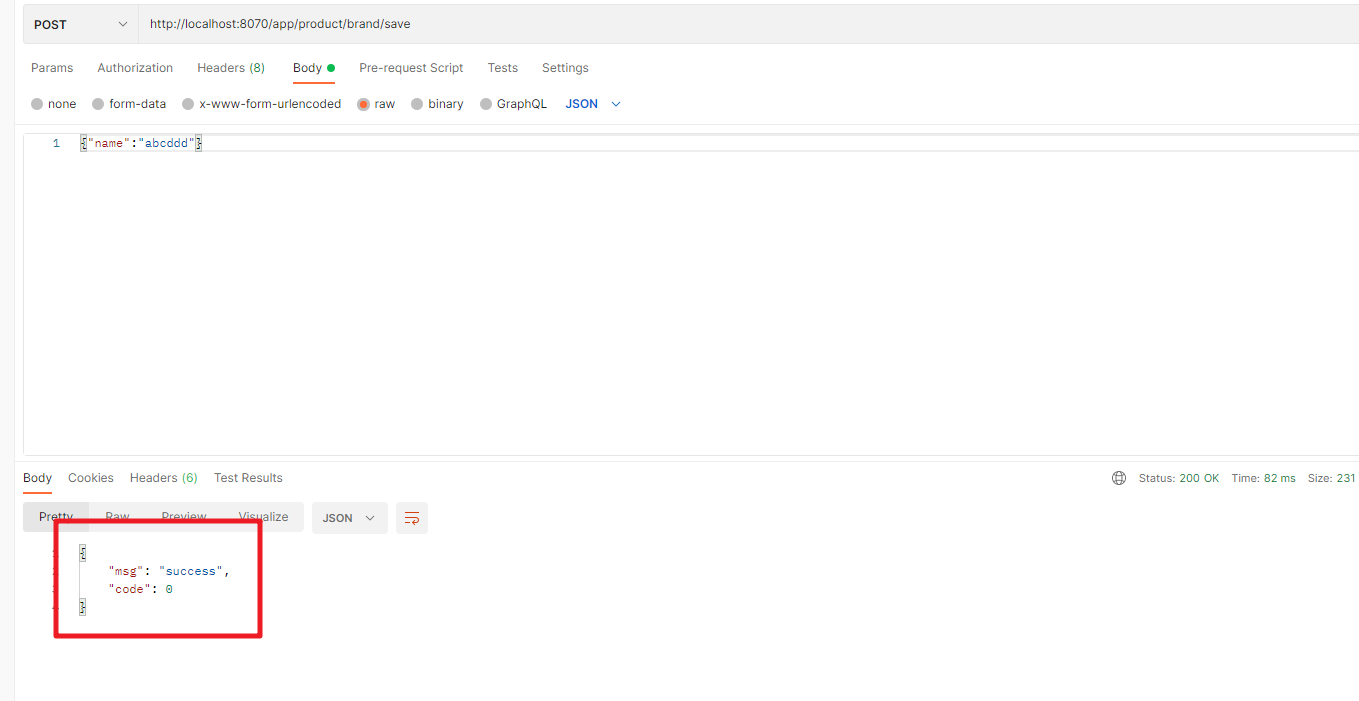
当我们提交一个非空的数据是可以通过的
|
|
|
|
|
|
|
|
|
|
|
|
|
|
|
|
|
|
|
|
|
|
|
|
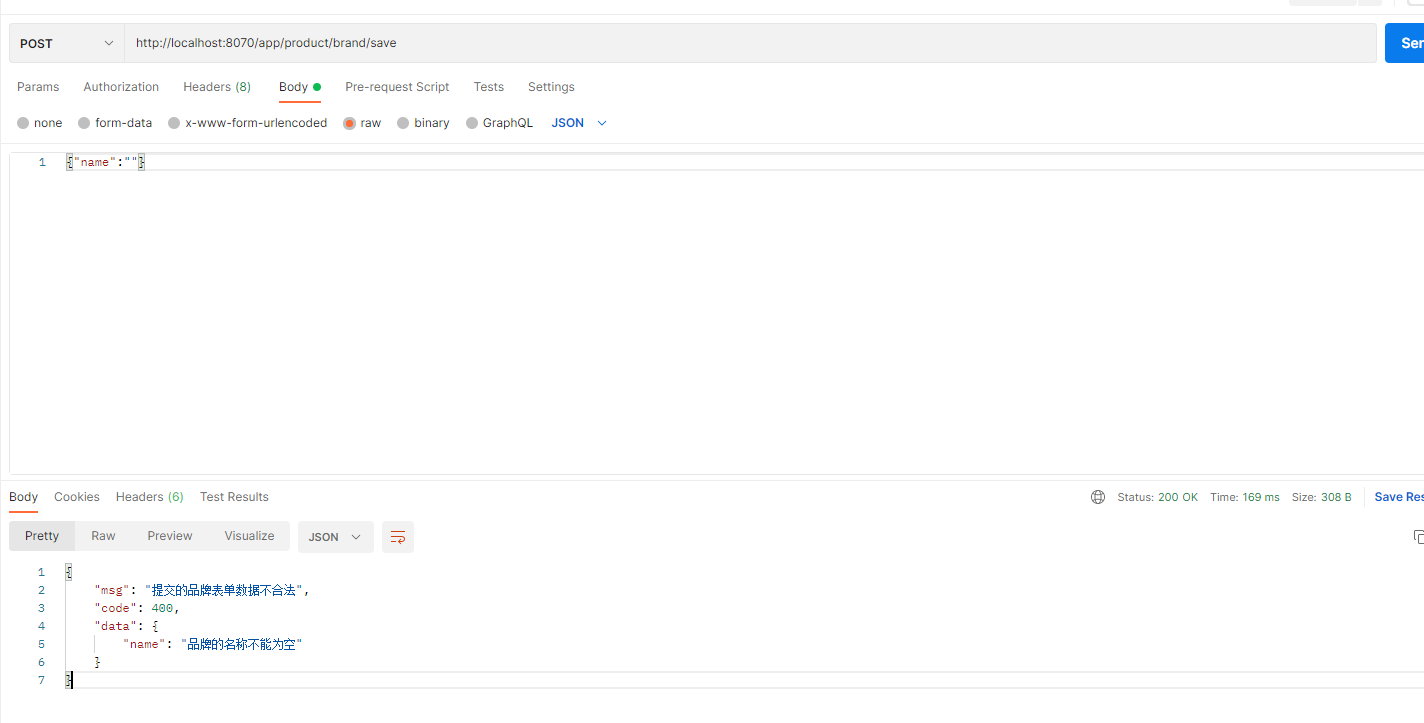
5.校验不合法的提示信息,在Controller中通过 BindingResult对象来获取校验的结果信息,然后解析出来后封装为R对象响应
|
|
|
|
|
|
|
|
|
|
|
|
```java
|
|
|
|
|
|
@RequestMapping("/save")
|
|
|
|
|
|
//@RequiresPermissions("product:brand:save")
|
|
|
|
|
|
public R save(@Valid @RequestBody BrandEntity brand, BindingResult result){
|
|
|
|
|
|
if(result.hasErrors()){
|
|
|
|
|
|
// 提交的数据经过JSR303校验后有非法的字段
|
|
|
|
|
|
Map<String,String> map = new HashMap<>();
|
|
|
|
|
|
List<FieldError> fieldErrors = result.getFieldErrors();
|
|
|
|
|
|
for (FieldError fieldError : fieldErrors) {
|
|
|
|
|
|
// 获取非法数据的 field
|
|
|
|
|
|
String field = fieldError.getField();
|
|
|
|
|
|
// 获取非法的field的提示信息
|
|
|
|
|
|
String defaultMessage = fieldError.getDefaultMessage();
|
|
|
|
|
|
map.put(field,defaultMessage);
|
|
|
|
|
|
}
|
|
|
|
|
|
return R.error(400,"提交的品牌表单数据不合法").put("data",map);
|
|
|
|
|
|
}
|
|
|
|
|
|
brandService.save(brand);
|
|
|
|
|
|
|
|
|
|
|
|
return R.ok();
|
|
|
|
|
|
}
|
|
|
|
|
|
```
|
|
|
|
|
|
|
|
|
|
|
|
|
|
|
|
|
|
|
|
|
|
|
|
然后完善其他字段你的校验规则
|
|
|
|
|
|
|
|
|
|
|
|
```java
|
|
|
|
|
|
@Data
|
|
|
|
|
|
@TableName("pms_brand")
|
|
|
|
|
|
public class BrandEntity implements Serializable {
|
|
|
|
|
|
private static final long serialVersionUID = 1L;
|
|
|
|
|
|
|
|
|
|
|
|
/**
|
|
|
|
|
|
* 品牌id
|
|
|
|
|
|
*/
|
|
|
|
|
|
@TableId
|
|
|
|
|
|
private Long brandId;
|
|
|
|
|
|
/**
|
|
|
|
|
|
* 品牌名
|
|
|
|
|
|
*/
|
|
|
|
|
|
//@NotEmpty
|
|
|
|
|
|
//@NotNull
|
|
|
|
|
|
@NotBlank(message = "品牌的名称不能为空")
|
|
|
|
|
|
private String name;
|
|
|
|
|
|
/**
|
|
|
|
|
|
* 品牌logo地址
|
|
|
|
|
|
*/
|
|
|
|
|
|
@NotBlank(message = "logo不能为空")
|
|
|
|
|
|
@URL(message = "logo必须是一个合法URL地址")
|
|
|
|
|
|
private String logo;
|
|
|
|
|
|
/**
|
|
|
|
|
|
* 介绍
|
|
|
|
|
|
*/
|
|
|
|
|
|
private String descript;
|
|
|
|
|
|
/**
|
|
|
|
|
|
* 显示状态[0-不显示;1-显示]
|
|
|
|
|
|
*/
|
|
|
|
|
|
private Integer showStatus;
|
|
|
|
|
|
/**
|
|
|
|
|
|
* 检索首字母
|
|
|
|
|
|
*/
|
|
|
|
|
|
@NotBlank(message = "检索首字母不能为空")
|
|
|
|
|
|
@Pattern(regexp = "/^[a-zA-Z]$/",message = "检索首字母必须是单个的字母")
|
|
|
|
|
|
private String firstLetter;
|
|
|
|
|
|
/**
|
|
|
|
|
|
* 排序
|
|
|
|
|
|
*/
|
|
|
|
|
|
@NotNull(message = "排序不能为null")
|
|
|
|
|
|
@Min(value = 0,message = "排序不能小于0")
|
|
|
|
|
|
private Integer sort;
|
|
|
|
|
|
|
|
|
|
|
|
}
|
|
|
|
|
|
```
|
|
|
|
|
|
|
|
|
|
|
|
|
|
|
|
|
|
|
|
|
|
|
|
#### 6.3 统一的异常处理
|
|
|
|
|
|
|
|
|
|
|
|
  在SpringMVC中的统一异常处理我们通过ControllerAdvice来处理
|
|
|
|
|
|
|
|
|
|
|
|
```java
|
|
|
|
|
|
/**
|
|
|
|
|
|
* 统一的异常处理类
|
|
|
|
|
|
*/
|
|
|
|
|
|
/*@ResponseBody
|
|
|
|
|
|
@ControllerAdvice*/
|
|
|
|
|
|
@Slf4j
|
|
|
|
|
|
@RestControllerAdvice(basePackages = "com.msb.mall.product.controller")
|
|
|
|
|
|
public class ExceptionControllerAdvice {
|
|
|
|
|
|
/**
|
|
|
|
|
|
* 处理验证异常的方法
|
|
|
|
|
|
* @param e
|
|
|
|
|
|
*/
|
|
|
|
|
|
|
|
|
|
|
|
@ExceptionHandler(value = MethodArgumentNotValidException.class)
|
|
|
|
|
|
public R handlerValidExecption(MethodArgumentNotValidException e){
|
|
|
|
|
|
Map<String,String> map = new HashMap<>();
|
|
|
|
|
|
e.getFieldErrors().forEach((fieldError)->{
|
|
|
|
|
|
map.put(fieldError.getField(),fieldError.getDefaultMessage());
|
|
|
|
|
|
});
|
|
|
|
|
|
return R.error(400,"提交的数据不合法").put("data",map);
|
|
|
|
|
|
}
|
|
|
|
|
|
|
|
|
|
|
|
/**
|
|
|
|
|
|
* 系统其他的异常处理
|
|
|
|
|
|
* @param throwable
|
|
|
|
|
|
* @return
|
|
|
|
|
|
*/
|
|
|
|
|
|
@ExceptionHandler(Throwable.class)
|
|
|
|
|
|
public R handlerExecption(Throwable throwable){
|
|
|
|
|
|
log.error("错误信息:",throwable);
|
|
|
|
|
|
return R.error(400,"未知异常信息").put("data",throwable.getMessage());
|
|
|
|
|
|
}
|
|
|
|
|
|
}
|
|
|
|
|
|
|
|
|
|
|
|
```
|
|
|
|
|
|
|
|
|
|
|
|
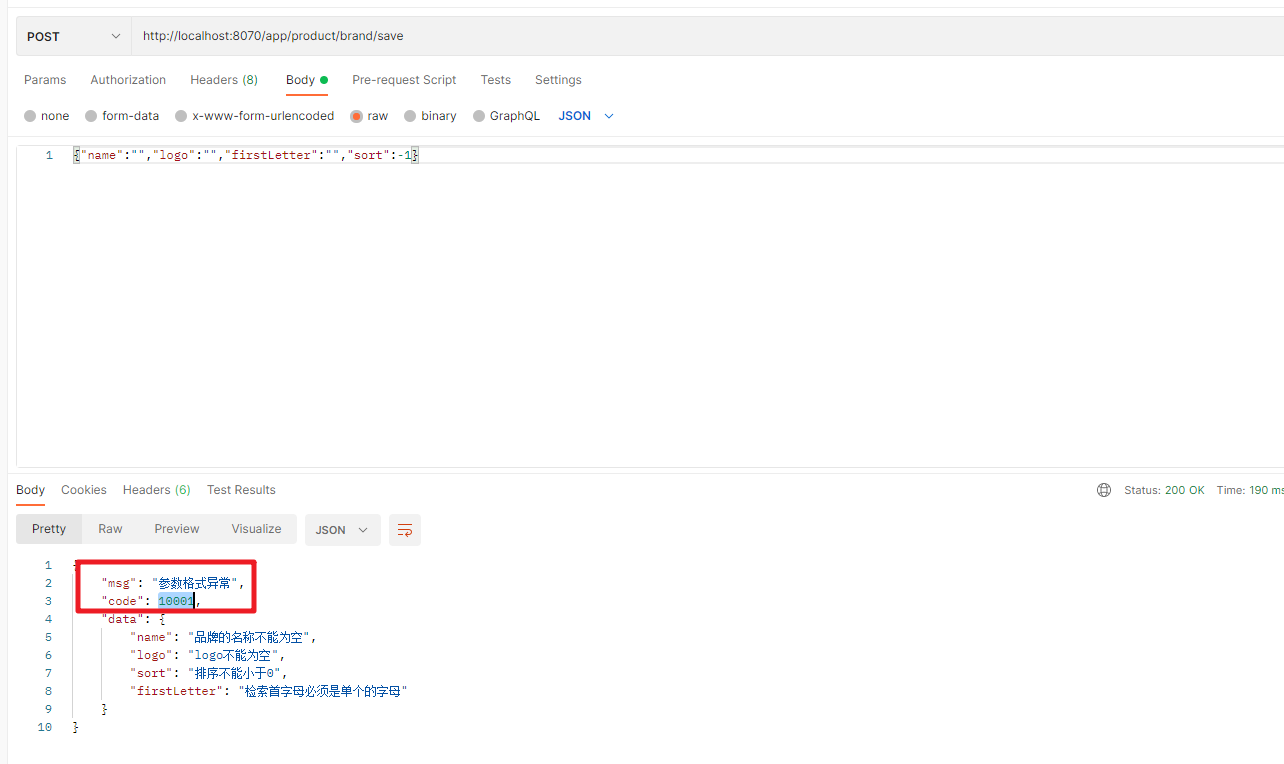
响应编码的规制制订,因为随着后面的业务越来越复杂,我们在响应异常信息的时候尽量准确的给客户端有用的提示信息。
|
|
|
|
|
|
|
|
|
|
|
|
> 通用的错误列表,响应的编码统一为5位数字,前面两位约定为业务场景,最后三位约定为错误码
|
|
|
|
|
|
>
|
|
|
|
|
|
> 10:表示通用
|
|
|
|
|
|
>
|
|
|
|
|
|
> /001:参数格式错误 10001
|
|
|
|
|
|
>
|
|
|
|
|
|
> /002:未知异常 10002
|
|
|
|
|
|
>
|
|
|
|
|
|
> 11:商品
|
|
|
|
|
|
>
|
|
|
|
|
|
> 12:订单
|
|
|
|
|
|
>
|
|
|
|
|
|
> 13:物流
|
|
|
|
|
|
>
|
|
|
|
|
|
> 14:会员
|
|
|
|
|
|
>
|
|
|
|
|
|
> .....
|
|
|
|
|
|
|
|
|
|
|
|
定义对应的枚举类
|
|
|
|
|
|
|
|
|
|
|
|
```java
|
|
|
|
|
|
package com.msb.common.exception;
|
|
|
|
|
|
|
|
|
|
|
|
/**
|
|
|
|
|
|
* 错误编码和错误信息的枚举类
|
|
|
|
|
|
*/
|
|
|
|
|
|
public enum BizCodeEnume {
|
|
|
|
|
|
|
|
|
|
|
|
UNKNOW_EXCEPTION(10000,"系统未知异常"),
|
|
|
|
|
|
VALID_EXCEPTION(10001,"参数格式异常");
|
|
|
|
|
|
|
|
|
|
|
|
private int code;
|
|
|
|
|
|
private String msg;
|
|
|
|
|
|
|
|
|
|
|
|
BizCodeEnume(int code,String msg){
|
|
|
|
|
|
this.code = code;
|
|
|
|
|
|
this.msg = msg;
|
|
|
|
|
|
}
|
|
|
|
|
|
public int getCode(){
|
|
|
|
|
|
return code;
|
|
|
|
|
|
}
|
|
|
|
|
|
|
|
|
|
|
|
public String getMsg(){
|
|
|
|
|
|
return msg;
|
|
|
|
|
|
}
|
|
|
|
|
|
}
|
|
|
|
|
|
|
|
|
|
|
|
```
|
|
|
|
|
|
|
|
|
|
|
|
在统一异常处理中我们就可以使用通用的编码
|
|
|
|
|
|
|
|
|
|
|
|
```java
|
|
|
|
|
|
package com.msb.mall.product.exception;
|
|
|
|
|
|
|
|
|
|
|
|
import com.msb.common.exception.BizCodeEnume;
|
|
|
|
|
|
import com.msb.common.utils.R;
|
|
|
|
|
|
import lombok.extern.slf4j.Slf4j;
|
|
|
|
|
|
import org.springframework.web.bind.MethodArgumentNotValidException;
|
|
|
|
|
|
import org.springframework.web.bind.annotation.ControllerAdvice;
|
|
|
|
|
|
import org.springframework.web.bind.annotation.ExceptionHandler;
|
|
|
|
|
|
import org.springframework.web.bind.annotation.ResponseBody;
|
|
|
|
|
|
import org.springframework.web.bind.annotation.RestControllerAdvice;
|
|
|
|
|
|
|
|
|
|
|
|
import java.util.HashMap;
|
|
|
|
|
|
import java.util.Map;
|
|
|
|
|
|
|
|
|
|
|
|
/**
|
|
|
|
|
|
* 统一的异常处理类
|
|
|
|
|
|
*/
|
|
|
|
|
|
/*@ResponseBody
|
|
|
|
|
|
@ControllerAdvice*/
|
|
|
|
|
|
@Slf4j
|
|
|
|
|
|
@RestControllerAdvice(basePackages = "com.msb.mall.product.controller")
|
|
|
|
|
|
public class ExceptionControllerAdvice {
|
|
|
|
|
|
/**
|
|
|
|
|
|
* 处理验证异常的方法
|
|
|
|
|
|
* @param e
|
|
|
|
|
|
*/
|
|
|
|
|
|
|
|
|
|
|
|
@ExceptionHandler(value = MethodArgumentNotValidException.class)
|
|
|
|
|
|
public R handlerValidExecption(MethodArgumentNotValidException e){
|
|
|
|
|
|
Map<String,String> map = new HashMap<>();
|
|
|
|
|
|
e.getFieldErrors().forEach((fieldError)->{
|
|
|
|
|
|
map.put(fieldError.getField(),fieldError.getDefaultMessage());
|
|
|
|
|
|
});
|
|
|
|
|
|
//return R.error(400,"提交的数据不合法").put("data",map);
|
|
|
|
|
|
return R.error(BizCodeEnume.VALID_EXCEPTION.getCode(), BizCodeEnume.VALID_EXCEPTION.getMsg())
|
|
|
|
|
|
.put("data",map);
|
|
|
|
|
|
}
|
|
|
|
|
|
|
|
|
|
|
|
/**
|
|
|
|
|
|
* 系统其他的异常处理
|
|
|
|
|
|
* @param throwable
|
|
|
|
|
|
* @return
|
|
|
|
|
|
*/
|
|
|
|
|
|
@ExceptionHandler(Throwable.class)
|
|
|
|
|
|
public R handlerExecption(Throwable throwable){
|
|
|
|
|
|
log.error("错误信息:",throwable);
|
|
|
|
|
|
//return R.error(400,"未知异常信息").put("data",throwable.getMessage());
|
|
|
|
|
|
return R.error(BizCodeEnume.UNKNOW_EXCEPTION.getCode(), BizCodeEnume.UNKNOW_EXCEPTION.getMsg())
|
|
|
|
|
|
.put("data",throwable.getMessage());
|
|
|
|
|
|
}
|
|
|
|
|
|
}
|
|
|
|
|
|
|
|
|
|
|
|
```
|
|
|
|
|
|
|
|
|
|
|
|
|
|
|
|
|
|
|
|
|
|
|
|
#### 6.4 分组校验
|
|
|
|
|
|
|
|
|
|
|
|
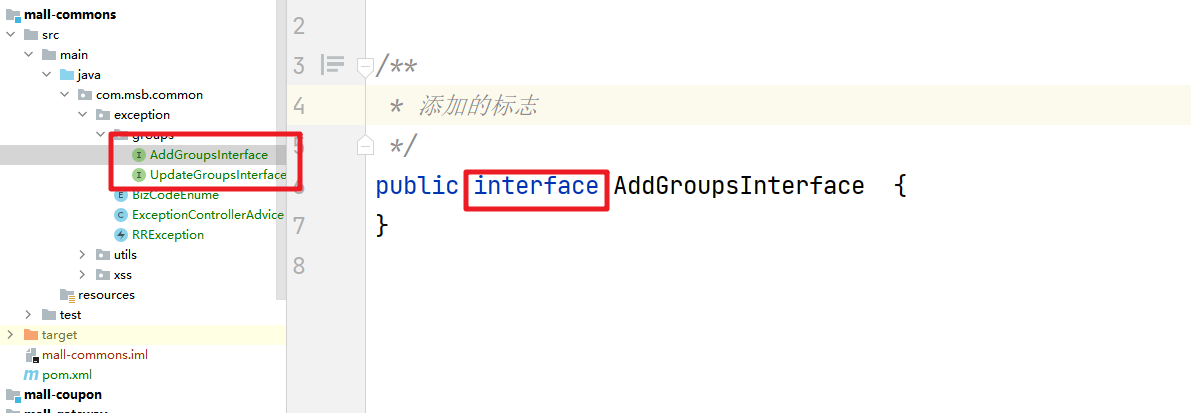
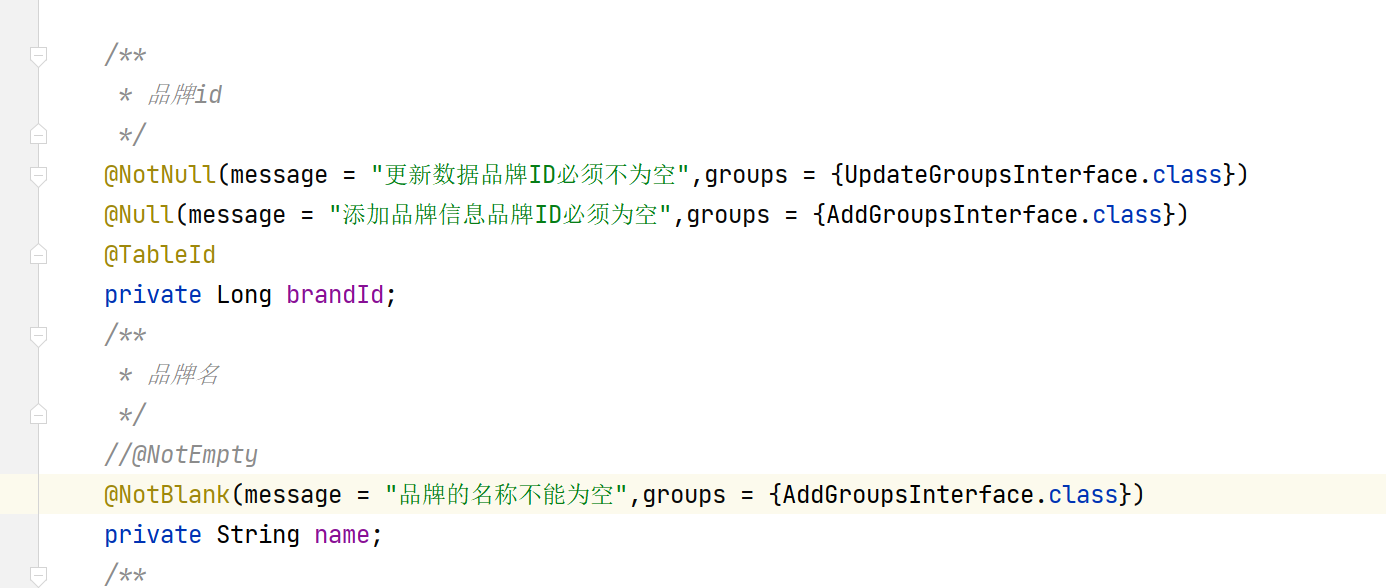
  在实际的业务场景中同一个Entity的校验可能会有不同的规则,比如添加数据品牌id必须为空,而更新数据品牌Id必须不为空,针对这种情况我们需要使用分组校验来实现
|
|
|
|
|
|
|
|
|
|
|
|
1>定义标志类
|
|
|
|
|
|
|
|
|
|
|
|
|
|
|
|
|
|
|
|
|
|
|
|
2>在Entity中指定分组规则
|
|
|
|
|
|
|
|
|
|
|
|
|
|
|
|
|
|
|
|
|
|
|
|
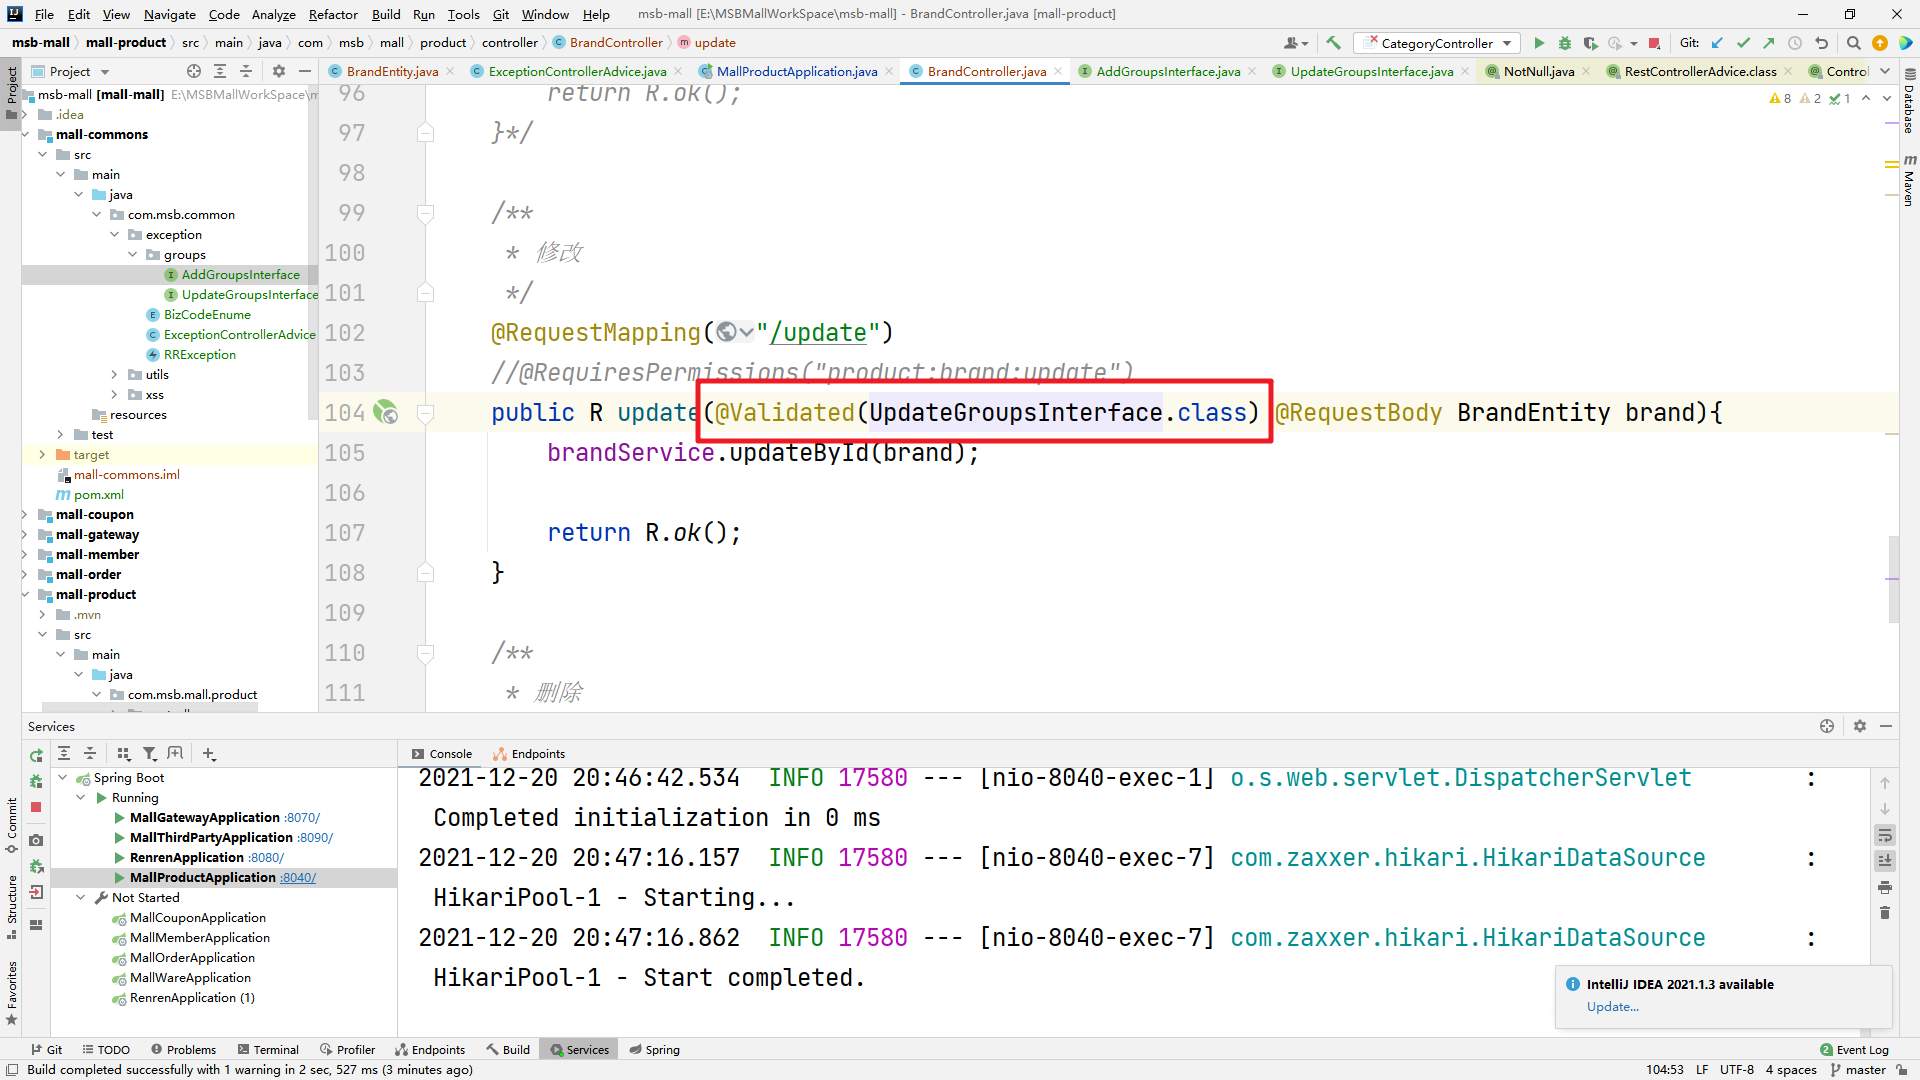
3>通过@Validated注解来实现分组校验
|
|
|
|
|
|
|
|
|
|
|
|
|
|
|
|
|
|
|
|
|
|
|
|
#### 6.5 自定义校验注解
|
|
|
|
|
|
|
|
|
|
|
|
  面临特殊的校验需要我们可以通过正则表达式来处理,当然我们也可以通过自定义校验注解的方式来实现。
|
|
|
|
|
|
|
|
|
|
|
|
1> 创建自定义的校验注解
|
|
|
|
|
|
|
|
|
|
|
|
```java
|
|
|
|
|
|
/**
|
|
|
|
|
|
* 自定义的校验注解
|
|
|
|
|
|
*/
|
|
|
|
|
|
@Documented
|
|
|
|
|
|
@Constraint(validatedBy = { })
|
|
|
|
|
|
@Target({ METHOD, FIELD, ANNOTATION_TYPE, CONSTRUCTOR, PARAMETER, TYPE_USE })
|
|
|
|
|
|
@Retention(RUNTIME)
|
|
|
|
|
|
public @interface ListValue {
|
|
|
|
|
|
|
|
|
|
|
|
String message() default "{com.msb.common.valid.ListValue.message}";
|
|
|
|
|
|
|
|
|
|
|
|
Class<?>[] groups() default { };
|
|
|
|
|
|
|
|
|
|
|
|
Class<? extends Payload>[] payload() default { };
|
|
|
|
|
|
|
|
|
|
|
|
int[] val() default {};
|
|
|
|
|
|
}
|
|
|
|
|
|
```
|
|
|
|
|
|
|
|
|
|
|
|
对应需要创建提示信息的属性文件
|
|
|
|
|
|
|
|
|
|
|
|

|
|
|
|
|
|
|
|
|
|
|
|
2>创建一个自定义的校验器
|
|
|
|
|
|
|
|
|
|
|
|
```java
|
|
|
|
|
|
package com.msb.common.valid;
|
|
|
|
|
|
|
|
|
|
|
|
import javax.validation.ConstraintValidator;
|
|
|
|
|
|
import javax.validation.ConstraintValidatorContext;
|
|
|
|
|
|
import java.lang.annotation.Annotation;
|
|
|
|
|
|
import java.sql.ClientInfoStatus;
|
|
|
|
|
|
import java.util.HashSet;
|
|
|
|
|
|
|
|
|
|
|
|
/**
|
|
|
|
|
|
* 对应的校验注解的校验器
|
|
|
|
|
|
*/
|
|
|
|
|
|
public class ListValueConstraintValidator implements ConstraintValidator<ListValue,Integer> {
|
|
|
|
|
|
private HashSet<Integer> set = new HashSet<>();
|
|
|
|
|
|
|
|
|
|
|
|
/**
|
|
|
|
|
|
* 初始化的方法
|
|
|
|
|
|
* 举例:@ListValue(val={1,0})
|
|
|
|
|
|
* 获取到 1 0
|
|
|
|
|
|
* @param constraintAnnotation
|
|
|
|
|
|
*/
|
|
|
|
|
|
@Override
|
|
|
|
|
|
public void initialize(ListValue constraintAnnotation) {
|
|
|
|
|
|
int[] val = constraintAnnotation.val();// 0 1
|
|
|
|
|
|
for (int i : val) {
|
|
|
|
|
|
set.add(i);
|
|
|
|
|
|
}
|
|
|
|
|
|
}
|
|
|
|
|
|
|
|
|
|
|
|
/**
|
|
|
|
|
|
* 判断校验是否成功的方法
|
|
|
|
|
|
* @param value 客户端传递的对应的属性的值 判断value是否在0 , 1 中
|
|
|
|
|
|
* @param context
|
|
|
|
|
|
* @return
|
|
|
|
|
|
*/
|
|
|
|
|
|
@Override
|
|
|
|
|
|
public boolean isValid(Integer value, ConstraintValidatorContext context) {
|
|
|
|
|
|
return set.contains(value);
|
|
|
|
|
|
}
|
|
|
|
|
|
}
|
|
|
|
|
|
|
|
|
|
|
|
```
|
|
|
|
|
|
|
|
|
|
|
|
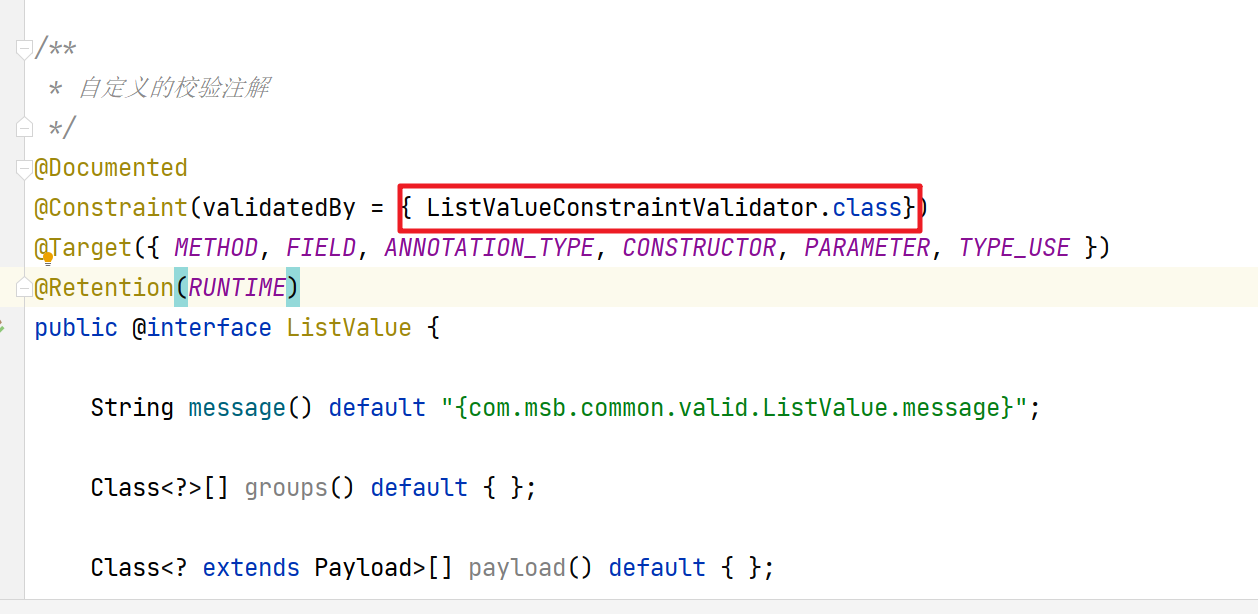
3>关联自定义的校验注解和校验器
|
|
|
|
|
|
|
|
|
|
|
|
|
|
|
|
|
|
|
|
|
|
|
|
### 7.品牌级联类别
|
|
|
|
|
|
|
|
|
|
|
|
##### 7.1 完善品牌功能
|
|
|
|
|
|
|
|
|
|
|
|
1> 分页插件--定义分页插件的配置文件
|
|
|
|
|
|
|
|
|
|
|
|
```java
|
|
|
|
|
|
package com.msb.mall.product.config;
|
|
|
|
|
|
|
|
|
|
|
|
import com.baomidou.mybatisplus.extension.plugins.PaginationInterceptor;
|
|
|
|
|
|
import com.baomidou.mybatisplus.extension.plugins.pagination.optimize.JsqlParserCountOptimize;
|
|
|
|
|
|
import org.mybatis.spring.annotation.MapperScan;
|
|
|
|
|
|
import org.springframework.context.annotation.Bean;
|
|
|
|
|
|
import org.springframework.context.annotation.Configuration;
|
|
|
|
|
|
|
|
|
|
|
|
@Configuration
|
|
|
|
|
|
@MapperScan("com.msb.mall.product.dao")
|
|
|
|
|
|
public class MybatisPlusConfig {
|
|
|
|
|
|
|
|
|
|
|
|
// 旧版
|
|
|
|
|
|
@Bean
|
|
|
|
|
|
public PaginationInterceptor paginationInterceptor() {
|
|
|
|
|
|
PaginationInterceptor paginationInterceptor = new PaginationInterceptor();
|
|
|
|
|
|
// 设置请求的页面大于最大页后操作, true调回到首页,false 继续请求 默认false
|
|
|
|
|
|
paginationInterceptor.setOverflow(true);
|
|
|
|
|
|
// 设置最大单页限制数量,默认 500 条,-1 不受限制
|
|
|
|
|
|
paginationInterceptor.setLimit(500);
|
|
|
|
|
|
// 开启 count 的 join 优化,只针对部分 left join
|
|
|
|
|
|
paginationInterceptor.setCountSqlParser(new JsqlParserCountOptimize(true));
|
|
|
|
|
|
return paginationInterceptor;
|
|
|
|
|
|
}
|
|
|
|
|
|
|
|
|
|
|
|
|
|
|
|
|
|
// 最新版
|
|
|
|
|
|
/*@Bean
|
|
|
|
|
|
public MybatisPlusInterceptor mybatisPlusInterceptor() {
|
|
|
|
|
|
MybatisPlusInterceptor interceptor = new MybatisPlusInterceptor();
|
|
|
|
|
|
interceptor.addInnerInterceptor(new PaginationInnerInterceptor(DbType.H2));
|
|
|
|
|
|
return interceptor;
|
|
|
|
|
|
}*/
|
|
|
|
|
|
}
|
|
|
|
|
|
|
|
|
|
|
|
```
|
|
|
|
|
|
|
|
|
|
|
|
2> 带条件查询
|
|
|
|
|
|
|
|
|
|
|
|
```java
|
|
|
|
|
|
@Override
|
|
|
|
|
|
public PageUtils queryPage(Map<String, Object> params) {
|
|
|
|
|
|
// 1. 获取key
|
|
|
|
|
|
String key = (String)params.get("key");
|
|
|
|
|
|
QueryWrapper<BrandEntity> wrapper = new QueryWrapper<>();
|
|
|
|
|
|
if(!StringUtils.isEmpty(key)){
|
|
|
|
|
|
// 添加对应的查询条件
|
|
|
|
|
|
wrapper.eq("brand_id",key).or().like("name",key);
|
|
|
|
|
|
}
|
|
|
|
|
|
IPage<BrandEntity> page = this.page(
|
|
|
|
|
|
new Query<BrandEntity>().getPage(params),
|
|
|
|
|
|
wrapper
|
|
|
|
|
|
);
|
|
|
|
|
|
|
|
|
|
|
|
return new PageUtils(page);
|
|
|
|
|
|
}
|
|
|
|
|
|
```
|
|
|
|
|
|
|
|
|
|
|
|
#### 7.2 品牌级联类别实现
|
|
|
|
|
|
|
|
|
|
|
|
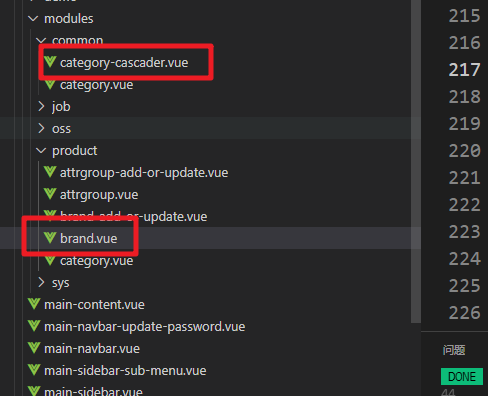
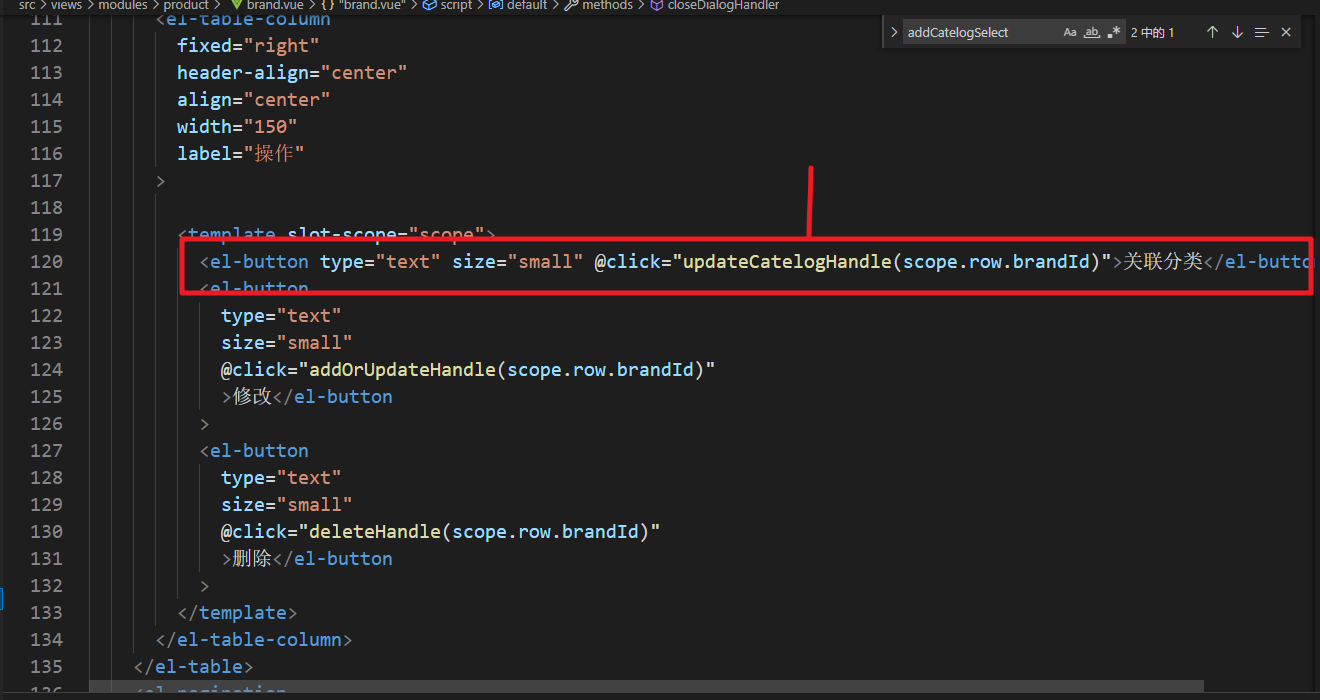
然后我们来看下品牌和类别的级联实现,首先前端的代码已经提供给大家了,直接覆盖即可。
|
|
|
|
|
|
|
|
|
|
|
|
|
|
|
|
|
|
|
|
|
|
|
|
|
|
|
|
|
|
|
|
|
|
|
|

|
|
|
|
|
|
|
|
|
|
|
|

|
|
|
|
|
|
|
|
|
|
|
|
其他的代码自己参阅
|
|
|
|
|
|
|
|
|
|
|
|
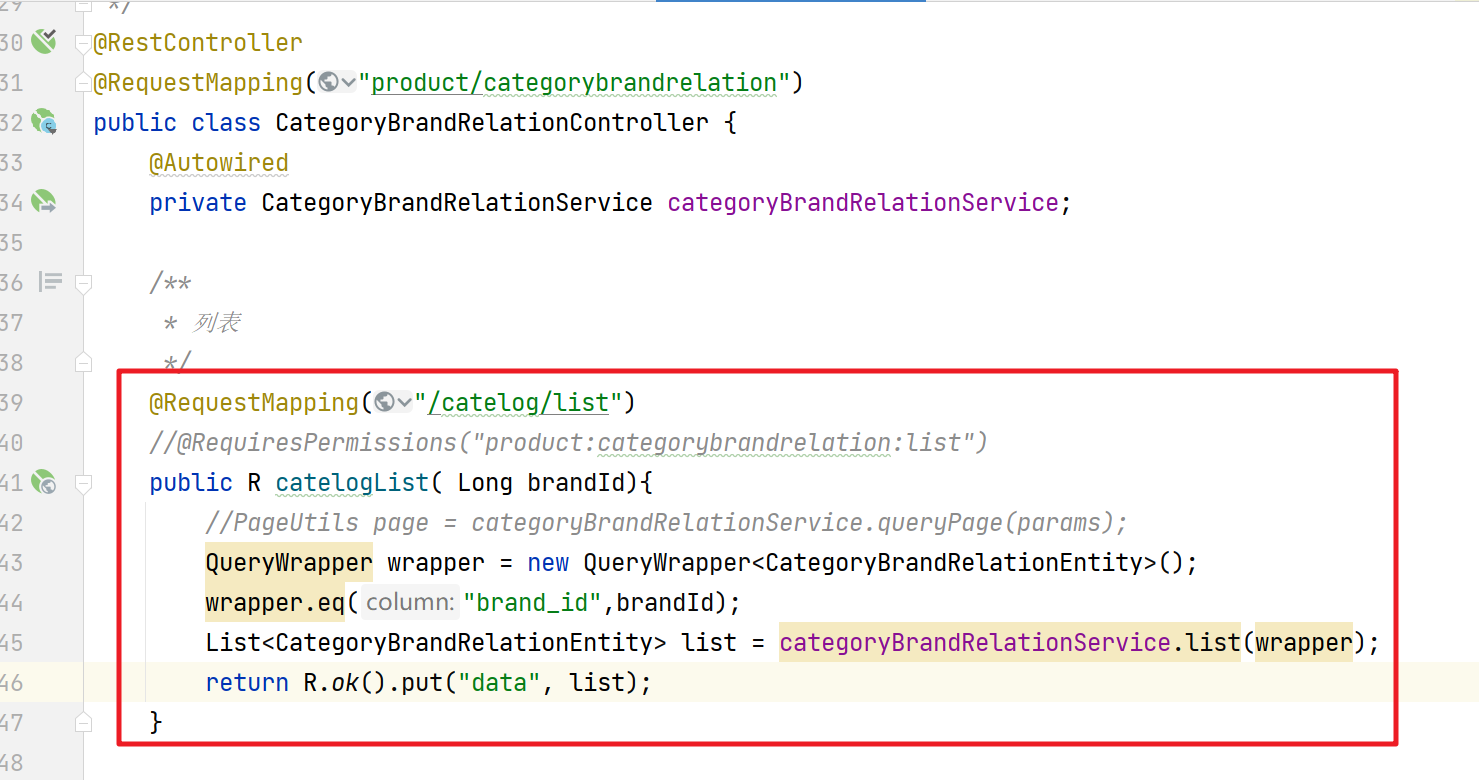
后端服务的处理,查询关联数据,我们需要重新提供根据类别编号查询的方法
|
|
|
|
|
|
|
|
|
|
|
|
|
|
|
|
|
|
|
|
|
|
|
|
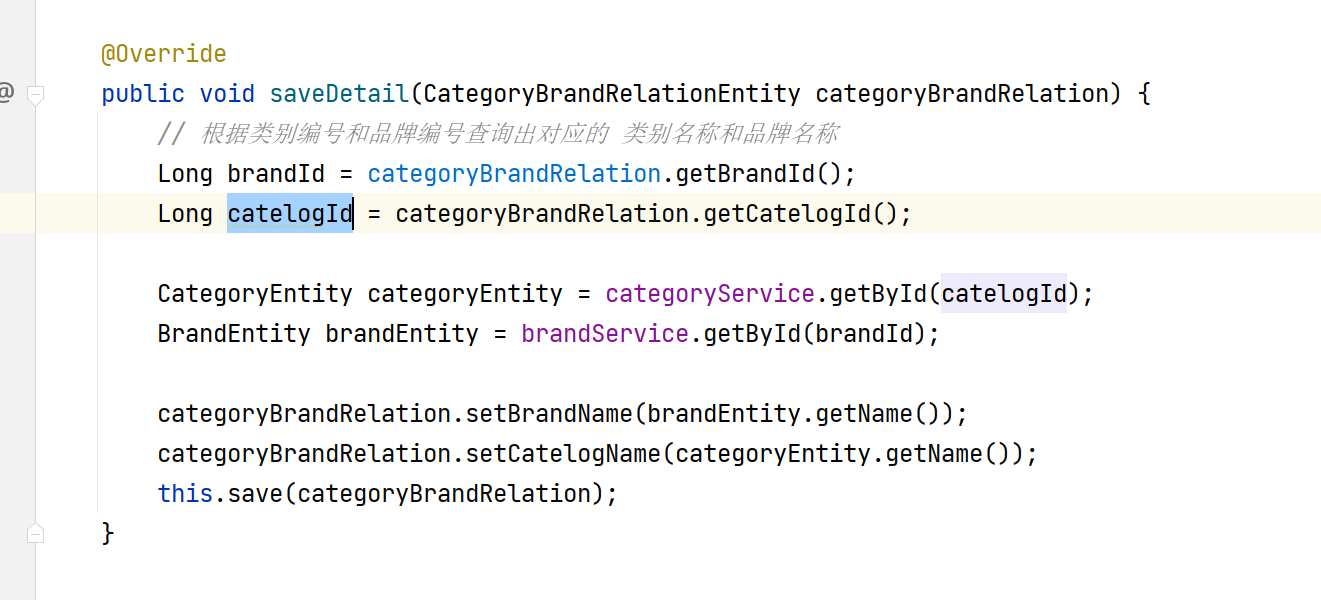
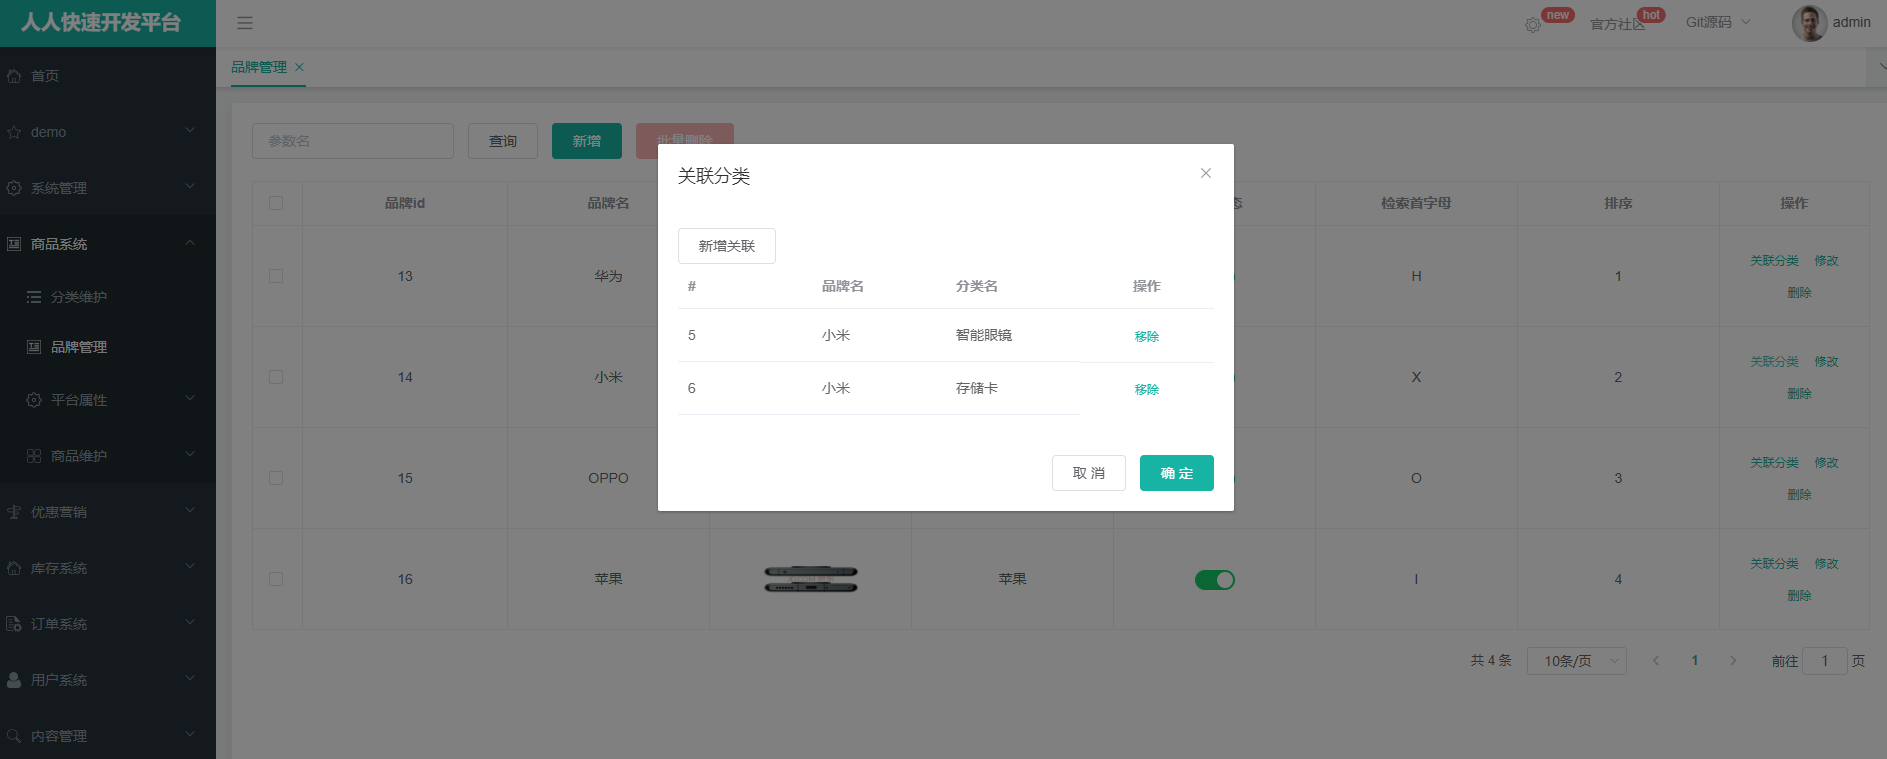
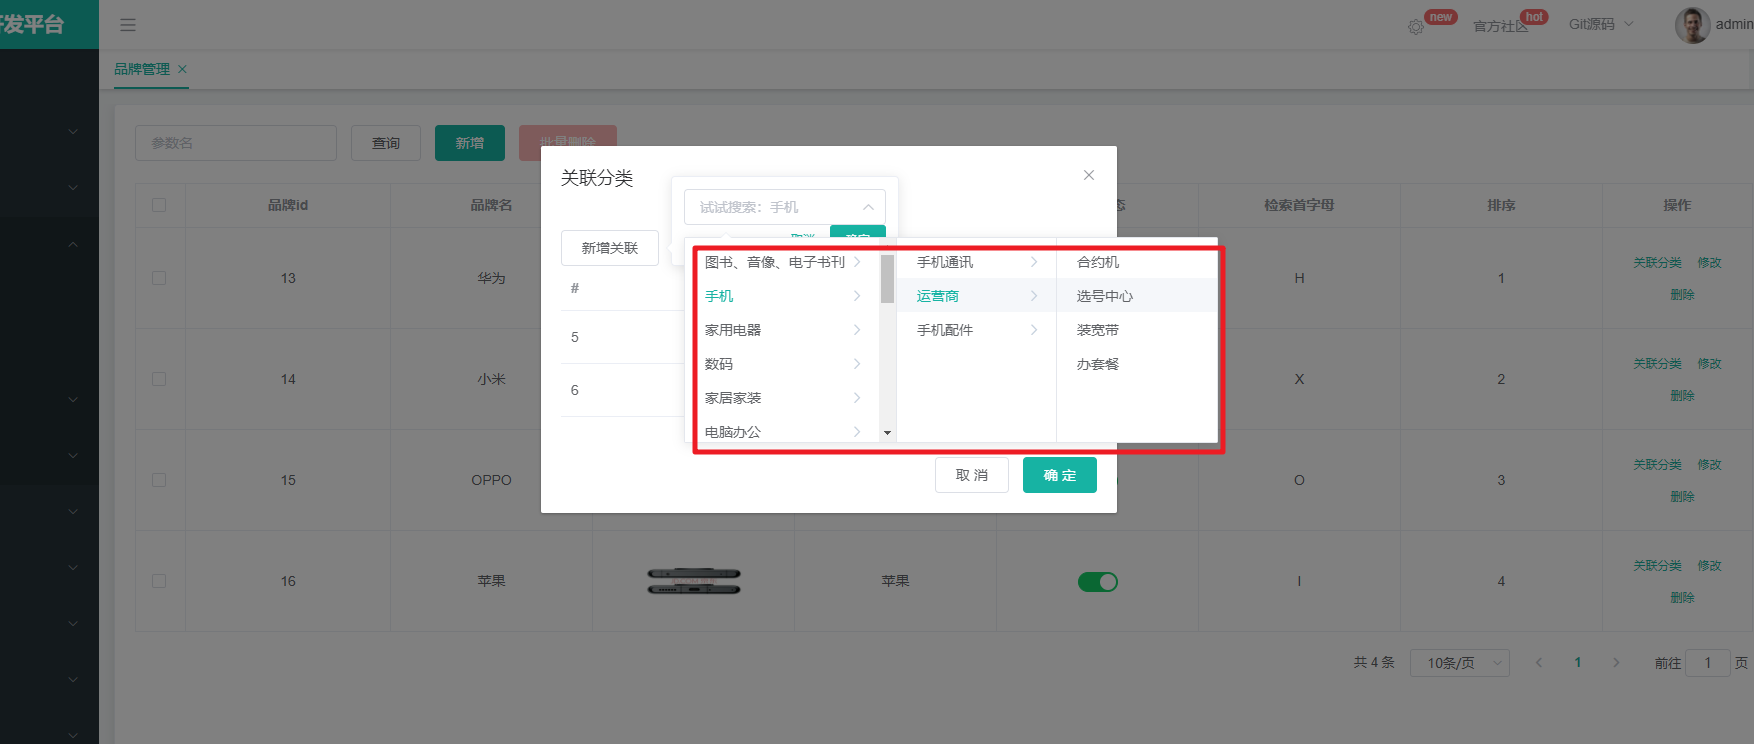
然后就是保存选择后的关联数据,因为表结构中设计的字段有冗余,所以我们需要先根据品牌编号和类别编号来查询出对应的类别名称和品牌名称然后更新
|
|
|
|
|
|
|
|
|
|
|
|
|
|
|
|
|
|
|
|
|
|
|
|
|
|
|
|
|
|
|
|
|
|
|
|
|
|
|
|
|
|
|
|
|
|
|
|
#### 7.3 冗余数据同步
|
|
|
|
|
|
|
|
|
|
|
|
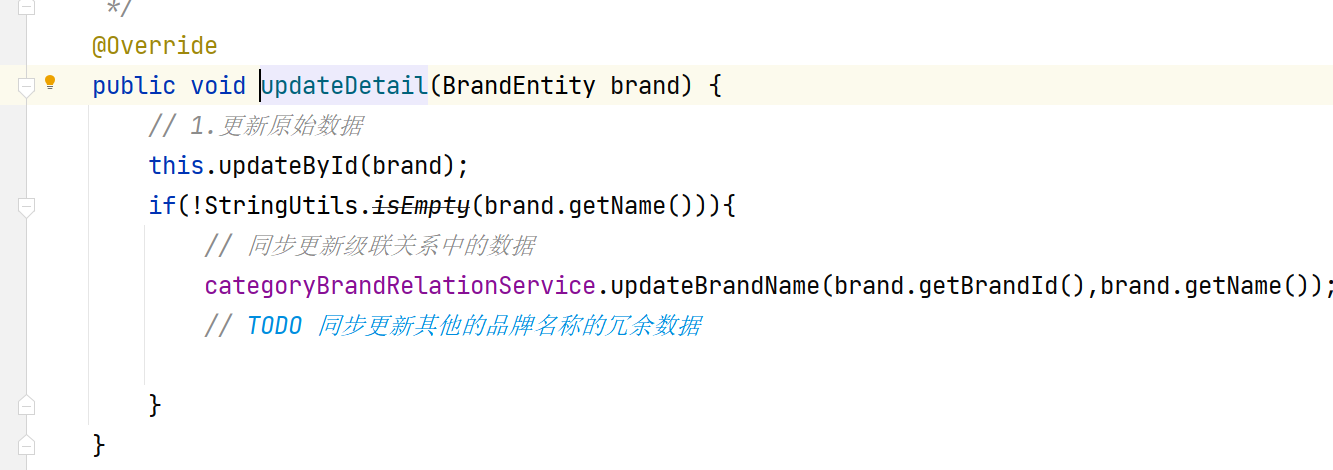
  针对品牌名称和类别名称这类冗余的数据,我们需要做同步的处理。先同步更新品牌名称。
|
|
|
|
|
|
|
|
|
|
|
|

|
|
|
|
|
|
|
|
|
|
|
|
|
|
|
|
|
|
|
|
|
|
|
|
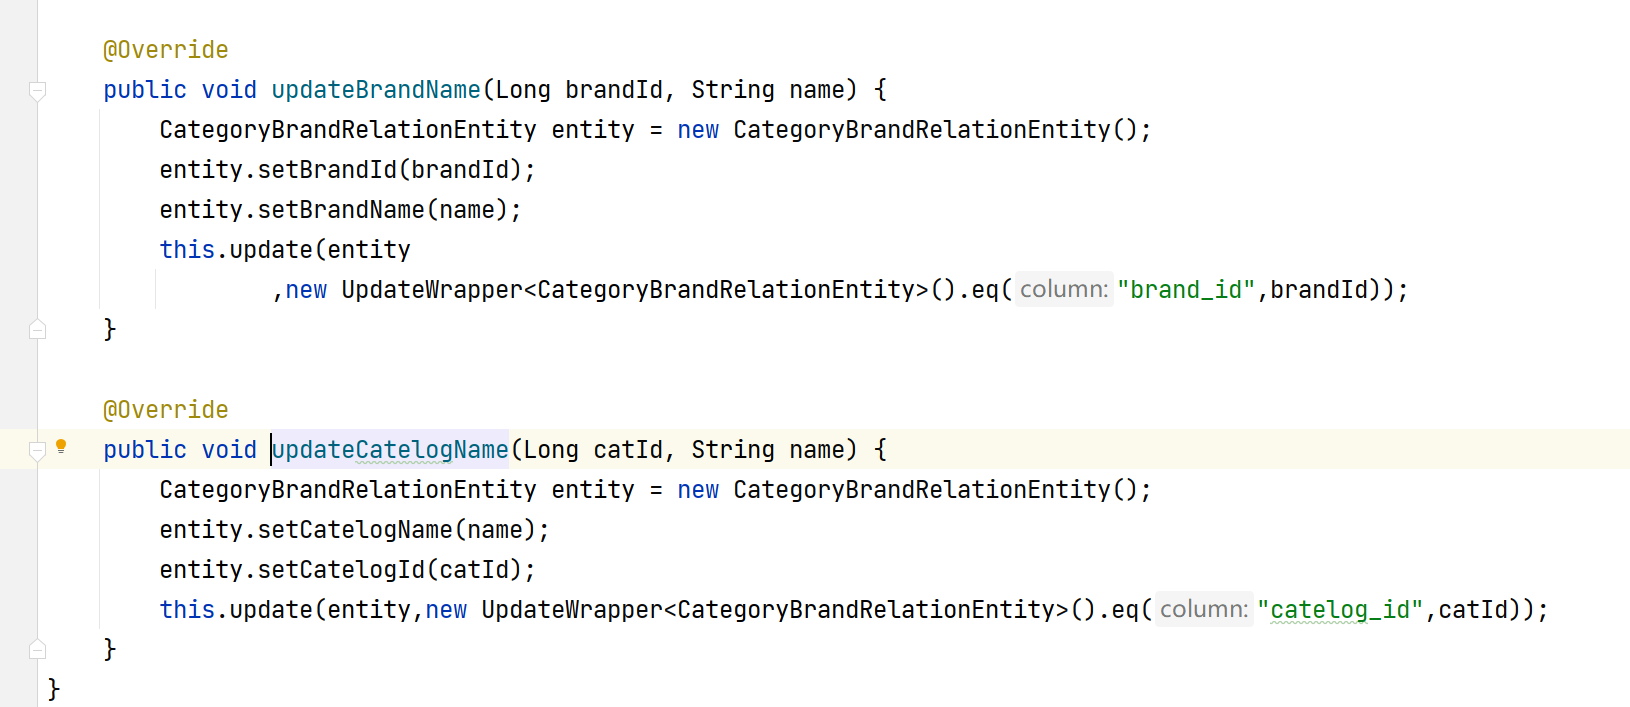
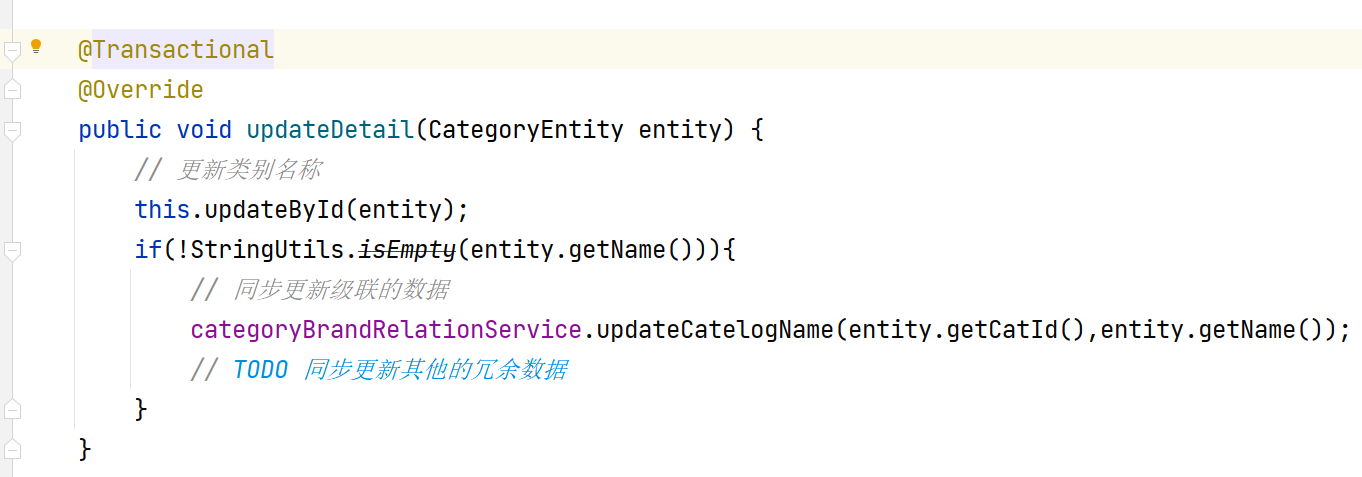
然后通过类别名称的更新
|
|
|
|
|
|
|
|
|
|
|
|

|
|
|
|
|
|
|
|
|
|
|
|

|
|
|
|
|
|
|
|
|
|
|
|
|
|
|
|
|
|
|
|
|
|
|
|
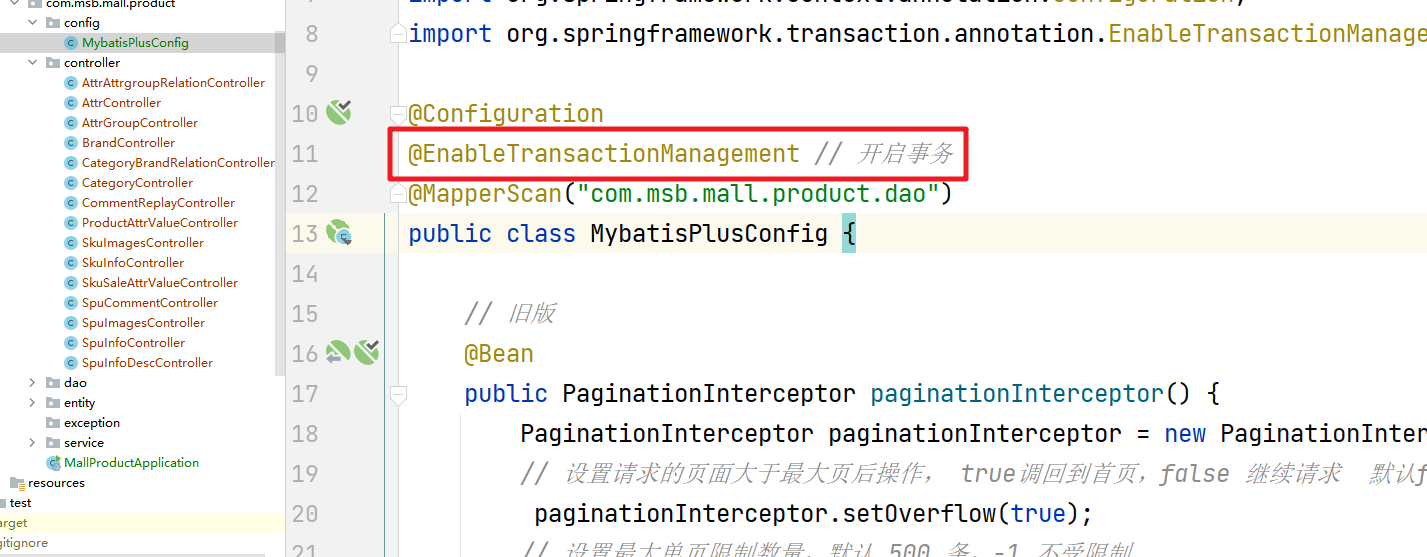
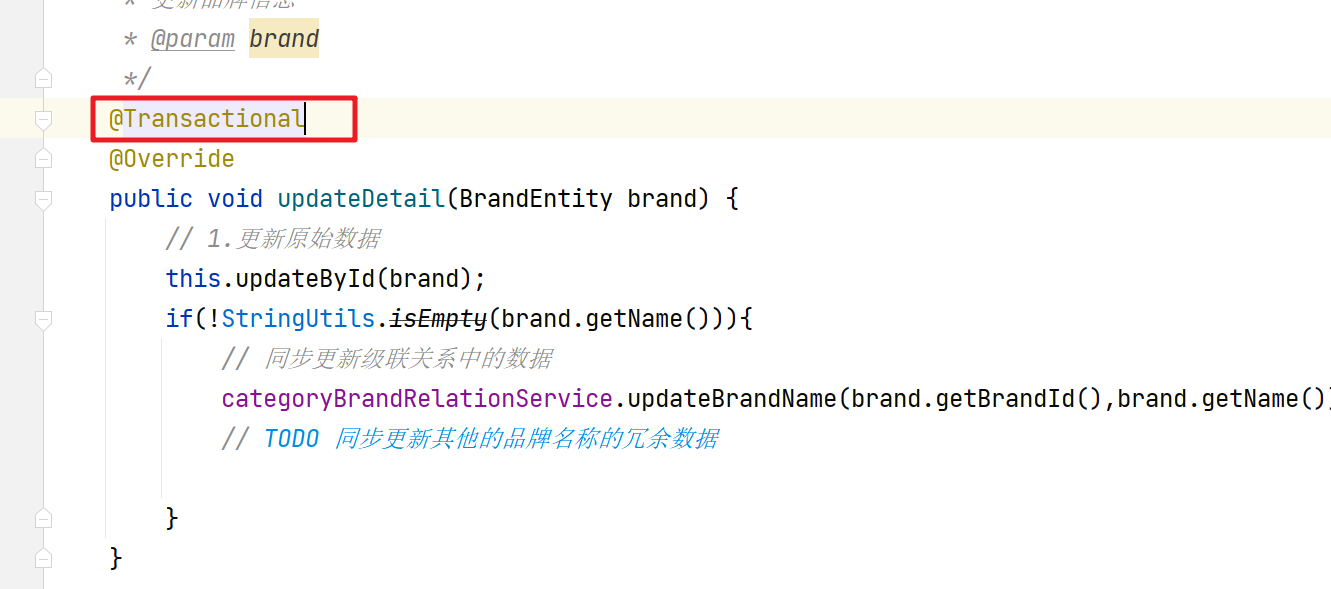
不要忘了事务的处理
|
|
|
|
|
|
|
|
|
|
|
|
|
|
|
|
|
|
|
|
|
|
|
|
|
|
|
|
|
|
|
|
|
|
|
|
|